New Year's crafts 3. New Year's crafts with children. What you need to use for sculpting mittens
There is nothing more wonderful when parents and children do joint work, and if it is also creative, it is doubly pleasant.
New Year is considered the most favorable holiday for the formation of festive family traditions.
Having prepared a minimum of material and a little fantasy, you can get a result that will make the child believe in the New Year's miracle. Worthy decorative decorations can be created from items and things available at home: pieces of bright fabric, beads, cardboard, candy wrappers.
WITH early age kids are interested various types creativity: drawing, modeling from plasticine, making appliqués. Joint creativity of parents and children has a number of significant advantages:
- development of the baby, his creative abilities;
- development of children's imagination and creativity;
- emotional unity of parents and child;
- stimulation of fine motor skills;
- self confidence;
- desire to continue to be creative.
We offer several options for New Year's crafts for children 3-4 years old. They are very easy to make and do not require much effort.
Christmas lollipop pendant
You will need:
- multi-colored felt;
- sticks;
- thin satin ribbons;
- hot glue gun.
It will not take much time to make the pendant, but this process will bring a lot to the child. positive emotions. He will be proud of his creation.
Step-by-step instructions for creating a lollipop pendant:

- We cut out 7 narrow stripes from the fabric 1 cm wide and 15 cm long.
- We stack them on top of each other, alternating colors.
- We glue all the ribbons together.
- We twist all the ribbons with a roll and fix them with glue at the base.
- Glue a stick to a multi-colored roll.
- At the top we attach a ribbon for attaching the product to the Christmas tree.
- We remove the remaining glue.
New Year's fan
This craft is suitable for children 3 years old. The simple design will allow the child to develop motor skills of hands.
You will need:
- a set of colored paper for scrapbooking;
- glue;
- threads of a golden hue;
- hole puncher.

Even a kid can assemble a fan
Step-by-step instructions for creating an accordion:
- Cut a sheet of paper into rectangular pieces.
- We fold each part with an accordion, where the width of the fold is 1 cm.
- We fold the accordion and give it a rounded shape on both sides.
- Fold each piece in half. The blanks can be different color.
- We connect 4 accordions in one piece.
- We attach the golden thread for the pendant.
New Year's candy "Merry deer"
Children are very fond of sweets. Any lollipop placed in a deer's paper face will delight a child. It can be scrolled, and then it will seem that the deer's nose is moving.
You will need:
- cardboard or colored paper;
- scissors;
- pens, pencils, glitter;
- glue;
- round lollipops.

Reindeer lollipops
Step-by-step instructions for creating a New Year's candy:
- We draw the outline of the head of a deer on a piece of cardboard or colored paper.
- Outline the outline using two identical shapes.
- Carefully cut out a round hole in place of the nose on both parts of the part.
- We decorate the muzzle of a deer by drawing or gluing features.
- We fix the lollipop in place of the slot for the nose.
- We glue both parts.
New Year's Changeling Dog
You will need:
- watercolor paints;
- red pompom;
- white paper eyes.
Children love to make prints of their hands. New Year's dog will be a real gift for the whole family.
Step-by-step instructions for creating a New Year's dog-shifter:

- We take paper and together with the child draw whatever we want.
- We dip the child's hands in brown paint.
- Gently put the handprint on the paper with your fingers up.
- Then we dip again in brown paint and put another print on the paper with our fingers down so that these two prints converge with each other.
- We dip the child's finger in white paint and draw a hat.
- We dip the child's finger in red paint and draw a collar.
- We are waiting for the paint to dry.
- We put on the top imprint of the eye.
- Attach a red pom pom to the hat.
New Year's game "Mouse and her cheese"
The game "Mouse and Her Cheese" will help to consolidate children's knowledge of colors. The child is invited to arrange the mice in the holes of the corresponding color.
 You will need:
- cardboard;
- glue;
- markers;
- regular pencil;
- scissors;
- ruler.
Step by step instructions for creating a game:
- Cut out a strip of white paper 3 cm wide and 21 cm long.
- We bend the strip with a “loop” and glue the edges.
- With a simple pencil, draw a semicircle on the glued edge, round off the corners.
- Cut off the corners with scissors.
- Cut out 2 ovals from white paper.
- Glue the ovals, stepping back a little from the edge. These are mouse ears.
- We draw with felt-tip pens a mouse mustache, nose, eyes.
- Cut out the tail of a mouse from paper.
- We fasten the tail on the back.
- We make a piece of cheese.
- From colored paper, cut out two semicircles. Yellow should be smaller than red.
- First, glue a red semicircle on a sheet of cardboard, then yellow.
- Cut out ovals from colored paper different colors and stick them on the cheese in random order.
- For the game, you need to make as many mice as there are colored holes in the cheese. The color of the tails of the mice should match the color of the holes in the cheese.
Cheerful snowman-know-it-all
Making this craft will be interesting for children 4 years old.
You need:
- 2 paper plates;
- silicate glue or glue gun;
- scissors;
- 2 plastic eyes;
- yellow, orange, purple paper;
- felt or black paper.
Step-by-step instructions for creating a snowman:
- We glue 2 plates so that one finds on the other.
- Place the top plate front side, and the bottom back.
- Cut out a carrot from orange paper.
- Cut out a scarf from yellow paper.
- Cut out mittens and socks for the snowman from purple paper.
- Glue the eyes and nose in the form of a carrot.
- Draw a smile with a marker.
- At the junction of the plates we glue a yellow strip of paper in the form of a scarf.
- Cut out 2 circles from black felt and glue on the snowman with a glue gun.
- We turn the craft over with the back side and glue the arms and legs of purple paper to the body.
In the snowman you can hide questions and answers about animals, cartoons, fairy tale characters and play a fun game with your child.
The original mask of Santa Claus
Another way to introduce your child to New Year's fairy tale is to create a mask. Other family members can also try on the mask. The child will like it very much.
You will need:
- 2 paper plates;
- red paper;
- cotton wool;
- scissors;
- PVA glue.
Step-by-step instructions for creating a New Year's mask:

- Cut out the bottom of 2 paper plates.
- We glue the candies together.
- Cut out 2 large triangles from red paper.
- Lubricate each of them, glue along the contour, except for the lower part, and glue. We should get a red cap.
- We put a circle of plates into a hat for 4-5 cm and coat with glue.
- Glue both sides of the hat to the base.
- We form a lot of white balls from cotton wool and glue them at the bottom of the white circle.
- We also lay them out in a row at the junction of the cap and the circle of plates.
- We make a large ball of cotton wool and glue it to the top of the hat.
New Year's picture for a children's room
The picture that the child will make delights all family members. This develops in the child the desire to improve and strive for creativity.
You will need:
- cardboard;
- cotton pads;
- scissors;
- glue.

DIY picture in the children's room
Step-by-step instructions for creating a New Year's picture:
- We put a few drops of glue on a sheet of cardboard. We attach cotton pads, forming a snowman.
- At the base we place a large disk, then a smaller disk.
- For the snowman's head, use the smallest disk.
- We cut out a nose, eyes, a hat, a scarf from colored paper and glue all the details to the disks.
- We decorate with snowflakes, a rain of a finished snowman.
- To decorate the picture, we will make several Christmas trees from colored paper and glue them next to the snowman.
Felt Christmas tree
A felt Christmas tree will become a real decoration of a home Christmas tree. Also, as a New Year's souvenir, it can be presented to grandmothers and relatives.
You need:
- cardboard;
- felt;
- buttons;
- beads;
- scissors.

Felt Christmas tree
Step-by-step instructions for creating a felt Christmas tree:
- We make a cone out of cardboard for the base.
- Cut a strip of felt 2.5 cm wide.
- We fold it in half and make cuts that should not reach the edge of the strip.
- We glue the obtained strips with a cone along its height from the bottom up.
- We decorate the Christmas tree with buttons, beads.
Craft "Waffle cup with a secret"
In the process of making Christmas toys with our own hands, we are able to realize any idea.
 Therefore, it is worth making ice cream that will decorate festive atmosphere.
After all, children are very fond of this incredibly delicious dessert.
You will need:
- felt;
- curly scissors;
- threads;
- glue;
- felt.
Step-by-step instructions for creating a waffle cup:
- With curly scissors, cut out a circle of felt with a diameter of 6 cm.
- From the remnants of felt we cut out small balls, bells.
- Cut out a cone from felt.
- We connect the parts with glue, forming a cup and ice cream.
- We attach bells and balls to the cone.
- At the bottom of the product we place a small bow.
- You can hide a small lollipop inside the ice cream. This will become a long-awaited secret.
Air lumps
Air balls of thread look very festive, especially if they are made from threads of different colors. Delicate lumps can decorate not only the Christmas tree, but also serve as a decor for a nursery, a child's bedroom.
You will need:
- small balloons;
- not very thick threads with lurex;
- glue;
- dishes with water for wetting the threads;
- petrolatum;
- thick thread for hanging;
- rhinestones and sequins.
Step-by-step instructions for making air balls from threads:
- We inflate the balloon, which will correspond to the size of the finished product.
- Lubricate it with Vaseline.
- We wind the threads on the ball in random order.
- We hang the ball and let it dry for two days.
- We pierce the ball and remove it from the air figure.
- We place rhinestones and sparkles on the ball.
Dear parents! Strive to help your child, trust him to work with details, do not limit his imagination, even if the works made by his tiny hands do not look like works of art.
Related video
Simple winter and New Year crafts with children 2-3 years old
Hello dear readers!
In winter, especially New Year's days, you want to immerse your child in a little fairy tale and do something interesting with your own hands. Today we will consider options for crafts that children of 2-3 years of age can do. Despite their ease of manufacture, these options creative tasks, are original. Such crafts can even be presented in kindergarten at the exhibition.
- Snowflake made of cotton wool (cotton balls)
 Apply a snowflake pattern to a sheet of paper using a glue stick or PVA (using a wide brush). Have your child apply the balls to the adhesive strips. It turns out a voluminous and beautiful snowflake!
- Snowman from cotton pads

- Paper plate crafts
On the basis of paper plates, you can do similar work:

| 
|
And if you glue the plate with pieces of napkins or crumpled paper, you get a beautiful white bear, the nose of which will be a paper cup, and the ears - 2 pre-cut circles of paper.

| 
|
- Wax drawings
 On a white sheet of paper with a wax candle, draw snowflakes or another drawing on a winter theme. Invite your child to color a sheet of paper in blue and blue tones. And then a miracle happens: under a wave of the brush, a drawing will begin to appear that you have previously depicted.


Source: maam.ru
This is another interesting technique drawing. Ask your child to color the cabbage leaf with white paint or toothpaste and attach it to paper. In the print you will see a wonderful winter tree. And if you try a little, you can thus depict a whole forest. It is better to use Chinese cabbage.

If your child loves to sculpt, then he will obviously like the creation Christmas decorations from salt dough.
Salt dough without cooking:
1 cup flour
0.5 cup salt (preferably "Extra")
0.5 cup water (add food coloring if needed)
1 tbsp vegetable oil
Mix all ingredients and mix well until smooth.
From this test, wonderful figures are obtained that can be dried and painted.
Using molds for modeling (can be replaced with cookie cutters), we cut out the figures, dry them in a warm place (for example, a few days at the battery) and paint them with paints. You can also decorate the product with cereals or seeds when sculpting.

Surely in every house there is a sleeve from the roll toilet paper or paper towels. You can also use cylindrical packages.
Wrap the sleeve in wrapping paper or beautiful fabric, tie the edges with a ribbon. Don't forget to hide the surprise inside the cylinder!
This candy can be used as a Christmas decoration.

A child's handprint can become a tree. When the drawing dries, smear it with glue and sprinkle with salt. After the glue dries, shake off the remnants of flowability.

The kid can decorate such a Christmas tree with felt balls, or plasticine balls, which he rolls up himself. To give a festive atmosphere, the bump can be pre-painted in green color, apply glue to the edges and sprinkle with glitter or salt.

Cut off the front of the sock (this will be a hat) and set it aside. Turn the resulting blank and tie one free edge with a thread. Instruct the baby to pour rice into the resulting bag (it is more convenient to do this with a spoon). Tie off the free end. Use yarn to form the snowman's body and head. Put on a hat and decorate as you wish. The child can knit a scarf for the snowman.
A snowman with grits is not only a home decoration, but also a wonderful tactile toy.

Volumetric paints look very unusual and beautiful. And it's very easy to make it. Just mix shaving foam with PVA glue in a ratio of 2 to 1. Liquid dyes can be added if necessary.
Time inexorably runs forward and now white flies are flying outside the window, slowly sinking to the ground and covering everything around with a snow-white fluffy veil. However, despite the cold, the soul is warm and joyful. And all because suddenly appeared snowflakes herald the onset of the New Year. Most main holiday the year is already very close, which means it's time to think about New Year's decor, gifts and, of course, crafts.
The days are getting shorter and the evenings are getting colder and longer. What to do with yourself, and even more so with your little fidgets, when it is already too dark for outdoor winter fun? Well, crafts, of course. New Year's crafts can be made from the most unexpected materials: cocktail tubes and much more. But there are also more traditional materials, such as paper. In this article, we have collected for you more than 60 step-by-step master classes for making paper crafts for the New Year. If you still think that only applications can be made from paper, then drop everything and carefully look at our article! Well, for those who are looking for something unusual and know what miracles can be created from plain paper, we can only advise you to start the process of creating New Year's paper crafts according to our schemes and templates without delay.
One of the simplest New Year's paper crafts can rightly be considered a garland. We all remember well from our childhood how they decorated the Christmas tree with such paper garlands not only at home, but at school or kindergarten. A paper garland is made very simply: colored paper is cut into strips of the same width, the first strip is glued into a ring, and each subsequent one is threaded into the previous ring and also glued. Such paper craft perfect for 4-5 year olds.
If the task of entertaining children is not worth it, but you need to decorate the house, then here's another version of a paper garland for your note. It is made even easier than the previous one, but you will need sewing machine. So, to create such a New Year's paper craft, you will need: a lot of circles of different diameters (the number depends on the size of the garland), sewing machine. Sew circles through the center on a typewriter and hang a garland. From any gust of air, such a garland will “come to life”.

So, if you decide that the issue with garlands is closed and there is nothing else to think of here, we hasten to upset you - this is only the very tip of the iceberg. Simple paper garlands- an activity for beginners. Professionals prefer more complex tasks, for example, voluminous crafts from paper. Below is a master class on making a volumetric garland in the form of light bulbs.

By the way, paper lanterns can decorate the usual LED garland. This New Year's paper craft looks very cool, especially if you decorate the wall with this garland.

Interested in a garland? Then see more ideas:

New Year is the most beloved holiday associated with miracles and magic. New Year's Eve Celebration festivities and happy meetings. It is impossible not to love this time of the year, when everything around is transformed, and every house or shop window becomes like scenery for a fairy tale. Everyone wants to participate in this transformation, and therefore they try to decorate their homes […]
Since we are talking about the decor of the apartment, it would be strange not to mention Christmas wreaths, or as they are also called New Year's wreaths. Everyone can make such a paper craft, in addition, a New Year's paper wreath is a reusable decoration that will not deteriorate and will not lose its appearance over time.

A very cool paper craft for the New Year is a wreath of roses. You will have to work hard to create such a craft, so if you decide to make yourself such a paper wreath on the door - stock up on patience and mood!

If you have planned theme party for the New Year, say in Cuban or Hawaiian style, then you will definitely need a certain kind of scenery to create an atmosphere. Here is such a simple, but very original wreath made of paper will come in handy!

Surely your child at school or in the garden was asked to make a Christmas wreath with their parents. Allegedly for a competition, but the main task of this task is to get parents to spend time with their children. But maybe you should not wait for a task from school, but spend time with your child yourself. In addition, with such a New Year's craft, you can decorate the house in a very original way, and most importantly, get a lot of positive emotions!

Need a Christmas wreath? See more ideas:

Preparing for the New Year is sometimes even more pleasant than the celebration itself. The whole family, including the youngest residents, can take part in the process of decorating the interior. You can decorate an apartment or house for the New Year holidays with the most different ways, but in Lately New Year's wreaths, which are better known to us from the romantic Christmas films of Hollywood, are very popular. However, trendy […]
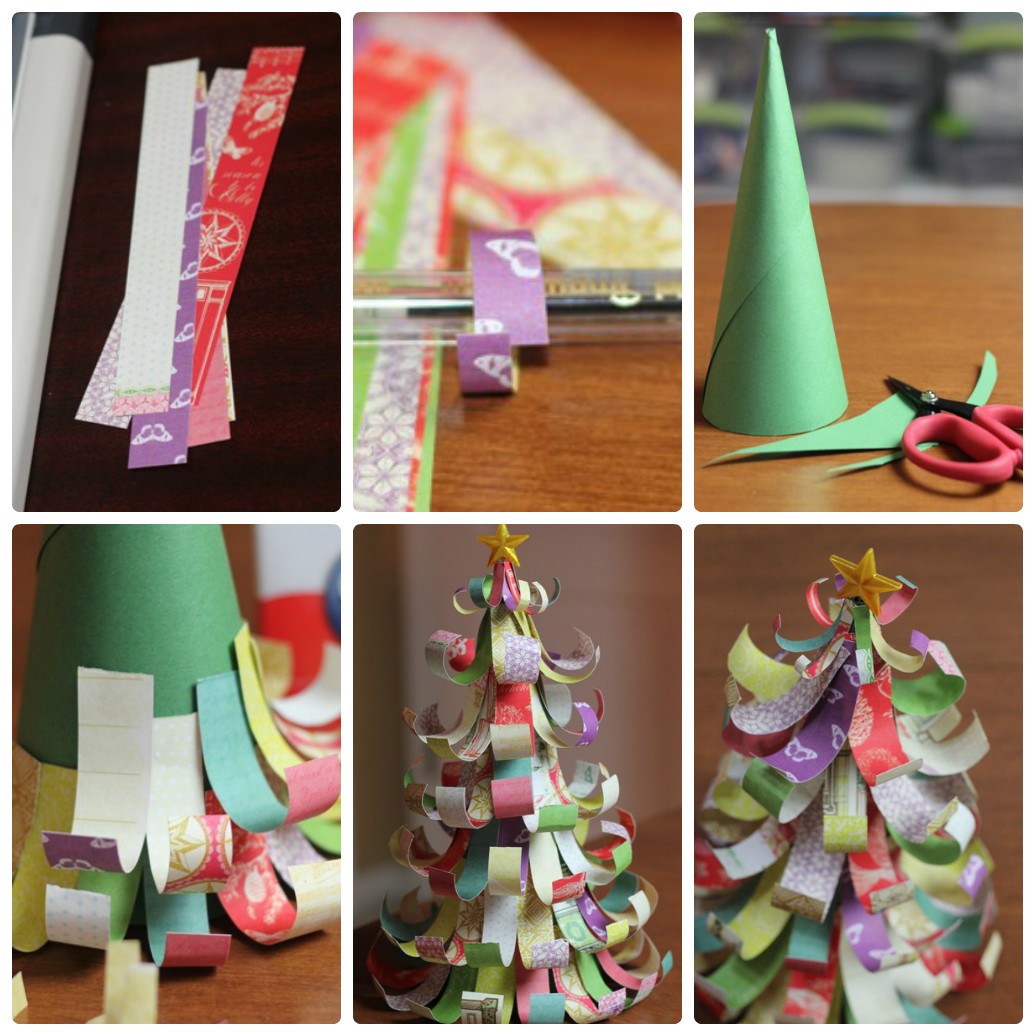
So, we continue to decorate the apartment. There is a garland, there is a wreath. Something is missing? Oh, of course, Christmas trees! If you prefer to new year holidays putting a big forest beauty is not a problem. By the way, read on. Small paper Christmas trees make a great addition to the decor, and they can also be used as small souvenirs for guests!
# 10 New Year's paper crafts with our own hands: we make a Christmas tree toy "Herringbone"
A Christmas tree made of paper does not have to be on the table or somewhere in the house. You can make a craft out of paper, which you can then hang on the Christmas tree itself, and if there is no Christmas tree, then you can simply hang such voluminous paper Christmas trees around the house. The scheme for making a Christmas tree is quite simple, but if you don’t quite understand what the essence is, or you just don’t have time to figure it out, then you can download a ready-made template.

A very cute Christmas tree can be made from corrugated paper. This paper craft looks very realistic, but it is done quickly and easily.

If you are still interested in a paper Christmas tree, but you want to make something unusual, then use this master class.

The tree does not have to be on the floor, it can also be hung from the ceiling. An excellent Christmas garland will turn out from plain paper.

How to distinguish New Year's table from the usual holiday? Everything is correct! According to thematic elements of decor. And how to make a suitable New Year's dessert, see.


Do you want more workshops on making paper Christmas trees? See:

Christmas tree for sure main attribute the most important winter holiday. It will not be possible to do without the forest beauty, the atmosphere is not the same, and where does the good grandfather put the gifts? It so happened that a Christmas tree is decorated in the house for the New Year holidays: someone puts a live one, someone prefers an artificial one, and someone paper. A paper Christmas tree can not only replace a Christmas tree […]
#17 Christmas paper crafts: making a movable card with wishes
From paper, you can make not only flat or voluminous crafts, but also movable ones. With our ready-made scheme, you can make a postcard with an encrypted congratulation or message. Such unusual gift will please not only children, but also adults! Download ready scheme can be lower.


In winter, wild flowers are not to be found, even in flower shops. But there is nothing to worry about, flowers can be made from paper with your own hands. And our step-by-step master class will help you with this.

A wide variety of flowers can be made from paper, the whole secret is cutting out the ends.


If you want to make a big new year star for wall decoration paper tubes Then this master class is especially for you!

A very themed New Year craft made of crimped paper. Such a paper cone looks very natural and is quite difficult to distinguish, especially if it is used as a decoration. With our master class, you can easily cope with such paper crafts.

There is another technique for creating paper cones with your own hands. This method is more labor intensive and will take you more time. In addition, to create such a New Year's craft, you will need: paper, a foam blank, a lot of safety pins, a ribbon and beads for decoration. However, if you have the time and desire, then pay special attention to this scheme for making a cone, especially if you want to impress.

From paper, you can make very special crafts using the Japanese origami technique. Our step-by-step master class will help you create a New Year's paper ball that can be used to decorate both a room and a Christmas tree.

A step-by-step diagram for creating an origami star with your own hands. You can decorate the top of the Christmas tree with such a star, you can simply create a festive atmosphere in the house, or you can combine it into one big garland.

You can make the base yourself, as in the first picture. Or you can download the finished pentagon blank and, depending on the size of the pentagon, the size of the finished star will change.


At your service step by step diagram manufacturing volumetric snowflakes from paper. Follow the instructions and you will definitely get such a miracle.

# 34 We decorate the apartment with cones: do-it-yourself Christmas paper crafts
In continuation of New Year's paper crafts, I would like to offer you another scheme for making paper cones. In addition to paper circles, you will need an oval or round shape, glue and spruce twigs for decoration.

Another great option for decorating an apartment with your own hands is a large voluminous snowflake on the wall. A snowflake can be not one, but a whole ensemble. In addition, on such a New Year's background, you will get great photos!

New Year's gift must be in beautiful packaging. In my opinion, the gift itself is not so much important as the intrigue around it. After all, it is this intrigue that will remain in the memory, this is a pleasant expectation and unfolding the paper. Use our scheme for making paper flowers with your own hands and decorate gifts for dear and close people.

It is customary to decorate a Christmas tree with toys, but these toys do not have to be purchased. Even better if they are made by hand. And what could be easier than making a Christmas tree toy out of paper. Take advantage of our step by step instructions and make your christmas ball from paper.

Very simple, but incredibly cute voluminous lanterns can be made from ordinary colored paper. Even children can handle this craft, so feel free to get to work if you have little helpers. Well, if not, then you can do it yourself!

You can make completely unexpected crafts out of paper, including gift boxes. And not just boxes, but in the form of delicious sweets. For such a gift box you will need: cardboard cylinder, colored paper, glue, scissors, satin ribbon.

In continuation of the question of gift wrapping, we want to offer you another budget, but very charming option. You can make such a gift elf with your own hands using our master class.

Here's another option for you original packaging new year gift with your own hands.

Need more gift wrapping ideas? See:

On the eve of the New Year holidays, shop windows are full of gift boxes, decorative bags, wrapping paper for every taste. Smiling sellers helpfully offer to provide services for wrapping New Year's gifts. And all this seems to be great, because you must admit, it is much more pleasant to receive a New Year's trifle in a beautiful package. But on the other hand, the whole meaning of the gift is lost, the very gift that […]


Want more ideas Christmas balls? See:

Today on store shelves you can find great amount a wide variety of Christmas decorations, so turning an ordinary Christmas tree into a real festive beauty is not difficult. However, the New Year is a special day! The day when old year left behind, and ahead are new adventures, new events, new victories. But after all, the old year did not pass without a trace, […]


#55 A simple paper snowflake pattern: decorating a room for a party

#56 Do-it-yourself voluminous paper crafts: making a snowflake. Scheme


#58 Christmas paper crafts: decorate the house with diamond crystals
Download ready-made schemes and make your own paper diamond crystals.

#59 New Year craft paper ball "Mistletoe" with your own hands
Here you can make such a mistletoe paper ball with your own hands, using ready-made cutting templates. Stock up on patience and New Year's mood!


You can decorate a house not only with standard snowflakes or stars. You can make such a wonderful vase out of paper. Download the finished scheme and assemble the vase following the instructions in the master class.

The most diverse decorative elements can be made from plain paper, just download the finished diagram, print it, cut it out and glue it. A wonderful Christmas paper craft is ready!

#64 Christmas patterns for cutting: a great photo shoot for the new year
Note! Templates are very large sizes And good quality so the download may take some time.

Simple Christmas decorations can be made from paper. In our master class, an example with a ball is given, but it can be other shapes: hearts, stars, Christmas trees and much more. You can download ready-made templates below.

You can make a simple and original Chinese lantern with your own hands using our ready-made scheme.

An excellent decoration for the new year will be a composite paper star. You can download a ready-made template for gluing below.

In our time, you will not surprise anyone with ordinary paper cutters. Volumetric crafts cause much more delight. This master class describes a step-by-step scheme for creating a simple volumetric star. You can download a ready-made template with a large, medium and small star from the link below.

It is quite difficult to imagine a New Year's decor without all sorts of variations on the theme of stars. In this master class, you will learn how to make a volumetric double-sided star out of paper with your own hands. You can download the finished scheme below.

#70 Christmas paper masks
Carnival masks must be included in the list of New Year's paper crafts. Well, what new Year party can do without masks? That's right, none! In fact, there are a lot of options for making paper masks, and if you turn on your imagination, you can make many wonderful crafts!

That in the New Year and Christmas can be more magical than a Christmas tree. In the evening, when the lights are turned off, a fairy tale begins in the mysterious flickering of lanterns in the branches. Everyone comes up with their own magical story.
In some, the nutcracker defeats the king of mice, in others, snowflakes lead round dances. We decided to compose a fairy tale about a Christmas tree elf. It will constantly change, acquire new plots, be supplemented by characters, and most likely, it will be different every year. Only the beginning of our fairy tale will always be the same: - Once upon a time in his cozy house, among fluffy spruce branches, a little Christmas tree elf ...
Here we decided to make such a fabulous house with our own hands today. Join, because the fairy tale has already begun!

For the walls, we will take a rectangular piece from cardboard box. We cut a hole for the window, and mark the place for the door. We will strengthen the walls with "wild stone". Let's take the pieces eggshell and glue it with PVA glue.
To make our masonry look more realistic, we need to simulate traces in the seams cement mortar. Yes, and the shells will hold on tight. Tape the walls with plain gray toilet paper. When it dries, we clean off the excess, exposing the protruding parts of our “stones”.


When the scales of the cones stick well, we will fit the pipe, because there will probably be a fireplace or a stove in the house so that our elf lives in warmth and can cook magic potions or porridge.
We twist the pipe from a small piece of cardboard and glue it with lentils, as if it were a refractory pebble.

For greater importance, we will make a ladder for the roof. She is from the same toilet paper, twisted into flagella. Yes, we almost forgot about the frame for the window, cut it out of cardboard.

Now we will install the roof in place and tint the facade of the house. We will do it with ordinary gouache. Although acrylic would be better, it is not necessary to varnish it.


It remains to glue the finished fairy-tale house on the base. Since we planned that our elf will have a light in the window, we will cut a hole for the LED in the base.

We wanted to decorate the "courtyard". Snow is cotton wool, and a snowman is also made of it. The Christmas tree is that “peeled” cone, painted green. This is not necessary, maybe your elf will live in a hanging house. Then only the bottom and the loop will come in handy.


We made such a fabulous house with our own hands in just one evening, and the little Christmas tree elf has already begun to live its own life. For him, a bathhouse, a cellar, and even neighbors with their houses have already been invented, this is a hedgehog and a squirrel.

Decoupage - decorate a bottle of champagne for the New Year
A handmade gift is always original and unique. Do you want to surprise your loved ones? Make decoupage on a bottle of champagne. This New Year's craft will not go unnoticed.

For decoration you will need:
- A bottle of champagne;
- three-layer napkin with a New Year's motif;
- PVA glue;
- acrylic paint;
- decorations.
First of all, you need to clean the bottle of stickers. To do this, dip it in a container of warm water and leave for a while.


We cover the entire open surface of the bottle with acrylic paint. The first layer can be applied with a brush. After drying, we paint the bottle a second time, but we already use a piece of sponge (“we smack it”).

In just an hour, the acrylic paint will dry out, so you can remove the tape from the neck and proceed to the next stage of decorating. We take a napkin for decoupage and tear out the selected fragment of the picture from it.

We remove the two lower layers from the napkin, and lay the top one face down on the stationery file. Gently add some water to the drawing, smoothing out all the wrinkles.


We smooth the file with our hands. We make sure that the napkin is securely fixed on the surface, and then carefully remove the file from the bottle.

Dilute PVA glue with water in a ratio of one to one. This solution is applied to the entire surface with a pattern with a brush. Her movements should be from the center to the edges, we try to smooth out all the wrinkles and expel the bubbles.

After the glue has completely dried, we take finely dispersed sandpaper (preferably “zero”) and carefully sand the contours of the napkin. We also process those places where irregularities have formed.

Next, we take a sponge or a piece of foam rubber, dip it in acrylic paint, “smack” along the edges of the fragment of the picture. Thus, we try to mask the transition from the napkin to the main surface of the bottle.

The work is almost completed, it remains only to add some "zest". For example, stick a ribbon on the neck. The easiest way to do this is with glue gun. The braid will not only complete the entire ensemble, but also close the transition from paint to foil.

DIY Christmas snowflake
The New Year holidays are approaching and the motives of the New Year and Christmas are increasingly heard in our work. I propose to tie a small snowflake with which you can decorate children's mittens and a hat, and by attaching a loop to the snowflake, you can hang it on Christmas tree. This snowflake knits very quickly and easily. Even a beginner knitter will cope with this work.

Materials and tools:
For knitting, Karachai acrylic yarn of white or blue color. I took this yarn so that the loops could be better seen. Hook number 3 is suitable for this yarn.

You can use thinner yarn, then the snowflake will be even smaller.
Abbreviations used in the text:
VP - air loop;
CC2H - double crochet.
We will complete the entire pattern in one row. Let's start with a set of four air loops. We will close 4 VPs into a ring with a connecting loop. Next, we collect 3 VP.

We knit in the ring 1 CC2H.

We knit a chain of 4 VP.

And we close the chain of 4 VPs with a connecting loop to the beginning of the chain. We collect 5 VP and close to the same point. Then 4 VPs and a connecting loop to the same point. We knit 4 VPs to move to the next ray of snowflake.

We knit 2 CC2H with a common top: On the hook there is one loop from the last VP of the chain of 4 VPs, one more loop remains from each untied СС2Н.


We knit three loops on the hook in one step.

We close the chains of 4, 5, 4 VP with a connecting loop to the common top of the columns with two crochets. After each ray, we knit a chain of 4 VPs. We complete the motif with a connecting loop in the first ray. The thread is cut and fastened.

If you want to use the snowflake as Christmas tree toy, you will need to tie a loop and starch the product.


Snowflake is ready! The master class was prepared by Svetlana Chalkina.

Plasticine mittens - winter crafts
What could be warmer and more pleasant than warm woolen mittens that keep your hands warm on a frosty day. If you make them with your own hands, for example, from plasticine, then such a craft can rightfully be considered winter. With such mittens you can catch the magic winter fairy tale, because they are made with love and will definitely come in handy as a gift made from the heart.
On the eve of the New Year, they usually make copies of Christmas trees, Santa Claus and the Snow Maiden. The proposed mittens are unique, the craft is not like the others. And the more interesting it will be to make it with the children, especially since it is quite simple.

What you need to use for sculpting mittens:
- white and blue plasticine;
- a small strip of lace to create a believable knitted texture;
- toothpick.
How to mold plasticine mittens
The white and blue set is a very good option for sculpting the chosen craft. Mittens should be woolen, knitted, cozy. They are indispensable in the cold season, when snowdrifts lie on the streets, the sun shines brightly, but does not warm. We make sure to buy ourselves new accessories and never go out without grabbing this important thing.

First, make soft pellets to create the top of the craft. You need to prepare 2 balls different size. The larger one will be for the palm, the smaller one for the thumb cell. Soften the plasticine in your hands and immediately proceed to the next step.

Press down the larger and smaller white pieces to form flat cakes. Then, on one side, lightly squeeze on both sides, on the other hand, on the contrary, round and smooth with your fingers. Fasten your palm and thumb together. Smooth out the seam. The body of the craft itself is ready. Don't stop at this stage either. You need to act quickly while the plasticine is still warm. Now we have to create a knitted texture.

Make the lower part - blue cuffs for accessories. Roll out two blue pieces into flat cakes.

While the plasticine on the white part of the craft has not yet frozen, make a lace surface, or rather, its imitation, using a piece of lace. Press the lace against the soft plasticine and press with a slight pressure with your fingers on its surface. After you remove the fabric, an imprint will remain on the soft surface, which will be very similar to the desired texture.
Instead of lace, something knitted is also suitable, for example, a doily or even socks. Experiment and be surprised, because it is such unusual way drawing a relief pattern on a plasticine surface.

Make both mittens textured. On a blue background, use a toothpick to also create a knitting effect by drawing small notches.

Fasten the mittens to complete the planned craft.

Interesting winter version For children's creativity performed very quickly. In the process of work, children will learn not only to create parts of various shapes and sizes from plasticine, but also to create unusual relief patterns on a smooth surface. Now think about what else you can do with plasticine-knitted. For example, model a hat or a sweater according to the same scenario.
New Year's deer made of felt - do-it-yourself craft

The New Year's deer is a very common symbol of the upcoming holiday. Soft toy in the form of this cute animal, made with your own hands, can serve as an excellent decoration for the New Year tree, as well as a pleasant souvenir, presented from the bottom of your heart.
The process of tailoring a deer is a very exciting activity and, at the same time, quite simple, which even a primary school student can handle.
For work, we need the following materials:
- Felt medium density brown or gray;
- paper;
- pen or thin crayon;
- threads in the tone of felt or a contrasting color;
- synthetic winterizer or other filler;
- ready-made eyes or beads;
- sequins, beads or beads.
We draw a silhouette of a deer on paper or print out a ready-made template, cut it out.

We transfer the image to the felt and carefully cut out in duplicate.


We are preparing a decor that makes the deer brighter and more festive. In our case, the decoration is a snowflake, crocheted from the remains of red threads. We collect 11 air loops and close them into a ring, then we perform 14 RLS (single crochet) inside the ring.

With the help of CCH (double crochet), we knit a “flower”, trying to distribute all the columns evenly.

In the formed arcs between the dc we knit 5 dc each, between which we make arches of 10 air. loops.

We tie the resulting sbn element, knitting a pico from 3 air. loops approximately in the middle of the arch.

We iron the resulting snowflake with a hot iron, trying to give it the correct shape.

Sew a snowflake to one side of the deer. The middle of the snowflake can be decorated with sequins and beads or a button.


Glue on the eyes.

We prepare the synthetic winterizer and sew the blanks, starting with the horns. It should be noted that it is not necessary to stuff the toy with synthetic winterizer too tightly, as this can cause uneven seams.


New Year's souvenir is ready!

DIY New Year's Topiary


DIY candles - crafts for the New Year
Candles have always been an integral part of any celebration. romantic evening. After each celebration, you most likely throw away candle ends that could have been used. If you have accumulated candle ends, you can make new candles with your own hands.

Necessary materials:
- old candles;
- toothpicks;
- small sticks;
- molds.

You need to melt the wax so that it becomes completely liquid. To do this, put the wax in molds in a water bath.

Preparing molds.

When the wax has already become liquid, pour it into the prepared molds.

As a wick, you can use cotton thread, or get it from old candles. So that it does not pop up, we take out a metal holder from the old candle and attach the wick.


Then we dip it in wax.

Place any stick on top to secure the wick.


Let the candles dry overnight.


When the candles are dry, remove them from the molds. To do this, put them in boiling water for a few seconds.

To decorate the candles, I used gold ribbon and paper napkin. After I wrapped the candles, they became more festive.

To decorate a candle in a glass, I used Christmas decorations for the Christmas tree, tying it to the glass.

So in a simple way can be done Christmas candles with your own hands. You can experiment with different molds, or decorate finished candles with coffee beans.

Step-by-step master class with photos how to make it -.


DIY Christmas composition with hats
Create a Christmas atmosphere in your home with a fun arrangement of miniature hats. This master class is ideal for creative activities with children.

Necessary materials:
- Multi-colored knitting threads;
- thin cardboard cylinder;
- white acrylic paint;
- dry branch without leaves;
- glass bottle of wine or champagne.

Let's make hats from threads. Take a cardboard cylinder and cut it into rings 1.5–2 cm wide. You can also make rings yourself from thick paper fixing them with a stapler.

Cut 30 cm of thread and fold it in half. Such segments will need about 30-40 pieces, depending on the diameter of the ring.


Thread the thread, folded in half, into paper ring. Pass its ends into the formed loop and tighten the formed knot.


Tie the remaining threads on the ring in the same way. Try to place them close to each other, avoiding gaps.


When the ring is completely braided, thread the ends of the threads through it, as if turning it inside out.


Tie the ends of the threads with an additional thread of the same color.

Trim the ends of the threads, forming a neat pom-pom on the hat.

Spread the hat from the inside, making it more voluminous. Fluff up the pom-pom.


Similarly, make hats of other colors.

Let's make a small winter composition. This will require a small dry branch, which can be found in the park.

Paint it white to create the effect of a snow-covered winter branch. Leave it to dry.


Take an empty glass bottle and apply 2 coats evenly acrylic paint, being careful not to leave highly visible brush strokes. Let it dry completely.


We collect the composition. Place the branch in the bottle. Put on hats for small branches. You can decorate the branch with threads and beads.


Detailed master classes step by step photos Here - .


Wreath for New Year and Christmas from willow branches
The next master class is "Christmas wreath with your own hands."

To make jewelry, take the following materials:
- Willow twigs (medium thickness);
- New Year's tinsel;
- cones;
- items for decorating cones (paints, sequins, beads, rhinestones, and so on);
- moment glue, thin copper wire or nylon thread for attaching decorative elements.
Important! So that the vine does not break, you need to weave as soon as it is broken. If the branches dry out, nothing will work.
Let's start forming a wreath.

We take several thin branches (long) at once and form a ring, intertwining them with each other.

If it does not immediately turn out to be the correct shape, do not be upset, with subsequent interweaving, the ring will align. It is necessary to weave the vine, securing the end between the rods of the previous circle.

Thus, we continue to weave a wreath to the required size.

The basis for the festive wreath is ready, now you can move on to the decoration.

We take tinsel and wrap the finished ring so that gaps are visible. At the bottom of the wreath, we leave a little space for attaching decorative cones.

Let's move on to decorating the cones. To do this, you can use everything that your imagination has enough for (paints, rhinestones, beads, ribbons, sparkles, and so on).

As a result, we got such beautiful decorative cones.

To attach the cones to the wreath, you can use instant glue, a thin copper wire or kapron thread. In my case, glue was used.
That's all, wreath to holiday decoration ready at home. Spent a minimum of effort and time, but received a maximum of pleasure from pastime.
You can even bring the whole family. This will make things much more interesting.

New Year's crafts - do-it-yourself boots
You can put a New Year's gift to a child in a felt boot sewn with your own hands.


You can hang such a textile decor on a Christmas tree or a doorknob.

For work you will need:
- piece of fabric;
- edging for the top;
- decorative braid and beads for decoration.
If the fabric is thin, you can make the boots double - lined, it will look more voluminous and presentable.
Decide on the size of the boot. Reshoot the pattern of the boots. It is as simple as possible, you can draw it yourself, leave some space for seam allowances.

Since in this case raincoat fabric was chosen for the felt boot, the pattern was also transferred to the lining.

Secure the fabric with pins, stitch along the line, cut out the workpiece.


In places of rounding, carefully make notches with sharp scissors. Turn out the boot.


Felt or a thin strip of fur is suitable for edging. Remains of overcoat fabric are used here.

Decorate the boot with snowflakes or appliqué. Sew on a loop so that the boots can be hung. Make buboes from a small piece of boucle, assembled and sewn into a ball.


Such a boot can be useful not only as a package, but also as a decoration.
New Year's boot with a bunny
New Year's gifts for all children are the most desired. They write letters to Santa Claus, asking him to give them toys and sweets. Then they wait for the fulfillment of all desires. A good wizard will surely respond to their requests. Under the Christmas tree new year's eve children find plush bunnies and bear cubs, dolls and baby dolls. And also a gift in the form of crafts can be made with your own hands from any materials available for children's creativity, for example, from plasticine.
This lesson shows the stages of making plasticine crafts for the New Year in the form of a bright boot with a bow, filled with gifts, the main of which is a white bunny.

To sculpt a New Year's gift, prepare:
- white, red, blue, black, green plasticine;
- tool.
How to make a New Year's craft from plasticine
The plasticine set contains not just bars, but a whole treasure, toys, accessories, even gifts for the New Year. All products are easy to make yourself, having at hand detailed instructions, which is what this detailed master class. Imagine and enjoy the creative process.

To get started, take the red plasticine and knead it thoroughly in your hands. Form a boot from the soft mass. Pull the mass into a cylindrical part, then pull the resulting cylinder on one side, press down with your fingers at a right angle.
In the right places, simply smooth the surface of the boot, giving a believable look. The base of the craft is ready. Of course, in fact, the part should be hollow inside, but we will not cut a hole, but we will simply put the bunny toy on top, more precisely, we will make only its upper part.

To decorate your New Year's product, draw out a few strands of white, green, of blue color. Roll out the soft mass with your fingers with light pressure, pressing down on a hard surface.

From a thin green sausage, make a fringing for the top of the boot. Use a blue sausage to model a bow - it will look very nice on a gift. Twist the white and red sausages into a flagellum. Press down over the entire surface. Trim off the excess on both sides. Then bend so as to get Santa Claus's staff.

Form blanks for the upper part of the bunny figurine. For a plush toy, we will show only a head with long ears, front paws. Use white plasticine for modeling.

Stick white cheeks on the head ball, pierce them with a toothpick, showing hairiness. Attach black eyes and nose. Give the rest of the white pieces the shape of the ears and paws.

Glue the details to the top of the red boot so that the impression remains that the bunny is sitting inside and just looking out.

Add the decorative elements prepared earlier. Place a white and red staff near the bunny's head. Add a bow to the top of the shaft.

A unique plasticine gift dedicated to your favorite holiday - the New Year - is ready. Having made the same base, you can put a bear or a gingerbread man in the boot. Either option would be welcome and so cute.


Children can also be involved in the manufacture of the following crafts for the New Year. Such joint creativity will bring great joy to both children and parents. After all, on winter holidays I want to decorate my house in a special way. You do not need to master complex needlework techniques, you can try to make something interesting from ordinary white paper.
All of us in childhood learned to cut lacy snowflakes from paper folded in several layers. But decorating your home with snowflakes is too banal and simple. Turn on your imagination, let the openwork weaves turn into dresses for graceful ballerinas floating under the ceiling.

For work you will need the following materials:
- Sheets of white paper;
- scissors;
- pencil;
- fishing line.

First, draw silhouettes on paper with a pencil. graceful ballerinas, which raise the leg and take the arms to the sides. Or download ready-made ballerina templates. Cut out their images along the contour. Then make the most openwork snowflakes so that they are lush and light.

Try to cut a hole in the center so that the ballerina can fit into it. Glue the snowflakes at the waist level of the dancers.

Watch the video tutorial on how to do this Christmas decoration- do-it-yourself ballerina snowflakes.
Volumetric foam snowflakes
All the same openwork paper snowflakes are taken as the basis, the pattern is transferred, for example, to polystyrene or polystyrene foam. With the help of a sharp knife, all the necessary elements are cut out, and as a result, unusually beautiful, voluminous snowflakes are obtained.
DIY Christmas toys.


Also for kids, you can make crafts from a bottle and gouache, just push the bottle with cotton wool, make eyes, a nose and equip it with a scarf. It will turn out pretty and irresistible, the kids will definitely like it.
Older children can make a snowman out of cotton buds by gluing sticks clockwise onto ordinary cardboard.

Or from decorative ribbons, such a toy for the Christmas tree.


If you are a stick lover, then you can make such interesting christmas toys on the tree: 
Or like this:

You can turn on your imagination and ingenuity and simply make any character from a cartoon out of one stick, and even Santa Claus.

Also paper or satin ribbons you can easily build a Christmas tree. Make a cone and glue the needles.


Crafts for the New Year 2020 from various improvised materials (paper, cones, bottles, cotton pads, cardboard, beads, felt)
Of course, each of us loves to make crafts from what is always at hand, in haste.
If you decide to make New Year's toys and paper crafts, then here are the most original ideas, here everything is clear how to make:
Santa Claus and Snowman


Mouse or rat

All kinds of decorations from caps and bottles:

And you can also just lay out a Christmas tree from books:

In schools and kindergartens, at institutes, you can arrange this creation in the form of gloves like this:

But if you like to collect cones in the forest, and then create from them, then you can also draw such ideas for yourself on this subject:


Bottle products have also become popular, as everyone likes them with their simplicity and originality of presentation, see for yourself on these photos:
bells

Snowman from cups


From ordinary light bulbs, you can create toys for the Christmas tree, but of course, such souvenirs are not for toddlers and preschool children.

You can even find uses for socks. Really very funny and looks wonderful.

From cotton pads, in general, you can add pictures and Christmas trees:


You can also make various creations and masterpieces from cardboard and threads:

But from beads, of course, if you do not know how to weave, it will be immediately difficult to master this technique. But still worth a try. Key chains are popular with most people, for example, such a snowman (diagram) or snowflakes.


And of course, from felt, here the task is of course more difficult, but many cope with it with a bang.


Do-it-yourself crafts with the symbol of the coming year in the form of a mouse (rat)
Of course, most of us will make a funny and funny mouse this year, because it is she who will patronize in the coming year.
The most accessible and easy toy to make is, of course, molded from plasticine.


Or sew from felt, such a pattern will help you.

The kids still love to get up out of yarn, in the form of donuts:

New Year's crafts with patterns and patterns for children
If there are children in your house, then I suggest you quickly make such toys and crafts with them that will bring joy to everyone.
I give ready-made layouts and so to speak step by step wizard classes from the photo, put it into practice, I'm sure it will turn out just super and very cool!
Attention! Do this craft with your parents!
You won’t believe it, but I got the idea to make a candlestick, and imagine from a tangerine, it’s cool and tasty, so to speak, a natural flavor)))

I really liked the idea of \u200b\u200bmaking a Christmas tree out of plywood or cardboard with my own hands, how charming it looks, a nice New Year's composition:

If you want the rat to accompany you always in the classroom at school or in another educational institution bookmark the book.


Crafts for the New Year for kindergarten with parents and children from all sorts of things
I thought, I thought about this question and decided this year to create such a culinary masterpiece, in the form of a Christmas tree made of cookies. As a basis, you can take any recipe for your favorite cookies, and then what, but make stars out of it and fold a Christmas tree, and then decorate with cream, or sweets, mastic, elementary:


Well, the most common fashionable option is a craft from the hands of a child and an adult:

Photo illustrations, pictures of crafts for the New Year holiday
I would also like to give you a bunch of ideas on this New Year's theme, you yourself probably already came up with something unrealistically beautiful in your imagination while watching this article.


Video compilation of New Year's master classes with different ideas for toys and crafts
In conclusion, I want to offer you videos to watch, I hope if you have not yet decided what you want to do, they will help you with this, especially since everything is described in detail and shown from A to Z:
You can make a snow globe:
A cool friend made of origami-style paper, after all, this is a symbol of the year: