How to make a do-it-yourself valentine in the shape of a car. Do-it-yourself valentines: step by step diagrams. Do-it-yourself Valentine from napkins: video
The tradition of giving heart-shaped cards on Valentine's Day began many years ago and has since creative masters every year they try to come up with new ideas on how to make valentines with their own hands. Below we have collected 10 original ways their creations that will appeal to all young people planning to make romantic surprise The 14th of February.
Idea 1. Valentine card with voluminous hearts
If you want to give your loved one a symbolic postcard on Valentine's Day, it is not at all necessary to run to the nearest gift shop. It is quite possible to do it yourself, and in a few short minutes.
For this it is necessary use: cardboard paper, which is the basis for a future postcard, an ordinary sheet of bright red paper (or cardboard), scissors, a pencil and glue.

How to do: 1. On a sheet of red paper, draw by hand a few hearts that resemble a spiral. Cut out two spiral hearts in this way.

2. Make a standard postcard-book out of rectangular cardboard paper. Glue on both inner sides of the heart. The latter are linked together, slightly turning them in a spiral. The product is ready.


Idea 2. Valentine card with many hearts
In the case when you want to make the most ordinary valentine card, inside which you can write a lot of wishes, you should decorate it in an original way, which will make it festive and romantic.

First of all, to create it, it is necessary to prepare such materials: a large sheet of red cardboard, several smaller cardboard sheets of various shades and types, one napkin with an openwork pattern (but this is not at all necessary), PVA glue (it can also be replaced by double-sided tape), scissors. If there is a hole puncher at home with various forms, it can also be useful here.

How to do: 1. Fold a large sheet of red cardboard in half - this will be the basis of our postcard.

2. From all other cardboard sheets, cut out the correct hearts of the same size. Do the same with the openwork napkin.

3. Fold all received hearts in half (along) and paste into each other according to the principle of a book.
4. Glue the voluminous heart thus obtained on the outside of the postcard.

5. If desired, decorate the latter with a declaration of love, as well as small butterflies (hearts, flowers) cut out with a hole punch.
6. Paste a blank sheet of paper inside the card. white color and write on it all your wishes for your loved one.

A beautiful valentine card is ready, it remains to wait for February 14 and solemnly hand it over to your dear husband, boyfriend or good friend for whom you have certain feelings.
Idea 3. Valentine card with many wishes
Recently, quilling (or the paper rolling technique) has become more and more popular, and therefore it can be used to beautifully decorate even seemingly trivial valentines. For example, it can be done like this:
1. Prepare a cardboard sheet of paper, fold it in half, making a postcard.


2. On the front side the last to stick a lot of small hearts made using the quilling technique. Under each of them write sweet words for your man.
Idea 4. Valentine card with an original inscription
Who said that the words "I love you" have to be typed or handwritten? Knowing how to twist intricate figures from thin strips of paper, you can safely “write” in this way a declaration of love, which will become very original decoration homemade postcard.

However, someone who is more seriously interested in quilling can create such beauty:


Idea 5. Homemade paper valentine
Anyone who likes to make interesting things out of paper, and also knows at least a little about stamps and other special devices for handmade craftsmen who specialize in creating cute postcards and other products, will surely appreciate the following video tutorial:
All necessary materials, presented in this video, you can buy at any online store, the main product of which is paper and everything that lovers need to make all kinds of greeting cards, business cards and more from it.
Idea 6. Openwork Valentine
Universal access to the Internet allows almost everyone to instantly download a large number of ready-made templates to create unique crafts including valentines. Yes, among them you can easily find complex schemes openwork patterns in the shape of a heart, which will become a worthy decoration of a love card. For example, it might look like this:

All that is needed to create it is to download and print the diagram you like, and then carefully cut out each element, trying to do it very carefully. A sheet of paper designed in this way can simply be glued onto a cardboard backing, or attached to the front side of a postcard that opens like a book.
Idea 7. Volumetric postcards
Also, those who like to create voluminous products can always download for themselves a couple of templates that allow you to make voluminous postcards with the words "I love you" or a couple of angels running towards each other.

It is quite simple to make them, just carefully cut along the contour of the figure, leaving them attached in some places to the main sheet of paper.

Idea 8. Valentine envelope
And someone who likes to leave secret messages can easily make one big valentine card, on top of which several small envelopes with wishes hidden inside are pasted at once.

Alternatively, you can always get by with one envelope with a red ribbon:

Idea 9. Non-standard Valentine
Among other things, on the Internet you can find a template for creating a small custom-shaped valentine, which must first be cut out of a sheet of paper and then folded in a certain way. For example, it might look like this:

Idea 10. Valentine card "Heart"
Well, in the end, you should never forget about paper valentines made in the shape of a heart. They are easy to cut according to your own hand-drawn pattern.

And to give a presentable look, they should be decorated with all sorts of additions in the form of smaller hearts, ribbons, beads and floral applications.
We offer you several master classes on creating a variety of valentines by February 14th. Here we have collected the best ideas, schemes, tips, templates and step by step instructions. From this article you will learn how to make valentines with your own hands from various materials: from paper, felt, beads, threads (we will crochet), salt dough, jewelry, etc.
In this collection you will find both very simple and at the same time original hearts, as well as those that take a little more time to create. That is why some of the crafts will be described briefly (you will just have to look at the photo to understand how to make a Valentine), and we will dwell on others in more detail.
Paper valentines
Let's start with the obvious - paper hearts. To create them, you will need cardboard, colored paper and a glue stick. In some cases, additional decor will also be needed - it can be added at will to any of the presented crafts.
Postcard with a three-dimensional heart
This is a very simple and at the same time spectacular homemade valentine card, which will be a pleasure to receive on Valentine's Day for a person of any gender and age.

We will need:
- rectangular base cardboard;
- colored paper for decorating a heart;
- glue;
- stencil.
The template can be anything you like, but we suggest you cut and fold a ready-made heart. It looks like this.

It needs to be cut out and the folds marked on it.

Fold the heart in half and bend the sides to it.
Fold the cardboard base in half and attach to it the heart that you cut out of colored paper using a stencil. Mark the place where you will glue the heart. Circle its contour and glue the side parts (small hearts) with glue.
Glue the paper to the cardboard behind the little hearts.


You have a postcard with a voluminous paper valentine. You can write a wish directly on it, and decorate the gift cover by February 14 with felt-tip pens or rhinestones. You can also place another valentine on the cover, instructions for making which you will find below.
valentine from paper strips
This beautiful and neat valentine can be a great addition to a Valentine's Day gift. It can be attached to a box or bag with a surprise for a loved one.

We will need:
- paper strips of the same width and different lengths(several colors);
- stapler or rivets;
- glue;
- threads and colored paper for cutting hearts.
As the main material, you can use ornamental, corrugated, velvet and any other beautiful paper or cardboard. It's great if this paper has an interesting decor.
The strips should differ in length by several centimeters - it depends on the size of the desired valentine.
Fasten the paper strips together at the base: short - closer to the center, the closer to the outside - the longer the strips.
Then fasten the strips together in two and bend them to the center, forming a heart.
Additionally, you can attach a paper loop to the valentine and make a pendant from a thread and small hearts.

Great idea- write a wish or declaration of love on each strip. Do this from the inside and invite the recipient to take apart the valentine.
Volumetric 3D paper valentine
An easy way to cut and fold a valentine with your own hands. The postcard will be original and very touching. The decor looks complicated, but this heart can be made out of paper or cardboard in just a couple of minutes.

We will need:
- cardboard or colored paper;
- stencil or ruler;
- paper cutter;
- lace.
Cardboard or paper is better to take double-sided. If this is not at hand, just glue two sheets together, painted on only one side. Just make sure that all parts of the future gift for February 14 are tightly glued to each other - otherwise it will come out sloppy.
Take a sheet and draw a heart on it. Then we apply a stencil to it or make markings at equal distances. Please use this template for your convenience.

You can print it out or just sketch it out.
Then we simply cut out a valentine from paper and go through the cutter along the marked strips. We bend them one by one: we push the first strip forward, the second - back, the third - forward again, etc.


The craft can be completed with a cord or thread. Attach a valentine to a gift or give it just like that.
Paper valentine in the form of a box
A Valentine card is not always a standard postcard. You can give your loved one a box in which you can hide sweets or any other surprise.

We will need:
- cardboard;
- stencil;
- glue stick;
- satin ribbon.
The stencil for cutting out a valentine box looks like this.

Print it out or draw it. Sizes can be customized to your liking. In this case, the box is made up of a standard A4 cardboard sheet.
We cut out the image of the heart, having previously marked the fold lines on it.
We fold the box, making the necessary cuts (look at how it looks in the photo) and fastening small parts with glue or double-sided tape.


You can attach a bow made of satin ribbon.

Decoupage valentine boxes look very nice. if you have decorative napkins, think about such decoration.
Quilling paper valentine's card
We will need:
- cardboard;
- Super glue;
- any decorations;
- satin ribbon.
Cut out a heart from cardboard. If the cardboard is too thin, make it double or even triple: we will stick massive decorations on it - it is important that the material is durable.
It is better to lay out the composition in advance, and then simply glue the decorations with superglue and tweezers. You can choose a color cardboard or pre-paint it.
For inspiration, take a look at some valentine assembly ideas.

Complete holiday composition ribbon, and write a wish on the back. Such a romantic gift will please anyone.
Beaded heart
If you have enough time and you like to make crafts from beads, the next master class will suit your taste. This voluminous valentine can be a complete gift for a loved one.
In this video tutorial you will find all the necessary instructions. Even if you do not have much experience in beading, you will surely master this master class without any problems.
Such a heart for Valentine's Day will delight your soul mate for a very long time, because this gift can be put on the shelf and look at it every day.
Fabric valentine (embroidery)
And here you will find several beautiful schemes for embroidery. Each of them can be easily repeated. All you have to do is print or draw the pattern and run it on canvas or any plain fabric that makes it easy to calculate stitch spacing.

We will need:
- plain fabric;
- threads for embroidery of several colors (preferably floss);
- finished circuit in the form of a heart.
Please note that embroidery can be done not only on a napkin or towel, but also on a pillowcase, and then place a small pillow in it - you get a beautiful and practical Valentine's gift.


Choose any of the presented patterns for embroidery and create unique valentines by February 14th. By the way, embroidery can also be done on cardboard if you prefer standard postcards, but at the same time you want unusual design solutions.
Gypsum, polymer clay and salt dough valentines
These postcards are divided into one subcategory according to the principle of manufacture. Any of the presented crafts can be done as from polymer clay(cold porcelain), and from a gypsum mixture or from salt dough.

We will need:
- main material;
- broken glass, buttons, beads, openwork stencils and other decor;
- braid.
These postcards are difficult to sign, but they turn out very beautiful, so it's worth trying to make them.

If you need a DIY salt dough recipe, you can get this.
The easiest way to cut out hearts is to use cookie cutters. If you don’t have them, roll out the mass for modeling, from which you will make a valentine, and put a cardboard heart on it, and then circle it with a needle and cut off the excess with a knife or spatula.

Decorate the heart with openwork details, buttons, beads and other decor. Bake the valentine in the oven, having previously made a hole in it for the braid.

If you want to add a wish to a homemade Valentine, write it on a cardboard heart and tie it to a ribbon. In addition, a heart made of gypsum, polymer clay or salt dough can be painted with paints or special markers and write the name of a loved one on it.
Felt valentines
One of the most popular cards for Valentine's Day is felt hearts. They turn out gentle and touching, and even an inexperienced master can sew them.

We will need:
- felt of any color;
- threads for embroidery;
- cotton wool or cotton pads.
Draw a standard heart on cardboard and then attach it to the felt. You need to cut two identical pieces.
Do beautiful embroidery, sew on beads or beads and sew the pieces together. At the same time, it is not at all necessary to make a secret seam - the exterior finish also looks beautiful.
Stuff hearts with cotton wool or cotton pads - plump felt valentines look even more beautiful.
Here are some ideas for inspiration.


Try to make several valentines at once - you can make cute compositions from them.
crochet valentine
From this collection of video tutorials you will learn how to crochet a valentine. We have collected for you the best detailed and understandable instructions that will help even a beginner to master this technique. Knitted postcards and crafts for Valentine's Day are very attractive and valuable.

- Master class on knitting a voluminous valentine in 30 minutes
- Video tutorial on creating a simple crochet valentine for beginners
- Master class on creating an openwork valentine: coasters for hot
- Volumetric crochet heart
- Another lesson on knitting a voluminous valentine
Hearts can be given just like that, tied to a gift or planted on wooden skewers and made into a bouquet. Knit colorful bright valentines - your loved one will definitely not remain indifferent.

Choose any of the proposed ideas. Decide on the material from which you want to make crafts by February 14, and then read how to make valentines, and boldly get down to business. Your loved ones will definitely appreciate such a gesture of attention on Valentine's Day.
Views: 20 138
Good afternoon, in this article I have collected the most interesting ways to make valentines with your own hands. You can give heart crafts to your loved ones and loved ones for Valentine's Day. After all, how nice it is to receive gifts made by YOUR HANDS. For each craft, I will try to make a drawing (if there are no ready-made templates) and explain in detail what and how to do step by step. We will cut out valentines from paper, cardboard, fold them into boxes, and make valentine envelopes and other crafts for Valentine's Day. Here are the most interesting ideas make a paper heart in different three-dimensional techniques.
So, let's begin our affairs of the heart...
Paper valentines
IN CARVING TECHNIQUE.
Here is the easiest craft. which even children can do kindergarten. middle group or the eldest, when they already cut well enough with scissors (without trembling hands and sweaty foreheads), they can easily make this valentine with their own hands.

Everything is simple here. Flatten the sheet in half. We draw on it a half of the heart and horizontal lines. We cut the lines and cut out the heart itself. Unfold the heart and put it on the table fold edge down. And then the most interesting for children. It is necessary to pull the strips UP with your fingers - but not all, but through one - we leave one, pull the second, skip one, pull the second up (changing the fold to the opposite). We get a ribbed heart. Below we see a visual template for the blank for this paper craft bulky heart. A simple and quick do-it-yourself valentine card for children in kindergarten.

You will find many other ideas for simple children's valentine crafts in a special review article.
And here's another one beautiful craft for children - in the form of a puff valentine. Where the layers of the heart are located in different planes.
We bend the sheet in half. We draw the contours of the heart on the sheet. And we highlight with bold lines the places where you can cut with scissors, and with dotted weak lines the places that do not need to be cut. We explain to the children which lines to cut.
And then with our fingers we bend the inner heart forward with the edge of the fold, and the outer heart is the edge of the central fold back, and the card itself becomes the edge of the fold forward. It turns out as in the photo below. A quick paper valentine - just in 20 minutes of kindergarten classes.

THIS IDEA does not have to be copied exactly. It can be changed and played with. For example, change the cut zone and the bend zone on the same contours (as the drawing above).
THAT is to change the BEND ZONE of such a heart contour (the zone that is indicated by a dotted line in the diagram) and get a new voluminous postcard craft, where the heart is already protruding from the other side.

Take a closer look at the photo above. On this valentine, a large heart is held up by an UNCUT LOWER CONTOUR. And the inner little heart is held up by uncut apex and tip on both sides of the centerline. Here is what these changes look like on the diagram.

The most interesting thing is that you yourself can continue to EXPERIMENT IN THIS TECHNIQUE. Make cuts in the shape of a heart, or a half heart and bend them in different directions. And one day you will get a cool author's craft.
For example, if you place the half-hearts IN A CIRCLE - then cut through the contours of the half-hearts and bend these contours - then we will get such an interesting round craft HEART DANCE.

This is how the conceived drawing looks like - drawing half-hearts, in a circle.

Such an openwork puff appliqué can be pasted on a postcard for Valentine's Day. You will get a beautiful design valentine card with your own hands.
More ideas for greeting cards for Valentine's Day you will find in our special article
DIY VALENTINES
WITH NOTES.
On Valentine's Day, we say to our soul mates nice words. Declarations of love can be said not in words (after all, at a solemn moment, all the most tender phrases can fly out of a head in love). Therefore, their mur-mur-phrases can be written on notes- roll these notes into rolls and hide them in paper rosebuds on this valentine craft below.
See how beautiful - each twisted paper bud contains a small white twist note. This craft with notes for Valentine's Day is easy and simple to do with your own hands. Now I’ll tell you exactly how to quickly and conveniently do such work with your own hands ...

We take a piece of thick cardboard (for example, a lid from a pizza box, it is just large). We buy in stationery packaging of red office paper(it is just double-sided and dense - what you need).
Paper is cut into wide stripes. Fold each strip in half ALONG(so that it is doubled - so the rosette will turn out thicker and more magnificent). And then we twist this double strip with a roll (around the pencil). We remove the twist from the pencil, loosen it slightly, let it unwind a little and fix the tail of the twist with glue(so as not to bulge).
We make a whole lot of such paper twists-roses - so that they all fill our cardboard heart tightly. And then we fix them on a cardboard base - you can use glue. BUT Better with double sided tape- it holds wonderfully - we cover the entire surface of the cardboard heart with strips of adhesive tape, remove the protective film on this sticky base poke our roses. Then we put a note with warm words, promises, confessions, heartfelt vows and intimate hints into each bud ...
The second craft with a note.
HEART WITH A SECRET.
And you can also put a love confession inside a PAPER HEART with a gap in the middle.

Here detailed master class for the manufacture of such a VALENTINE WITH A SECRET.
We take square sheet paper - and fold it in half - lengthwise and across. So that it quadruples along the folds - cross to cross (as in the first photo).
We bend the lower edge of the square up to the middle horizontal fold line (photo 2).
Turn the sheet over, down this fold (photo 3). Then we bend the right and left corner to the vertical midline (photo 4).

Again, turn the sheet over with the other side up, corner down (as in photo 5). And bend the upper corners to the middle vertical line (photo 6 and 7).
And again, these same upper corners - once again we bend to the middle vertical line (photo 8).

And now our module (which has the shape of a hexagon) is bent in half. That is, the upper corner of the hexagon lies on its lower corner. And then such ends appear at the top (photo 9).
These protruding ears-ends need to be folded (as shown in photo 10) - that is, we put our finger on the corner of the ear (the one where the fold angle is) and press this edge of the fold to the edge line of the module. And as a result, our ear flattened out (as in 11 photos).

Now look at our module has 2 layers - 2 triangular halves lying one on top of the other. We take the upper triangular half and put it in the POCKET on the lower triangular half (there is just such a wonderful pocket (photo 12, 13).

There was a small touch left. Modify the shape of the ears sticking up above the module so that the ears look like rounded hills at the top of the heart.
First, we bend the rectangular ends of the ears - so that the ears begin to have a terangular shape (photo 14)
And now that the ears have become triangular, you need to smooth out the sharp corners of these triangles. That is, bend them down (as in photo 15). And all the valentine's with your own hands is already ready - we turn it over to the front side.

You will find even more paper heart folding techniques on our website in a special article.
And we continue...
VALENTINE ENVELOPES
With your own hands from paper.
And here you will find ways to make a heart-shaped envelope from thick paper or cardboard.
On a sheet of cardboard we draw a template for a future Valentine, as in the photo below. You can copy the picture or draw it yourself according to the model. Sizes can be any (for your task) - the main thing is to keep the proportions. That is, the width of the half of the heart should match half the width of the central rectangle of the envelope itself. All other sizes can be any under the size of your letter.
In such a valentine envelope, you can put little present like earrings. Prick earrings on cardboard in the form of a heart (for example, from beautiful velvet cardboard) - make two holes and put earrings into them. And put this velvet heart with earrings inside such an envelope. Healthy and beautiful.

You can make the envelope simpler. Here's one. Cut out a heart from cardboard or thick gift paper. Draw a rectangle inside the heart - so that the HEIGHT rectangle and HEIGHT zones above m were EQUAL.
That is it is not necessary to copy this template exactly from the computer- you can draw a heart of any size and shape yourself (thick or elongated - it doesn’t matter). The main thing is that the height of the rectangle should be equal to the height of the zone that is located above this rectangle. And everything else doesn't matter. You will get an envelope in any case.

And you can also make a valentine letter with your own hands inside closed paper boats. Fold a sheet of pink (or beige) paper in half. And we put the stencil of the palm so that the fold line falls on the back edge of the palm. We circle the stencil - cut out two layers of paper along the contour at once, without unfolding. And when the silhouette is cut out, we unbend the folded stencil - and we get two open palms. And inside the paper heart we paste (folded). We write a love note or kind words to a loved one on a paper heart.

And when we want to make a gift for Valentine's Day, then the envelope will not be enough. We need a whole box so that we can put a three-dimensional object (souvenir or gift) in it.
So let's see what simple valentine boxes we can cut and fold from a sheet of cardboard or flat paper.
VALENTINE BOXES
How to DIY
Heart shaped boxes.
Here is the first version of a simple heart-shaped box that is easy to make with cardboard. You can see a stencil template for such crafts for Valentine's Day in the diagram below.


And if the same template is slightly changed. Then you can make just such a Valentine in the form of a box - with double entry of one box into another. The stencil will be exactly the same - with only one nuance - in it the lower corner of the heart should be DIRECT - that is, have 90 degrees. And the intermediate walls (between the hearts) should not have a pointed bottom - but instead they should have the same straight walls as the top). Now I will try to draw such a diagram for this template so that it is easy and understandable for everyone.

To make everything clear, I drew a diagram below. You can see for yourself that the stencil differs little from the previous template - only the walls between the hearts are rectangular (and not triangular) and the hearts themselves have an angle of 90 degrees (so that they can be closed by thrusting into each other).


Therefore, go to this thematic article to learn how to quickly and easily make such boxes with your own hands.
And since I started about heart boxes, I need to tell you a little about what you can put in them. Here below beautiful ideas original FILLINGS-CRAFTS for these valentine boxes.
You can put toy hearts in the box crochet. For example, in the form of delicious puffy donuts, decorated with knitted icing and beaded sprinkles. Such toys can be used as pendants on Christmas tree- that is, they will faithfully serve your family for a long time in every New Year's celebration.


You can bake real gingerbread hearts from dough, cover them with jelly red icing and decorate with white egg white and powdered sugar icing

Any recipe for gingerbread dough will work for such sweet valentines. We bake heart-shaped gingerbread. Cool down. In a saucepan we breed red jelly azure. Gelatin 40 grams soaked in cold water 100 grams, into which 1 packet of food coloring was thrown. After swelling of the gelatin, heat the mixture in a water bath, but not to a boil. Immerse the whole gingerbread in this icing, with tweezers and put it on a dish in the refrigerator to solidify.

What if you don't like baking? You can buy ready-made square cookies in the store and decorate them with sweet mastic. Mastic dough is made in 1 minute - we buy Marmeloshow marshmallows in the store, heat them in the microwave - we get a sticky mass that looks like plasticine. We pour powdered sugar on the table - and in this powder (as if in flour) we knead our marshmallow dough. We get ready-made sweet mastic, from which you can fashion decor for cookies for Valentine's Day

We take a part of the mastic dough and roll it out with a rolling pin - cut out squares from the rolled sheet to the size of the cookies. We glue the squares on the cookies. We roll part of the dough into thin sausages - these will be the seams of the envelope. And we mix part of the dough with red food coloring - we sculpt hearts from it, decorate our sweet envelope. If there is no food coloring - it does not matter.- hearts can be cut from red marmalade.
Such sweet Valentines with your own hands can be made on the basis of waffles, cookies, cupcakes. We buy ready-made flour products and decorate them with sweet mastic from Marmeloshow marshmallows melted in the microwave (our Soviet marshmallow is not suitable - only bourgeois rubber).
Valentine's cards
With my own hands.
And here is a classic school paper heart craft. Wicker valentine in the form of a checkerboard weave of strips, threaded one through one.

This is how such a heart is made. We fold a white sheet of paper in half - cut out a HALF OVAL with scissors. We cut three or four, or five cuts at the oval - from the fold line and deep into the oval without going with scissors into the area of \u200b\u200bits round top. We do the same with the red sheet of paper. And then we thread two modules alternating its strips, as shown in the diagram below.

This simple classic craft has found a lot of creative interpretations. Depending on the curvature of the strip - we can get a different weaving pattern ...

Let's see how it goes. If we modify the wicker module like this with rounded tubercles, then we will get a wicker heart with a pattern in the form of many small hearts.

If on the four lines of our module we make recesses in the form of 2 round ears on the left and 2 ears on the right. Then, when adding a valentine with our own hands, we will get a flower with four petals in the center.

And if there is only ONE tubercle - and only in one direction - then we will get a HEART SILHOUETTE in the center (as in the photo below).

We can try to be a creator ourselves and draw our braid lines at random. Assemble a Valentine craft and see what an unexpected pattern will come out in the end.
Moreover, we can decorate not only the wicker part of such a valentine with our own hands - we can also decorate the round EARS of the heart with curly carvings (as is done in the photo below).

DIY Valentines
TIERED ABUNDANCE.
Here's a Valentine's card that I really like. She looks very chic and rich. And it's very easy to do. Therefore, this valentine can be a topic for a lesson in kindergarten or a craft in the classroom at school.


Below I show the module for valentine-LADDER in three tiers.

We take a sheet of cardboard. And we fold it in three layers - that is, in a triple fold. Then we expand this sheet. And cut it in half - diagonally. The angle of inclination can be any (this will not affect the essence of the craft). And then we supplement each such oblique strip with cuts. In each of the three folded parts of the strip, we cut it EXACTLY IN THE CENTER, reaching with scissors somewhere to the middle of the thickness of the strip.
The incisions of the strips are different - pay attention - in one strip, the incisions go with alternating bottom, top, bottom. And in the second strip, on the contrary, the incisions alternate like this - at the top, at the bottom, at the top.

Then our walls are dressed with these slots into each other. And we get the backbone future crafts handmade valentines. And on this wicker base we stick hearts, flowers, lace, rhinestones and other decor made of paper and cardboard.
And it is not necessary to make three folds on this module. The accordion can have as many walls as you like - 4, 5, 6. The more, the more tiers with a hearty decor such a ladder craft will have.
Valentine pendant
Framed by hand.
You can do very simple craft for Valentine's Day. We bend a sheet of white cardboard in half like a postcard. In one half we cut a square window so that the half becomes a frame for the future Valentine crafts. And now, inside such a vertically placed postcard, we hang a double heart made of cardboard.

We cut out two hearts from cardboard and hang them on a thread, piercing one and the second heart with two stitches.

Valentine crafts
Cardboard with paper flowers.
These are the ideas for DIY Valentines we have collected for you in this article. Good luck with your creativity, the way you get original crafts.
Olga Klishevska, specially for the site
If you liked this article
And you want to encourage our author, then you can send any amount convenient for you
to his personal wallet Poison wallet - 410012568032614
You can make a Valentine for February 14 with your own hands. This article offers many interesting options for creativity.
Valentine - obligatory attribute of the holiday of all lovers on February 14. Even if you do not give a gift to anyone on this day, you must give a valentine to your loved one, a friend, a parent, or even a stranger. Not giving a Valentine on Valentine's Day is Bad sign dooming you to loneliness and misunderstanding throughout the year.
In modern stores, a person can find a wide variety of valentines: large and small, postcards and flyers, in the shape of a heart or a rectangle, decorated and simple valentines. But, all of them are exactly the same, as they are the product of the work of printing publications. What is the best way to give and receive as a gift? handmade valentine.
A handmade valentine is product of incredible beauty, as well as a real, sincere declaration of love. Don't be afraid to make your own postcards, because The activity is fun and creative. You can make any of your fantasies come true. To help beginners and professional needlewomen come famous decor techniques:
- scrapbooking
- Craquelure
- quilling
- Decoupage
- Embroidery
- Application and more.
Before you start your work, you should definitely familiarize yourself with the ideas of creating valentines with your own hands in order to understand and decide for yourself which one you want to see the future postcard. After that it is desirable draw a tentative design on a draft, pick up and get to work.
One of the most popular card decorating techniques is quilling. quilling- it is a kind voluminous application from thin colored paper ribbons twisted into a coil and glued to the surface.
With quilling, you can create patterns and drawings of incredible beauty: monograms, floral motifs, figurines, even writing words. You will need to work quilling set(a thin wooden stick and a set of colored ribbons), as well as glue with which you will attach the pattern (usually hot or rubber glue is used, as well as instant drying glue).
Quilling valentines:
Valentine's card with floral quilling motifs  Openwork valentine in quilling technique
 Simple and stylish quilling valentine
  Valentine card - a postcard decorated using quilling technique
 Unusual valentine in the technique of quilling "seals"
  Pattern on a quilling valentine card
Another spectacular and popular idea for creating a festive valentine is voluminous postcard. This method allows you to make a real work of art from a simple sheet of paper or cardboard. All you need is a base for a valentine, scissors and a pattern by which you can cut out the pattern.
In addition to the three-dimensional pattern, the postcard can also be decorated with ribbons, pebbles or beads, sprinkled with sparkles or glued paper appliqué with drawings. They will add special meaning and charm to the postcard congratulatory inscriptions, printed on the printer, cut and glued.

 Valentine card with voluminous hearts
  Options voluminous postcards on February 14
 Valentine's card with three-dimensional figures and a pattern
 Valentine's card with a three-dimensional inscription
  Postcard for February 14 with a valentine inside
 One of the most beautiful technician for needlework - scrapbooking. Postcards made with the help of are of incredible beauty, an abundance of decorative ornaments and special elegance. In addition, this technique is not difficult and all it requires is your inspiration and imagination.
You will need a lot in your work. various decorations, which can be found in any art store ribbons, beads, lace, beads, gold and silver threads, inscriptions, flowers, pictures, golden dust and sparkles, as well as much more.
Before starting your work, you should get acquainted with ideas and examples of ready-made valentinos and only then proceed to create the design of your product. Sketch a tentative sketch of the finished postcard on the draft, taking into account all the decor you have. All decorations should be attached to the base with “powerful” glue (hot, rubber or instant dry glue).
Scrapbooking valentine ideas:

 Valentine's card in the shape of a heart, scrapbooking technique
 Beautiful valentine in scrapbooking technique
 Easy Scrapbooking: Valentine Ideas
 Stylish scrapbooking valentines
 Postcard decorated using scrapbooking technique for February 14
 Do-it-yourself valentines - master class: photo
There are many options and ideas for creating holiday valentines: from simple to complex. Enjoy great popularity hanging valentines, that is, those that can be received as a gift and hang on the wall, as well as any other surface.
You can make an uncomplicated, but very effective hanging valentine card from a set simple materials and tools: red cardboard, pink colored paper (or pink quilling ribbons), scissors, glue and a wooden skewer.
Cut out a heart of your preferred shape and size from cardboard (postcard or just a figurine). The quilling ribbon should be cut on one side many times (see photo). Gradually wind the quilling serpentine onto a thin skewer, smearing each turn with PVA glue. The finished flower should be removed from the skewer, crush its base so that it finds a flat bottom.
IMPORTANT: The flower is attached to the postcard with PVA glue. You can attach flowers to the entire area of the cut out heart, you can decorate only the edges, or even “write” a three-dimensional word.

 Do-it-yourself step-by-step postcard from paper and cardboard
 If you are not good at needlework, but want to make a beautiful and elegant Valentine, drawing will help you! Postcards "in the spirit of minimalism" are very popular lately. The main thing is to make a bright accent that compensates for the “emptiness” of your product.
For work you will need:
- A sheet of thick cardboard, you can with a pattern. This will be the basis for the postcard.
- Sheet of paper (any, for the template)
- Paints for drawing (any)
- Tassel or heart-shaped signet
Work step by step:
- From a sheet of cardboard, fold a postcard-book
- Cut out a heart shape from paper. To do this, you just need to fold the sheet in half and cut out half of the heart. Opening the leaf, you will get a proportional heart pattern.
- From another sheet of paper or cardboard, cut out a small heart and glue a match to it. This will be a signet - a tool for leaving a drawing.
- Overlay the cutout heart template on the front of your postcard.
- In the palette, dilute the paint of red and pink.
- The resulting print should be dipped in liquid paint and leave a pattern inside the template. If you do not want to make a print, you can draw hearts with a regular brush.
- Press the template firmly against the card so that the ink from the print does not flow under the paper and leave streaks.
- After you print a large number of small hearts, remove the template and wait for the paint to dry completely.
- When the drawing is dry, sign the postcard. Valentine is ready!
 Do-it-yourself Valentine card from simple materials
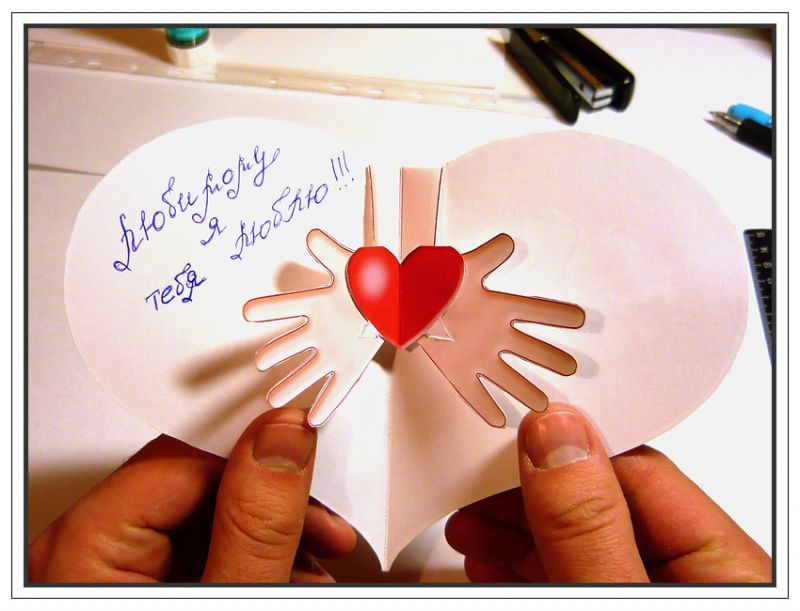
 Valentine - heart in hands with your own hands
Valentine's card "heart in hands" is very popular because it is a fairly simple product, but at the same time a spectacular postcard. You can make such a postcard, both from plain paper and from cardboard.
You will need the following materials and tools:
- A sheet of cardboard or paper.
- Paints or felt-tip pens for coloring Valentine.
- Scissors for cutting (preferably nail scissors - they will help to cut out each element in detail).
- Simple pencil drawing pattern.
Step-by-step work on creating a valentine "heart in hands" and a template for cutting:

 Work description
 Template for cutting
 IMPORTANT: Ready product can be decorated to your liking with any decorations and ways. Be sure to sign the valentine inside with your hand.
 Finished product: valentine "heart in hands"
 Do-it-yourself valentines from paper to school: templates
Together with your child, you can make beautiful and original valentines out of paper for a contest or just to give them to your friends. Such postcards will be much more beautiful than purchased ones and it will be a pleasure for every classmate to receive them.
For example, try making a simple paper card out of a single piece of paper or cardboard. Cut it out according to the template and color it as you wish. Sign with your hand or stick a printed inscription. If desired, you can sew a ribbon-loop to the card so that the Valentine can be hung.

 A simple paper valentine for children and adults
 Ordinary sewing or knitting threads can also serve as a great idea for creating a festive valentine card. Use a sheet of cardboard as a base. Its front part will be decorated with a heart. For work, choose contrasting colors, for example:
- White paper - red thread
- Red paper - white thread
With PVA glue on the front of the postcard, draw a heart. It is convenient to do this with a brush. You should apply a thick layer so that it does not have time to dry. Unwind the thread in advance and gradually, layer by layer, lay the thread on the glue to get a lush and tangled figure. On the other hand, if you use knitting thread, you can carefully lay out each stripe and get a beautiful figure.
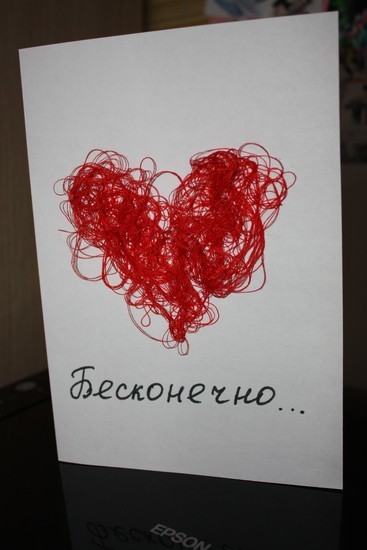
 Finished product: a valentine with a heart made of threads on paper
 With the help of a thread and paper appliqué (colored, craft or even packaging), you can create great amount options for greeting valentines. Here are some examples:

 Paper and thread valentine: heartbeat
  Valentine card from two sheets of paper: applique
 Postcard-book for February 14 from colored hearts and thread "brushwood"
 As a decor for a paper card, you can use any decorations: beads, ribbons, coffee beans, eggshell(craquelure), felt, fabric, lace and more.

 February 17 paper card decorated with coffee beans
 If you have the opportunity to buy cardboard or art paper, you can create cards of incredible beauty. As a rule, such paper has a variety of patterns, prints and patterns.

 Paper valentines for friends
 SECRET: If you do not have such paper, you can print it on a printer. To do this, in the browser search engine, type in “background February 14” and select any picture. Or, use the suggestions in this article.
 Background: paper hearts
  Background: lettering for Valentine's Day
 Ideas for creativity: background for February 14
 Background: blue with hearts
  Background: white with hearts
  Background: painted hearts
  Ideas for creativity: a calendar for February 14
 Do-it-yourself valentines from pattern fabric
If you want to move away from the stereotypes and patterns of familiar paper cards, ideas for creating fabric valentines will help you. A modern valentine does not have to be in the form of a booklet or a leaflet. Why not sew it from felt or textiles?
Such a souvenir will be able to pleasantly surprise the person to whom you give it. The most common form of a fabric valentine is a heart, because it is a symbol of the holiday and the person in love. This souvenir can be hung anywhere in your home and stored, regardless of the calendar date - it will always please the eye and give pleasant emotions.

 Variety of fabric valentines
 How a fabric valentine should look like is up to you. The most common are:
- Keychains in the form of hearts, bears or birds
- pendants
- pads
- Wreaths on the wall
- Toys

 Different types fabric valentines day
 Patterns of valentines from fabric:

 Valentine cat: pattern
  Mouse-Valentines: patterns
 Heart-Valentine: pattern
 DIY fabric heart using decoupage technique
 Valentine cat: pattern
  Valentine: pattern
 Do-it-yourself valentine for mom: ideas, photos
Children love Valentine's Day very much, not because they are in love with someone, but because on this day you can tell your mother how much they love her. This is done not only with the help of words, but also by means of a beautiful homemade valentine.
There are several bright and original ideas make beautiful valentine. For this, thick paper and some decorative elements(beads, ribbons, lace and more).
A simple but very touching postcard is obtained from one sheet of paper and scissors. To do this, you need to use a two-way colored paper. Fold the sheet in half and place your hand on the front of the card. Circle it with a pencil.
IMPORTANT: The circled hand on one side must necessarily touch the fold of the postcard, it does not need to be cut, it will fasten the valentine.
When folded, the card will only look like a hand, but when mom opens it, she will see a heart depicted by two hands and this surprise will please her. In addition, you can write wishes and declarations of love on the inside of the card.
 A simple DIY valentine for mom
 Another way suggests you to do hanging postcard, which you can decorate the house on a holiday. For this valentine you will need:
- Three sheets of colored paper (for example, pink, red and white).
- Glue (preferably dry glue stick)
- Scissors
- Small thin ribbon
Choose a color for the base of the card and cut out a big heart. On the other two, you should trace your hand with open fingers as carefully as possible. Both paper hands are cut out and superimposed on each other so that a heart is formed.
Do-it-yourself valentine from children's handsIMPORTANT: Before gluing the heart from the cut out hands to the base, insert a thin ribbon in the form of a loop under them.
Other ideas for creating baby valentines:

 Paper valentine decorated with buttons
 Valentine applique
  Valentine card with colorful hearts
 Do-it-yourself voluminous valentines: ideas, photos
Volumetric postcards can be divided into two main types:
- Postcards with three-dimensional decor
- Surprise cards
In the first case we are talking about the unusual decoration of the front of the product: flowers, figurines, lace, and so on. The easiest way to make a pattern using the quilling technique is the most affordable and easy-to-use decor.
With the help of paper strips, you can write words, make lace patterns, hearts, flowers and any shapes. The contrasting use of colors will help to make a postcard of incredible beauty.
The most spectacular and not complicated will be a postcard, decorated with simple serpentines made of thin strips of paper. Just draw or cut out a certain shape and seal the space inside it with twisted ruffles.
 Volumetric valentine labeled "love"
 Volumetric valentine with a heart in the form of a serpentine
 simple voluminous valentine
 Do-it-yourself valentines with children
By creating valentines for children and adults together with your child, you teach him not only that this holiday should be respected and honored with its traditions. But, and instill in him a love of creativity.
Spend enough time to create really beautiful postcard on February 14. Surprise the child unusual ideas valentines. Show how diverse and creative creativity can be.
- Valentine's Topiary
- Valentine card with envelopes (in which you can place surprises or ordinary compliments on notes).
- Valentine cards decorated with appliqués, ribbons and decor.
- Valentine frames on the wall
Valentine ideas:

 Valentine's Topiary
  Valentine's card with envelopes
 Valentine card with decor and applique Valentine card - frame on the wall
 Video: "How to make a beautiful valentine for Valentine's Day. - Postcard for February 14"
Helpful Hints
Do you want to prepare a surprise for your loved one?
You can look for a gift, but a hand-made congratulation is unique.
To find out how you can make a congratulation on St. Valentine's Day, you just need to have a certain amount of materials from which a valentine will turn out.
You don't need to have special qualities to make a valentine - here you can make sure that beautiful does not mean complicated.
Paper valentines with your own print and patterns

You will need:
Potato
small knife
acrylic paint
Heavy paper or cardboard, or watercolor paper
simple pencil
tassel
thick thread
1. Take a potato and cut it in half.
2. With a simple pencil draw a heart on the cut.
3. Take a knife and cut out the excess to make the heart stand out.
4. Prepare the paint and brush and apply the color you want to the eye-catching heart.


5. From thick paper, cut out the size of the rectangle you need - this will be the basis for your valentine. It is better to use watercolor paper, because. the printed heart will look better on it.
6. For another pattern, prepare a thick thread and wind it around a piece of plywood or other small object with a flat side. Next, apply paint to the thread and you can leave prints on paper, as shown in the picture.

7. From paper with striped patterns from a thread, cut out hearts.
8. Prepare the base for your valentine (a rectangular sheet of thick paper) and leave a heart print on it. After that, glue one or more cut out paper hearts with a thread pattern.


* You can make several similar valentines and give them to several people. Try experimenting with shapes, colors and patterns. Don't forget to write a message on your valentine.
Valentine card with a heart made of wax crayons

You will need:
Scissors
Colored paper (patterned paper)
Stationery knife
Baking paper

1. Turn on your iron to heat up.
2. Prepare some wax crayons in similar colors (red, pink, orange)

3. On a protected surface, start cutting the crayons into small pieces. Do this on the non-pointed side of the crayons so you can still draw with them.

4. Cover the surface with a towel and lay square baking paper on it. On paper you need to pour out small pieces of wax crayons. Do not put too many pieces, as long as they are closely pressed against each other. Cover these pieces with another square piece of baking paper.

You can use the tip of the iron to gently spread the crayons over the surface of the paper.
* You can make several similar blanks.
5. Take a heated iron and gently, barely touching the surface of the paper, start melting the crayons under the paper. It only takes a few seconds to hold the iron over the same place.


6. Set the blanks aside and let them cool.
Preparing postcards:
From thick colored paper, make a blank for a valentine. You can just fold the paper in half.
Use a utility knife to cut a "window" in the center of one of the halves of the paper.
Prepare a thread and blanks from melted crayons. From the blanks, with the help of scissors, cut out hearts and glue to them along a short thread. For one postcard, you need 2 hearts that need to be glued together, and a thread will be fixed between them.

* To make all hearts the same size, make a template on separate paper and circle it with a pencil on each blank.
* You can use a utility knife to trim the hearts.

Cut out small hearts from paper.
Now you need to glue the blanks from the crayons to the valentine. To do this, just glue one end of the thread glued to the heart of melted crayons to the top of the "window", and to make it more beautiful, just cover the glued thread with a heart cut out of plain paper.

* Instead of a paper heart, you can use a sticker in the form of a heart or something suitable for the topic.

Beautiful valentines from sequins on a thread

You will need:
Heavy paper
Sequins on a thread
Scissors
simple pencil

1. Prepare thick paper of any color and fold it in half - this will be your blank for a valentine.
2. Use a pencil to write any wish, a short message, the name of a loved one or a simple picture on paper.

3. Circle each letter or shape with glue.

4. Start gluing sequins to the workpiece and let the glue dry.

5. Cut off the excess with scissors.

6. Now inside the Valentine you can write any message.


* If you wish, you can decorate the Valentine with sparkles, stickers, etc., the main thing is not to overdo it - everything should be in moderation.
Do-it-yourself valentines from paper. 8 bit heart.

You will need:
Stationery knife
Ruler
Colored paper (white, red, pink, lilac)
1. Prepare a small sheet of white paper and make several even cuts on it, as shown in the image.
2. From colored paper, cut thin strips of the same width and length.

3. Insert each strip as shown in the picture - you should get something like this beautiful heart. You can secure each strip with a small amount of glue.
You can also glue this valentine on a piece of thick paper (A4 paper folded in half).
It remains only to write your message.
Valentine's cards with favorite poems

You will need:
Wrapping
Notebook sheets (you can use any thin sheets)
Scissors
Thread and needle (you can use a sewing machine)
Buttons (in this example, heart-shaped buttons)
1. Cut out the cover for a postcard from cardboard.

2. From thin paper, cut out several pages for a notebook.

3. Sew the pages to the cover.

4. You can decorate the cover with wrapping paper by cutting and pasting it.
5. On one and the other side of the cover, sew on one button and tie a thread.
