Volumetric crafts papier mache. Papier mache. Master classes with photos for beginners. How to make the material more durable
Papier-mâché stands out due to its versatility and originality. In this article, we will talk about the rules for making papier-mache mass at home, as well as how to make the simplest, but very beautiful things in this way.
In contact with
Classmates
To make some souvenir, or simply useful thing, it is not necessary to have any specific skills or be a master potter. It is enough just to stock up on a lot of unnecessary newspapers, and you can start creating.
Let's take a closer look at how to make a mass of what is at hand. Thanks to these recommendations and videos, you can easily learn the main points of this case and understand all the complexities and nuances.
A bit of history
What is papier-mâché? This is such a kind of homogeneous mass, which is created from newspapers and other paper waste with the addition of glue or any adhesive. If you translate this name from French, then it will sound like "chewed". For the first time this mass was used in the XVI century in France. Then dolls were made from this mass, which gained incredible popularity. Papier-mache appeared on the territory of Russia only during the reign of Peter I. In industry, paper pulp began to be used at the beginning of the 19th century.
You can make a lot of interesting crafts and products from papier-mâché. Such products are very light and quite durable. Previously, the mass was used only to create dolls, but years later they began to make dishes, souvenirs, masks, toys and various elements from it. Currently, papier-mâché is widely used in theatrical art. Even models and theatrical props are made from paper pulp.
Do-it-yourself papier-mâché: techniques for creating mass
There are currently three ways creating a mass of papier-mâché with your own hands:

Preparation of material for papier-mâché
Any papier-mâché product begins with the preparation of the necessary material. The first is the paper itself. For the first time, it is recommended to use a newspaper, as it quickly soaks, and the finished product will be more durable. You can also easily work with plain paper napkins or toilet paper. The following materials can also act as the main material for the mass of papier-mâché:
- egg packaging;
- Cardboard;
- Corrugated cardboard.
 As the adhesive composition, ready-made glue is most often used. As a rule, this is PVA glue, which is diluted with water in a ratio of 1: 1. At home, as a sticky substance, you can also use starch, flour, from which you need to make a paste. The density of such a paste will depend on experience and the type of crafts being made.
You will also need a base or mold for modeling and vegetable oil, which lubricates its surface. This is done so that the mass does not stick to the form. In addition, it will be required acrylic paint or varnish for exterior decoration. If there is no such paint, then gouache and PVA glue can be mixed in equal amounts. Such a composition is easy to wash off the surface of the craft when it has not yet completely dried. And when the composition is completely dry, it does not smear even during the application of other layers.
How to make papier mache?
Before starting paper work, you need to make a paste. To do this, boil a small amount of water. In a separate container, mix 2-3 tablespoons of flour or starch with water until a homogeneous mass is obtained. Pour the resulting composition in a thin stream into boiling water and heat until thickened. The more starch or flour, the thicker the paste will turn out. It will be much easier to prepare the glue. To do this, pour the right amount of glue into the bleaching container and add the same amount of water, while stirring thoroughly.
After that, you can start shredding paper or newspaper. This stage of work is very painstaking, but how finely the paper will be torn, further work on future craft. Small pieces of material must be poured with hot water and let it brew for several hours. After that, all the liquid is drained, and all the paper is crushed into a homogeneous mass using a mixer. . If the mass is too liquid, then you just need to throw it in a colander and squeeze it well with your hand. This technique applies to any material used.
The dust that will eventually turn out is mixed with glue to the state of plasticine. After that, the mass must be allowed to rest. If modeling is not planned immediately, then the mass can be stored in a tight plastic bag in a cool place. For those who have not yet fully understood the principle of preparing a mass of papier-mâché, the video is provided below.
 To make the final product more durable, do not be lazy to make as many layers as possible. This is especially true for the manufacture of plates. It is also recommended to wear gloves during operation so that the glue does not dry on the skin, and the product will stick to the hands.
Don't be afraid to experiment using various materials. So you will gradually find something with which it will be easy for you to work constantly. The base, as mentioned earlier, must be covered with vegetable oil so that after drying it can be easily removed from it. Paper for the mass must be torn by hand, and not cut into even pieces. This is the only way to break the connection of the fibers, and the mass will become more homogeneous.
As for papier-mâché coloring, then if the product is planned to be white, then only the last two layers are made of pure white paper. In other cases, the craft can be painted in any color. If you cover the product with varnish, then it will be protected from moisture.
During operation, the work surface must be covered with film or newspapers, since the glue is then poorly washed off. Do not rush to apply the next layers without waiting for the previous ones to dry completely. You also need to start painting. only after complete drying of the product.
DIY papier-mâché crafts: master classes
And now let's get acquainted with the master classes of some do-it-yourself papier-mâché crafts. These crafts can decorate your home. They can also be given as a gift to your loved ones. And jewelry made by hand from papier-mâché will complement your look.
Master class on making papier-mâché plates

Master class on making a papier-mâché mask

Master class on making papier-mâché beads

According to this scheme, you can make with your own hands not only beads, but also bracelets, necklaces and even brooches. It remains only to show a little of your imagination.
taken here expert.urc.ac.ru
The production of papier-mâché products is usually carried out according to special samples - models. Various factory-made items can be used as such samples: teaching aids, models, toys, masks, household equipment, etc. In most cases, special models molded from clay,% plasticine are used to make papier-mâché crafts , paraffin and other plastic materials. Most often for the manufacture of models in works with papier mache use clay material is very common and cheap. Stacks used in modeling clay models.
From clay, according to a pre-prepared sketch or sample, a model is molded - the original, the shape of which they want to accurately reproduce from papier-mâché. To make a model, it is necessary to take a solid lump of well-mixed clay that is quite sufficient in size in order to mold the entire model out of it. In cases where the model must have big sizes, as well as when sculpting models that have separate, far protruding parts, a wire or wooden frame is embedded in a lump of clay taken for modeling.
1 It should be noted that papier-mâché is often misunderstood as all sorts of paper plastics, in which the paper is pre-crushed mechanically or boiled into individual fibers and mixed in a powdery or mushy state with adhesives and other fillers into a homogeneous plastic mass. This mass is used to fill molds and after drying becomes hard and durable.
Usually, the original is first molded from clay by hand, and only after the general shape and the relative position of the individual parts of the model have been more or less accurately outlined, the details are worked out using stacks. Stacks are narrow spatulas of various shapes made of dense wood or metal.
With long breaks in sculpting a clay model, it must be wrapped in a wet rag, which must be kept moist all the time.
It is very convenient to sculpt small models in the conditions of the "Skillful Hands" circle from plasticine - a special wax plastic mass. Before work, the plasticine must be well kneaded by hands, and when sculpting models from it, use metal stacks, which are slightly heated from time to time.
For the manufacture of small models, paraffin is also used, from which each time a blank is first cast, roughly resembling the future model in its contours, then the model is finished with a knife and heated metal stacks.
Production of products according to models-forms.
Depending on the purpose, size and circulation of the product, and often depending on the availability necessary materials, the technology of its manufacture from papier-mâché is chosen. If single specimens are needed, and their dimensions are relatively large, then in many cases it makes no sense to spend time and materials on the manufacture of special forms: the product can be pasted directly on the clay model - the original. The model serves as a form at the same time.
The model-form is covered entirely in one or two layers with pieces of moistened paper, which are pressed with a cloth or a piece of rubber sponge to the surface of the mold to ensure a snug fit 1* to eliminate all air bubbles. Then the entire surface of the model is laid out layer by layer with small pieces of damp loose paper, coated on one side with a paste.
So that the clay from which the model-form is made does not get wet when pasted with paper, the surface of the model must be impregnated with drying oil, any vegetable oil, or covered with a thin layer of a special paste, which is a solution of stearin in kerosene. The manufacture of stearin-kerosene paste is described below.
it is convenient to use purchased plastic baths as model-forms. Clay flower pots can serve as molds for making papier-mâché decorative flower pots. Old papier-mâché toys are often used as molds for making the same homemade toys.
In order to avoid gluing the listed models-forms with papier-mâché, and also so that these models do not deteriorate from the moisture contained in the clay, their surfaces are pre-coated with varnish, a thin layer of stearin-kerosene paste, vegetable oil or melted wax, paraffin or stearin . The first layer of moistened paper is laid out on the surface of the model-form without lubrication with paste. After the layer of papier-mâché applied to the model-form dries so much that the product can be separated from the mold without fear of deformation, it is removed and dried well in a warm, but not hot place.
With the method of manufacturing products described above, the papier-mâché layer is adjacent to the model, which serves as a form, with its wrong side. Therefore, the front surface of the product only approximately reproduces the original. In order for this reproduction to be as accurate as possible, in the process of gluing the individual layers of papier-mâché, it is necessary to strictly ensure that their total thickness is the same everywhere.
Manufacture of products on skeletons, frames and blanks
In terms of technological methods, the above-described method of making papier-mâché products according to model-forms is very similar to the method often used in “Skillful Hands” circles, which comes down to pasting a special cardboard frame with ten to twelve layers of paper. So, for example, when making a papier-mâché box, you can make the right size cardboard box and cover it, layer by layer, with paper. After drying, with the help of priming, puttying and grinding, the box is given the correct geometric shape, and it is painted or painted with oil paints, enamels or nitro paints.
Cardboard cores are also used in the manufacture of many three-dimensional layouts in geography; this technique speeds up work and helps to save materials and significantly lighten the weight of the finished product. Figure 138 shows a model of a volcano made on a cardboard frame.
In cases where the product is large and has a complex configuration, papier-mâché can be glued on a frame made of any material suitable for this purpose: wooden bars and slats, plywood, wire, cardboard, etc. * Such frames are usually made on special shields or boxes with low walls.
Making from papier-mâché various crafts with strict geometric shape, carried out, as a rule, using blanks of the appropriate form. Such blanks are made from dry, not knotty wood. Their surface is well cut and painted with waterproof paint, nitro-lacquer or oil varnish.
When making a product from a blank, the latter is lubricated with oil or stearin-kerosene paste and wrapped with one or two layers of paper. Then, layer by layer, the blank is pasted over with paper and, having brought the layer of papier-mâché to the desired thickness, left to dry. The dried blank is removed from the blank, its surface is cleaned with a rasp and sandpaper, and further finishing is carried out. To make it easier to remove the workpiece from the blank, it is useful to cut the latter slightly “on a cone”, and to remove small chamfers along the edges of the blank.
mold making
If according to the existing original - a model made of clay, plasticine, paraffin, etc. - it is necessary to make several identical copies of papier-mâché and these copies must accurately reproduce the model, then molds are made from this model.
Forms are imprints of models in gypsum, wax, paraffin, stearin and other materials, which for this are either melted by heating or closed with water. Hardening as a result of cooling or chemical interaction with water, these substances reproduce with sufficient accuracy in reverse general form and all elements of the model surface.
For the manufacture of molds, finely ground burnt good quality gypsum. Good gypsum is elastic and oily to the touch, does not contain foreign inclusions and grains, and does not stick to the fingers. Being closed with water until a solution of sour cream density is obtained, gypsum forms a solution that well fills all the smallest details of the model surface. This mortar quickly thickens, sets and hardens, forming a shape that is relatively easy to separate from the model.
The advantages of gypsum as a material for molds also include the fact that after hardening it is quite strong, well processed and glued.
The mold casting for each papier-mâché product should be made in accordance with its size and configuration. For planar products, such as, in particular, many geographical layouts, various bas-reliefs, cartouches, etc., molds are made that are open on one side. They are usually called simple, or single-leaf forms. Such forms are slabs of one size or another made of gypsum, alabaster or other materials. On one side of each plate there is an exact imprint of the model - a form for making a papier-mâché product.
Casting single-leaf molds from gypsum or alabaster, if the models do not contain figured parts that could prevent the removal of the finished cast mold from them, is relatively simple.
After the model is prepared for mold casting, i.e., lubricated with vegetable oil or a solution of stearin in kerosene, a gypsum mortar is prepared. To do this, gypsum powder is poured into a cup or bowl of water, distributing it evenly over the entire surface of the latter. With the help of a wooden spatula, without lifting it from the solution and avoiding shaking, which leads to the formation of air bubbles in it, quickly mix the solution.
Freshly prepared gypsum mortar should resemble cream in density. If the solution turns out to be too thin, a little dry gypsum should be added without delay, with continuous stirring.
The prepared solution quickly thickens, and as soon as it looks like thick sour cream, it must be immediately used for mold casting.
First, a thin continuous layer of gypsum mortar is applied to the model, carefully observing that bubbles and voids do not form on the surface of the future form. Then quickly cover the entire surface of the model with a layer of mortar at least 2.5-3 cm thick in the thinnest places. It is highly desirable that the wrong side finished form It was a plane: with the subsequent use of the form for work, it is more convenient to put it on the table in this case.
The cast plaster mold is left to harden. The utensils used for mixing the gypsum must be thoroughly cleaned and washed immediately, since the gypsum in which the hardening process has begun is hardly removed from the surface of the utensils and tools. The solution prepared for molding should be completely consumed each time, because the remaining gypsum still has to be thrown away. For the same reason, it is necessary to prepare a gypsum solution for each form separately. Finished gypsum molds dry well and are completely covered with oil varnish or liquid wood glue - sizing. After repeated drying and each time before using the forms for gluing papier-mâché products, the working surface of each form must be covered with a thin layer of stearin-kerosene grease, vegetable oil, and even better - a mixture of vegetable oil with a solution of laundry soap.
Compound forms
In the manufacture of papier-mâché of some bulky products, composite, or, as they are also called, collapsible, folding or lumpy forms are often used. Depending on the complexity of the configuration of the models, such forms consist of two or more parts - flaps or pieces. When using composite forms, each sash is glued with a layer of papier-mâché separately, and after drying, all parts of the product are glued together.
In the manufacture of each sash form, it is necessary, in accordance with the nature of the model and product, to outline the smallest number of sashes. At the same time, the borders of the latter should pass on the model so that each leaf can be easily removed from the model, and individual parts of the product, after drying the papier-mâché layer, are easily separated from the corresponding mold doors. It is advisable to mark the borders of the valves so that the seams between separate parts products could be made invisible during finishing. In the manufacture of composite forms, it is necessary to take measures to accurately match each other with individual valves.
The wings of the composite form are cast sequentially, one after the other, and the gypsum mortar is prepared each time in a volume sufficient for the manufacture of the next leaf. At the time of casting, each sash must be limited along the entire contour outlined on the model, either by the side surfaces of already cast sashes, or by special temporary partitions made of tin, thin oiled cardboard and other materials.
If the model, according to which the sash mold is to be made, is made of solid material, then temporary partitions for casting individual sashes can be made of stucco clay. To do this, a long sausage is prepared from clay dough by rolling on a board, and then a tape 10-12 mm thick is formed from it. Having cut off one side of this tape with a knife and slightly wetting the cut plane with water, they encircle the model along the marked line with a clay wall. Thus, for the casting of each leaf, a closed contour is obtained.
Before casting the next sash, the surface of the corresponding section of the mold and the side surfaces of the adjacent sashes and partitions already cast are lubricated with grease.
As the simplest case for the manufacture of a composite mold, one can point to the casting of a gypsum double-leaf mold according to a small and relatively uncomplicated model made of some hard and durable material. The greased model is simply pressed into a thick layer of well-kneaded clay dough. The clay near the model is leveled with a knife and around the entire model, at some distance from it, a roller is made - a wall of clay. The upper half of the model prepared in this way is poured with gypsum mortar.
When the plaster hardens, the model, together with the cast leaf of the mold, is turned over and thoroughly cleaned of clay. The half of the model to be filled with plaster and the surface of the seam along which both mold doors will be connected are covered with a thin layer of grease, after which the second leaf is cast^
After the plaster mold is completely cast, it is given the correct shape from the outside, if possible, by removing the excess plaster on the wings with a knife. When the gypsum hardens well, the leaves of the gypsum mold are opened by inserting a knife blade into the gap between them.
Pasting forms with paper
Depending on the size and configuration of the product, strips and pieces of paper of various sizes can be used to glue the forms. The more complex the relief and the smaller the product, the smaller pieces of paper have to be used to glue it. Pasting large cylindrical and prismatic blanks in the manufacture of home-made spyglasses, periscopes, kaleidoscopes, pencil cases and other crafts is carried out with whole sheets of paper, the width of which corresponds to the length of the blanks.
It is most convenient to pre-cut paper for papier-mâché into strips 3-4 cm wide and 20-30 cm long. The strips are poured for several minutes with hot water and stacked. When the excess water drains and the paper wilts a little, it is used for layering papier-mâché, and, depending on the shape of the object, the strips are glued in their entirety or torn when sticking into separate pieces. The first layer of moistened paper is laid out without smearing with glue.
Forms are glued either from the middle to the edges, or from one edge to the other. The gluing of products is usually carried out in no less than 5-6 layers, and most often in 10-12 or more layers. In order for the work to go faster and the final thickness of the papier-mâché layer in the finished product to be uniform, it is recommended to use paper for gluing each successive layer, which would differ in color or texture from the paper used to glue the previous layer. For example, having glued the first layer of newsprint, you should use colored or smooth paper for the next one. white paper, for the third layer, you can again use newsprint or paper of a different color, etc. This simple technique allows the worker to avoid gaps and achieve a uniform thickness of the glued papier-mâché layer.
If the product has small bulges, then when gluing the mold, the cavities corresponding to these bulges are glued separately with several layers of paper and filled with small lumps of paper smeared with glue, after which the gluing of the mold is continued in the usual way.
When gluing individual sashes of a composite shape, a small excess layer of papier-mâché is created along the edges. At the end of gluing, this excess is folded inside the mold flush with the edges of the sash and glued to the inner surface of the papier-mâché layer. In this case, shoulders are formed,.
After each of the parts of the product dries, a seam line is transferred to its edges along the entire contour with a pencil or a knife. The part is carefully removed from the mold sash and finally dried. Then the edges of the manufactured part are leveled and cleaned with a rasp to the seam line outlined by the above method. If a higher accuracy of fitting to each other of the individual parts of the papier-mâché product is required, then the planes of the seams are ground with glass paper.
If the seam between the individual parts of the product lies in the same plane, then it is convenient to smooth its surface on a sheet of glass paper laid on the table front side up. In this case, the removed from the mold and dried part of the product is laid with the entire surface of the seam on sanding paper and rubbed until a good fit to neighboring parts is ensured.
Drying of the molded parts of papier-mâché products is carried out in a warm, dry room. Each product is dried first in the form, then they are carefully removed from the forms and dried, hanging on ropes or laying them out on boards.
Too fast drying of papier-mâché parts when high temperature usually results in warping, which makes it difficult to assemble the product and spoils its overall appearance.
Dried and fitted parts of papier-mâché products are glued together with hot wood glue.
Finishing papier-mâché products
When the product is dried and its individual parts are glued together, all seams and flaws on its surface are puttied with a special wooden or steel spatula - a spatula or a simple knife with glue or oil-glue putty. The puttied product is dried well again, the seams and unnecessary protrusions are cleaned with a knife or rasp, after which its entire surface is completely polished with glass paper or a piece of pumice stone.
For continuous coatings, a thicker putty is prepared than for sealing individual flaws and seams.
For puttying papier-mâché products, putties of the following composition can be used:
1. Adhesive putty
Chalk ground sifted, preferably elutriated ................ . . ... 20 parts
Joiner's glue ................ 5 »
Desiccant ................... 1 part
The chalk is kneaded with water until a thick dough is obtained, a thick adhesive solution is added and, without ceasing to interfere, is heated. After a completely homogeneous slurry is obtained, a desiccant is added and, thoroughly stirring, is heated again.
It is advisable to use this putty while it has not cooled down.
Prepare this putty in the same way as described above. Good results are obtained by adding a small amount of grated oil paint to these putties.
Oil varnish - until the putty of the desired density is obtained.
This putty dries quickly and is highly durable.
In order for the surface of papier-mâché products to be stronger, and their coloring to be juicier and brighter, as well as to reduce the consumption of paint and varnish during the final finishing of products, the latter are preliminarily primed, that is, covered with a thin layer of primer.
2. Oil-adhesive putty
Chalk ground sifted
Joiner's glue.....
Drying oils. . .......
8 parts 3 parts 1 part
3. Lacquer putty
Chalk ground sifted White zinc grated.
3 parts 1 part
The simplest and most accessible primer for papier-mâché when working with children is a very thick starch paste, which is brewed in the usual way and consists of two parts of potato starch and five to six parts of water. If, due to lack of water, the paste does not brew, it is heated in a boiling water bath until the solution becomes thick, transparent and homogeneous. Starch primer is usually applied by hand.
Easy-to-make putty is obtained according to the recipe:
glue joiner's tile ........... 8 parts
water.................. "25"
ground sifted chalk - until the density of sour cream is obtained.
For greater strength of this primer, you can add to it:
drying oils .............. 1 part
oil varnish ................ 1 »
grated zinc white .............. 1 "
If the primer is so liquid that its layer applied to the surface of the product is translucent, then chalk should be added to the primer. Glue water is added to a primer that is too thick.
Under the working conditions of the “Skillful Hands” circle, a strong and waterproof casein primer of the following composition can be used. Ordinary cottage cheese made from skimmed milk is poured over with boiling water, squeezed in a clean rag and dried in the oven. The resulting mass is ground in a mortar into powder, to which 2 to 5 percent is added. ammonia. To give the primer greater elasticity, 1-2% glycerin is added to the mass, after which everything is diluted with drying oil to the density of sour cream and mixed well. It is useful to add a little grated zinc white to the resulting primer.
After the primer applied to the surface of the products dries well, it is lightly sanded with fine-grained glass paper and painted.
For dyeing and coloring papier-mâché products made by children, oil paints are most often used, usually applied in two or even three layers. For painting masks, theatrical props, models and other papier-mâché products, refined turpentine is added to oil paints. An increase in the strength of the coating when finishing with oil paints can be achieved by adding to the paint (when applying the last
him her layer) a small amount of light oil varnish.
Good, after which the clay dough is kneaded until it stops sticking to the hands and retains its shape well. When carrying out small-sized and responsible work, it is recommended to add raw vegetable oil to the clay.
Plasticine for making small models can be purchased at stationery stores, but it is not difficult to make it on your own according to the following simple recipe:
natural wax .............. 60 parts
melted pork fat. 40 »
turpentine........ . . 100 "
dry mineral paint, finely ground ............. 30 "
potato starch .............. 125 *
Wax, lard and turpentine are carefully melted over low heat in an enamel bowl. Little by little, with continuous
Papier-mâché is an ancient art that has not lost its popularity. Try this simple creativity and find in it a source for new masterpieces!
Papier mache - simple technique making volumetric objects using paper and paste. Even with the advent of various plastic masses (super plastics), papier-mâché does not lose its popularity, remaining indispensable for some types of creativity (for example, masks). Take a brief excursion into the history of this unusual technique and find out what options exist for its application, how to make papier-mâché with your own hands, and how this activity will be useful.
History of paper art
The papier-mâché technique is time-tested, because its history goes back several thousand years! The ancient Egyptians made death masks using layers of papyrus interspersed with adhesive. In Persia, decorative items were made from multi-layered paper, including chests and goblets. Often, thin metal plates were applied over the paper layer.
The strength of papier-mâché products with a large number of layers was noticed back in ancient China- they began to use this technique for the production of armor and shields that could protect the warrior not only from an arrow, but also from a sword strike.

Repeated coating with natural varnishes added additional strength to the material. In addition, in Japan and China, ceremonial masks were made from this material, decorative elements to a military suit, items home decor(caskets, vases) and even buttons.
Often the surface of the products was covered with a glossy varnish and, thus, things that looked luxurious were obtained from a relatively cheap material. In India, papier-mâché could be found in any craft market in the form of richly ornamented household items.
From the 17th century, papier-mâché began to be actively used in France, and then in England, in puppetry - this technique was the best way to reproduce the subtle features of puppet faces. The big advantage was the high strength of the material. Unlike porcelain, the finished papier-mâché product was not brittle and was also much lighter than wood.
In the 18th century, papier-mâché became an inexpensive alternative to architectural stucco and carved wood, later this technique began to be used even for the manufacture of furniture elements (for example, the backs of chairs) and church utensils.
To this day, papier-mâché is widely used in film production and theater for the manufacture of props (models of various things: weapons, dishes, jewelry, interior items, imitation of reliefs in the landscape or architectural structures), overhead elements for make-up (nose, chin), stage details costume (headwear, masks). 
Minimum cost and maximum benefit
Papier-mache is one of the few types of creativity that will be of interest to almost everyone, because there are a lot of options for glued paper products, and the process of working in this technique does not require artistic training or certain knowledge. Despite the fact that paper is used for this type of creativity, it has nothing to do with other paper hobbies, weaving from paper tubes.
The benefits of this hobby are obvious:
- it does not require material costs;
- he does not need a large workplace;
- you can do without special skills;
- technique is an extremely simple process that even a preschool child can master;
- a wide creative spectrum (manufacturing of dolls, masks, figurines, caskets, elements for decorations, Christmas decorations, plafonds);
- suitable for making items of any size;
- finished products have high strength and do not require special care.

What you need for classes and the first crafts
As already noted, papier-mâché is a very economical type of creativity. The main thing you need for papier-mâché is thin paper and glue (PVA, carpentry, stationery, gelatin or starch paste). There are two fundamental different options this technique:
- pieces of paper are glued in layers on the finished form;
- an elastic mass is prepared from paper and paste, from which an object is formed.
Everyone can include this hobby in the list of their hobbies, and only those who do not like to quit what they started can expect success. Qualities that will be useful in working with papier-mâché:
- perseverance;
- accuracy;
- a little fantasy.
Features of layer-by-layer technique and work process
The first option (from pieces) is suitable for making masks, doll heads, figurines, boxes. The surface of the finished products can be polished, so to achieve perfect smoothness quite simply. The whole process of work can be divided into several stages.
First stage
Prepare thin paper (newspaper works well). To do this, you can cut or tear it into pieces, their size depends on the intended size of the product - for small works it can be 1x1 cm, for large ones up to 4x4, 4x10 cm. Torn paper will make the surface of the product smoother than cut.
Prepare the form on which the paper will be pasted. To do this, you can take both a ready-made object, and fashioned from plasticine or clay (for example, a doll's head).
If you are using a finished item as the basis for papier-mâché, remember that to get a three-dimensional form, you will need to cut the already finished papier-mâché into two halves to get the base form, and then glue them together. Therefore, the base can be damaged when cut. For a spherical shape, you can take balloon, which at the end of the work can be removed through a previously left hole in the layers of paper.
To make the finished papier-mâché easily separated from the base (both finished and molded), it is recommended to grease the form with petroleum jelly or wrap it with cling film before applying the first layer of paper.
Second phase
Glue the form with layers of paper. The number of layers depends on the desired thickness and strength - the minimum number is 4–5, the maximum is not limited, but already with 15 layers, the wall thickness of the product will be about 0.5–0.7 cm, so it usually makes no sense to make more than this number of layers. 
To evenly cover the form with paper, it is convenient to alternate layers different colors- so it will be clear when to start a new one.
Third stage
Dry the product well (during the day) and remove from the mold. If a cut is required for removal, it is convenient to make it with a sharp paper knife. After removing the mold, you need to stick pieces of paper along the cut on the inside of the product so that half of the piece goes beyond the border of the cut, then smear them with glue and attach the second half of the product.
You also need to glue the junction line of the halves on the outside with two layers of paper and, for strength, cover the entire form with another layer of papier-mâché (if further staining is expected, it is better with a layer of white paper). 
A well-dried product can be sanded with fine-grained sandpaper.
You can decorate papier-mâché with any paint, but it is best to take acrylic - it will not be erased from the mold and dries quickly. If desired, papier-mache is opened with varnish.
Modeling from paper pulp
The second version of papier-mâché (from paper pulp) is suitable for the formation of finished products by simple modeling or modeling on a frame. By the way, the very name of the technique is translated from French as “chewed paper”. There are quite a lot of recipe options for preparing the mass, and after several trials you will find your own optimal ratio of ingredients.
Usually it is done this way: soak newsprint, cardboard from boxes or egg trays, or toilet paper in warm water, leave it for several hours, periodically kneading it with your hands (you can put it on the stove to keep the water warm).
After soaking, the mass is carefully squeezed out and crushed with a blender or in a meat grinder (a more time-consuming option is rubbed through a sieve). Next, glue is added to the mass and kneaded until a homogeneous elastic mass ceases to stick to the hands. 
The formed product dries completely in 2-3 days - it is not worth drying it on a battery, as this can lead to cracks. The dried mass becomes hard and very light. It can also be sanded and painted in the same way as or.
Useful activity for pleasure
As already noted, using the papier-mâché technique, you can make absolutely different types products, this is a great way to make both decorative pieces and items for practical application in home. With this technique, more expensive materials can be imitated, such as metal, stone or ceramics.

Cat's house


Working with papier-mache calms, helps to focus on the process and take a break from everyday worries, develops creative thinking. Starting with simple and common products, you will quickly move on to the implementation of your own creative ideas.

Step by step tutorials for beginners
To make it easier for you to move from plans and doubts to action, our needlewomen have prepared step by step instructions with photo. Based on master classes, you will quickly master the pape-mâché technique and learn how to create your own masterpieces worthy of imitation.


It is not difficult to make crafts from papier-mâché with your own hands. Let's learn the basics and prepare the necessary materials.
The emergence of this technique for making crafts most likely occurred in France. Papier mache is French for "chewed paper". There is nothing surprising in the name, because for crafts you need a newspaper, A4 white sheets and glue.
There are 2 different ways:
- glue the pieces in stages, in layers (mashing);
- sculpt from wet paper pulp.
Most items are made easily and quickly, but it takes a long time to dry. Finishing sometimes takes a day or two, especially when the product is complex.
Paste recipe
A glue is needed to connect paper parts. Ordinary PVA is too thick, wallpaper will not work either.
The sticky mass can be made at home, following a simple recipe: PVA and plain water. They are mixed in a ratio of 2:1. It is not necessary to cook the paste, you can buy it ready-made in specialized stores.

mashing
Do-it-yourself papier-mâché products for beginners - choose simple ones. So, in order to “sculpt” a cup or a vase, you need to choose a suitable container. The manufacturing technique is quite simple:
- Cover the outside of the container with foil.
- Then tear up the paper, trying to make the pieces small. Try to emphasize the rounded parts of the future figure.
- Step by step stick the pieces on the outside over the foil. Arrange them slightly crosswise to avoid the formation of gaps. Glue is more convenient to coat on top of the paper - it will then soak itself. It's better to straighten out.
- When finished, allow the product to dry. It is best to leave it overnight.
- Apply a couple more coats the next day. If you plan to paint the finished figure with paints, then the final one is made from white paper torn into small pieces.

It is convenient for beginners to use this method.
Production of adhesive mass
Of particular interest is a kind of papier-mâché technique. A newspaper, a roll of waste toilet paper (multi-layered, soft), napkins, or a package of new paper towels will do.
Before making papier mache, carefully fold the paper and cut it. If there are no scissors or you want to quickly, then pluck to get the same squares (the recommended size is 1.5 × 1.5 cm).
Put them in one mug to the top, or you can put them in a mixer. Now fill with water, mix well. Add fluid little by little if necessary.
It is easier to soak the paper, wait three hours, then stir it with your hands, forming a paper mass.

Drain excess liquid with a sieve. Transfer the resulting mass to a large bowl, add a spoonful of glue, a little paste. Stir. A mixture of glue + paste is necessary, because a simple paste is not enough, and if you get by with one glue, then it is difficult to sculpt
Add more until the mass becomes sticky and resembles dough. You can adjust the degree of liquid by adding glue or decanting water. Enhance the strength of sawdust.
When finished, hide the paper pulp in a regular bag and store in the refrigerator.
What can be done at home using the papier-mâché technique:
- caskets;
- dishes;
- animal figurines;
- eggs;
- mugs;
- various carnival masks;
- beads;
- beautiful gift boxes;
- earrings;
- paintings (using thick cardboard to create the base).

Helpful tips for beginners:
- The duration of production directly depends on the type of craft.
- Remember to dry the paper layers thoroughly each time after laying. Standard drying - 1-2 days, only then the finished product will please with durability.
- You can decorate them with gouache or watercolor, and to fix the result, cover the finished figure with varnish.

- If in modeling you need paper strips, try to lay them out randomly without a system, regularly changing position.
- Instead of newspapers, unnecessary napkins or white offset, you should take toilet or multi-colored corrugated paper, cardboard pieces of packages, from cereals.
- Protect your hands with latex gloves.
- Before decorating, the finished craft must be primed. Construction putty will help create smoothness and beautiful curves.
- If you are attaching paper layers to one particular base, then process it first sunflower oil. After the end of the part, it will be easier to separate from the surface of the walls.
- Are you planning white craft? It is more convenient to use sheets of white paper, then the paint will not come in handy.
- Coat the finished product clear varnish, it will not crack and retain the brightness of the color for a long time.

Carnival mask
A detailed master class will help you create a beautiful carnival mask for a magical festive night!

What will be required:
- plastic form (on the base);
- thin elastic band (fastening at the back);
- newspaper;
- white napkins;
- sifted flour;
- filtered water;
- scissors;
- a piece of openwork fabric;
- stationery glue;
- brush.

Manufacturing:
- The first step is to prepare the glue. Pour pre-sifted flour into a deep bowl, pour water. Mix well to obtain a homogeneous thick mass.
- Cut the newspaper into identical small squares (size 1.5 × 1.5 cm), and the napkin into thin strips.
- Lubricate the upper part of the face (where the mask is supposed to be) for safety.
- Gently moisten newspaper squares with water, then apply them to your face, modeling the shape and exact dimensions of the future mask.
- Coat the finished first layer with a paste. Newspaper squares will also be next. Keep the shape of the mask set earlier.
- The third layer is applied with strips smeared with glue.
- The fourth layer is again newspaper squares, then white cut napkins.
- At the end, soak the workpiece with a paste.
- Wait for the material to dry slightly. You can use a hair dryer to dry.
- Carefully remove the mask blank and place it in a warm but dark place. Wait a day.
- When dry, carefully cut off excess from the edges with scissors, forming an even layer everywhere. Mark teardrop holes for the eyes.
- Textile. Wrap it around the mask, then firmly fix the edges with glue from the inside.
- Let it dry, then cut two holes in the fabric under the eyes, immediately fix the free edges inside the mask with glue.
- It remains to attach to finished product gum.


Papier-mâché egg
Mastering the technique of paper plastic with a child. It's best to start by making an egg. For the development of children's motor skills, needlework is extremely useful. Lessons learned together will be remembered for a long time.
Manufacturing:
- For the base, it is more convenient to take a toy egg or mold it from a piece of plasticine. Be sure to cover the product with ordinary sunflower oil, otherwise you will not be able to peel off the paper layer later.
- When finished with the base, cut the newspaper. Pour water into the bowl. Soak the finished pieces in it.
- Form the first layer from paper moistened with water without glue.
- Stir the adhesive mixture, the composition of which is: 2: 1 (2 - glue, 1 - filtered water).
- Lubricate each of the subsequent layers with glue step by step. There will be 7 or 8 in total.
- Leave the workpiece for 1-2 days, let it dry thoroughly.
- Paint the egg mold with white paint and leave again.
- Carefully cut the dried blank with a knife, pull out the base. Using superglue, simply glue the paper egg halves together again.
- Color the eggs however you like.
Similarly, you can make an apple, pear, watermelon and any other fruit (vegetable). The main thing is the basis for papier-mâché crafts. Remember that a watermelon is large, round, a pumpkin is more flattened laterally and has ribbed edges, a pear has an elongated shape. The bottom is wider, and the top, on the contrary, narrower.
The easiest way is to sculpt the bases from ordinary plasticine. From it it is easy to adjust the shape and estimate the size of the future product.
The finish is the same, only the colors are different.
papier mache flowers
Making flowers from papier-mâché newspapers is harder than volumetric figures. The technique is as follows: the petals are made separately, then after drying and coloring they are attached to one central base, collecting a flower. The required materials are the same, only with a standard set you need a glass, balloon, special glue gun and a sheet of thick cardboard.

Manufacturing:
- First stage. First dilute PVA with water, mix thoroughly. The proportions are approximately 2:1 (where 2 is glue). Tear up the newspaper. Inflate the balloon, trying to estimate the size of the future flower.
- Second phase. Gently cover the surface of the ball with newspaper pieces soaked in glue. Form 4 layers. When finished, leave the balloon to dry. It will take 3-4 days. It is better to paste over several balls at once, it will be faster.
- Third stage. Cut the dried workpiece into two identical halves. These are the petals of the future flower. Paint them as intended. Draw white stripes from the inside. Below, add some smaller black lines.
- With scissors, give the petals the shape you need, paint over the trimming points with the main color.
- You will need 5-6 petals per bud.
- The fourth stage is assembly. The middle will be made of cardboard, and alternately glue the petals on it. Place the first two opposite, then two more in the remaining free places. Send the flower to dry.
- The fifth stage is the middle. Crumple the newspaper, wrap the resulting lump twice with a napkin. Fasten with white thread. Fix tighter. First connect them crosswise, turn over and cross again. You will get a ball with several selected slices. Attach the finished middle to the center of the dried flower and paint gently green, draw small black strokes on top with the end of the brush. The last are the white dots on top.
- Sixth stage. A sheet of cardboard will be the basis of the future picture. Gently glue the finished flowers to it and draw additional green branches. And cut out the leaves from thin cardboard. Paint green and glue two to each of the colors.

Papier-mâché airplane
This toy will definitely become great gift or interior decoration. Light, beautiful, it seems that it is about to take off.
What will be required:
- small plastic bottle;
- 8 covers;
- special masking tape;
- cardboard;
- scissors;
- newspaper sheets;
- PVA glue;
- brush;
- paints.

Manufacturing:
- You can make an airplane out of papier mache based on plastic bottle. Cut out with a knife (or scissors, as it is more convenient) the middle part from the narrowing point. So you will make the future plane shorter. Cut off all unnecessary ledges at the bottom, leaving one. Remove the neck, so the fuselage will become smooth and beautiful. You need a ledge at the bottom, attach the tail there.
- Connect the parts of the cut bottle with tape. Draw the outlines, cut out the wings, as well as all three parts of the tail from cardboard. Attach them alternately to the base of the aircraft using tape.
- Chassis. Fold the covers (2 for the front, 6 for the main unit), fasten them with tape. They will be the chassis wheels.
- Close the neck opening with a paper ball, forming it from sheets of crumpled paper. For reliability, the connection can be fastened together.
- Wrap the bottle more tightly with adhesive tape, paste over it on top with 3-4 layers using papier-mâché (overlap it with pieces of paper soaked alternately in glue).
- Leave in advance a strip of plastic on the nose of the future aircraft. Pilots need a clean windshield!
- Let dry and paint the plane. Draw round windows, glue the pilot figure in front, the faces of the passengers on the side.


In a similar way, you can make a whale - cut out fins, a base from an unnecessary bottle, or mold it from plasticine. AT last case after drying, cut the halves of the body, then glue it again. Do the fins and the end of the tail separately.
Big papier mache hedgehog
Making animal figurines is an easy but fun process.
To make a hedgehog, you will need:
- plastic bottle (large) - 5l; (average) - 1.5 l;
- unnecessary newspapers;
- gypsum putty and bandage;
- egg trays;
- toothpicks;
- paints;
- artificial eyes (from toys).

Manufacturing:
- Cut off bottle necks. Insert them into each other. This is the muzzle of the future hedgehog.
- Add volume to the figure with moistened newspaper pieces. Paste the back, sides, bottom. So you give the hedgehog naturalness. Blind the muzzle in the same way.
- Leave to dry, then cover the entire craft with putty.
- Hedgehog spines. Insert the toothpicks, placing them obliquely, at an angle, while the putty dries.
- Paint the hedgehog and, after waiting for it to dry, glue the eyes. If there are no ready ones, then you can draw.


papier mache mushrooms
You will need unnecessary trays left after the eggs. Soak them and leave to infuse for a day. By the way, fill with hot water.


What will be required:
- soaked trays;
- paste, separately PVA;
- corrugated paper;
- gouache;
- ordinary starch;
- semolina;
- coil of wire.


Manufacturing:
- As soon as the trays, softened, begin to disintegrate, crush them with your hands and leave to soak further.
- To make the mass more homogeneous, you can use a blender. Squeeze the mixture through cheesecloth or a regular rag, removing excess liquid. You will get a wonderful mass, from which it is easy to fashion any figure: a helmet, a tree, a fish (you will make the fins separately or immediately), a stump (the color of the trays is just brown).
- Before work, you need to add a little paste, otherwise you can’t sculpt, the figures will turn out to be too fragile. Form a mushroom - start rolling a small ball. And to give it more smoothness, take some round container.
- The hat of the future mushroom will be perfect if you throw the ball with force on the table. Now make a small hole inside the finished hat.
- From the second similar ball, form the leg of the mushroom.
- Dry the parts, then glue them. It is more convenient to start with a long leg. Cover with crepe paper. To level the surface before crepe, glue the blanks with sheets of soft toilet paper in 2-3 layers.
- Paint the finished hat with a stalemate on top, and leave the bottom. Pat is a mixture obtained from a PVA compound, a small amount of starch and brown (you can red or yellow, depending on which mushrooms) paint. First, the glue is mixed with the right amount of starch, after which the mixture is dyed. The finished stalemate is stored in a separate jar and covered with a lid to prevent drying.


See what papier-mâché dolls can be made using toilet paper. From the same material you will make a piggy bank, toys, New Year's crafts.
How to make a papier-mâché piggy bank with your own hands?

You will make such a funny tiger cub if you take:
- two sheets of white paper;
- newspapers;
- plasticine;
- a small polyurethane jar;
- PVA glue;
- scissors;
- paste;
- gouache;
- stationery knife;
- thin and thick brush;
- acrylic pistachio varnish.

Prepare the paste. To do this, take a glass cold water, pour it into the pan, pour 2 tsp here. starch, stir well. Put the container on the fire, stirring often, bring the liquid to a boil, remove from the stove. When the paste has cooled down, it is ready to use.
Remove the lid from the jar, turn the container over, put it on the table. Sticking around the jar with plasticine, immediately form the ears, eyes, paws, facial features of the tiger cub. Here's how to make the piggy bank go further.

Tear the newspapers into small pieces, start pasting them over the blank. Attach the first layer with water. The remaining 10 layers must be fixed by lubricating each piece of newspaper with a paste.

Leave the workpiece overnight to dry. In the morning, glue it with pieces of white paper, which must be attached with PVA glue, which will give the product strength.

Let the toy dry completely, then cut it into two halves with a clerical knife.
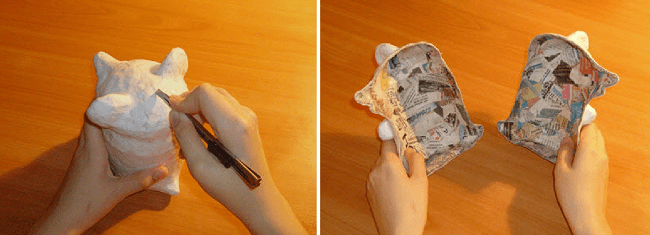
Remove these parts from the jar, connect them again, gluing them at the cut site with white pieces of paper smeared with PVA.
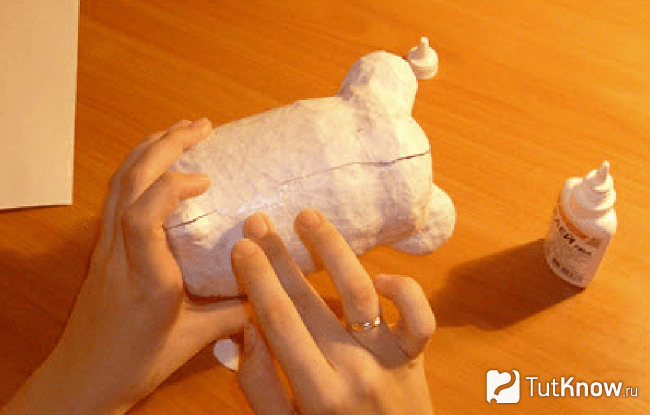
At the top, with a clerical knife, make a cut of such a size that coins of the desired denomination can be lowered into the piggy bank through this hole.

Now walk along the outer surface of the product with white gouache to prime it. When it dries, paint the product in the desired color.

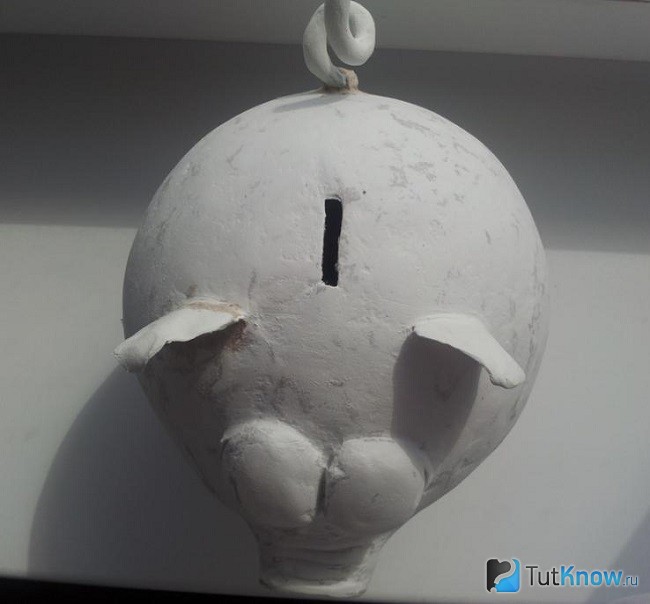
Here's how to make a piggy bank out of paper and newspapers. If you want to see how to make a funny pig that is also designed to store and multiply small things, then check out the second master class.
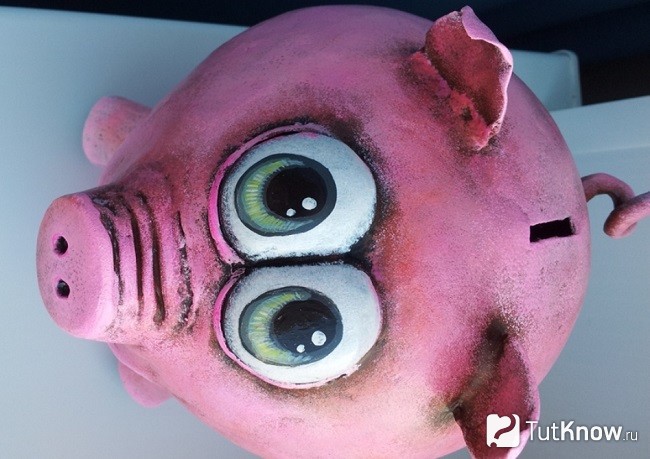
This is how touching and at the same time funny the piglet will turn out. To make it, use:
- inflatable ball;
- toilet paper;
- acrylic paints;
- building PVA;
- foil;
- newspapers;
- toothpicks;
- acrylic putty.
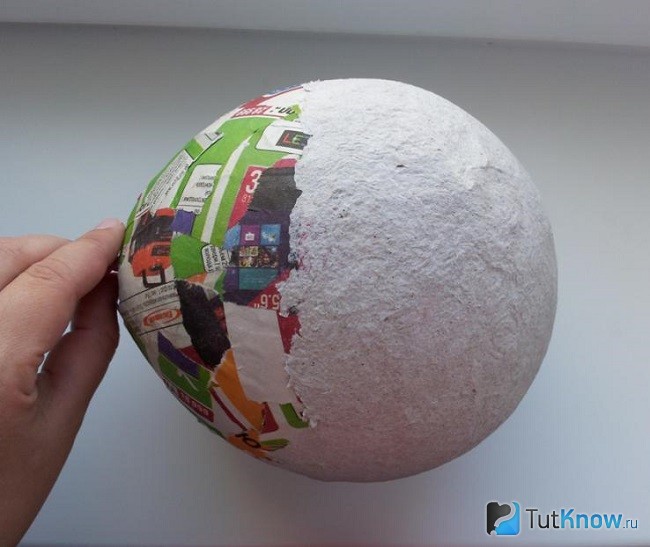
You can first moisten pieces of newspaper in water, then dip them in PVA, forming the surface of the ball, and glue torn pieces of paper here.
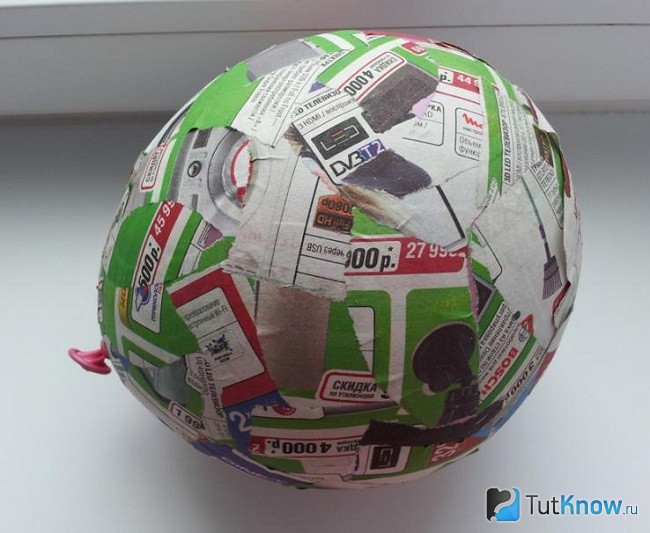
We make mass for papier mache, for this, rather large pieces are torn off toilet paper. Put them in a container in which you want to add PVA. After that, it remains to mix the contents well. Now, using a sponge or rubber-gloved hands, apply this mass to a ball covered with newspapers.
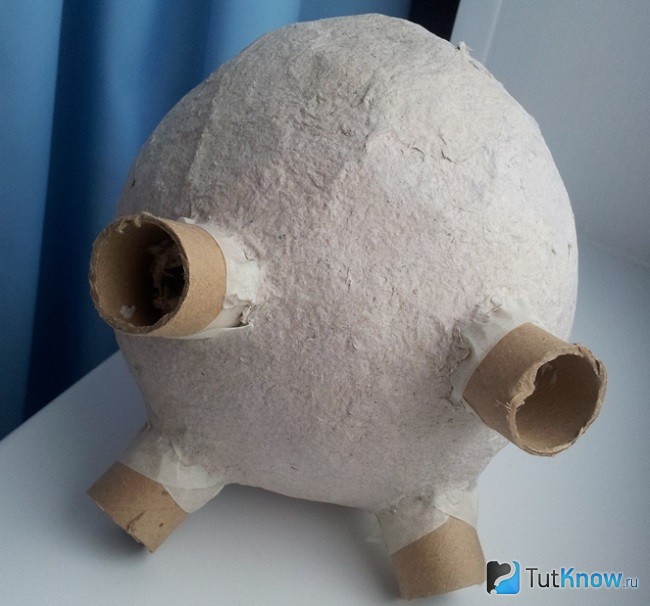
When it dries well, make a puncture with a needle. Remove the burst ball through the bottom hole. Cover the slot with two strips of masking tape that are attached crosswise. Piggy bank legs can be made from a reel left over from foil or stretch film. These cardboard tubes need to be cut with a knife into 4 parts. You can use toilet paper rolls if you like.
These blanks must be attached to the base with masking tape, and a papier-mâché mass should also be applied on top.
Make a piglet from a piece of foil, attaching it with toothpicks and tape. Paste it with toilet paper soaked in glue, form a nose.
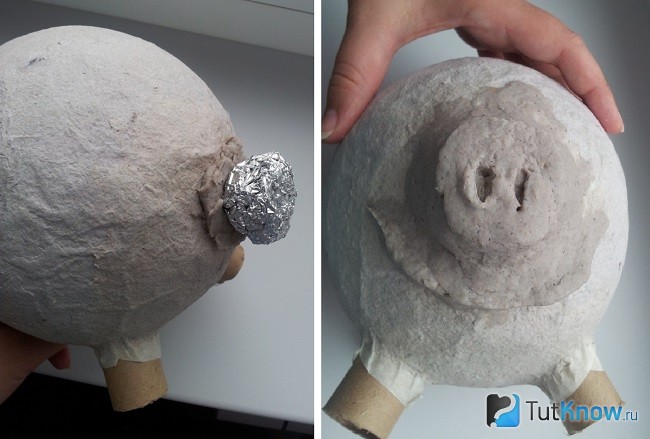
From it you will need to fashion eyes, attach them in place with glue. Ears can be made from papier-mâché or clay

Now we need to leave the piggy bank so that the papier-mâché will dry well. Then we grind the workpiece with sandpaper, after which we apply acrylic putty on it. We are waiting for it to dry, then wipe the piggy bank with a damp cloth to level the product. We apply putty in several layers until the surface becomes even.
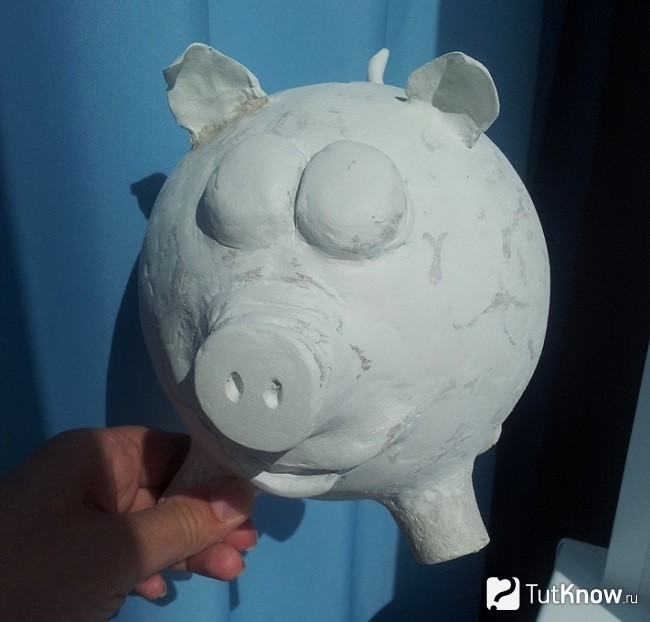
Use a utility knife to make a hole for the coins. We attach the tail, which must be made in advance from wire and papier-mâché.
We begin to paint the product. First we apply any dark paint, then, using a sponge, cover with red.
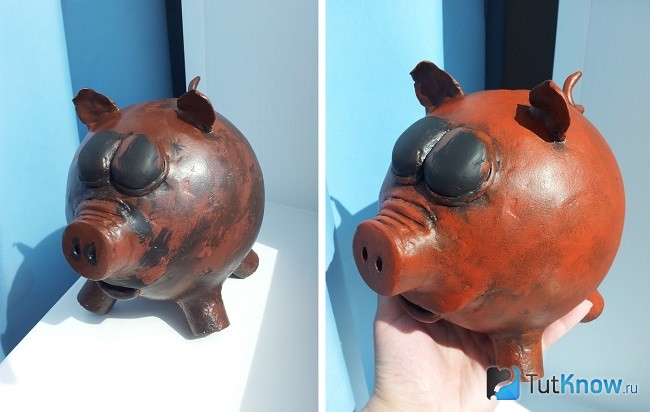
Next comes pink color, after it - a mixture of white and pink. The next coat of white paint, but it needs very little.

It remains to paint the eyes, after which the papier-mâché piggy bank is ready.
How to make a mass for modeling paper with your own hands?
It is not always that the base is simply pasted over with torn newspapers, there are very interesting recipes cooking mass for papier mache. Get to know one of them.
From such a mass you can mold an animal figurine, for example, a bear. Take:
- 2 rolls of the cheapest gray toilet paper;
- 3 art. l. linseed oil;
- 500 ml of universal or building PVA glue of a liquid consistency;
- 1.5 liters of water;
- gauze;
- large bowls;
- sandpaper of medium and fine fraction;
- colander;
- PVA glue.
Now you need to wring out the paper. To do this, lay gauze folded in several layers on a colander, put a little mass here, some of the water will drain. Remove the rest by lifting the edges of the gauze, squeezing out the paper. Also squeeze out the rest, but do not overdry, leave some water.
Put all this paper in a large bowl, then add construction glue to it. Stir the mass. This will be easier to do if you mix the paper and glue in small batches.
Add linseed oil, stir. It will allow the mass to become more plastic. Now you can sculpt from papier-mâché or put this mass into molds to make toy parts. You will glue with the help of PVA, which is called "Moment joiner".
When papier-mâché blanks are completely dry for several days, they will need to be sanded with medium, then fine sandpaper.

The finished product is primed and then painted.
Master class: do-it-yourself Baba Yaga's hut
It can also be made from the mass, the recipe of which you just learned or use another. This is how the house of this fairy-tale character will turn out.

But for this you need to work hard, but first prepare:
- a bottle of suitable size and shape;
- napkins;
- stack;
- PVA glue;
- ruler;
- pencil;
- mass for papier-mâché.

Starting from the bottom, the mass for papier-mâché is glued in strips. Decorate two sides at once, forming circles in the form of slices of logs.

With the help of a stack, make stripes on the door, logs, so that they convey the texture of the tree.

Make smaller details of the door.

Let the house dry for a day.
Blind from the mass for papier-mâché a window, shutters. Using a stack, decorate them with carvings. We begin to make an attic, in the photo it is pink.

Such elements need to be made above the window and above the door, then we make out the roof.

Having made a row on one side and on the other, leave to dry, only after that make one more tier.

Then work the third row and pipe.

Use the stack to make a brick pattern here, then give these elements a roundness.

There will be another row at the top of the pipe. Then we decorate the wall with fly agarics from polymer clay.

Leave the house to dry completely. After that, you need to paint it.

Baba Yaga's hut is ready.
DIY papier-mâché dolls
I can’t even believe that such wonderful works of art can be created from toilet paper.

To make such a Snow Maiden, take:
- an empty glass bottle in the shape of a trapezoid;
- copper wire;
- pliers;
- mass for papier mache from toilet paper;
- rubber glue;
- polymer clay;
- cotton wool;
- elastic bandage or well-stretched fabric;
- scissors;
- paints;
- fabric for clothes;
- satin ribbon for hair;
- rhinestones for decoration.

Cut a piece from the wire with pliers, wrap it around the neck to make papier-mâché doll handles.

Wetting the elastic bandage with rubber glue, wrap the workpiece with it.

Now grease this bandage on top with PVA glue, attach papier-mâché here, forming the chest and back of the doll.

From the same mass, make a head for her.
To use less papier-mâché, first you can wrap the top wire with foil, then cover it with this mass, forming facial features, ears.
Leave the workpiece to dry completely, then sand it, apply putty. After the one dries, it also needs to be processed with sandpaper.

To make hands, moisten cotton wool with an aqueous solution of PVA glue, apply it to the wire. Wrap the moistened glue with an elastic bandage or a strip of cloth. Make brushes from polymer clay. Paint the doll using skin color, mark the eyes, eyebrows, lips with the appropriate shades.

Sew a petticoat and dress for the doll, made of cardboard. Unraveling the satin ribbon Brown, you will get such luxurious shiny hair. It will take a lot of time to make such a papier-mâché doll, but the materials will cost a little, and what a luxurious result awaits you!

If you want to get acquainted with another sample, then watch the second master class in this section.

Here is such a wonderful doll on a horse you will succeed. To make this duet you will need:
- toilet paper;
- wire;
- cardboard;
- Styrofoam;
- strong thick thread;
- newspapers;
- foil;
- acrylic paints;
- foam ball.

Give the doll the desired shape by overlaying with a mass of papier-mâché.

We make a horse. Bend the wire, as in the photo, wrap it with foil.

Coat this blank with papier-mâché paste.

When it dries well, stick two pieces of wire into it to make the legs of the animal.

Cover the top of the workpiece with wet papier-mâché. Let the horse dry well. Now we need to add volume to both blanks, for this we also use papier mache, including to make the ears and nose of the prince. And we make the ears of the horse from cardboard, cutting out the details of the appropriate shape. Sand the blanks.

Cut off excess wire on the legs of the animal, add a mane, tail, and muscles to the prince. Cut out a strip with zigzag edges from cardboard, glue it with newspapers, fold it into a crown. Coat papier-mâché.

After finishing grouting with sandpaper, the doll will look like this.

Glue the crown using papier mache. With the same mass we connect two heroes.

For the platform, a piece of foam is used, which must be pasted over with newspapers.

Cut out the wheels from cardboard using coins as a template. Also cover them with newspapers and papier mache.

Apply the same mass on top in 4 places of the cart to attach the horse.

Sand the blanks, then paint them.
Let's create them using the same papier-mâché technique. If you want such funny hedgehogs to show off on the Christmas tree, then proceed to creative work right now.

To create them, you will also need such materials that you do not need to buy - the savings are obvious. Take:
- two toilet paper rolls;
- cones;
- mass for papier mache;
- cotton pads;
- paints;
- plasticine;
- glue Titanium;
- two wooden skewers;
- brush;
- sequins.

Disassemble the cones into scales, glue them on one side of the roll, as well as on the sides. Form the rows, starting from the bottom, placing the elements of subsequent rows in a checkerboard pattern. Use titanium glue for this.

At the beginning of the article, you read how to make papier mache mass from toilet paper. You can use other similar materials, such as paper towels. In this master class, napkins were taken for this yellow color their color doesn't matter. Form the body and nose of a hedgehog from such a mass.

Let it dry, make the front legs, attach them to the tummy, using the same mass. Here are some interesting crafts on the New Year 2017 are obtained. But for now, we need to let our hedgehogs dry well, then cover the arms and tummy beige and then brown. We paint the spines of animals in the reverse order - first we use a brown tone, then beige or white. Then the hedgehog's coat will be as if powdered with snow.

Make eyes, eyebrows, mouth, nose out of plasticine, fashion a mushroom, attach it between the handles of the animal.

If you want, you can make lower paws for an animal from plasticine or plastic, placing them at the ends of the laces, the middle of which is threaded through the upper hole. You can attach a bell so that when the hedgehog moves, it makes interesting sounds.

These are the most wonderful crafts for the New Year you will get.

Make them with your kids. If it is difficult for children to do this, then tell them interesting idea creating papier-mâché cakes, which they will gladly bring to life. Let the child make such dolls and toys as a New Year's treat.
To do this, put next to it:
- foil;
- cardboard;
- two bowls;
- not a food spoon;
- newspapers;
- paper towels or a rag to dry your hands.
Cover the table with newspapers in advance, cover it with plastic wrap. Then the child will not stain the work surface.
Let him tear or cut the newspapers into small pieces, put them in a separate container. In another, you need to pour a paste. It is prepared as follows: pour a glass of water into the pan, add 2 tsp. flour or starch, mix. Put on fire, bring to a boil with vigorous stirring. Let the paste cool, pour it into a bowl.
Have your child roll the foil into balls.

From a sheet of cardboard you need to make a box. Look at the diagram on how to cut its sidewalls, fold them, gluing them.

Everything is ready, it's time to start making crafts for the New Year with your own hands, the photo will show how to make it.

Everything you need is on the table. Let the child dip the lumps in foil in a paste, then attach pieces of paper here.

Then you need to leave the craft for a few days so that the glue dries well. If this is not done, the work may begin to mold.
When the cakes dry well, let the child give free rein to imagination. Using paints, small red pompoms, finely chopped colored pieces of paper, he will make such a festive treat for dolls.

When the paint dries, it's time to arrange these cakes to decorate the table of toys.
In the same technique, you can make other children's crafts for the New Year. With their own hands, they will build blanks from foil, which must be pasted over with pieces of newspaper. This process has just been described. To attach the toy to the Christmas tree, at this stage you need to tie a carpet ring with a cord or rope, as is done in the photo tip.

This is followed by another 2-3 layers of papier mache from newspapers, after which Christmas decorations need to colorize.

Now you can make papier-mâché dolls, christmas toys from the same material, a piggy bank. We offer you to get acquainted with the process of making an apple. It turns out so realistic that you should immediately warn both guests and family that the fruit is not edible.
If you want to see how to make mass for papier mache, then watch the second plot.