How to make an artificial pumpkin out of fabric. Beautiful textile pumpkins: workshops and ideas. Stencils and Templates for the Pumpkin Head
Halloween is the oldest holiday in the world. Its deep history goes back thousands of years and goes through the festival of the Celts Samhain, the day of Pomona among the Romans and the Day of All Saints among the Christian nations. It miraculously combined the Celtic traditions of the worship of evil spirits and the Christian honoring of the Saints. But until today, only a set of fascinating traditions and mystical symbols have survived from Halloween. On such an unusual night, it is customary to organize a masquerade in the costumes of evil spirits. And in preparation for the holiday - pay special attention to the selection of bright decorations and the creation of original jewelry for home, school and kindergarten (from pumpkin, plasticine, paper, cardboard, thread and other improvised materials). Using step by step master class with pictures, photos and videos, adults with children make the most different crafts for Halloween with your own hands. To scare away all evil spirits on the mysterious day of October 31 ... Well, or call ...
Crafts "Pumpkins from threads" for Halloween with their own hands for children 3-5 years old

A pumpkin is an essential attribute of the Halloween holiday, so why not make a craft dedicated to it with your own hands, along with children 3-5 years old. The resulting product will certainly be endowed with special magical properties. After all, since ancient times, the pumpkin head has symbolized not only the end of the harvest season, but also the eternal fire that scares away evil spirits.
Necessary materials for crafts "Pumpkins from threads" for children 3-5 years old for Halloween
- orange yarn
- decorative cinnamon sticks
- braid "flowers"
- felt green braid
- button (red, black or brown)
- themed craft tag (label)
- a piece of cardboard
- glue gun
- scissors

Step-by-step instructions for creating a children's craft "thread pumpkins" for Halloween
- Take a small piece of thick cardboard (approx. 6 cm x 10 cm) and carefully wind several meters of yarn across.

- When the hank is plump and heavy, cut off the end of the yarn.

- Slowly remove the threads from the cardboard and pinch the middle of the skein with your fingers, as in the photo.

- Tie the workpiece tightly in the center with a thread of the same color, and cut through all the loops.

- You will get a small pom-pom. Using sharp scissors, trim the barrels of the pom-pom to make it pretty. oval shape, flattened "at the poles".

- Take out the cinnamon stick. Lubricate one end with hot silicone from a gun and attach to the top of the "pumpkin" pom-pom.

On a note! You can use a decorative blank for needlework or a real spice. At this time, the craft will be not only festively beautiful, but also fragrant.

Festive Halloween crafts for kindergarten with photo instructions

There are many options for holiday crafts in Kindergarten ik for Halloween with step by step photo instructions designed for self-fulfillment by children. Our master classes are more suitable for joint work of parents and kids. They not only bring the whole family together at the same table, but also include more complex techniques that give amazing results in the end.
Necessary materials for festive crafts in kindergarten for the exhibition in honor of Halloween
- blank - white foam wreath
- black crepe paper
- yellow eyes for handmade dolls and animals
- black satin ribbon from 5 cm wide
- glue gun
- scissors
Step-by-step photo instructions for creating a festive craft for kindergarten on Halloween
- Start your Halloween craft by wrapping the blank with black ribbon. Cut the corrugated paper into strips of 5-6 cm and wrap one by one around the foam wreath. Fix the ends firmly with a glue gun.

- It's time to get the kids involved in the process. Let the kids wrap front side black circle "eyes" for handmade dolls and animals.

- Let the guys first attach the largest eyes in a chaotic manner over the entire surface of the wreath, then fill the remaining space with smaller details.

- If there is a little free space between the elements (2-4 mm each), there is nothing to worry about. Such gaps will not hurt, on the contrary. The black background will set off the yellow eyes even brighter.

- When the entire wreath is pasted over, tie a black satin ribbon bow at the top. Leave a loop to hang the finished decoration.

- You must have done great holiday craft to kindergarten on Halloween according to our photo instructions. With such an interesting idea, it is your baby who will win the thematic exhibition.

Children's crafts from tangerine, paper and cardboard for Halloween with their own hands

A great craft that is easy to create with your own hands in a children's company is a company of decorative Halloween pumpkins made of tangerines, paper and cardboard. First, this option holiday decorations perhaps the easiest to implement. Secondly, all the guys love to cut out unusual details, which means they will be delighted with the creative process.
Necessary materials for children's crafts for Halloween from cardboard, paper and tangerine
- tangerines
- thin orange paper
- sheet of black cardboard
- green chenille wire
- scissors
A step-by-step master class on creating bright children's crafts from tangerine, paper and cardboard for Halloween

On a note! If the paper is too thick and unyielding, it is better to use plain colors. paper napkins. They are softer, which means they are perfect for such a task.

On a note! If you can’t draw beautifully by hand, use templates from the Internet. But first, change the scale so that the details are small.

How to make Halloween crafts for school with children 10 years old

It's difficult to imagine school holiday Halloween without any frightening details: bats, skulls, cobwebs, spiders and other crafts created by children of 10 years old without much difficulty. We offer you another unusual master class that will successfully replenish the collection of jewelry and decorations for the triumph of evil spirits on October 31.
Necessary materials for crafts for Halloween school for children 10 years old
- foam ball ir 8 cm
- foam ball 2 cm
- black crepe paper
- orange crepe paper
- skein chenille wire black color
- orange or black beads
- toothpick
- PVA glue
- scissors
Step-by-step instructions for children 10 years old to create a cool DIY craft for school on Halloween
- Cut black crepe paper into strips 4 cm thick. Cut each strip into several pieces to make small rectangles.

- Lubricate a large foam ball with glue. Similarly, saturate the rectangles with glue and cover the part with them. The ball should turn out completely black. Similarly, trim the smaller ball with corrugated paper.

- Using a thin wooden toothpick, attach the head of the future spider to its body. Or rather, a small detail to a large one.

- From a roll of black chenille wire, unwind and cut eight pieces of 12 cm each. Bend the parts in such a way that it looks like spider legs. Break in the area of \u200b\u200bthe "knees" and wrap it in a spiral at the end.

- From yellow corrugated paper cut out a few small circles. Paste them over the body of the spider. Stick four legs on both sides (pre-lubricating the ends with glue). Fix beady eyes on the head.

- Even if not all the details turn out perfect, don't be discouraged. For children 10 years old, Halloween crafts for school are slightly careless, but always made with soul and full dedication.

Original crafts from improvised materials for Halloween at home according to instructions with pictures and videos

Of course, the hallmark of Halloween is an orange pumpkin with twinkling eyes. But do not forget about other traditional things: funny ghosts, hairy spiders, flocks of bats, a witch's hat and more. After all, most of these symbolic elements of Halloween can be skillfully combined in an original DIY craft made at home from what was at hand.
Necessary materials for the original Halloween crafts from improvised materials at home
- gauze fabric
- thin wire
- Styrofoam
- thick cardboard orange color
- thick black cardboard
- thick green paper
- PVA glue
- toothpicks
- themed craft tag (congratulatory)
- handmade eyes for dolls
- round lollipops

Step-by-step instructions with pictures and videos for creating an original craft at home for the celebration of Halloween

On a note! Chupa Chups can be used as lollipop coasters. They fit perfectly in size and will be a nice bonus for the kids for their work at the end of the creative process.
- Dip the gauze circles into the glue one by one. Then gently wring out and hang on the "stands".

- Set this part of the craft aside for a while.

- Take care of the 3D pumpkin. From thick orange cardboard, cut out seven circles 6-7 cm in diameter. Fold the pieces in half.

- Glue the circles in halves to each other using a glue gun or ordinary PVA.

- On black cardboard, draw the silhouettes of bats and cut them out. To speed up the process, use templates from the web.

- Cut three pieces of 15-20 cm from a coil of thin flexible wire. Glue one "bat" part with hot silicone to the end of each piece.

- Wind the wire around a pencil or toothpick to make it spiral. On green cardboard, draw the details of the "pumpkin leaves" and cut them out with thin, sharp scissors.

- Insert a small wooden skewer into the middle of the pumpkin between the cardboard elements. Attach leaves to it, wind spiral wires with bats.

- Glue a cardboard craft track with a suitable inscription to the second toothpick. For example: "Halloween", "Woooo", "Happy Holidays", "October 31", etc.

- Remove dried gauze ghosts from lollipops. Glue each ghost on a pair of eyes.

- For the main ghost, stick a flag with a congratulatory inscription in the barrel. Make a small composition of all the elements.

- Such original craft from improvised materials for Halloween at home (according to instructions with pictures and videos) will conquer all the guests of the holiday. It combines the most popular symbols of the Celtic holiday and the most common techniques for children's and adult needlework.

October is inexorably coming to an end, which means it's time to move on from watching step-by-step master classes with pictures, photos and videos to turning them into reality. It's time to make Halloween crafts with your children from everything you can find at home: from pumpkins, paper and cardboard, threads, plasticine, gauze, etc. You can decorate your home or show off at an exhibition at school and kindergarten with these amazing DIY children's products.
Such pumpkins can be sewn for Halloween, or you can simply decorate the interior of your kitchen or cottage with them.
They are quick and easy to make, and look delicious and sunny.
I’ll make a reservation right away: there are similar master classes on the Internet, so I don’t pretend to be exclusive, but I’ll just tell you how I do it. Maybe someone will come in handy just such options for making pumpkins.
First of all, I would like to draw your attention to the fact that the pumpkins are made of knitted fabric. In MK, cotton jersey with lycra is used (such jersey is used for sewing T-shirts). In the store, it was sold under the name "Jersey", because. stretches not only along the width of the canvas, but also along the length. I think that with the same success you can sew pumpkins from synthetic knitwear such as "butter". True, “oil” is more elastic than cotton jersey.
Why knitwear, you ask? Because, due to its “stretchiness”, it more easily takes the desired shapes and volumes and, unlike coarse calico, almost does not give rough folds and creases during formation.
The pumpkins that you see in the photo are made of thin, but dense knitwear in orange and flesh colors. By the way, the flesh color was obtained by bleaching the original orange jersey in "Whiteness".
So we need:
- jersey in matching color
- strong threads in the tone of knitwear (or a tone darker). I use thread 45LL,
- needles: long (for tightening) and ordinary sewing,
- fabric scissors,
- our golden pens and good mood!
1st option.
Flat pumpkin with a fabric tail.
Cut out a circle from the knitwear. The diameter will depend on the desired pumpkin size and the stretch of your knitwear. Approximately (but not necessarily), the diameter of the pumpkin will be half the diameter of the original circle.
I repeat: if the knitwear stretches well, and even with dense stuffing, the diameter of the pumpkin may turn out to be larger than the radius of the workpiece.
To form the pumpkin tail, lay a basting seam at a distance of 0.5-1 cm (but not less than 0.5 cm!) From the edge of the workpiece. We sew double thread, stitches of medium length.
For the convenience of stuffing, we will pull off the basting a little, and stuff the pumpkin quite tightly with holofiber or sintepuh. The denser we fill, the more voluminous our pumpkin will be, and the less
on itwill befolds.
Note: if the knitwear is thin and strongly stretches, then it is not necessary to stuff it much: to the desired look and volume.
Stuffed, tightened as tight as possible.
The allowance that we left is tightly collected and wrapped with threads - we get a pumpkin tail.
Now let's insert about a third of the needle into the upper part of the pumpkin (the invisible part of the needle in the photo is marked with a blue dotted line), and, working with the needle as a lever, we push the stuffing up, increasing the volume of the upper part of the pumpkin, where there are many assemblies. Thus, we give the workpiece the shape of a ball, at the same time, there are fewer folds on the fabric.
This is how we should get it, almost a ball.
Moisten your finger with PVA glue and coat the pumpkin tail, while squeezing it from all sides, forming a dense leg. Let the glue dry.
On the side of the pumpkin opposite from the leg, we outline the “ass” of the pumpkin with a pencil.
Thread a long, strong thread into a long needle. On the "butt" we will make a couple of securing stitches.
We insert the needle into the “ass” and bring it out near the tail of the pumpkin (blue arrow 1).
Note: all inside stitches marked with blue arrows, outer ones with red arrows).
They took it out, tightened the thread, creating tension, and again we return to the “ass”, but now we are laying the thread along the top of the fabric (red arrow 2).
Again we insert the needle into the “ass”, we bring it out near the leg, but at a small distance from the first puncture (blue arrow 3). We carefully tighten the thread so that it forms a hollow between the “slices” of the pumpkin.
Note: To help maintain tension, you can sew reinforcement stitches from time to time
We continue to drag in the same image and likeness: first, along the outside of the pumpkin (red arrow 4), and again inside (blue arrow 5), etc.
The number of slices of a pumpkin can be arbitrary, as fantasy and patience will tell)))
Having finished the tightening, we again form the top and bottom of the pumpkin with a needle, now each slice.
This is how it turns out as a result.
2nd option.
Tall pumpkin with a fabric tail.
We cut out a rectangle from the jersey, fold it in half (right side inward).
We sew along, stepping back a little from the edge of the workpiece (sorry, the photo did not turn out quite well).
We collect along the edge with a basting stitch, and tightly tighten, p at the same time we turn the ribs from the basting inward,thread endtoohide inside the workpiece.
We turn the blank on the face, sweep the upper edge and stuff it in the same way as in the first case.
We tighten the top assembly. As a ponytail, I decided to use a piece of a tree branch. I try on a branch, pull off the basting, but I still don’t fasten the thread.
I finish with a little filler to add volume to the top of the pumpkin and remove excess folds.
On the opposite side (where the “butt” is), we also knock out the filler with a needle (as in the 1st version of the pumpkin), giving the pumpkin a beautiful look.
Lubricate one end of the branch with Dragon or Titan glue, carefully insert the branch into the hole, fill the allowances inside the pumpkin.
We tighten the thread around the branch and fasten.
We pull it in the same way as in the 1st option.
Important! I always make one of the tightenings along the seam so that it is less noticeable.
As a result, we get such a pumpkin.


3rd way.
Long gourd.
I like the shape of such pumpkins, but I didn’t find how to sew them anywhere on the Internet (maybe I was looking badly?). So I came up with my own way:
We take a rectangular piece of fabric (approximately as in the second version), fold it in half and remove the edges on one side of the workpiece.
I'm sorry, but I was so carried away by the process that I did not take a photo of the workpiece. I am correcting myself: I drew patterns of all three pumpkins on paper. If something is unclear - ask!
In general, they stitched along the dotted lines (option 3), cut off the upper corners, the lower (wide) part was assembled with a basting stitch.
Turned out through the upper (narrow) hole.
Stuffed with filler. The tail can be made one of the options described above, or you can come up with your own way, for example, felt out of wool or sewn from felt, in general, fantasize ...
I'm on hastily repeated the option with a tree branch.
Now the pulls. This time I started tightening from above, from the ponytail.
We pass inside the pumpkin from the tail to the “ass” (blue arrow 1), tighten the thread.
Next, we lay the OUTER stitch (red arrow 2a) from the “butt” to point A, located approximately at the level of the beginning of the narrowing of the upper part of the pumpkin (see the green dotted line in the photo), we enter the inside of the pumpkin with a needle and go through the inner stitch to the tail (blue arrow 2b) .
We tighten the thread and return to the “ass” again through point A: first along the top of the fabric (red arrow 3a), after point A - inside (blue arrow 3b).
And in this way we pull away all the pumpkin slices.
P.S. Here I decided to describe in a little more detail the process of tightening this pumpkin.
The tightening on oblong pumpkins, to make it easier to remember, is done with a "figure eight": i.e., if half the length of the pumpkin is pulled along the top of the fabric (1), then the second half is inside the pumpkin (2). When passing back, on the contrary: on the half of the pumpkin where there was an internal tightening, we lay the thread on top (3), and where the thread was on top, we tighten it with an internal tightening (4).
Here is the scheme:

In the photo below - the result of tightening an oblong gourd.I've already sewn a spout to the pumpkin and outlined a drawing. We will have it as a pumpkin for Halloween))) In principle, pumpkins are already good, but I like to paint them additionally, and not only with Halloween horror stories ...
Pumpkin painting.
You can paint knitted pumpkins with dry pastels and / or acrylic paints.
Pumpkins sewn from fabric of a more saturated color are best painted with acrylic, then they will turn out brighter, juicier.
More delicate pumpkins can be painted with dry pastel,they will look tenderer.
And thoughin coloring bookthere is also a chance to “overdo it” with pastel, but it’s easier to fix such a “blunder” there, but what is painted with acrylic on knitwear is easier, probably, only cut down with an ax ... (((
But, I won't scare you, let's get down to business.
I use Sonnet's Earth Tones dry pastels. In this set, crayons are soft, but deep shades.
I cut the crayons of the desired colors with a knife. I like to use flat, synthetic brushes.
This time I took brushes No. 6 and 9.
We begin to paint with the lightest tone with brush No. 9.
We collect a little pastel on the brush and from the “butt” we begin to “deepen” the folds and hollows of the pumpkin.
You probably remember the basics of drawing: more convex places are always lighter than the main tone, and “convex” ones (that is, different depressions and folds) are darker. So, based on this, we will additionally “deepen the convexities” of the pumpkin with a pastel of dark tones. Pay attention to how I hold the brush: the end of the brush goes along the crease.
If you accidentally applied and a lot of pastels - gently rub this place with a napkin or paper towel, all the paint, of course, will not be removed, but the brightness of the coloring will noticeably decrease.
Pumpkin is one of the main attributes of the Halloween holiday and the coming autumn. The orange-colored fruit symbolizes harvest time and is an excellent seasonal decoration for an interior or dining table, even for those who are not going to celebrate this holiday.
In this collection, we have collected a lot of ideas for decorating pumpkins and making crafts for Halloween in different techniques and styles, as well as options for creating this cute vegetable from improvised materials.
Pumpkin decor without a knife
A pumpkin with a geometric or floral ornament will create a positive mood on the eve of All Saints' Day. Using stencils and your own artistic abilities, you can easily add variety to the festive interior.
Alisa Burke
Advice: Do not forget that after coloring the pumpkin becomes inedible.
Silver or gold colors will make the pumpkin a glamorous element of the festive interior. For painting, it will be most convenient to use aerosol cans.

Call it a day, Megan Morris
Lacy pumpkins are moderately gloomy, but surprisingly beautiful. Wrapping the fruit in nylon or gluing individual openwork patterns, you will turn Halloween into an elegant and feminine holiday.

Stylissim, living sweet living
On a black-painted pumpkin, rhinestones and marbles will look festive and mysterious.

Phunu, Huffington Post
Also, do not forget about sequins, with their help you can also quickly and easily turn a banal vegetable into an art object.

Familyholiday, Paisagismo
In addition to stones, wire can become a decoration material.

Good Housekeeping, The Magic Brush Inc.
The pumpkin stalk can be tied beautiful bow, and the fruit itself will be decorated with an inscription or a pattern of buttons. And from small pumpkins with the help of bandages and stickers, you can make a whole family.

Diva de Plantao, Memetales
carving pumpkins
A pumpkin can be a great interior decoration. You can make a flower vase out of it or just carve it into a pretty face.

Eileen Goodall
Get creative and use old stuff to make the Halloween symbol even creepier.

The Fox 94.1
There are many templates for carving a pumpkin, you can make your fruit unique by placing scary rats in the holes.

Motley News and Photos, My Halloween ideas
An illuminated pumpkin can delight not only children, but also real aesthetes. For this you will need interesting patterns or your own imagination.

Dump a day, Nisagra Designs
Autumn leaves, simple flowers... Literally anything can inspire you to decorate a pumpkin.

Home Display
Crafts in the form of pumpkins
Sew a pumpkin with your own hands, then the decor element will look according to your tastes and will last more than one season.

Ruchkodelki, Fair of Masters
Even velvet can serve as material for a pumpkin, and it will be convenient to make a stem, for example, from felt.

Stillwishingforfaries
You will need handy materials. Wrap a ball with thread or connect metal plates together.

Designer MacGyver, Digsdigs
Decorate the pumpkin with fresh flowers, then your holiday will also have a spring mood.

Crafts 'n Coffee, Noinetcafe
Paper or even a washcloth: everything can become a material for creating crafts in the form of a pumpkin.

Sand and Sisal, Etsy
Do not forget that festive table can also convey the atmosphere of the holiday. Use foods in characteristic colors and little tricks to make each dish look Halloween-inspired.

Buvdevskaya, Eventoclick
It turned out that we are similar in many ways, which allowed us to get closer in the future. But we'll start with classic options dealing with the main symbol of Halloween, which is also called the head or Jack-o'-lantern.
According to legend, Jack was a drinker and, as a result of his risky disputes with Satan, was forced to wander the world. He was not allowed into heaven and he did not fit in hell. Therefore, with him he carries a gourd lamp with a smoldering ember. Since then, such a composition has become a symbol of a lighthouse that helps lost souls to rest in peace.
Every year on October 31, many parts of the world celebrate (sometimes on a grand scale) the beautiful Night of the Floating Apples. Of course, such a celebration is more typical for countries like Mexico, but in Russia and the CIS countries, the tradition of carving pumpkins at the end of October is gaining momentum. And it's great! Agree, in our traditions there is nothing even close to similar.
Let's start from the very classic way creating a festive accessory - carving a pumpkin.
How to make a pumpkin for Halloween: detailed instructions with photos
Carving a beautiful Halloween addition from a pumpkin is not that difficult. It is enough to prepare the following tools and materials:
- pumpkin,
- scotch,
- sharp knife,
- spoon (choose the size depending on the size of the pumpkin),
- scissors,
- something long and sharp (wooden skewer, awl or knitting needle),
- marker (best food),
- stencil (if you can do it, you can draw a face or a drawing already on the pumpkin itself),
- one or more candles (you can use a small battery-operated lamp).
Progress
- First, cut off the lid of the pumpkin. To do this, draw a contour with a marker and cut out this element with a knife. A lot of effort will have to be made, especially if the pumpkin is large. The juice that comes out can be wiped off with a rag. If you stuck the knife deep enough, you should be able to remove the lid without any problems.
- Cut the seeds off the top and scoop them out from the inside of the pumpkin. If the fruit is large, it will be much easier to do it with your hands. Otherwise, use a spoon.
- Don't forget to take out the pulp. To do this, make notches inside the vegetable with a knife and remove the soft contents with a spoon. Cut off the pulp from the lid, leaving a hard layer.
- Now attach a pre-prepared template with the image you like (there will also be several photo options below). Stick it with tape so that the image does not slip.
- Now the image needs to be translated into a pumpkin. To do this, make small holes along the template with an awl along the entire contour.
- After that, with a sharp knife, connect all the dots together, cutting out the pattern. The more complex the selected composition, the more time it will take for this stage.
That's all. It remains only to put candles or a small lamp inside. For greater safety, you can degrease the pumpkin with alcohol.
For everyone who wants to see all the actions in detail, I advise you to watch the video:
Stencils and Templates for the Pumpkin Head
For pumpkin carving, the following templates will come in handy:


By the way, these ideas can be used in makeup.
Other ways to process pumpkin
If you want to do something less traditional, then the following ideas will come in handy for this.
Scary and toothy pumpkin head
Perfect for little pumpkins. For this, you will need a gourd, a small sharp knife, plastic vampire teeth, and a pair of round-tipped pins. Cut a hole large enough for plastic teeth to fit in. After that, they must be placed in the opening and stick the eyes-pins.

Cut out drawings ... with a drill
An alternative way to create patterns (if you prefer them rather than faces) can be realized if you use a drill with drills of different diameters. In this case, at the stage of creating a drawing, mark the places where the pattern should be located and drill holes.

small pumpkin candles
Usually pumpkins are used as lamps. But why not make an original candle out of a small fruit? To do this, you will need to cut off the top (you can use a metal baking dish). After completing all the other steps, you will need to insert a wick inside the cleaned pumpkin and fill it with melted wax. While the wax has not hardened, secure the wick in a vertical position.
Use wax in contrasting pumpkin colors to get bright colors. The vegetable itself can be additionally decorated with rhinestones or painted.
Decorative pumpkins: for those who don't like carving
To decorate your home for Halloween, you don't have to struggle with cutting and removing the pulp. You can leave the fruit whole. It will also keep for much longer.
colorful pumpkins
This collection contains several options. Firstly, you can simply paint the vegetables at your discretion (for example, with acrylic paints). You can also glue rhinestones or use markers.
We decorate with a garland
If you have some glue and a solid piece of garland with balls, then you can glue it to the pumpkin. To do this, coat the vegetable with glue and attach the garland to it in layers.
Confetti
Grab some confetti or create your own with a hole punch and colorful paper. Coat the pumpkin with glue and sprinkle with the resulting circles. On top, you can make an additional layer of glue so that the confetti does not fly around.

pumpkin unicorns
Of all the ideas presented, this one is the most interesting and unusual (especially if you are creating a surprise for a girl). For him, you will need a pumpkin, foamiran for ears, acrylic paints(you can take a balloon), polymer clay, glue and wooden skewers.
First, color the pumpkin and cut off the twig. After that, glue the ears made in advance from foamiran. Twist the horn and stick a skewer into it, bake the structure (if the clay is baked). After that, stick the structure into the “forehead” of the unicorn. Make a mane out of several sausages polymer clay and attach it to the creature's head as well. Color the muzzle.
Pumpkins in a variety of interpretations
On Halloween, it is not necessary to use only live vegetables. You can use them in most different options to decorate yourself and the room.
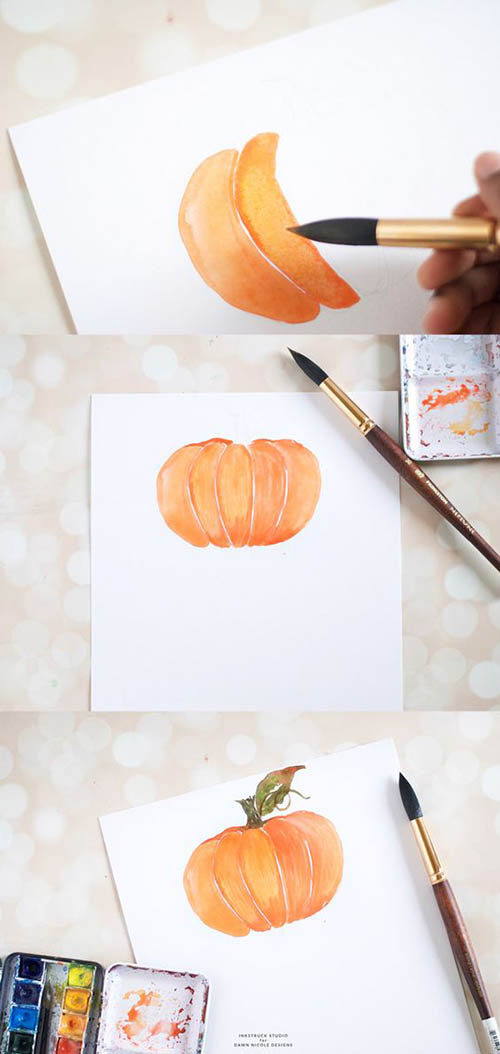
Draw a pumpkin
Think it's difficult? In fact, it is enough to have watercolor paints on hand and this simple master class. Agree, everyone will draw such slices?
Halloween costume
You or your child can appear as a charming pumpkin. In the first version presented, you only need a large amount of orange mesh, which can be assembled like a skirt, make a green border and sew on a scary face.

The same was done for the second variation.

But the next suit is easy to turn into a man's. To do this, you just need to replace the pack with red or green pants.

See even more options for holiday costumes in this article.
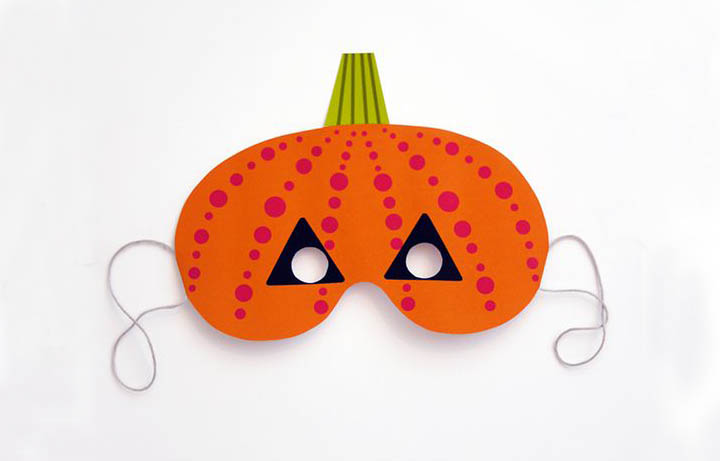
pumpkin mask
To create one you will need colored cardboard, colored paper or paint and a thin rubber band. Cut out the mask using the template below. Cut out the rest of the details from colored paper or paint with paints. Make holes on the side, thread the rubber band through.
paper pumpkins
To create such a paper pumpkin, you will need a template (available in the master class), thick decorative paper, a glue gun and scissors. Here it will be enough to cut out the base, glue it along the upper pieces and attach all the other elements.

Papier mache
Also paper, but the result is much more realistic. For such a pumpkin, you will need a balloon, threads, lots of newspaper strips, a primer and acrylic paints.
To begin, inflate the balloon (not very tightly), tie a ponytail and tie threads (better twine) to it so that the balloon can be broken into several sections. Tie the ends of the threads tightly at the opposite base. After that, start gluing the strips to the base (more on this). After applying all layers and drying them, prime the product and leave to dry, then paint.

Thread garland
There is nothing easier than making a garland of many pumpkins from threads. To do this, you only need a couple of colors of thread and a "fluffy" wire for the legs. Each fruit is a skein of thread, fastened with fluffy wire.
From cinnamon sticks and lid rings
Take 22 metal lid rings, twine and a few cinnamon sticks. Connect the rings like bagels on a bunch and place cinnamon sticks inside.
fabric pumpkin
For her, take a bag of fabric and stuff it tightly. Then fasten a knot with threads at one end and pull it out at the opposite. Distribute the threads as in the papier-mâché master class. You can use a stick as a ponytail.


Pipes in motion
A piece of corrugated pipe can easily turn into a festive fruit if you connect it together, paint it and make a stick-tail.

But what about acorns?
Have you ever thought that acorns look like little pumpkins? If they are painted in an appropriate way, you will get a bright likeness of pumpkins.

Kawaii felt pumpkin for Halloween
And here is a guest post from Nastya. Anastasia is a very creative and diversified person - a needlewoman, layout designer, caring mother. And in every direction she brings a piece of herself, creating something new and magnificent. What wonderful toys she makes out of wool and felt! How to optimize sites (and at the same time create designs)! I’m generally silent about the role of a young mother and the combination of all this.
So, I give the floor to Anastasia herself, who will tell us how to make a pumpkin for Halloween with your own hands from felt - a wonderful cute souvenir for family and friends on the Night of Floating Apples ^^ After all, who said that a pumpkin must be hard?
My name is Kalashnikova Anastasia, and I present to you today this small master class. Halloween is coming soon, so I suggest sewing its symbol out of felt - a cute pumpkin. The toy consists of simple details, so it is perfect for creativity with children.
You will need:

- Orange, white and black felt;
- Orange and white floss;
- Needle;
- Scissors;
- A little synthetic winterizer;
- Black beads for the eyes;
- Tape or magnet optional
You can download the pattern HERE, this is what it looks like:

The process of making a pumpkin
First of all, cut out all the necessary details from the felt. According to the pattern given above, the toy will turn out to be about 5 * 5 centimeters.
Disappearing or with a simple pencil draw curved lines to indicate the segments of the pumpkin. Sew them with a back stitch, I used two strands of light orange floss.

The first line is ready

And from the reverse side:

Now it's the turn of the eye. Place them in accordance with the pattern, just above the center line of the pumpkin body. Then sew with overlock stitch or needle-forward stitch.


Sew the stalk from the front.

My favorite moment: choosing the expression of the toy's face. See how much it changes when I just change the location of the eye-beads))


The muzzle is almost finished!

You can embroider the mouth with black floss or cut it out of felt. My toys are intended for children, so I do not use glue when making them.

Well, the muzzle of the pumpkin is ready. On the reverse side of the toy, I sew a pocket with a magnet, but if you wish, you can replace it with a ribbon.
Then sew both parts of the pumpkin with your favorite stitch. Don't forget to leave a hole for stuffing.

Stuff with a small amount of synthetic winterizer to give the toy volume.


Sew up the hole and voila! The cute pumpkin is ready!

If desired, you can sew the second half of the handle on the back:


Photo of a pumpkin and her owl friend ^^


If you liked my little master class, you can get acquainted with the rest of the Halloween toys in the article “Halloween Felt Crafts for Kids. Patterns and master classes.
Creative inspiration to you!
On my own behalf, I want to add that I hope to meet Anastasia on my blog more than once. This concludes the post about Halloween pumpkins and hope to see you here more than once.
Sincerely, Anastasia Skoreva and Anastasia Kalashnikova