Craft volumetric Christmas tree with your own hands. Christmas tree made of paper: wonderful DIY crafts. Forest beauty from spruce and pine cones
In December, brisk trade will open on city streets Christmas trees. It would seem that we should rejoice at such an abundance of New Year's bazaars, but often we feel sincerely sorry for the green beauties, cut down at a time when they had just begun to grow. Fortunately, now many people are purchasing artificial plastic spruce trees or even making them at home from the most unusual tools at hand - lemonade bottles, balls, tinsel, cones, and even books! Today we will share with you new information, from what and how to make a Christmas tree with your own hands for the New Year 2018, how to decorate it, what crafts you can bring to school and Kindergarten for the competition. From our master classes with step by step instructions and a photo you will learn how to make a green miracle from paper and cardboard with your own hands, cotton pads, threads and ribbons.
How to make a Christmas tree from ribbons with your own hands to school in stages: a master class at home for the New Year 2018
Probably, there are no materials left that craftsmen did not try to make christmas trees. Everything is used - from cones and paper sheets to soft toys and beads. But, perhaps, you have not yet heard how to make a Christmas tree from ribbons with your own hands to school at home. Then this video and master class is for you!
Video master class on making a Christmas tree from ribbons

After watching the video below, it will become clear to you how to make a small Christmas tree with your own hands at home at home from satin ribbons. This elegant mini-tree will need to be decorated with artificial pearl beads or large beads. However, this video master class will only work for those who know how to deal with small details and are used to making small crafts.
How to make a paper or cardboard Christmas tree at home for the kindergarten for the New Year 2018
Before the New Year, preschoolers often give simple tasks to preschoolers - they offer the children to make something for the upcoming holidays: a box for gifts, a snowman made of cotton, christmas toys. Perhaps, after reading our recommendations and watching photos and videos of master classes, parents will be able to explain to their daughters and sons how to make a Christmas tree in a kindergarten with their own hands from paper or cardboard at home.

Master class on making a paper Christmas tree with step by step photos

You must have seen how diligently kids make different paper crafts for the holidays. How enthusiastically the eyes of the children shine, realizing that everything they do is just fine! This simple master class step by step photos will explain to you how at home you can make a Christmas tree in kindergarten- do-it-yourself crafts from paper or cardboard. In addition, you will need:
- Pencil;
- Scissors;
- Tinsel;
- Fluffy wire;
- Glue;
- sequins;
- Elastic;
- Stand with filler or a large decorative candle.

How to make a Christmas tree with your own hands at home to school for the New Year's craft competition-2018
Before the New Year in schools, children are often asked to bring homemade New Year-themed toys to classes. At the same time, the Christmas tree always remains the most popular product. If you want to learn how to make the best Christmas tree with your own hands at home and win a craft competition at school, read our instructions, memorize the recommendations of the master classes, watch the video with explanations.

Craft Christmas tree for a school competition - Master class with a photo step by step

The most talented children always participate in school competitions. Fighting for a prize, they think over in advance the most unexpected, original products and look for suitable materials for them. After reading how to make a Christmas tree with their own hands at home to school for a craft competition, the guys will be able to make unusual Christmas trees. They can decorate both the classroom and the shelf with souvenirs. Carefully read all the instructions of the master class and get to work.

The Christmas tree can be made in another way. Just stick on the cone bright ribbons from paper until you get wat such a miracle.

How to make a Christmas tree from cotton pads at home with your own hands: a master class with a photo
Have you still believed that cotton pads sold in supermarkets and pharmacies are bought up only by ladies who use them to remove makeup? No, they are also acquired by craftsmen, lovers unusual crafts. If you want to make a fluffy New Year's beauty covered with snow, read how to make a Christmas tree from cotton pads at home with your own hands: a master class with a photo will explain all your steps to you. The size of the product will depend on the size of the Whatman sheet for crafts.
Christmas tree made of cotton pads step by step - Master class with a photo of children's crafts

Having learned how to make a beautiful Christmas tree at home from ordinary cotton pads with your own hands, turning to our master class with photos and explanations, you can surprise all your friends and relatives. Rarely do you find an artificial spruce of such beauty! Try to make it yourself.
Before starting work, prepare:
- Whatman sheet;
- Glue stick;
- stapler;
- Lots of cotton pads;
- Scissors;
- Adhesive plaster;
- Decorations for the finished craft.


How to make a Christmas tree at home from threads for the New Year 2018: video master class with explanations
Among all the Christmas trees made from the most unusual materials, probably the lightest in weight is the filament tree. Well, to ak at home, to make a simple, but durable and beautiful Christmas tree with your own hands from threads, will explain the video master class with explanations from the author of such an unusual craft.

Do-it-yourself Christmas tree made of threads: a master class on video at home

To surprise your friends who came to visit you on New Year, see how to make a Christmas tree with your own hands from threads at home: a video master class with explanations will give you all the necessary tips. This craft is quite inexpensive, but it always looks amazingly airy!
How to make a Christmas tree from tinsel to celebrate the New Year 2018 with your own hands: step-by-step instructions with photos for kindergarten and school
Often we feel sorry for the felled Christmas trees, so many are looking for an alternative to a real New Year's tree. It can be an artificial homemade spruce from a brilliant decor. Having learned how to make a Christmas tree for the 2018 meeting with your own hands from tinsel, you will give up the idea of \u200b\u200bgoing to the Christmas tree bazaar.

Christmas tree 2018 from tinsel - Master class with photos and instructions

Having prepared inexpensive, affordable materials and tools, remembering how to make a chic Christmas tree from shiny tinsel for the New Year 2018 with your own hands, you can get to work. Just in case, let the page with the master class open on it and instructions for making crafts be open.

How to make a Christmas tree in stages with your own hands from improvised tools and books: a master class for children for the New Year 2018
How can you imagine a modern Christmas tree schematically? In fact, this is a triangular bright structure, decorated brilliant decor, beads and garlands. Some craftsmen manage to make spruces even from glossy magazines! We will tell you how to make a Christmas tree with your own hands from improvised tools and books.

Christmas tree from books - Master class with step-by-step photos

Having got acquainted with the master class explaining how to make the most unusual Christmas tree with your own hands from various improvised means and books available in your home library, you will understand that such an activity will bring you real pleasure. Well when you last time were holding thick volumes of novels in their hands? Now you will do it with pleasure!

What to make a Christmas tree with your own hands: a master class of crafts from cones
The most "alive" are Christmas trees made from natural materials. If you really want to know what you can do with your own hands to make a realistic Christmas tree, a master class with explanations on creating crafts from cones will help you prepare for the New Year 2018.

Christmas tree for the New Year 2018 from cones - Master class with instructions


If you are looking for what to make a Christmas tree with your own hands, a cone crafts master class, or rather, each of its instructions, will answer all your questions. In addition to dense but fully opened buds, you will need the following:
- Thermal gun;
- Hot glue;
- Scissors;
- Cardboard;
- Flowerpot;
- Tinsel and toys;
- A can of white or silver (gold) paint.
Immediately make a reservation that you can choose any size of spruce. Of course, it will take more than a dozen cones to make a large tree.

What can you make a Christmas tree for crafts for the New Year 2018 and how to decorate it
Having decided that in no case will you buy a cut down tree at the Christmas tree market, thinking about what you can make a Christmas tree for crafts for the New Year 2018 and how to decorate it, refer to the master classes presented on this page. One of them tells how to make cotton tree. When following step-by-step instructions, home craftsmen always get a fluffy white beauty!

White fluffy Christmas tree made of cotton wool - Master class with photo

If, after much thought about what you can make an original Christmas tree for crafts for the New Year 2018 and how to decorate it unusually and brightly, you decide that the cheapest option is for you, read our master class and look carefully at his photo. Create a beautiful Christmas tree from ordinary cotton wool!

How to make a Christmas tree with your own hands from plastic bottles and how to decorate it
Sometimes, throwing away seemingly completely unnecessary things, we don’t realize that you are sending valuable building material to the trash for the most unusual crafts. Having learned how to make a Christmas tree with your own hands from plastic bottles and how to decorate it, you will most likely reconsider your attitude to some "garbage".

Green Christmas tree made of plastic bottles: a master class with explanations

Perhaps, after drinking lemonade or Sprite, you throw the used bottle in the trash without regret? In vain. If you are looking for what to give a friend for the New Year, our master class with explanations on how to make an original green Christmas tree with your own hands from plastic bottles and how to decorate it beautifully will help you in choosing a present for the holiday.
Prepare for work:
- Green plastic bottle
- Scissors;
- cork stopper;
- a candle;
- Glue;
- Foam rubber;
- Little a plastic cup from under yogurt or mousse.


Now that you've seen some great tutorials on how to make your own Christmas tree using a variety of materials, including plastic bottles, ribbons, cones, tinsel, books, thread, cotton pads, and paper, you and your child can make some great Christmas tree crafts. New 2018 year in kindergarten or school. Perhaps it is your product that will take first place in the competition, and all rivals will puzzle over what you made such beauty from.
On the eve of the New Year, it becomes relevant to make Christmas trees with your own hands. Volumetric Christmas trees made of colored paper will perfectly decorate the apartment. Such creative gift will be a pleasant surprise, especially if it is made together with children.
It will be very exciting to make such a Christmas tree with children.

Such Christmas trees will perfectly decorate the apartment on a festive night.

Before the New Year, it is very popular to make Christmas trees out of paper.
To make crafts, you will need green corrugated paper, PVA glue, green cardboard, scissors, and a toothpick.
Before starting to make a Christmas tree, you should prepare the main tool for twisting paper "rolls". To do this, the toothpick is cut off at the edges. On one side, make a small incision with a knife, slightly dividing it in half.

It is not difficult to make such a Christmas tree

To create such a Christmas tree, prepare paper, glue and scissors
Christmas tree making steps
Draw a large circle on the cardboard using a compass. Next, cut it out. This will be the basis of the future Christmas tree.
- In order to roll a cone from the resulting circle, it should be connected in half, and cut along the fold. Form a cone from the resulting semicircle. Glue the junction of the edge of the cone with its base with glue. Wait a few minutes to allow the glue to hold the cardboard together well and dry.
- For the manufacture of quilling strips, green corrugated paper is taken, and cuts 1.5 centimeters wide are applied to it.
- On the resulting tapes along the entire length, make frequent cuts, not reaching the edge. This will turn out a fringe of needles for a tree.
- To perform the main element of paper rolling, the spiral, one end of the strip is inserted into the forked part of the toothpick and a piece of paper is wound along the entire length onto the toothpick. In this case, it is better to twist the toothpick itself, and not the tape. To get the same elements, try to twist evenly and neatly.
- To prevent the twisted paper roll from untwisting, the free end is glued to the base. Let the glue dry.
- After all the elements are made, to give them the correct volume, you need to gently fluff the chopped fringe on them.
- Glue the prepared paper rolls onto the cone. It is better to start doing this from the top of the cone. To do this, the pointed end is lubricated with glue and an element is put on it.
- Press the item. Next, glue the entire cone with fluffy spirals.
The Christmas tree will look brighter if it is decorated with bows and balls of corrugated paper. To do this, you can roll multi-colored balls or squares out of it, connected twice, tied in the middle with a thread. Made Christmas decorations glue.

Such Christmas trees will create festive atmosphere in the apartment

To make the tree look beautiful, decorate it with bows

To make a Christmas tree, you can use the instructions
Herringbone in quilling technique
A quilling Christmas tree will become beautiful and original decoration holiday postcard.
To make a Christmas tree, you will need A4 colored paper, scissors, a toothpick, PVA glue, a Christmas tree base (it can be colored cardboard or a postcard)
To make the Christmas tree look more creative, you can take colored paper green, but different shades. Roll up 4-5 elements of each color.
- On colored paper, draw stripes 3-5 millimeters wide, cut.
- Next, use a toothpick to start making paper rolls. To do this, insert one edge into the incision made with a knife on a toothpick and twist evenly. Instead of a toothpick, you can use wooden skewers for barbecue or a regular rod. Then you can simply wind in the middle of the selected tool.
- In order for the resulting spiral to be free, it is better to let it go. When it blooms a little on the table, fasten it to the selected diameter.
- For a more interesting Christmas tree, the bases of the spirals can be twisted in various diameters.
- Laying out Christmas trees on cardboard is best to start from the top, taking the smallest element. Glue in the shape of a cone did everything. Maybe in an irregular order.
- The Christmas tree can be decorated with ornaments in the form of twisted spirals of a very small diameter or beads.

For the manufacture of spirals, you can use colored paper

A quilling Christmas tree will become a beautiful and original decoration for a holiday card.
Christmas tree from a cardboard cylinder from toilet paper
Non-traditional decoration New Year's room can become Christmas tree-shaped pendants made from a cardboard sleeve from toilet paper. Such holiday symbols can be hung as separate decorative elements or as a garland.
For decoration you will need:
- cardboard, the inside of toilet paper;
- emerald or green acrylic paint;
- bright ribbon;
- flat pieces for decoration. it can be buttons, rhinestones;
- glue (for gluing plastic, the “crystal moment” is perfect, its transparent texture will be invisible, plus it dries instantly).
- scissors.
When everything you need is prepared, you can start preparing the decoration.

Christmas trees made by yourself will perfectly decorate the apartment

Such Christmas trees can be hung on the ceiling or Christmas tree.

Making a Christmas tree this way is a little easier
First, the roll should be painted with paint in several layers and allowed to dry well. This may take up to half an hour.
In order to make a spiral out of a roll, you need, starting from the top, cut it in a single line to the bottom with a width of 1.5 cm. The ends will be pointed.
In order to give the tree the correct shape, you should twist the cut strip into a coil. To fix the shape, put the resulting spiral under a heavy object, such as a stack of books, for 30-60 minutes.
Unwind the future New Year tree a little, and glue the prepared round elements on the outside, which will imitate balls. You can arrange them both in a chaotic manner, and according to a certain algorithm.
Glue a bright thin ribbon to the top of the craft. It can be a red ribbon to decorate flowers, or even a thick thread, yarn.


Making your own Christmas tree is not difficult.
Japanese paper Christmas tree
For crafts, you can take either special Japanese paper or brightly colored glossy cardboard.
You will also need: wrapping paper (magazine sheets with a bright image), A4 white sheet, skewers, pencil, scissors, ruler, PVA glue.
For the base of the Christmas tree, cut a regular sheet of paper into strips 2 cm wide. Twist all the strips into circles. Attach all the elements to each other in a circle with glue. You should get a large circle of spirals. The width of the circle is arbitrary. The wider, the more stable the figure will be.
Cut out two rectangles of cardboard measuring 21 by 28 cm. Bend each of them with an accordion so that the sides are 1.5 cm wide. Round off the ends of the accordion.
Fold the part in half, gluing it end-to-end. A semicircle is formed
Glue the resulting semicircles with each other so that you get a circle. This will bottom row tree branches. You can replace the glue with wire by piercing both semicircles and twisting its ends.
Make rectangles in two pieces of the following sizes: 18 by 28, 16 by 28, 14 by 26, 12 by 26, 8 by 25, 6 by 23.
Make an accordion from all the rectangles, connect the same semicircles in 6 circles.
Now you need to prepare the skewers. They need to be wrapped. To do this, you will have to cut a strip several centimeters wide from a bright sheet, wrap it in a spiral.
Put on a skewer all the circles of the branches made. There should be wider circles at the bottom.

The herringbone is a very beautiful decorative element.

A Christmas tree made by one's own efforts will perfectly complement the festive atmosphere.

To create such a Christmas tree, glossy paper or cardboard is suitable.
Christmas tree in origami technique
A green paper Christmas tree is very easy and quick to make using the origami technique. Mastering the art will be happy not only for children, but also for adults. This technique is attractive in that figures can be made from it anywhere, without additional tools at hand.
You will need green colored paper and scissors.
Instruction
- Make a square out of paper.
- Connect first in half, running your finger along the bend. Then unfold and bend in half diagonally, on both sides. Expand. You will get a square with highlighted stripes.
- Fold along the obtained preliminary bends, as shown in the figure.
- Bend each side to the middle.
- Expand the resulting bend so that you get a pocket, and connect the edge of the pocket with the center.
- Turn the corners of the Christmas tree to the outside, then fold them inward.
- The Christmas tree will have 8 equal edges, which must be cut along the edges horizontally in 4 places.
- Bend the notched sides down diagonally.
- Bend the previous bend and tuck it inside the Christmas tree along the resulting line.
- The top of the head can be stitched with a thread, making it Christmas tree toy or pendant for interior decoration.

This Christmas tree can be made quickly and easily.

Such a Christmas tree can be made without additional funds
Christmas tree made of paper strips
Many mothers prefer to make gifts for grandparents not only with their own hands, but also begin to instill a craving for creativity in their kids. Young children will be interested in making such a Christmas tree themselves.
For crafts, you will need multi-colored colored paper, scissors, a sheet of cardboard.
Children 3-4 years old will be able to make blanks from strips on their own. For younger children, their mother can pre-cook them.
- Cut colored paper into even ribbons of the same width (1-1.5 cm), but of different lengths.
- Smear the blanks with glue and glue them on cardboard in the shape of a Christmas tree. From below, horizontally arrange longer segments, gradually shortening their length to the top of the tree.

These trees are very easy to make.

Such a Christmas tree will be a great decoration for a Christmas tree or apartment.

Children can be involved in the creation of the Christmas tree
Volumetric Christmas tree from old paper
To create a New Year's beauty, you can use various improvised means. A product made from sheets of old paper or magazines will look especially interesting.

Such a Christmas tree will look unusual

Herringbone made on their own will perfectly decorate the interior
A quick and easy way to make such a piece of Christmas decor
- Take 2 magazines, PVA glue.
- Fold each sheet into 2 pieces. Bend the protruding edge. Get half a tree.
- For the second half, perform the same procedure with the second magazine.
- Glue both halves to get the finished Christmas tree. You can make a base by gluing a few wine corks on the bottom.
To make the Christmas tree look more creative, you can sprinkle it around the edges with spray paint.
Video: How to make a paper Christmas tree with your own hands
50 photo ideas for creating a Christmas tree from paper with your own hands:


Click Class
Tell VK
Let's decorate our home winter holiday. We have already made various ones, hung them on windows and walls. Now we want to give the holiday symbolism. And this, of course, is the main princess of the celebration - the Christmas tree. I know that many feel sorry for the trees and replace them with artificial counterparts. But sometimes you just want to make something with your own hands in order to get satisfaction from the action and accent in the decor.
All craft ideas are easy to do with the kids. To make it easier to do the job, make the basics in advance. And try not to skimp on decor. Buy more different beads, ribbons, ribbons, beautiful buttons. Collect small toys from kinders and decorate with them. And they will go into business and will not wallow.
You can create beauty from everything that is at hand. The main thing is to attach to this a share of imagination and all your accuracy. With modern devices, such as a glue gun, you can give the product original forms and fix different textures and materials.
I know that wine bottle corks and ice cream sticks are also used. Well, we didn’t have traffic jams at home, and the sticks have long been sold for different needs, so we turn to materials that any housewife will definitely have - pasta and yarn.
Let's start with pasta. I know that various snowflakes are made from them. It turns out that they are also suitable for the Christmas tree.

We will need:
- A pack of pasta (better to take feathers)
- glue gun
- Cardboard sheet
- Dye
- Decor
It is better to prefer the shape of "feathers" or "spirals". choose good manufacturer so that all the little things are even and the same length.
First of all, we glue a cone out of cardboard. I do this by simply twisting the sheet around my hand. To prevent the workpiece from falling apart, we fasten it with a stapler.

And now we cut the base so that the tree stands straight, and not crooked.

We always start from the bottom. “Lay” the first two rows, i.e. glue them so that they lie on the surface, so the product will be more stable.
And the next rows need to be raised exactly on the previous one by an amount equal to half the “spiral”.

When you finish the top, we begin to cover the entire craft with paint.

You can take green, or you can buy gold or silver paint in a spray can. Only then you need to spray it not at home.
I really like the result. It doesn't take much time, but it looks very elegant.

Now it's the turn of yarn and cord.
To make a Christmas tree out of yarn, you need to wind the thread exactly one above the other on a paper cone. Periodically fastening it with hot glue to the base.

Decorate with decor.

This product is made even faster than pasta.
You can decorate them with buttons.


We will need:
- Wire
- Decor
First, we select the wire. It should be firm and not thin. From it we turn a cone-shaped spiral. We check for stability. The bottom can be wrapped twice.

We begin to string the cord on the wire.

Dry and decorate.
Glue will give the structure additional strength and will not allow the cord to slide down the frame.
Volumetric Christmas tree made of paper
Paper is always the first thing that the word "craft" is associated with. And from it you can create not one Christmas tree, but a whole spruce forest in which not a single tree will be repeated!
Let's say we want a paper tree to delight us on the kitchen table. Then you need to make it fluffy and voluminous. And also the most stable.
So, I picked up a few detailed master classes with a clear description of the process.
Option 1
We will need:
- cardboard cone
- Paper of green color of different shades.
We cut out many circles of the same size from paper.
And we begin to glue their edges to the cone, observing the rows.

The first layer always goes at the base.
This craft is available in terms of difficulty, even for a two-year-old child. And it looks quite rich because of the different shades of the same color.
Option 2. Terry cone herringbone
Cut out 4 half circles. Each of them is smaller than the previous one in diameter by 2 centimeters.

We glue the blanks into a cone and cut the edges around the perimeter a little to get the volume. Fold the terry edges a little.
Now glue a smaller cone on the largest workpiece. And so in the direction of decreasing.
That's the whole easy process.
Option 3. Let's make a Christmas tree from paper circles
Cut out 4 circles. Each of them is 1 centimeter smaller than the previous one.

Then we fold each circle 3-4 times in half.
We also make the base out of paper. You can wrap green paper around a pencil or a kebab stick.
We string round blanks on the barrel in descending order of size.
To give stability, you can plant the trunk in plasticine, wax or a wine cork.
Option 4
We mark 15 circles, each time reducing the diameter by 1 centimeter. Then we divide each circle into 12 equal parts, drawing lines through the center.

From the center mark half the radius and draw a circle. Now we cut the lines clearly to the drawn circle.
Glue the tips on each petal.
When you have completed all the levels, start collecting the Christmas tree from the widest row to the smallest.
How do you like the ideas, I think that you will find ideas for yourself.
Craft from cotton pads for the new year in kindergarten
The child was taken aback by the task that tomorrow you need to bring crafts to kindergarten? And outside the window, of course, it is already night. Then you can use the packaging of cotton pads. In most families, they are actively used.

We will need:
- Packing of cotton pads
- Cardboard for the cone base
- PVA glue
- Decor
We fold the cardboard frame, connect the edges with a stapler.
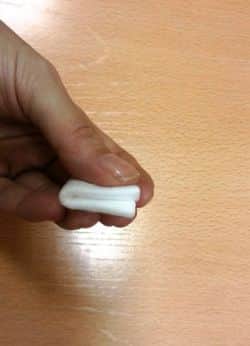
Take a cotton pad and fold it in half.

Then, on a harmless PVA glue, we plant two tips of a cotton semicircle.

And we glue the workpiece to the base, after smearing its fold with the same PVA glue.

So we do row by row. It is better to glue cotton pads closer to each other so that there is a minimum of gaps.

It remains only to decorate the delicate beauty!

Children in kindergarten will definitely like your product, and they will not be ashamed in front of other parents.
DIY craft from napkins
Another very affordable material is napkins. You can use the most inexpensive and monophonic.
We take white, red, blue and green festive shades.

We fold the napkin several times to get the shape of a square, then cut the fold points and cross-fasten the middle with a stapler.

Now we bend each layer, forming a pompom.

Lay out the first row on the frame with these balls. Then we glue balls and other Christmas tree decorations on double-sided tape.
And fill the entire surface of the frame with napkins.
Everything is pretty fast.
By the way, you can see how to make from napkins here. It also turns out very nice.
Candy Christmas tree
A wonderful gift would be a candy craft: buy a box of good candies in a beautiful package at the grocery store.
It is made of two parts - a base for sweets and a barrel.

We glue the base with a side of 23 centimeters. When cutting, indent along the bottom edge and at one edge 1 cm. We will apply glue to them.

Decorate beautiful paper or film. Glue the bottom to its base.

We make the trunk, decorate it and glue it with the frame.

Now we evenly put sweets, braid or Christmas tree beads on the hot glue.

Use the same color scheme for the base and candies.
We make a Christmas tree for the New Year from pine cones
Natural material always gives the desired zest to the decor. It immediately smells of freshness and resin at home. Will give a symbolic meaning to this winter holiday.
Cones are also suitable for various crafts.
You can create a Christmas tree from only cones, or you can dilute them with sisal balls, decorative flowers or fir branches.
The combination of cones and dried citruses also looks unusual.

Glue the cones onto the base with hot glue. You can not think about the side that you have them. This will give a slight bewitching negligence to the product.

Alternating bumps with Christmas balls or other decor.

We cover with artificial snow or white enamel from the sprayer.

Everything is quite easy, and the result is incredibly beautiful.
Light tinsel Christmas tree
We can't imagine the New Year without tinsel! There are no decorations on it now: stars with balls, and multi-colored tips. It decorates windows, curtains, walls and, of course, is used as a material for crafts: wreaths and Christmas trees.
Since most tinsel manufacturers thread it on a thin wire, it is easy to bend and shape in all sorts of ways.
A spruce tree is made from it in three minutes!
We will need:
- Tinsel
- Cardboard sheet
- Double sided tape.
From cardboard we make a base in the form of a cone and glue it with double-sided tape.

We remove the protective film from the first row and begin to glue the end of the tinsel, tightly wrapping the frame.
If you didn’t have enough tinsel, then glue the end with tape, and put the next fluffy ribbon of the same color on top of it.
Fluffy pom-pom beauty
Pompoms have also long been loved by our craftswomen. Previously, we made a dog out of them, now we will create a fluffy beauty.
The balls themselves can be made in two different ways: winding 20 layers on a fork or use two round blanks.

We will go with the second method.
We take cardboard or plastic, cut out two identical rings.

Now stepping back from the edge of the thread 5 centimeters, we begin to wind the yarn very tightly.
Then cut the outer fold between the blanks.

With the thread end left, we tie the middle of the pompom so as not to lose all the threads.

Now we are looking for a thick wire and turn it into a spiral. Leave the base wide. We string pom-poms on it.

If the wire is not found, then we use the experience of previous products and form a triangular or conical base.
Felt Christmas Tree Ideas
Felt is also popular with our craftswomen. No matter what they do, educational toys and Christmas tree decorations. Today I will give a few ideas for creating a spruce tree.
From the simplest options to the most complex.
Option 1. Cut out 10 Christmas trees of the same size from felt. Fold in half and glue the fold to the trunk.
We use branches, saw cuts of trees (preferably spruce or pine).

Option 2. Cut out many identical triangles from felt.

Glue them to the frame in rows. The upper triangle lies between the two lower ones!

Option 3. We prepare 5 squares of different sizes: 9 cm, 7 cm, 5 cm, 3 cm, 1 cm.
We make five of each size.

Now we string the largest squares onto the thick one, distributing them diagonally to each other so that there are no voids.
We pass all the squares like this.
New Year's beauty from fabric
And two more ideas of fabric beauties in the piggy bank. The ends can be finished with a decorative stitch with a thick contrasting thread. Sew buttons or beads onto symbolic branches.

Use several colors of fabrics and textures. For example, take velvet on one side and linen on the other.

You can also choose different patterns in one color scheme or vice versa to play with flowers - companions.

You can fill the Christmas tree with holofiber, synthetic winterizer or cuts, the remnants of your creativity.
If the product is small, fill it with cotton wool.
My dear, I tried to find for you the most interesting and affordable materials for creativity. I'd love to hear your opinion in the comments!
tweet
Tell VK
What kind of New Year can be imagined without the main symbol - the Christmas tree. Green beauties on the eve of the holiday are sold at every corner. However, for such a holiday it is not necessary to buy a live spruce. Try to make it yourself. Therefore, in this article we will talk about what you can make a Christmas tree from. new year holiday. It is worth saying that you can create the main symbol of the new year from completely different materials. And today we will talk about it in more detail.
Mini Christmas trees from cones.
If your children are just as fond of making crafts as you are, then they can also participate in the creation of such crafts. The next craft - a Christmas tree - consists of cones and plasticine. All your child needs is to learn how to roll small balls out of plasticine. At the same time, for this purpose, you can use plasticine of the brightest shades. As a base for a Christmas tree, you can use ordinary thread spools. But you have to wrap them in foil. The cones are attached to the coil with super glue.

If you like the next Christmas tree, then take acrylic paints and paint them a bump. Remember that it is most reasonable to use green paint here. In this case, the tips of the Christmas tree are painted in White color paint. Make from plasticine Brown tree base. Use an asterisk for decoration.

The next craft is a little more difficult to do. Here it is worth using beads. Therefore, if your child is small, then control this process yourself. Glue the beads to the cone with a glue gun.

All the above crafts from cones can not only decorate your home. It will be nice to present such Christmas trees as a gift to your loved one.
The next craft looks more voluminous. And to create it, you need a few cones. As a basis here, you should use a cardboard cone. After that, the cone is glued with cones on all sides. In this work, it is customary to use a cool gun. As soon as the glue dries, glue the Christmas tree with large beads.

Simple tinsel Christmas trees.
If you read this article, you will be able to learn how to make an artificial Christmas tree at home. Above, we offered you ideas for Christmas trees that were made from cones. Now we suggest using tinsel for this work. Naturally, for such a craft, you must purchase the tinsel itself. For Christmas trees, make cardboard cones. Then, glue the tinsel to them. In this case, the tinsel should be glued to the cone in a spiral. While working, arm yourself with a glue gun.

Candy Christmas tree.
The next tree may not only be beautiful decoration, but also very nice gift. To make such a craft, make a cone. Fix the candy on it with adhesive tape, and then wrap the Christmas tree with tinsel.


Simple and voluminous tree from paper.
The next craft is also very easy to make. It can be a great decoration for a child's room. new year holidays. For manufacturing, prepare:
- thick green cardboard
- markers, glitter, paints,
- scissors and glue
- scotch.
Working process:
- We bend a sheet of cardboard in half and cut along the fold with scissors.
- We put the two parts that you have turned together together and bend in half again.
- Opposite the fold, using a marker, draw a half of the Christmas tree.
- Now cut along the drawn line. As a result, you will get 2 trees that will not differ from each other in any way.
- Gently bend each tree in half. Mark the center.
- Next, make an incision on one of the trees. The incision should be long from the very top to middle line. On the other tree, the cut should be from the bottom to the middle.
- Now we connect the Christmas trees by inserting them into the resulting cuts.
- And to make the tree more stable, use adhesive tape.
- That's all, now proceed to decorate your Christmas tree. Use your imagination and handy materials here.

And here is another version of the Christmas tree, which you can do in the same way from an old cardboard box.

Elegant Christmas tree made of paper.

If you want to know how to make a Christmas tree beautifully, then the following idea was created especially for you. For such a Christmas tree, prepare:
- colored paper,
- scotch,
- glue and scissors.

 The most difficult thing is to cut strips of colored paper, which must have the same length and width. In addition, each strip must be glued with adhesive tape in order to get a loop. After that, all the loops are glued to a strip of adhesive tape.
You should wrap a cone of thick cardboard with similar garlands.
How to make a glowing Christmas tree.
If you have decided to learn how to make a Christmas tree with your own hands, then you are on the right track. Above we have described some simple crafts. Now it's the turn of serious creativity in order to do something original.
 For a creative Christmas tree, prepare:
- Flower floristic sphere. For this case, we recommend buying more than one shade of green.
- Scissors, PVA glue.
- Thick cardboard for the cone.
- Cellophane, pins, garland, floral wire.
- Various decorations.
Working process:
- First, we make a cone from cardboard.
- We wrap the cone with cellophane.
- In a container, dilute the glue with water.
- We cut the floristic mesh into pieces and lower each piece into containers with glue and water.
- Now stick the segments on the cone. At the same time, the joints are glued again for reliability.
- Use pins to keep your craft from coming apart at the seams.
- As a result, you have the first layer of the Christmas tree. Make the second layer in the same way. Remember that after gluing the second layer, the structure should dry well.
- If the glue is dry, remove your Christmas tree from the cone.
- A garland is placed inside the Christmas tree.
- Now just decorate the Christmas tree as you wish.
Tree of threads.
If you want to have something unusual for the New Year in your house, then in addition to standard decorations, decorate your house various crafts on New Year's theme.
The creation of the next Christmas tree is also quite easy to handle. Take a sheet of drawing paper and make a cone out of it. Coat the cone with glue and start wrapping it with green thread.
When the glue dries, separate the cone from the paper.
Decorate the finished Christmas tree with various accessories. Ornaments are also glued to the Christmas tree with glue.

Finally
Spend your New Year bright! Make a variety of different Christmas trees that can make the atmosphere in your home truly magical.
The Christmas tree is, without exaggeration, an international symbol of the New Year, and it is also an image associated with childish carelessness, miracles and cute fairy tales. And if there is anything to give for this holiday, it is an original Christmas tree, which you can make yourself - for example, from cardboard.
We offer you original ideas: how to do Christmas tree do-it-yourself cardboard, ready-made templates, step by step instructions with photos and videos.
Beautiful does not mean difficult, so many models of cardboard Christmas trees can really be made even by children. Although they look very impressive, they can serve not only as an excellent craft for kindergarten or school, but also as a nice addition to a gift to relatives and friends.
From cardboard and tinsel
For the manufacture we need quite a few materials:
- white cardboard (it is advisable to take different formats - traditional A4 and larger ones from A1 to A3);
- green or multi-colored tinsel - as anyone likes;
- glue stick;
- double sided tape;
- compass;
- sweets in beautiful wrappers - round truffles look especially impressive.
Here's how to make such a Christmas tree:
Step 1. First you need to make a cone. To do this, on cardboard, using a compass, draw a circle of arbitrary diameter, depending on the height of the Christmas tree: 15 cm, 20 cm, or even 30-40 cm. Then we cut off exactly a quarter from this circle and glue the remaining parts, forming a cone, as shown in the figure.

Step 2. You can immediately make cones of different sizes, but their shape should be approximately the same - the upper corner is quite sharp.

Step 3. Now, with the help of a glue stick or PVA, we simply stick the tinsel - in a circle to the very top of the head. For beauty, you can take 2 different tinsels of contrasting shades and simply alternate them in a spiral.

Step 4 Now let's attach the candies. This can be done with glue, but it is most convenient to use double-sided tape. It turns out such a delicious beauty - great gift for the baby, and he can do it on his own.

And once again we will repeat the entire sequence of actions in the photo.

From cardboard and cotton pads
This craft is made a little longer, because it requires more painstaking work. However, all the actions are simple enough for younger students to cope with them.
We again need:
- cone,
- a lot of cotton pads (100-200 pieces depending on the size of the model),
- glue,
- stand. It can be made from some container, a pot, which is better to decorate with tinsel beforehand.
The sequence of actions is as follows:
Step 1. First, as in the previous case, we make a cone.

Step 2. And now we prepare cotton pads. They just need to be folded in half 2 times, then apply glue to the bends and fix them on the surface of the cone, as shown in the photo.
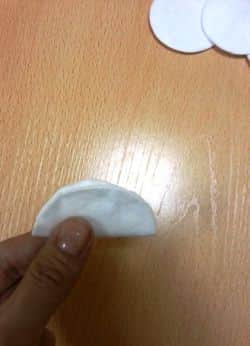


Step 3. And so we glue the cone with discs to the very top. This should be done quite carefully, in even rows. For convenience, on the surface of the cone, you can first (still on the circle) draw several even rows for reference with a compass.


Step 4. Now let's make a stand. To do this, take a small pot and wrap it with shiny paper or tinsel, fixing it with glue.
You will also need to make a "barrel" from a cardboard tube, on which to stick a circle of cardboard. It is attached to the inner side of the cone, after which the structure becomes quite stable.

Step 5. Well, now the most pleasant stage is to decorate the Christmas tree in the way that fantasy tells. Ribbons, bows, tinsel, sparkles, colored paper figurines will do. It turns out a real collective creativity, in which several kids can participate.

You can see the whole process visually here:
In general, making Christmas trees from cardboard based on a cone is a fairly popular technique that allows you to use creative imagination in all its glory. Indeed, along with cotton pads and tinsel, you can use the most different materials- for example, threads, self-adhesive rhinestones, etc.
10 inspiring ideas: how to make a Christmas tree with your own hands
And there are other ways to make Christmas trees - here are 10 ideas for inspiration.
Christmas tree made of cardboard - original photo stand
Now let's move on to more complex model cardboard trees. For example, original gift- photo stand You can make such a Christmas tree with your own hands and give it to colleagues, relatives and friends, and just please yourself with an original decoration for your favorite holiday.
Each person has, perhaps, hundreds and thousands of photographs in stock, but among them there will surely be the very same favorite photo, which in itself creates a festive mood. Why not make a special stand for such a picture?
We will need:
- green cardboard - 1 sheet;
- a skein of thick threads of green or blue-green color;
- white boucle threads or cotton balls;
- glue;
- pencil;
- scissors;
- beads;
- glue gun.

We will act in stages:
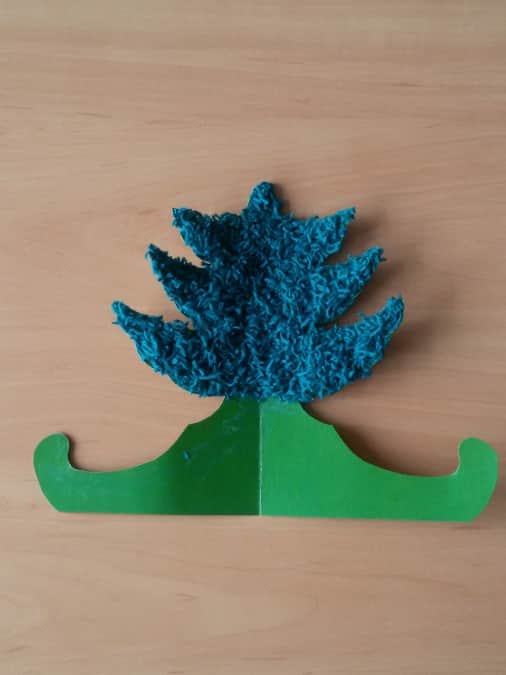
Step 1. First of all, we fold a sheet of green cardboard in half with the wrong side outward, after which we depict a half of the Christmas tree on it. To do this, you can simply print the template or draw from the sample.
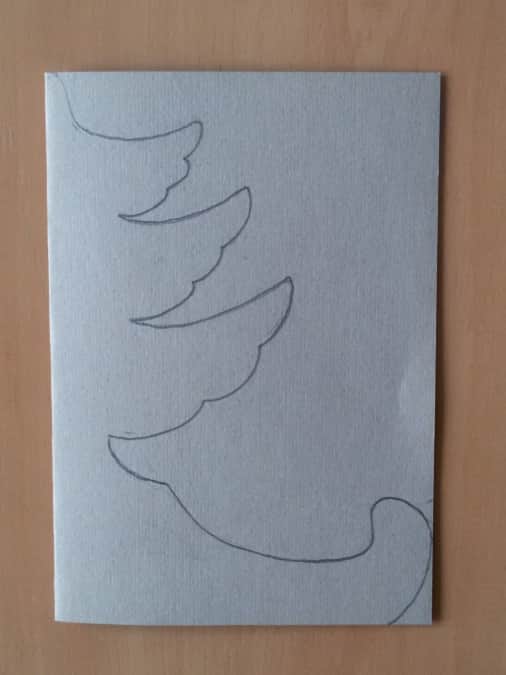
Step 2. Cut out the workpiece along the contour (when folded).

Step 3. Now let's take up the threads. They need to be folded in layers several times and cut into small pieces (1-2 cm each), putting them in a previously prepared container.

Step 4. Now comes the rather painstaking stage of work. Lubricate the surface of the Christmas tree with glue-pencil and stick the skeins on it. It is better to do this in stages so that dust does not accumulate on the sheet.

Step 5. In this way, you need to decorate only the top 3 sections, since we will decorate the bottom one differently.
Step 6. Let the Christmas tree lie down for a few minutes, and the glue will dry a little. In the meantime, take a boucle thread or just roll up a few small lumps of snow-white cotton wool.

Step 7. These lumps can be glued with a glue gun or glue stick. The work must be done carefully enough so that no glue stains remain on the surface.
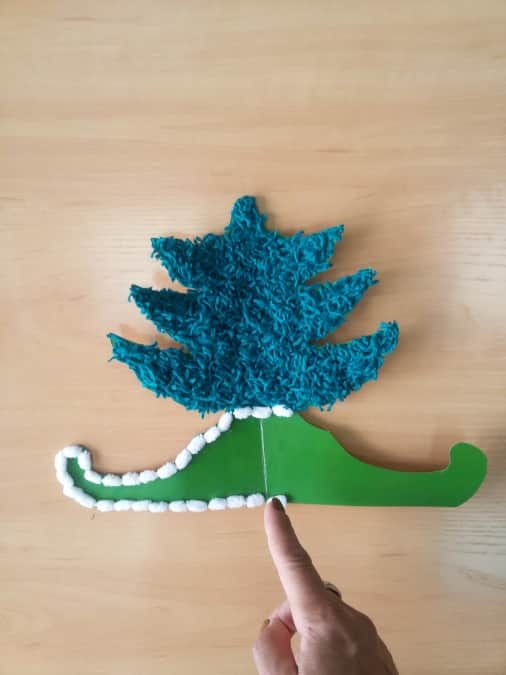
Step 8. And now you need to make tinsel for decoration. We will use a thread-grass or other similar material.

Step 9. We attach tinsel, glue other decorations - we get such a festive stand for a photo.

New Year in the office: Christmas tree in a hurry
There are cases when you need to make a Christmas tree literally in a matter of minutes - for example, a friendly company is ready to receive guests or the team is actively preparing for a festive corporate party, which is about to begin. For such situations, we can do the most simple option Christmas trees with their own hands.
We will need:
- sheets of colored cardboard or any cardboard and green paint;
- scissors;
- pencil;
- colored paper, glitter and other elements for decoration.
Creating such a model will not take much time:
Step 1. First, fold the cardboard in half and draw a half of a Christmas tree on it - literally 3 or 4 triangles of different sizes, as well as a small trunk. Cut out along the contour. We attach the blank to another sheet of cardboard, draw a pencil around the contour and cut out exactly the same model.

Step 2. Cut out the stand: cardboard circles with bases (2 or 3 intersecting lines). We make neat cuts along the lines.
Step 3. And now we bend the Christmas tree blanks in half and insert them one by one into these slots: 2 or 3 each, depending on how many lines are made at the base.
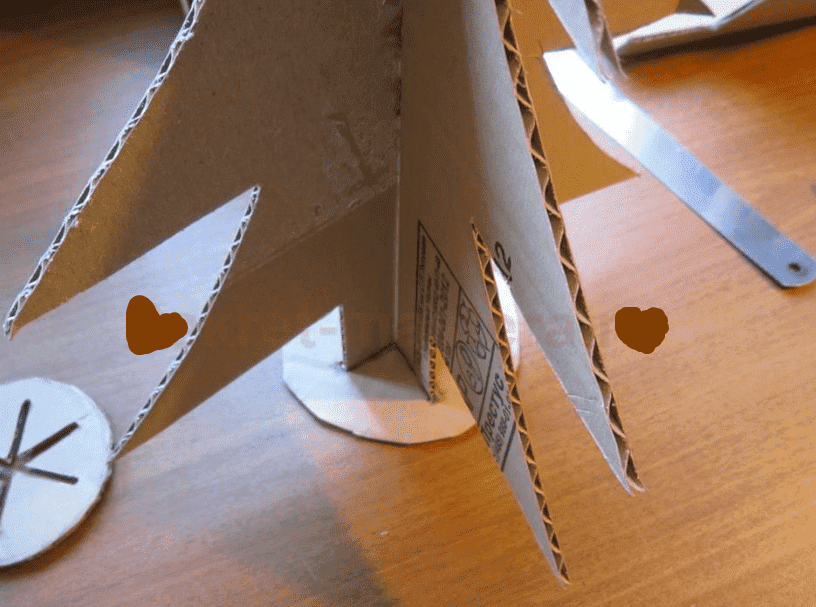
Step 4. It remains only to paint the Christmas tree in green color and dress her up with colored figurines, sparkles and other materials.
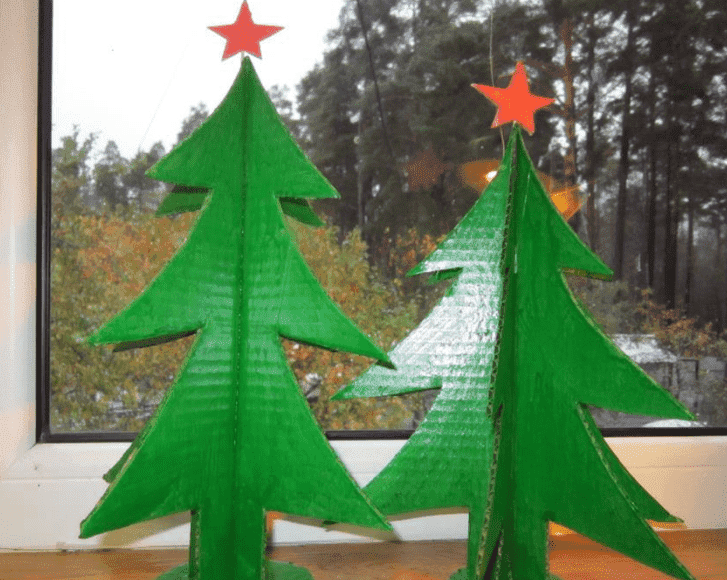
For example, here are such stars, which can also be cut out of cardboard.

By the way, a cardboard Christmas tree can withstand even the weight of a small garland - we will use this opportunity.

How to make a Christmas tree out of cardboard with your own hands: 10 ready-made templates
Of course, in the manufacture, you can use a ready-made template. Here are a few samples of the New Year's forest beauty that can be printed, cut out, and then made from cardboard in a matter of minutes.


Christmas tree 3D in papercraft technique
Here is another very interesting model forest guest, which, despite such an ornate name, is made quite simply. Although, of course, in this case you need to spend a little more time.
And the result will definitely please you, because ready product will look like this:

In order to make a Christmas tree from cardboard with your own hands using the papercraft technique, we will need:
- several thin sheets of cardboard (or thick sheets colored paper). By the way, they can be alternated in color: dark and light green;
- glue;
- compass;
- ruler;
- pencil,
- and also a stick or wire.
We will act like this:
Step 1. The product is based on the same workpiece - this is a circle drawn by 6 lines and 2 circles. The largest circle is twice the diameter of the smaller one.
Step 2. Such blanks need to be made 5-6 pieces or even more. Each subsequent one is 1-2 cm smaller than the previous one in diameter.
Step 3. After all the models are prepared, we cut the circle inward to a smaller circle, as shown in the photo. We glue each fragment, making a cone out of it.
Step 4. At the last stage, we simply string each element onto a stick or wire (you first need to make a hole in the center with a needle).
Step 5. The crown can be made from a small cone of the same color. It remains only to decorate our Christmas tree and put it in the most prominent place.

Using the papercraft technique, you can make several different Christmas trees - “thicker” and “slenderer”. It will turn out a small forest, which will surely be able to create a cozy atmosphere of childhood in any home.
By the way, this “forest” is easy to make hanging - for this you can take a beautiful ribbon and attach it to the top of the trees with glue or a needle.

Details and comments can be seen here:
Folding Christmas tree made of cardboard - we make it easy and fast
Here's another option for hastily- such a Christmas tree is made from several cardboard circles, which are also mounted on a skewer.
Accordingly, we need:
- cardboard,
- wire or wooden stick,
- as well as a lid plastic bottle or another similar object - it will be a stand.
We will act like this:
Step 1. Cut out several circles of different diameters - each subsequent one should be 2 cm smaller than the previous one.
Step 3. After all the blanks are ready, we straighten them, make a small hole in the center and put them on a skewer.
Step 4. The last step is to make a hole in the stand (lid) and attach the skewer to it. We decorate our Christmas trees - that's all, the holiday is approaching!

Here are just a few examples of how to make a cardboard Christmas tree with your own hands. It is clear that the finished model can be completely different size- from small beauties on the table to quite large ones that can be placed on the floor or on the nightstand.
Create a festive mood and gifts - to the delight of yourself and your loved ones!
Happy New Year!