How to make paper shuriken. How to make a shuriken out of paper or disk? Beautiful shuriken from scrap paper
Shuriken is a Japanese throwing weapon used by ninja. It is a small star with sharply sharpened corners. Children can watch the use of these weapons in their favorite cartoons, they were armed with Batman, Naruto, Raph, as well as anime characters.
In order to imitate their favorite heroes, the boys make these weapons with their own hands from a designer, paper or other improvised materials. But you can make origami from shuriken paper, and the craft will fly just as well as a real weapon, but it will not harm the enemy.
Not every parent imagines what a shuriken is. In Japan, many types of throwing weapons were invented, among which small stars occupied a special place. They were made of metal. There were two types of such weapons:
- small peaks with a point at the end;
- four-pointed stars, each corner of which was a sharpened blade.

It is believed that they gave one of the ninja schools an advantage over rivals. Now this throwing weapon is sold in some stores in Japan and Europe, and is kept in collections. Various hieroglyphs and mystical signs were often applied to their blades, which, according to the Japanese, brought good luck to their owners. Today, such signs are copied from ancient weapons, but applied only to collectible items.
Despite the fact that throwing stars often played a decisive role in battles, they were not used as the main weapons, which were katanas and yari spears. Shurikens were only an addition to equipment that played an important tactical role.
What is required to make a model?
If you urgently need to make a shuriken, then prepare a few rectangular sheets. To make a semblance of Naruto shuriken, you will need black sheets. When making a craft that complements the ninja costume, use paper that matches the color of the gloves or the robe itself.
Since we propose to use the origami technique for making crafts, you do not need anything but a few thick sheets paper. The modules are attached to each other with paper flaps.

It will take no more than 10 minutes to make crafts, which, if necessary, will allow you to quickly create new copies.
Shuriken translates as a blade in the hand, so make small models. The smaller the size, the tougher and more realistic the craft will turn out.
Four pointed throwing star
There are several schemes for making shurikens. All of them are based on the same principle, which is used to add a four-pointed star. This basic model is suitable for beginners. Traditionally for origami take square sheets. It takes two squares to make one model.
In more detail, how to make origami from shuriken paper, tells a step-by-step instruction:
- Fold two opposite edges of each square towards the center. The remaining points are also repeated for each detail.
- Fold the resulting rectangle in half.
- Bend diametrically located corners. On the second rectangle, make a fold at the other corners so that you get a piece that is a mirror copy of the first.
- Bend the workpiece obliquely on both sides. You received two halves with corners pointing in different directions.
- Fold the blanks one on top of the other perpendicularly so that you have the opportunity to connect the corners with gaps.
- Insert the corners into the gaps, first on one side and then on the other. Rate the end result.
You have received a paper shuriken, which can be made from contrasting shades of paper to make it even more attractive. This is a transformer craft that is used to make others, for example, it can be turned into a spinner or a bright spinner to decorate a festive table.

Children are very inventive: from four-pointed shurikens, they came up with the idea of assembling more complex weapons - a bunch of stars. She looks impressive big sizes through the use of 4 to 8 standard shurikens. Such models are most often used by the most avid origami lovers who have understood the essence of this art, have learned how to modernize basic models to suit your needs.
Eight-point complex design
One of the models, which was obtained by finalizing the basic modules, is an eight-pointed throwing star. It is called transforming. By appearance it bears little resemblance to Japanese throwing weapons, but is still loved by children. Many boys believe that an asterisk with eight sharp corners is “more dangerous” than a standard one, so they often make this model for games.
There are several options for adding such crafts. They will be mastered only by those who are fluent in the art of origami. Let's bring step by step instructions to one way.
Make 8 modules from square blanks of the same size:

- Lay the sheet at an angle towards you. If you took colored paper, then the white side should be up. You should not take the double-sided option, as the unpainted part will help you during the assembly of the structure.
- Fold it diagonally and unfold.
- Raise the bottom corners to the marked line in the middle of the sheet.
- Bend down the upper sharp corner.
- Fold the bottom corner in the same way.
- If done correctly, the tip will be flush with the tip of the valve assembled earlier.
- Fold the module vertically in half.
- Make 7 more elements to assemble a circle of modules.
The model folds very simply: the lower left corners of each module must be placed in the white pockets of the other.
According to this scheme, collect the entire eight-pointed star. After the circle closes, you get an origami paper “Eight-pointed Shuriken”.
The described elements can also be used to create other crafts, it is only important to apply imagination and understand the basics of fixing them without using glue.

How to throw shuriken?
From paper, a type of Japanese weapon, hira-shuriken, is obtained. It can be thrown from different positions, positioned horizontally or vertically towards the target. To throw, the craft is clamped between the fingers of one hand, and then they make a throwing movement with the brush, pushing the figure out.
During the flight, the figure must rotate around its axis by 360 degrees.
Japanese ninjas threw shurikens in such a way that they broke through flimsy fences and got stuck in a tree. In advance, forbid the child to throw crafts at animals and people. Give him a target similar to the one used in darts. Even paper can cause severe pain if it hits the eye or solar plexus. Throwing a toy at a target is even more useful, this activity will develop a brush and an eye.
Conclusion
It is not difficult to make a shuriken from improvised material. They are cut out of cardboard, folded from the designer, but paper toys will be a more gentle version of the toy. The art of origami, like this throwing weapon, came from the East. Therefore, it is very symbolic to use it for the manufacture of shuriken models.
You do not have to spend money on materials for crafts, which will allow you not to worry if the child loses it on a walk. It is also important that it will take no more than 10 minutes to make a replacement.
Karina is a permanent expert of the PupsFull portal. She writes articles about play, pregnancy, parenting and learning, baby care, and mom and baby health.
Articles written
Japan gave this world many different inventions and beautiful things, and to this day it never ceases to amaze us. Especially they are excellent, it turns out, to come up with different crafts from paper. Thousands of different figures have already been created, and much more is yet to come. Today, we will tell you how to make a shuriken with your own hands - a weapon used by ninja warriors and samurai in past centuries. Making a shuriken from metal is not very easy, but from paper - everyone can! Let's learn how to easily make shuriken at home.
How to make paper shuriken?
This paper craft is very easy to make, so no special knowledge or effort is required. All you need is our instructions and a sheet of paper. Let's not waste time - let's get started!
1. Prepare a sheet of paper. We can use any color, the main thing is to make the right shape. We should prepare a sheet square shape! Then we bend it in half and cut it into two parts along the fold line.

2. Fold each piece in half. If we want to get a multi-colored shuriken, we can prepare paper in advance different colors, and the right size.

3. Now we do the operation, which is shown in the figure - the corners of the triangle should be bent, one to the top, the second to the bottom.


Here is what we got as a result:

Please note that the parts must be the same shape, but symmetrical to each other.
5. We have come to the assembly stage. We should connect two finished parts, for this we put one part on the second and wrap the corners, as shown in the photo.

Bend the left and right corners of the lower part in half and wrap them in the pocket of the upper part. Here's what we get:


Use your fingers to go through all the folds well so that they do not unfold in the future.
The East is famous, as a rule, not only for the technique of paper folding, but also for oriental martial arts. The combination of these two types of art is reflected in the paper figures of military guns. A striking example of such a collaboration is shuriken. This is a Japanese throwing weapon, which is a small blade, made in the form of stars or coins.
Today I want to show you how to make paper shuriken.

This model will be especially interesting for children's creativity with boys who are fond of toy weapons. In addition, the implementation of such a figure does not require great knowledge in paper art. We will try to make several types of origami shuriken, video easy way assembly will be visual enough to repeat:
The addition of such figures from paper is quite popular not only in the East.
DIY origami shuriken
Admirers of Japanese culture from all over the world are trying to adapt all kinds of materials into their own language. Russia is no exception. I offer you visual diagram in Russian, following which will help you make a simple 4-pointed shuriken:
Avid origamists try to bring new ideas to the ancient japanese art paper folding. In this regard, there is far from one origami shuriken scheme. Japanese creativity, as you know, knows no boundaries at all. There are quite complex shuriken figures, the repetition of which can take a lot of time.

I will introduce you to the most common models.
Octagonal Throwing Star
If there were no problems when adding a 4-coal shuriken, then I suggest trying your hand and folding an 8-pointed shuriken.

By the way, such a weapon is also called "transformer shuriken". Initially folded according to this scheme, the figure bears little resemblance to Japanese military weapons. But by gentle pressure on different sides of the figure, the model begins to take on the shape of a shuriken. In my opinion, such a paper craft will be very interesting for children. Try to fold it yourself first, and then show this method to your child, thereby training attention and memory.
Throwing Star from Naruto
Today, cartoons shot in the anime genre are gaining special popularity. The most popular anime adaptation is the Japanese comic book about the restless teenager ninja Naruto. Fans from all over the world try to copy their favorite character's costume and ammunition. And shuriken is no exception. The main character of this comic is a master of this type of Japanese weapon. Therefore, it is far from a secret why this particular type of origami has become so popular.
Shuriken Naruto black:

To recreate this weapon from paper, it is enough to use black paper for work. The scheme of a simple 4-coal shuriken is given above, and its implementation will not cause great difficulties.
So if your child is very passionate Japanese culture, then you can please him with such simple crafts. Perhaps in the future he will be seriously interested in the art of origami, and it will become his hobby.
Don't be afraid to try new things and be creative. Maybe you can come up with your own original scheme to create paper sculpture.
Video tutorials for dummies
Shuriken is a Japanese throwing weapon. It is usually worn hidden and inconspicuous. Shuriken are small blades made from household items: stars, coins, nails, needles, knives, etc. But throwing "Shuriken" may well become harmless if made of paper.
Step-by-step instructions for creating a four-pointed Shuriken.
1 step. We take paper.
"Shuriken" can be made from white paper, but for greater clarity and colorfulness, it is better to use color.
2 step. We make squares from sheets.
To create a four-pointed "Shuriken" you will need two identical squares.


3 step. We take one square and connect the edges in the center.


4 step. We bend the resulting rectangle in half.


5 step. On each side, we bend the corners in a mirror, as shown in the photo.


6 step. Once again, on each side, we mirror the corners symmetrically to the triangles made earlier.


7 step. We do the same (from 3 to 8 steps) with the second square. The second half of the Shuriken should be a mirror image of the first.

8 step. We turn over one received part and lay it down as follows on the first one.

9 step. We bend the corners of the lower part into the formed pockets in the upper part.


10 step. Flip the resulting figure.

11 step. Again, we do the same with the bottom half.


12 step. The four-pointed Shuriken is ready.

The final view of the crafts of the four-pointed shuriken.
Step-by-step instructions for creating an octagonal Shuriken.
1 step. We need 8 identical squares.

2 step. Square preparation.
We bend the square first diagonally, then in half.

3 step. We connect two corners at the center line.

4 step. A rectangle is formed on the opposite side, which we bend to the inside and fold the part.


5 step. We do similar actions with the remaining 7 squares.
6 step. Assembling Shuriken.
We lay all the details in the same position. We insert part of one part with bent corners into a triangle concave inward. We bend the resulting tips into the inside of the part for fixation. So we connect all 8 parts.


7 step. Draw out the triangles that are free inside.

8 step. The octagonal Shuriken is ready.

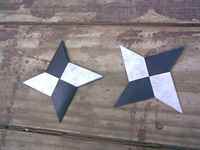
The final view of the crafts of the octagonal shuriken.

Two final pieces.
We hope that the manufacture of this craft brought you a charge only positive emotions and good mood. As for the series of paper crafts, next time we can offer you paper claws, which are very easy to recreate!
2. Cut a sheet of paper into two equal parts. If you want your shuriken to turn out from two different colors, then you can initially take two sheets of paper that have the same size, but different colors.
3. It is necessary to fold each piece of paper in half, resulting in 2 rectangles. The corners of each rectangle should be folded - one to the bottom edge, and the other to the top (as shown in the figure).
4. It is necessary to fold the resulting figures again, already along lines that are symmetrical to the previously laid triangles.
5. The resulting two modules paper craft should be similar and mirror-symmetrical with respect to each other. That is, the right module should be turned over to the other side and aligned with the left module.
6. The stage of assembling our paper star is coming. Assemble the shuriken by pushing the right and left triangles of the bottom module under the center edges (gaps) of the main triangles at the top (don't forget to look at the drawings, which clearly show everything what to do).
7. At the first stage of assembly, a figure is obtained that looks like a disconnected star.
8. Second and The final stage assembling a paper star - you need to turn the figure over and thread the remaining previously unused corners into the gaps, as shown in the figure.
Here are all the steps for creating a shuriken, and the asterisk is ready!
You can also see other drawings on the creation of a shuriken - a ninja throwing star.
