Christmas tree do-it-yourself twine craft. New Year's topiary Christmas tree: we decorate the holiday ourselves. Do-it-yourself coffee tree: a step-by-step master class
Save your face from wrinkles with starch
Potato starch is one of the most used products. It is used not only in cooking, but also in medicine, paper and textile production, as well as in cosmetology. With the help of starch, you can restore the smoothness and elasticity of the skin, making it toned and healthy. In this article, I have collected the most simple and effective recipes starch masks that are tested for personal experience and give an amazing result. A starch mask is an alternative to expensive salon rejuvenation sessions. Try the right recipe and you will understand that it is not necessary to be rich in order to look decent in adulthood.
Potato starch has a lot nutrients and trace elements that quickly penetrate into the deep layers of the epidermis. Their action is aimed at rejuvenation and maintaining the skin in good shape.
Vitamin C - restores damaged cells, increasing the tone of the dermis and creating a protective barrier for it from free radicals.
Choline - regulates the sebaceous glands.
Vitamin PP - makes cells work at full strength.
Iron - enriches blood cells with oxygen.
Potassium - maintains the natural water balance of the skin.
Carbohydrates and-and nourish and tighten the dermis.
Indications for the use of starch masks
There are no contraindications to the use of the product. Therefore, if you do not have open wounds on your face, you can safely start using masks to get rid of all types of wrinkles. But do not forget to alternate them from time to time so that the skin does not have time to get used to a certain composition. Keep the prepared product on your face for 10-30 minutes, and then rinse off.
If you regularly use starch masks, you can quickly achieve a positive effect. After all, then even those substances that are contained in the product in small quantities will begin to act. Cosmetic masks based on starch are shown to every woman with any type of skin:
skin fading
Excessive dryness or oiliness
peeling skin
First small wrinkles
Excessive sensitivity of the dermis
Tendency to allergies
How to put on face masks
Thoroughly mixed to a homogeneous paste-like state, the mass should be applied in an even layer on the cleansed and steamed skin of the face, and then cover it with scraps paper napkins and wait about fifteen to twenty-five minutes. At the end of the procedure, you need to wash off the rest of the mask with warm water and wipe the skin with an ice cube prepared in advance from green tea infusion, medicinal chamomile decoction or lotion prepared from your favorite medicinal flowers.
Starch Face Mask Recipes
With peach oil
One tablespoon of starch should be mixed with an equal amount of fresh milk. After stirring, the mixture is diluted with one teaspoon of peach oil. The prepared mask will have a good lifting effect on sensitive skin.
With protein
Dilute one tablespoon of starch to a paste with warm water and mix with foam from one protein, the effectiveness is increased if a few drops of juice from a juicy lemon are added to the mask. The prepared composition can be used instead of Botox by owners of oily skin type, in addition to the lifting effect, the mask will also tighten the pores, which means it will prevent their clogging.
Mix a teaspoon of salt with one tbsp.
Tin spoon of starch. The dry mixture is diluted with warm milk to the state of gruel and enriched with a teaspoon of natural honey. The resulting composition can be used instead of a scrub, it is recommended to apply it in a circular motion. Honey-starch mask is evaluated in cosmetology as one of the the best means from age wrinkles.
With kefir
A tablespoon of starch should be mixed with an equal amount of kefir and with one protein. The mask is used not only for wrinkles and to achieve a skin condition like after Botox, but also instead of a tonic. Under the influence of such a recipe, the face becomes fresh, rested, and with regular use yellowness and dull color go away.
With tomatoes
The pulp from half a tomato must be mixed with one yolk, then potato starch in the amount of one spoon and olive oil are added to the mixture (it will take half as much). Tomato starch mask moisturizes the skin, nourishes the cells with microelements and allows you to get rid of both small and deep wrinkles.
with banana
A tablespoon of ripe banana puree is mixed with potato starch in equal volumes. After mixing, homemade cream is added to the mixture. The banana and starch mask smoothes the skin, gives it elasticity and the result obtained with regular use of the recipe is comparable to the use of Botox for the skin.
With yolk
Mix one tablespoon of tomato pulp with one raw chicken yolk, then add one teaspoon of starch to the resulting mass (both potato and corn starch can be used). Stir the mixture again and dilute, if necessary, to a paste-like state with fresh milk heated in a water bath.
With sea salt
To prepare a starch mask for problematic and oily skin, you need to mix starch, liquid honey, sea salt(shredded) and warmed milk. The finished mixture is applied in two or three stages in an even layer (as soon as one layer dries, another is applied on top of it). After fifteen to twenty-five minutes, wash off the mask with warm water and wipe the skin with fresh aloe juice.
If you periodically use as cosmetic product ordinary potato starch, then very soon you will see for yourself how useful this simple product will be for the skin.
In many floristic compositions you can see various natural materials, starting from sisal and ending with cones. Today's master class is not entirely floristic, rather decorating, so we suggest you feel like designers for a while and make an interesting Christmas tree out of twine with your own hands. Master class with step by step photo attached, and for decoration we will use natural materials - cones and orange slices. For them, they will just be very suitable. If you have small children, then you can make such a Christmas tree with your own hands all together, because working in a company is much more interesting.
We will need:
- base paper (I used whatman paper);
- Linen twine;
- Dried orange slices;
- Glue.
And now let's get started and see how to make a Christmas tree out of twine with your own hands:
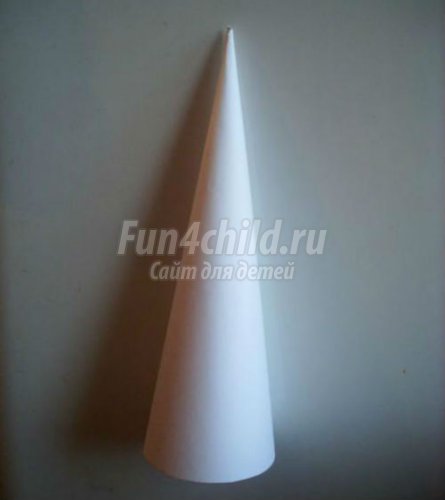
From paper, cut out a cone of the desired size. For clarity, I first made a stencil from a newspaper, and then I cut it out of whatman paper.

We fold the paper cone and glue the edge.
Now we carefully wrap the finished paper base row by row with linen twine. I acted like this: I covered small areas with glue, and then wrapped the cone with a rope. I think you can use double sided tape instead of glue.

We glue the last row with special care. Half of the work is done - the basis for our Christmas tree is ready.

We go directly to creativity - decorate decorative elements. We come up with a composition and begin to bring it to life.

I decided to arrange the decor diagonally, glued the bump and started to build a line of oranges.

Step by step, carefully glue orange circles to the base and Pine cones. A small nuance: disassemble the circles in size and stir the larger ones from below, and moving up - smaller and smaller ones.

Gift for Christmas "Twine Christmas tree souvenir". Step by step instructions with photo
Lapatina Svetlana Vasilievna, educator of the GPA MOU Tumskaya secondary school No. 46 Branch "Oskinskaya OOSh", Klepikovo district, Oskino village.Description: The master class will be of interest to elementary school students, GPA educators, teachers primary school and all those who love to do needlework.
Target- Making a souvenir tree for the Christmas holiday.
Tasks:
1. To develop students' interest in creativity.
2. Develop imagination, aesthetic taste compositional skills.
3. To cultivate accuracy in work, the ability to bring what has been started to the end.
Materials and tools:
1. Cardboard, twine, thread, needle.
2. Ribbons in red and white with polka dots.
3. Scissors, bell, titanium glue.

The course of the master class.
Educator.Guys, today I want to tell you an old legend about how the spruce became a symbol of Christmas at the request of the heavenly forces.
"The Legend of the Christmas Tree".
When the Savior was born in Bethlehem in a cave, a new bright star lit up in the dark sky to the singing of angels.

Heeding the Divine sign, not only people, but also animals and plants rushed to the cave.
Everyone tried to show the newborn their sincere joy and bring some kind of gift. Plants and trees gave the baby their fragrances, flowers, fruits and leaves.

Spruce was also in a hurry to a joyful event from the far north. She came last and, embarrassed, stood aside. Everyone asked her in surprise why she didn’t come in. El answered that she really wanted to enter, but she had nothing to give to the Divine Infant, and she was afraid to frighten Him or prick Him with needles.

Then the plants shared their gifts with Spruce, and red apples, nuts began to flaunt on its branches, bright flowers and green leaves. El was very happy, thanked everyone, and quietly approached Jesus.

The baby smiled when he saw a beautiful, multi-colored, kind Spruce, and then over its very top shone even brighter star of bethlehem…
Educator.
Guys, and now I invite you to make a soft fluffy Christmas tree out of twine with me. So, let's get to work.
Progress.
1. Making the base of the Christmas tree.
We make a cone from whatman paper, fix it with a stapler, trim the lower part with scissors.
We put the cone on cardboard, circle and cut out a circle in the shape of the bottom of our cone, cut along the edge, bend the undercuts.

We thread the wire into the upper part of the cone, fill it with old newspapers, insert skewers, glue the bottom of the cone.

2. Making roses from ribbon.
Bend the right corner of the tape down.

We make three turns from right to left, sew with a needle and thread. We got the middle of the rose.

After making two turns, bend the ribbon down away from you and continue to twist the rose.

Again we make two turns, now we bend the tape up towards ourselves and continue to twist.

We do this until we have such beautiful roses.

3. Design and installation of the Christmas tree cone.
We coat the cone with Titan glue and begin to evenly wrap it with twine from top to bottom.

We continue to wrap the cone further.

We also wrap the glass.

Now we wrap the lower part of the cone and skewers in a circle.
In a glass, dilute alabaster to a state of thick sour cream, insert skewers into the center, hold.

Christmas tree decoration.
We begin to decorate our Christmas tree with roses, using Titan glue.

We glue the roses evenly over the entire cone, decorate the cup with a ribbon to match the roses, tie a bell.

Here's what a cute Christmas tree we got: festive and elegant, let's sing
a song about a Christmas tree.
"Christmas Tree"
Music by V. Varlamov, lyrics by R. Panina.
Silver light streams through the window,
This night is not easy.
Let it be outside the window, let it be outside the window
Fairytale snow sparkles.
Brighter than all the stars in the world.
Become brighter than ever
And the children will smile.

Chorus:
Christmas tree
Let us all give
Joy and warmth.
Christmas tree,
Let it become in the heart
Quiet and warm.
The Christmas forest became fabulous,
The story is all around
The song of love pours from heaven
There is no life without miracles.
In the morning a star will flash in the sky
Brighter than all the stars in the world.
And never and never
Children will not cry.

Chorus:
Christmas tree
Let us all give
Joy and warmth.
Christmas tree,
Let it become in the heart
Quiet and warm.
Merry Christmas everyone! Guardian angel for you!
- New Year already close, but there is still enough time to make successful preparations for his meeting. Now on the Internet you can see great amount ideas of creation and, in the master class "from twine" I want to show my version of making a filigree beauty.


- Photo 1. For the base of the Christmas tree, we need:
Plastic cup,
- jute twine plain and bleached,
- food film,
- scissors,
- wooden skewer
- titanium glue,
- foil,
- coffee beans.
- We fill a glass with a newspaper, cut out a round bottom from cardboard and wrap the construction with cling film. From the twine, we begin to lay out the pattern (beginners, for convenience, can first draw a pattern on the workpiece, and then wrap it with a film). We drip on the film on it, lay out the twine.

- photo 2 And only after that I spread the patterns. In the process of such processing, the twine becomes not sticky and more obedient.

- Photo 3. Twine drops imitating branches are glued in a checkerboard pattern to the very top. With a hot awl, make a hole from above and insert the wire. We wrap the top of the Christmas tree with twine and continue to wrap the wire. Then we wrap the top with bleached twine, making a hat, make several turns around the wire.

- Photo 4. Making the legs. We leave the wooden skewer of the desired length, wrap one end with foil, forming a leg and wrap it with twine.

- Photo 5. We decorate the legs with bleached twine.

- Photo 6. We make the bottom from circles. I glue drops from bleached twine into drops-twigs. In addition, I make balls and glue them to the branches.

- Photo 7. We make a flower on a hat: we glue 6 identical segments with sharp tips together.
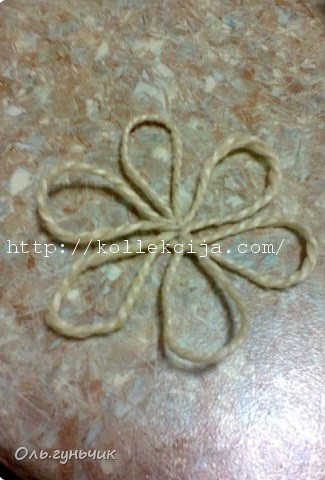
- Photo 8. Similarly, we make a smaller flower and glue it to a large flower. Glue the center of the coffee bean.

Master class on making crafts " christmas tree»
educator " Kindergarten"Sunshine", Biryucha, Krasnogvardeisky district, Belgorod region.Master Class designed for educators, teachers of additional education, parents and everyone who wants to be creative.
Target: make New Year's crafts- Christmas tree.
Tasks:
- show how to make New Year's crafts;
- create a festive, joyful mood;
- to form an interest in manual labor, a desire to make a craft with your own hands.
Good in the silence of the forest in any weather!
Only travelers bypass the Yolka.
In the summer you are prickly, fragrant Christmas tree!
But in winter, on New Year's Eve, you are the best!
Leaves will fall from birches, maple leaves will fall,
But the Christmas tree will remain green in the cold.
Let's decorate the Christmas tree and understand that evening:
It’s easier for her to keep jewelry on needles!
That's why the prickly Christmas tree is mighty!
All trees are good! You are the best!
I propose Master Class for making a Christmas tree.
Purpose: decoration for the holiday, crafts for the exhibition.
Required tools: cardboard, glue, scissors, threads, a cup, a stick, grains - coffee, gouache, brushes, beads, dried fruits, dried flowers, etc.

Progress:

Roll up a cardboard cone and glue it. When it dries, wrap it tightly with plain or colored thread.

Or glue the cone with coffee beans or whatever your imagination tells you.

Wrap the leg of the Christmas tree with a simple or colored dense thread.

These are the blanks that must be installed in any dish or cup, secured with building plaster.

You can decorate the Christmas tree with everything that is at hand.


The space under the Christmas tree can also be decorated differently: dye, stick pieces of yarn, put coffee beans, beads, cinnamon sticks.

Instead of toys, a Christmas tree can be decorated with dried fruits, cones.

This is how the Christmas tree turned out.

You can decorate with beads, bows, coffee beans.


Here is such a Christmas tree turned out using beads, buttons, bows, dried flowers.

These are such funny Christmas trees I got.
I wish you all a happy New Year! Creative success in work!