Knitted bedspread: diagrams and descriptions. Crochet bedspread on a sofa from large squares Crochet bedspread of unusual beauty knitting
Warm or openwork, a do-it-yourself crochet blanket is a practical and stylish element of the interior of your home. It will perfectly serve both as a bedspread on a sofa or pillows, and as a full-fledged blanket for your newborn baby. In today's lesson, we will show you how to crochet a beautiful plaid from leftover yarn for beginners without problems in just a couple of evenings!
White crochet blanket for pillows for a newborn baby
We will need:
- stocks of leftover yarn (100% acrylic, 127 grams per 290 meters);
- cr. No. 5.5.
Size: for a newborn, 38 x 40.5 cm.
Knitting density: 3 pattern repeats = 6.5 cm.
For the bedspread, we collect a chain of 57 c. P..
1 p.: knit 2 s. from n. in the 3rd p. from cr., * skip 2 p., (1 s. without n., 2 s. with n.) in the next. p., from * to the last 3 p., skip 2 p., 1 s. without n. in the last p. = 18 rapports, turn.
2 p.: 2 c. p., 2 p. from n. in the 1st s., * skip 2 s., (1 s. without n., 2 s. with n.) in the next. s., from *, finish 1 s. without n. in the last p., turn.
We repeat the 2nd p. until a height of 40.5 cm is reached, we do not cut the thread.
Binding the edge of the bedspread
2 in. p., 2 p. from n. in the 1st s., * skip next. 2 s., (1 s. without n., 2 s. with n.) in the next. s., from * around the product, we finish ss ..
Ready! You can wrap your baby in a blanket and enjoy a walk in the autumn park.
Plaid “Raspberry Cloud”: video master class
Three-color textured crochet blankets for pillows for a newborn
We will need:
- stocks of residues of large yarn (100 grams each) - 5 hanks of pink, 4 - lilac, 3 lilac and 3 purple;
- cr. No. 5.5.
Scheme
Description
We knit according to the scheme 16 motives A, 16 - B, 6 - C and 6 - D. We very carefully connect them according to the scheme.
A: 1 and 2 pp.: pink; 3 and 4 rr.: purple; 5 and 6 rr.: lilac color; 7 p.: lilac color.
B: 1 and 2 pp.: purple; 3 and 4 rr.: lilac; 5 and 6 rr.: lilac; Row 7: pink.
С: 1 and 2 pp.: pink; 3 and 4 rr.: purple; 5 and 6 rr.: lilac; 7th row: pink.
D: 1 and 2 pp.: purple; 3 and 4 rr.: lilac color; 5 and 6 rr.: lilac; 7th row: pink.
Edge binding
Single crochet around the entire perimeter.
Plaid pattern "Spider web": video master class
Beautiful summer chamomile plaid for pillows crochet with your own hands
We will need:
- yarn (100% acrylic, 198 grams per 338 meters) - 4 skeins of color. A and 2 skeins tsv. AT;
- cr. No. 4.
Knitting density: 1 and 2 pp. \u003d 10 cm, the square is 43 x 43 cm.
Scheme
Description
motives
The first "chamomile" square: n. And we dial 7 in. p, conn. into the ring with the help of ss .. We knit 1-10 rr. according to the scheme and go to n. B, then the 11th row of the scheme. We are finishing work.
2-9 motives: n. And we dial 7 in. p, connect in a ring with the help of sl-st, 1-10 rr. according to the scheme, then the thread B and the 11th row sch., at the same time we knit (2 ch, st. without n. into the arch of the previous motif, 2 ch) instead of the arch from the 5th century. n.. Angles of connection. in the same way, replacing the central c. n. arches on p. without n.. We combine 3 x 3 motifs into one canvas.
Edge binding
N. In in are. from 7 p., which is the first after the arch of 11 p., then tying according to the description below.
1 p. (LS): 1 s. without n. in the first ar. 7 p., (* 5 v. p., 1 s. without n. in the next ar., 5 v. p., 1 p / s with n. in the next s. (top 2 with with 2 n knitted together), x 7 times, 5 ch, 1 p / s with n in the next sec (again the top of 2 s with 2 n knitted together), x 2 times **, ch 5, 1 sec without n in the next arch, ch 5, 1 sec without n in the same arch, from *, we finish the last repetition before **, 5 in. p., (1 s. without n., x 2 times) in the arch of 11 p. ***, 5 ce, 1 s. without n. in the next arch) x 4 times, we finish the last rapport before ***, 3 c. p., 1 p. from n. in the 1st s. R. (= ar., we consider it as an ar. from 5 p.), turn.
2 p. (IP): 1 in. p., 1 p. without n. in the 1st ar., * 5 c. p., 1 p. without n. in sl. ar., rep. from * around, we finish 3 in. p., 1 p. from n. in the 1st s. this r. (= ar. from 5 p.), turn.
3 p. (LS): 3 in. n. (= 1 s. s.), 2 s. from n. in the same ar., * 1 c. p., 3 p. from n. in sl. ar., from * around, order. ss., do not turn..
4 p. (IP): (skip p., 1 v. p., 1 s. without n., 3 v. p., 1 s. without n.) s., * 2 c. p., (1 s. without n., 3 v. p., 1 s. without n.) in the central s. groups of 3 s., from *, order. 2 in. p., ss..
A blanket that also works great as a cushion cover is ready!
Afghan children's blanket: video master class
Plaid crochet "Dandelion" do-it-yourself for beginners
We will need:
- stocks of residues of coarse yarn (100% polyester, 100 grams per 78 meters) yellow;
- cr. No. 12.
Size: 89 x 89 cm.
Knitting density: 3 cones x 3 p. = 10 x 10 cm.
Patterns:
- cone: (nakid, grab n. from the loop (3 sts on cr.), prov. 4 sts on cr in one step.
Description
Cast on 52 sts.
1 p .: we knit a bump in the 4th p. from kr., * 1 in. p, pass. sl. p., bump in the next p., from * to last. 2 p. chains, prop. sl. p., s. from n. in the last p., pov..
2 p.: 3 c. n (= s. s n.), prop. 1st p. cones, cone in the next. p., (between two cones of the lower river), * 1 c. n, prop. n. bumps, bump in the next. p., from * to last. p., 1 c. p, s. without n. in the last P..
We repeat the 2nd p. until reaching a height of 89 cm. do not cut.
Edge binding
1 in. n, we tie a blanket with. without n. and 3 s. without n. on every corner, ss. in the first p..
Soft and warm, this type of bedspread will serve perfectly as a pillow and cape in cold weather!
Children's blanket Varvara: video master class
We will need:
- stocks of remnants of coarse yarn (100% acrylic, 141 grams per 234 meters) - 6 hanks of white color. (main), 3 skeins of black color. (color A) and 3 skeins of gray color. (color B);
- cr. No. 6.
Size: 114.3 x 132 cm.
Knitting density: 15 p. \u003d 10 cm, 4 p. With. without n. = 6.4 cm.
Patterns:
- bump: we translate the contrast n. in the back are. n. last. With. without n. (nakid, pull out n. from p.) x 3 through both are. this s. without n. (7 p. per kr.), go to n. the main color, we knit all the stitches on. together in one go.
Knitted blankets with their own hands. Description
1 p. (PM): n. main color dial a chain of 150 in. p, 1 s. without n. in the 2nd p. from cr., 1 p. without n. in each next p. row, pov. = 149 s..
2 p. (IP): 1 in. p, 1 s. without n. in every s. r., pov..
3 p.: as 2nd p., go to n. And at the end of the river, turn ..
4 p.: 1 c. p., 1 p. without n. in the first s., (1 v. p., prop. s. s., 1 s. without n. in the next s.) - along the river, pov. = 74 arches from c. P..
5 p.: 1 c. p., 1 p. without n. in the first s., 1 s. without n. in the arch, (1 v. p., prop. sl. s., 1 s. without n. in ar.) along the river. until the last p., 1 p. without n. in the last s., go to n. main color at the end of r..
6 p.: 1 c. p., 1 p. without n. in every s. and in each ar., turn. = 149 s..
7 p.: 1 c. p., 1 p. without n. in every s. r., turn..
8 p.: 1 c. p., 1 s. without n. in the first 2 s., *bump n. A**, 1 s. without n. in sl. 3 s. n. main color*, repeat between * and *, order last repeat. before **, 1 s. without n. in the village 2 s., turn..
9 p.: 1 c. p., 1 p. without n. in every With. and in each bump.
10 p.: 1 c. p, 1 s. without n. in the first 4 s., *bump n. A, 1 s. without n. in sl. 3 s. n. main color*, repeat between * and *, 1 sec. without n. in the village s., turn.
11-19 rr.: knit as 8-10 rr. x 2.
20-21 rr.: as 8-9 rr., connect n. And in con. last R..
22 p.: as 4 p.
23 rubles: like 5 rubles.
N. main color..
24 p.: 1 in. p, 1 s. without n. to con. = 149 s..
25-33 rr.: 1 in. p., 1 p. without n. to the end, very carefully connect n. In to con. R. = 149 s.
34 p.: 1 c. p., 1 p. without n. in the 1st s, (1 v. p., skipped next s., 1 s. without n. in the next s.) - along the river. = 74.
35 p.: 1 in. p., 1 p. without n. in the 1st s., 1 s. without n. in ar., (1 vp, skipped next s., 1 s. without n. in ar.) along the river. to the village p., 1 p. without n. in the village s., go to n. main color at the end of r..
36 p: 1 c. p., 1 p. without n. in each column and in each arch, turn = 149 columns.
37 p: 1 c. p., 1 p. without n. in every With. R..
38 p.: 1 c. p., 1 s. without n. in the first 2 s., *bump n. B**, 1 s. without n. in sl. 3 s. n. main color *, repeat between * and *, last. repetition finish before **, 1 s. without n. in the village 2 s..
39 p.: 1 in. p., 1 p. without n. to end.
40 rubles: 1 in. p, 1 s. without n. in 4 s., * bump n. B, 1 s. without n. in sl. 3 s. n. main color*, repeat between * and *, 1 s. without n. in the last With..
41 p.: 1 c. p., 1 p. without n. to end.
42-43 rr.: as 38-39 rr..
44-45 rr.: as 34-35 rr..
46 p.: 1 in. p., 1 s. without n. = 149 s..
47-55 rr.: 1 century. p., 1 s. without n., connect n. And at the end of the last R.
56-167 rr.: as 4-55 rr. x 2..
168-191 pp.: as 4-23 pp..
N. main. col..
192 r.: 1 c. p., 1 s. without n. = 149 s..
193-194 rr.: 1 century. p., 1 s. without n..
Binding of the side edge of the bedspread
We connect n. main col. in the corner of the side of the work.
1 p. (LS): 1 in. p., 1 s. without n..
2 p. (IP): 1 in. p., 1 s. without n..
3 p. (LS): 1 in. p., 1 s. without n..
The same for the other sidewall.
Bedspread binding
Comm. n. In the 1st s. last a row of tying the sidewall of the bedspread.
1 p. (LS): 1 in. p., 1 p. without n. in the 1st s., * (1 ch., prop. 1 s., 1 s. without n. in the next s.) to the next corner, (1 s. without n., 1 ch. p. , 1 s. without n.) in the corner point, from * 3 more times, ss ..
2 p. (IS): (ss, 1 vp, 1 s without n.) in the 1st are. from the 1st c. p, * (1 v. p., prop. next s., 1 s. without n. in the next ar.) to the next. corner, (1 s. without n., 1 ch., 1 s. without n.) in the st. angle, from * 3 more times, 1 c. p, ss..
cut n. V and conn. n. BUT.
3 p.: (ss., 1 v. p., 1 p. without n.) in the 1st are. from the 1st c. p, * (1 v. p., prop. next s., 1 s. without n. in the next ar.) to the next. corner, (1 s. without n., 1 c.p., 1 s. without n.) in the p. angle, from * more x 3, 1 c. p, ss..
4 p.: (ss., 1 v. p., 1 p. without n.) in the 1st are. from the 1st c. p, * (1 v. p., prop. next s., 1 s. without n. in the next ar.) to the next. corner, (1 s. without n., 1 c.p., 1 s. without n.) in the p. angle, from * more x 3, 1 c. p, ss..
Ready! According to the same scheme, you can also knit original pillows that will decorate the interior of your home.
We really hope that our lesson will be useful for beginner craftswomen and will help in knitting a warm and cozy bedspread with your own hands. Smooth loops!
And crocheted covers can be called a very popular trend in needlework. There are several benefits to this type of work. First of all, this is the obvious ease of making the fabric, as well as great freedom of action in choosing yarn, its color and texture.
A crocheted bedspread can be designed for adults or children, serve as a decorative element for a bed and sofa, or warm all family members on cool evenings.
Types of bedspreads and blankets that can be crocheted
What's great about creativity is that you can make something out of nothing. This fully applies to the manufacture of bedspreads. How many craftswomen exist, so many options for the execution of this product. However, you can list a few of the most common types of bedspreads that are available for crochet:

It is worth mentioning the last point right away: such bedspreads are most often knitted for children, so they have the shape of a butterfly, ladybug, bear, or just a huge flower with petals. The manufacture of such products does not lend itself to any patterns and is planned individually in accordance with the idea of the craftswoman.
Other types of bedspreads can have a square, round or oval shape. They are knitted from cotton (in the case of using an openwork pattern, a crocheted bedspread), woolen or half-woolen yarn (if the product should be not only beautiful, but also functional).
Square bedspread: circular rows
The rectangle is the most common and convenient shape to use in crochet. It is difficult to spoil it, since you need to try very hard not to build four identical faces with the simplest expansion at the corners. Crochet square bedspread patterns are very diverse. They are also suitable for making up a fabric from fragments, and for knitting one large square.

Do not be afraid that the schemes of squares have no more than 20 rows. They can be very easily adapted to your needs, for example by repeating several openwork or solid rows as many times as necessary. You can use rows from more than just one schema. The beauty of this technique is that all circular rows in square patterns are designed with the correct expansion, so you don’t have to worry about violating the proportions of the future bedspread. When working on a large square, you need to monitor the balance of colors. The photo above is a great example of good color matching. Two colors of the same tone (blue and green) are used here, light green and white, which gives them all contrast and brightness.
Blanket knitted in one piece
Literally every craftswoman will master such work. All that is needed is to make the correct calculations and make sure that there is enough yarn. Next, you should dial the required number of loops and knit according to the selected pattern until the fabric of the required size is obtained.


The only subtlety in doing such work is maintaining a smooth edge. The formation of an accidental reduction or addition of the web must not be allowed.
Crocheted bedspread from squares: working with motifs
A square or rectangular bedspread, consisting of several dozen fragments, always looks very impressive. For many households and guests of the house, the huge amount of work that the craftswoman did is obvious.
Square crochet bedspread patterns can be found literally everywhere, and it’s not necessary to use the old classic patterns. They are already, frankly, tired of everyone. Modern openwork or solid patterns used for such a traditional thing as a crocheted bedspread will be the key to creating an extraordinary product. You won't be ashamed to brag about his photos on social networks!
The diagrams below offer patterns for knitting bedspreads.
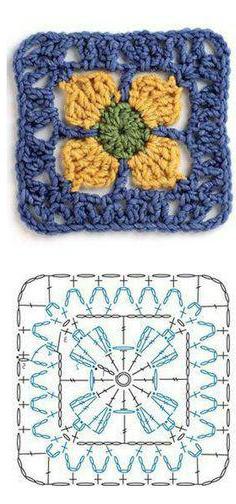
Here is the simplest scheme with a flower in the center. It is perfect for making a bedspread from a small fragment, and if desired, it can be expanded by the method described above. However, if the craftswoman plans to use the remnants of different yarns for knitting the product, this pattern can be used in its original form.

The next motif is designed to obtain a dense canvas. Such patterns of crocheted bedspreads can be increased indefinitely, repeating the penultimate row. The last row is performed only at the end of the knitting of the fragment, as it smoothes the corners formed when knitting the previous rows. This scheme is quite complicated, at first glance, but it is not difficult to understand it. For convenience, the rows are painted in different colors. Also, a scheme of an openwork fragment for creating

Connection of motives
The stage that completes the crocheting of the bedspread is the assembly of the stripped fragments. This can be done with a needle or crochet. It is highly not recommended to knit motifs in the process of knitting the last row. Quite often you have to adjust the shape or size of the fragments, especially if they are made in different patterns and from different yarns. It is more convenient to make any adjustments before the motives are collected.
At the end, the bedspread can be tied with a beautiful border or several rows of a dense pattern. This "frame" gives the product a complete look.
Good afternoon friends!
The crocheted sofa cover shown in the photo aroused great interest among the needlewomen of my groups in the networks. It is connected with large squares and decorated with a border with tassels.
But we didn’t have a border knitting pattern, and everyone had questions about this. I already decided to try to tie it myself and figure it out in order to make a description. And then I was lucky: I accidentally met all the schemes, and quite detailed ones. I nevertheless connected samples of motives and made a video master class.
Knitting bedspreads on the sofa
In the description of crocheting a sofa bedspread, we will determine the amount of yarn, and consider in detail the knitting pattern, and find out how to sew motifs.
How much yarn do you need
Very often and quite rightly the question arises of how much and what kind of yarn is needed.
For a knitted bedspread, it is best to use acrylic.
I took Circassian (or Kislovodsk it is also called) yarn, in composition it is acrylic + a little wool mixture. The thread is thick, I don’t know how long it is in a skein, I think that in 50 grams it is no more than 100 meters.
I had a hook with the number 1.5.
The square motif of a bedspread made of such yarn turned out to be quite large - with a side of 27 cm, unlike the bright one that I talked about earlier.
It took almost two skeins of yarn, about 80 grams.
If we need to knit 8 motifs in length, and 4 in width, therefore, only 32.
32 motifs x 80 grams = 2560 grams.
You also need a little yarn for the border, something like this calculation: 8 motifs x 40 grams = 320 grams.
2560 + 320 = 2880 / 2 = 1440 grams.
Those. we get as a result that the bedspread will require 1440 grams of yarn in two colors.
Accordingly, if the yarn is thinner, which is preferable, then its consumption is less.
Knitting a square
The crochet pattern of the squares that make up the bedspread on the sofa is in front of you.

For greater clarity, I post a separate knitting pattern for the center.

I'll tell you about the features of knitting.
- So, we begin to knit a square with a ring of 4-6 air loops.
- In the first row there are 8 petals of two columns with one crochet and three VPs between them. (At the beginning of the row, as always, instead of a column, we knit 3CH).
- In the second row, in each arch we knit 10 unfinished columns with three crochets, knitted together (this is shown in the diagram in the form of a barrel). Between them 4 or 8 VP. We finish the row like this: 2ch and 1sc in the air loops of the beginning of the row.
- The third row starts with a group of 5 unfinished С1Н knitted together. Further 1VP and 13 С1Н over the arch of 8VP. Above the arches of 4 loops - two groups of 5 unfinished С1Н, knitted together, and 4VP between them. At the end of the row, 5 unfinished stitches with 1 yarn, 2ch, 1sc to the beginning of the row.
The corners of the future square have already been determined, in which in all subsequent rows we knit the same pattern from two groups of unfinished columns. - We turn to reading a large pattern and knitting large petals on four sides.
In rows 4 to 11, you need to knit convex and concave columns with one crochet above the columns of the previous row on the sides of the square, as evidenced by the designations with “hooks” at the ends.
Thanks to this knitting, beautiful embossed “petals” are obtained.
Between the petals there is a mesh of columns with one crochet and two VPs between them. The number of cells increases with each row. - We tie the finished square around the perimeter with single crochets.

Video lesson on knitting a motive:
In total, you will need to connect 16 squares of one color and 16 of another.
Knitting a triangular border motif

Begin knitting again with a ringlet.
Then we knit in the first row 3CH, 2CH, 1C1H, 2CH, 5 unfinished columns with 1 crochet, knitted together, 4 VP, 5 unfinished columns with 1 crochet, knitted together, 2CH, 1C1N, 2CH, 1C1H.
We turn the knitting and knit all the following rows with rotary ones. In the center there will be a braid from groups of unfinished columns, and on the sides of it a mesh of C1H and 2 VP between them. The expansion of the triangle will occur due to increases at the beginning and end of each row.
We knit in this way until the side of the base of the triangle is equal to the side of the square motif. The last row is tying with single crochets.
I didn’t knit the whole full motive anymore, I don’t need it, it was only important to understand the principle of knitting and make a description of it for you.
 Video lesson on knitting borders:
In total, you will need to connect 4 triangles of each color.
How to crochet bedspread motifs
The figure shows that all the motifs of the bedspread, both square and triangular, are additionally tied with yarn of the same color and connected to each other with it.
With this method of connection, the motifs are folded together in pairs inside out and crocheted with single crochets, capturing both walls of the loops.
It turned out a beautiful seam on the front side with a scarf.
To be honest, I don't really like that the yellow squares are connected with green yarn. I would do this: I would connect motifs of the same color with the same yarn, and different in color - any, but from the inside out.
Knitting only seems to be a difficult type of needlework, but once you try it, how an exciting activity becomes the meaning of life!
If you are a beginner needlewoman and do not know how to crochet a plaid as simply as possible, or if you want to get the result in a short period of time, we advise you to choose this simple option. It is good because the pattern is simple and does not require preliminary calculations. Knitting will go in a circle, and thanks to this, it is impossible to make a mistake with the desired size.
Preparing to knit a plaid
Soft acrylic or wool blend yarn is best suited for crocheting a plaid. The main thing is that it should not be prickly - in this case, you will have to sew on a lining. The coloring of the "batik" type looks unusually colorful, when in a skein one color smoothly passes into another. In the photo Alize Angora Gold, Batik color.

Such a blanket can be knitted for a newborn child, and for an adult, and just as a piece of furniture. yarn consumption depends on the desired size of the product. The remains of plain yarn can also be used: each row or several knit in a different color.
The scheme of the plaid and the border to it is attached to the description.

Step-by-step knitting master class according to the scheme
We start from the center. The base pattern is very popular, popularly called "grandmother's square".


For those who are not familiar with circuits:
- from the central ringlet (consisting of five air loops) we knit the first row: * 3 columns with a crochet,
- 2 air loops * - so four times.
Only at the beginning of the row are three air loops instead of the first column. It turned out to be a small square. Photo of the first row step by step.

Second row. We reach the corner with semi-columns, there are 3 lifting loops, 2 columns, 2 air loops and 3 columns. Further - in each hole, 3 columns (that is, not from the loop, but directly from the large hole). Do not forget to knit two air loops at the corners.

The third and all subsequent rows of the plaid are crocheted according to the same principle. We stop when the product reaches the desired size.

Let's start crocheting the border of the plaid. It consists of only one row. Lush columns give an unusual effect. Border pattern:
- * Single crochet,
- 4 air loops,
- lush column in the next loop of the base,
- air loop,
- skip 2 loops of the base *.


This is repeated on the other sides. But at the corners, do not forget to “wrap” four columns at each corner, as shown in the photo. At the end, we close, make a knot, cut off all the protruding threads, and the knitting of the square for the plaid is completed!

To get a product of the right size, you need to knit one large panel or several parts and sew them together. The easiest way is to sew the squares with simple sewing threads, sew on a typewriter, and then tie the entire fabric with a border. Another option is to crochet the panels.

As for the shape of the plaid. As you already understood, only a square is obtained in this way, but there are situations when a rectangular shape is fundamental. It's okay, you can solve the matter like this: tie six identical squares, then arrange two wide and three high, and sew.
We hope this step-by-step instruction for beginners helped you find the answer to the question of how to crochet a plaid quickly and easily. If you have children, then check out our knitting and knitting workshops. For fashionistas we recommend, made in a fashionable technique with beads.
We hope that you will return to our cozy site "Women's Hobbies", we will definitely please you with new creative ideas.
For those who are not in the know, I inform you that in February of this year, the project “Spread for the Year” was opened on the blog, the purpose of which was to crochet a bedspread for a long time. The key word in this phrase is to connect, i.e. finish the job...
After all, it is no secret that many (and I am no exception) sometimes accumulate a whole heap of shortfalls (unfinished products), which is very difficult to bring to its logical conclusion. And the main reason for the accumulation of untied products, in my opinion, is that we just get tired of knitting this or that thing, it bothers us, because. the knitting process is by no means fast, and the thing becomes uninteresting to us.
And so I thought that if you plan your work in such a way that it would not be stressful to complete it and not get bored.
Here's what I planned...
Now I'm very happy - my plan worked! Here it is - my cover! Perhaps some of you will need this experience ...
How to crochet a bedspread in a year - the story of my knitting
So, for the bedspread, it was decided to knit only 9 motifs per month (they are quite large), i.e. 2-3 motives per weekend ...
Believe me, 2-3 motives in two days is very little ...
Experienced knitters can easily crochet such a bedspread in a couple of weeks ...
But, since I do not trade in needlework, I am in no hurry.
In addition, “against the background of knitting this large product”, completely different products will be born that will diversify my knitting ...
And another important detail ... I announced on the blog that I would not only crochet a bedspread from motifs, but I would, from time to time, report on the work done.
This announcement was a good motivator. Because I gave my word to my readers - it is necessary to fulfill ... 
At first things were a little tricky...
Having connected somewhere around 18 motifs, with a sinful deed, I thought about abandoning the idea of crocheting a bedspread and wanted to switch to something smaller (for example) ...
But, somehow, suddenly, unexpectedly for myself, for a month I forgot about this desire and connected 9 more motives ...
It turned out 27 - a lot for a pillow, and 27 motives - this is almost a third of my knitted bedspread ...
And immediately everything fell into place, i.e. it became clear that "the bedspread to be!"
And I also often laid out related motifs and admired them ... imagining what beauty would turn out in the end, and this also helped in my work))) 
How to knit a blanket from square motifs
It took me a lot of thread to knit this product ...
And, to my shame, again I can’t say exactly how much ...
The fact is that yarn is now expensive ...
Even the simplest thread, in such volumes, does not look cheap at all. Therefore, I ran to buy more yarn three times, probably, or even four ...
And in the end, I just lost count...
I can only say that for the crocheted bedspread I needed the yarn "Spark" of the Trinity factory in the amount of about two kilograms
- Yellow - about 500 gr.
- Orange - about 500 gr.
- Dark brown - about 700 gr.
- Light brown - about 300 gr.
and hook number 4
Speaking of hooks...
Durable and practical! 
Crochet set
Hooks, knitting markers and much more only 512 rubles 69 kopecks
Free shipping!
Knitted bedspread consists of 88 square motifs with a flower in the middle, crocheted according to the pattern 
A detailed description of the knitting of this motif can be found in the article.
In the same article, by the way, a promise was made to crochet the bedspread in a year.
I also recommend that you look at the article, it describes how to hide the threads in the process of knitting. It is better to do this right away ... otherwise, the final stage of knitting the bedspread (assembly) can drag on for a very long time ...
A rectangle with sides of 8 * 11 (motives) is sewn from the connected motifs and tied around the perimeter with one row of single crochet posts (in the corner of RLS + VP + RLS) and one row of connecting posts for the back slice of the loop - I really like this technique, it gives the edge knitted product complete and neat look. 
We connect the motifs in a bedspread
One of the important questions seemed to be the question of how to sew motifs for the bedspread ...
Moreover, I wanted to connect the motifs in such a way that no seams were visible either from the front or from the wrong side of the product.
After several experiments of connecting in different ways, I again settled on crocheting motifs using connecting posts.
Why? The answer is simple ... Simple, fast, excellent appearance, there is a seam, but it is flat, in short, everything suits me ...
How to crochet square motifs with connecting posts - Master class

 It turns out a flat connecting seam

- Further, similarly, as described in paragraph 2, we attach, tie and sew the third square motif

Let me remind you that all this is done without breaking the thread.
But the fourth motive cannot be attached in this way, so we tie it separately and sew it in according to the principle described in paragraph 3, but only two faces at once 
- In total, 20 such large squares were sewn. These squares can be immediately sewn into 4 strips of 5 pieces, and then connected and sewn along the narrow side of the bedspread with another strip sewn from 8 squares ...
That's the whole story about how I knitted for almost a year ... and, most importantly, crocheted a bedspread ...
P.S. Friends, I really liked this experience ... In short, I want to stir up ... It remains to choose what exactly I will knit)))