Crafts on the topic my mother is the best. Beautiful crafts for Mother's Day in kindergarten and elementary school (step by step instructions with templates). Crafts cards for mothers from children, step by step
Gifts for mom are a hot topic for creative activities with kids all year round. March 8th, Mother's Day in November New Year, February 14, name day or professional holiday- there is always a reason to please a loved one. The most expensive gift is the one that the child made with his own hands. The kids like to make souvenirs for their beloved mother, they are proud of themselves, seeing the joy and delight on her face.
In this article you will find a variety of paper crafts for mom - from simple postcards, which 3-4-year-old kids can handle, to complex volumetric colors.
A decorated kitchen or room that the birthday girl discovers in the early morning will be a pleasant surprise - this is how paper crafts for Mom's Birthday will become an attribute of the holiday and original decor premises for several months. Later, a garland can decorate a group or class where the child is studying.
Multi-colored daisies connected in a garland are made quickly and easily, and you can hang them on curtains, a wall or a chandelier.
For this:
- Fold multi-colored sheets of A4 format with an accordion.
- In the center, tie each accordion with a regular white thread.
- Trim the edges so that they become rounded.
- Straighten the blanks and glue the ends.
- Glue a round core of a different color to the center of the chamomile.
- String all the flowers on a long thread.

Bouquet in the palm
An original idea for a birthday present for mom is a bouquet of flowers clutched in a child's hand. The kid will definitely love the idea of making his own pen and putting flowers in it, and the process itself will not take much time and effort.
- First, make a palm. To do this, the child needs to put his pen on a light sheet of paper, circle it and cut it out. The daughter can decorate her wrist with a bracelet, and draw and “make up” her nails on her fingers.
- Create a flower bouquet. Cut out petals, buds, stems according to patterns from dense multi-colored sheets different sizes, collect them in a bouquet, gluing the finished flowers together at one point.
- Glue the palm blank to the base of the card, leaving the fingers free.
- Put the bouquet in the palm of your hand, wrap your fingers around the stems and glue them to the base of the card.
It turns out very unusual gift. In the same way, you can “put” a basket of flowers into the pen.

Bouquet in a vase or mug
The flower theme is endless. Here are two more options for making beautiful paper bouquets.
Clover, tulips or forget-me-nots in a mug can be made by a child of 3-4 years of age with a little help from an adult.
- Make a mug template with a handle.
- Fold a colored A4 sheet in half (you can take a smaller format), circle the template so that one edge of the mug matches the fold, cut it out, leaving the handle on only one side.
- Prepare the design of the front of the cup. To do this, cut out patterns on a white template with nail scissors. Glue the white part to the colored part.
- Make flowers from dense colored sheets,
- It remains only to put them in a mug. Please note: you need to glue the bouquet to the inside of the cup. To make the design stable, make the stems thick and short.
Here is a greeting card the kid can make himself. The work is easy and interesting, and the entire manufacturing process is shown step by step in the pictures below.
You can also make a vase from disposable plates with corrugated edges, painted with acrylic or gouache paints.

- One of the plates is cut in half and glued to the second so that a convex container is obtained.
- Then you need to build flowers. Paint the wooden skewers green. Collect flowers from three to five petals. Each petal is a strip of red or yellow color. The resulting loops are glued together: a skewer is attached to them on one side, and a core on the other.
- The child can place the finished flowers in a vase and decorate the composition with decorative floral ribbon, beads, corrugated sheets.
daffodils
Narcissus is a flower born in spring. Delicate, beautiful postcard with daffodils will be a wonderful gift for the first day of spring or March 8th.
- The white petals, stems, and green leaves are cut from regular multi-colored leaves, and the cores of the daffodils are made from the cells of the egg container.
- Each cell must be cut out separately and covered with yellow paint - a son or daughter will cope with this task without the help of adults.
- The dried cores are glued to the main part of the postcard - the gift is ready!
This is a real bouquet that will retain its freshness and beauty for a long time.
For a bouquet, you will need wire, glue, multi-colored sheets and a decorative vase or other small container.
- Cut out flower blanks. Each tulip consists of two blanks: a small four-leaf and a large six-leaf. In addition, you will need to cut out the core and two long green leaves for each tulip.
- Pass the wire through the first blank and bend it, glue the core on top.
- Bend and glue the petals to make a bud.
- Pass the large blank from below in the same way as the small one, and form a bud in the same way.
- Wire - tulip leg - wrap with green corrugation or a napkin, smearing with glue.
- Glue the petals to the stem, after giving them a bend.
- Make each new flower in the same way. Tulips can be three, five or seven - it depends on what kind of container you have prepared for them.
- Put the finished flowers in a vessel and present to the birthday girl.

Postcard with fluffy chamomile
Such an unusual card looks very elegant and festive. Making requires patience, attentiveness and the ability to work hard, so it is more suitable for children 5-7 years old. To make a postcard, you will need the following materials and supplies:
- Scissors.
- PVA glue.
- Simple pencil.
- Colored sheets of cardboard and paper.
- White sheets.
- Wallpaper with a bright floral pattern or a piece of decorative paper.
Now you can start the process itself.

puppet experiment
With such a creative craft, you can congratulate your mom-fashionista. The card turns out to be original and targeted, because the doll is made to look like a birthday girl.
- Prepare thick but thin white sheets, magazine clippings, and scissors (or a special layout knife).
- First prepare the base. Fold a white sheet in half, from the center draw a half of the silhouette of a lady in a dress. It is desirable that the dress and hairstyle be lush, voluminous. Don't forget to label your shoes and possibly your purse. Cut out the silhouette.
And now you can experiment with the workpiece. As a rule, dad is happy to join in choosing an image for the birthday girl, and creative process turns into an exciting game.
When the outfit is ready, fasten it to the back of the base and glue the inside thick sheet white, gray or any other color.

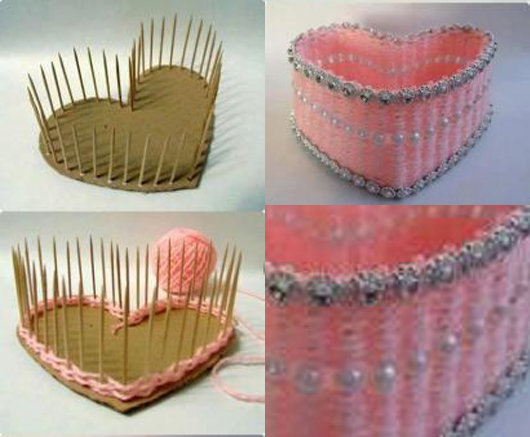
Jewelry box
You can put a few sweets or a small present in this box, or you can give it as an independent gift.
For manufacturing you will need:
- bright colored cardboard;
- a pencil with a ruler;
- glue;
- mockup knife.
- To make a heart, you need a layout. You can transfer it to the back of the cardboard yourself or print the finished diagram.
- After the scheme is transferred to the working material, it must be carefully cut and bent along all sides and lines.
- As the heart is assembled, each recess is glued, the parts of the box are compressed - this is how the heart is gradually formed.
At the end, the box can be decorated with beads, large beads, textile bows, flowers or butterflies.
Heart bookmark in an envelope
It's very cute children's gift for mommy, including packaging and a small surprise inside.
First, make a bookmark for the book. This is done very simply.

- Take bright red (blue, yellow, purple) paper and cut out two identical hearts from it, leaving small allowances on the sides so that the hearts can be conveniently wrapped around book pages. Please note that red sheets should not be dyed or rubbed off.
- Fold the hearts together, you can carefully glue them, but you need to make sure that there are no bulges and traces of glue left. Bend the allowances well. It turned out original bookmark. Now you need to pack it nicely.
- Make a small envelope for a surprise bookmark. The envelope can be made from decorative thick paper or cardboard with a pattern. You will also need a small thin ribbon of a bright shade.
- Cut out four circles with a diameter of 8-10 cm and fold each circle in half.
- Form a square from the circles. To do this, they must be overlapped and glued at the overlapping points.
It remains to put a heart inside, close the envelope, folding the semicircles with each other, and tie the ribbon beautifully.
congratulatory poster
Great idea for kindergarten but it can also be done at home.
Such a kind of wall newspaper can be made using any technique, placing flowers, butterflies, the sun, hearts or photographs on a large basis.
The smallest kids can be offered to put a lot of prints of their hands on the panel, stick flowers cut out by adults, sprinkle with sparkles or paint colorful butterflies with a sponge.
Conclusion
Each do-it-yourself paper craft for mom will become a work of art and the most precious gift, because the child puts all his love into it, sincerely and from the bottom of his heart tries to please his closest and beloved person.
Parents keep homemade gifts for their kids for years, often giving them special shelves in the most visible place at home - in the kitchen or in their room.
November 25, 2018 is Mother's Day in Russia. It's great that they came up with a holiday for our mothers. We so rarely tell them about our feelings that even if this holiday did not exist, it should have been invented. And how to express your love to your mother, if not a gift made by yourself. These gifts are made with soul, imbued with warmth and gratitude. On the eve of the holiday, the NNmama.ru portal has prepared a selection for you interesting gifts for Mother's Day with their own hands.
DIY Mother's Day Gifts
Postcard with balloons
You will need:
- photo of the child (from whom the gift is);
- scissors;
- air balloons;
- multi-colored threads;
- white sheet of cardboard or colored paper;
- a sheet of colored paper;
- PVA glue.
2. Inflate small balloons.
3. Tie with multi-colored woolen threads. It is better if the ends are long, so the card will look more impressive.
4. Glue colored paper on a white sheet of paper, slightly smaller than white.
Your gift is ready!
flower vase

You will need:
- green paper;
- napkins or corrugated paper;
- scissors;
- glue.
2. The resulting parallel lines must be cut to a horizontal line not reaching 3 cm from the edge.
3. Unfold the slit sheet.
4. Turn the sheet inside out and fold back 1 cm.
5. After that, coat with glue and glue.
6. When the paper sticks together well, roll the workpiece into a tube.
7. It turned out a stable vase with petals.
8. Make flowers from a napkin or corrugated paper.
9. Glue the finished flowers to the stems.
10. You can decorate the resulting bouquet to your liking, for example, glue sequins or tie with a satin ribbon.
Idea: flowers can be made multi-colored and then decorated with beads. If the option with glue and paper does not suit you, then take a regular jar, paints and a glass of water. Draw flowers on the jar and you will be happy.
Gift decorative candle

You will need:
- candle;
- baking paper;
- paints.
2. Then attach the pattern to a thick candle and fix it. Next, treat the candle with hot air, such as a hairdryer. beautiful candles ready.
Idea: you can write original congratulations or a message in verse.
Application "Sunshine for Mom"

You will need:
- ribbons;
- pasta;
- glue;
- colored paper;
- paints.
2. The sun is formed from round pasta. All elements are glued.
3. Then the eyes are glued to the main circle.
4. After that, we glue multi-colored stripes to the circle, which will symbolize the rays.
5. Pasta-bow is glued to the end of these rays.
6. And in order to decorate the craft and make it even more interesting, use flowers that are glued to the top of the sun.
wish flower

You will need:
- colored paper;
- scissors;
- glue.
2. Then cut out the flowers with scissors.
3. Gather the flower.
4. Glue all the petals together with a ribbon, and make the middle out of the squares. The size of the squares should be 3.5 cm by 3.5 cm. Fold them in the form of a frog. Glue all the resulting blanks with each other, and then glue on the middle of the flower.
Idea: if there is no printer, then you can draw a flower, and write wishes or compliments by hand.
flower bed

You will need:
- glue;
- double-sided colored paper;
- scissors;
- pen or black marker.
2. Then find the middle and glue the two parts of the workpiece to make a magnificent fan.
3. Now the most creative process, draw any flowers, lilies of the valley or tulips. Cut them out.
4. You can give the children ready-made templates, or you can have them draw and cut them themselves.
5. After that, distribute the finished blanks with glue on a fan. Good mood for children and mothers are guaranteed!
Application "Calla" from cotton pads

You will need:
- glue;
- paints or markers;
- tubes for a cocktail;
- cotton buds.
2. Color the cotton tip with a felt-tip pen.
3. Insert a cotton swab into the cocktail tube.
4. Place a cotton pad under the finished design.
5. Apply some glue to the bottom edges of the disc and press the edges together. A couple of minutes and the flower is ready.
The entire bouquet is done in this way.
Volumetric postcard 3D

You will need:
- double-sided colored paper;
- cardboard;
- ruler;
- scissors;
- glue stick;
- markers.
2. Fold it in half and get a smaller right triangle. We bend it in the middle again. Press the smaller side to the larger side. We draw on it rounded edge petal.
3. It remains to cut the flower along the intended line and straighten it.
4. Now cut off one of the petals from the flower. This is necessary in order to make it voluminous.
5. Circle the edges, then the flower will become more realistic. We do not touch one of the petals near the cutout, since we will glue the other on it.
6. Now we put the painted petal on the one that we did not touch and glue them together.
7. We color the core and continue to make 6 more of the same colors.
8. Bend the resulting flowers in half. We collect in a bouquet. For the side petals, glue two to one flower, on both sides.
9. We glue another one to the top flower, but already for three petals.
10. Glue two more flowers on the sides.
11. And the last flower we place up.
12. Cut out two hearts from cardboard, suitable in size for the bouquet. Red should be bigger than white. We put a white heart on a red one and glue it.
13. On the other hand, glue a white one, a little smaller, to the red heart, and another smaller red one on it. We bend in the middle. As a result, we got a card of four hearts. It is white on the inside and red on the outside.
14. Now glue the bouquet with the help of the top petal to one side of the heart. In the same way, glue the bouquet to the second side of the postcard. Ready!
Bouquet of spirals

You will need:
- colored paper - two-sided different shades;
- PVA glue;
- scissors;
- simple pencil.
2. Choose your favorite shade of colored paper, then draw a circle with uneven (wavy) edges.
DIY crafts for Mother's Day for a kindergarten or school are created from the most different materials, but the palm, nevertheless, belongs to colored paper and the most ordinary napkins. They make very simple children's applications, and original bouquets, and beautiful holiday cards. For preschoolers and children from grade 1, simple work options are selected that require a minimum of effort, and high school students are instructed to complete more intricate and unusual products.
We bring to your attention several workshops on making beautiful themed presents. Follow step by step instructions, create small, bright masterpieces with your own hands and delight your loved ones with pleasant holiday gifts.
DIY crafts for Mother's Day from napkins in kindergarten - master class
This interesting master- the class will tell you how to make a beautiful and touching craft from kindergarten for Mother's Day with your own hands paper napkins. Having mastered the lesson, the kids will get an idea of \u200b\u200bnon-traditional ways of working with napkins, develop fine motor skills hands and learn accuracy, perseverance and patience. The finished craft will turn out to be very tender and attractive and will surely please a loved one on a holiday.
Necessary materials for crafts from napkins for Mother's Day
- red cardboard sheet
- stationery glue pencil
- paper napkins (pink and white)
- narrow satin ribbon or braid
- scissors
- double sided tape
- simple pencil
- pattern in the form of a child's palm
- yellow colored paper
- sheet of white landscape paper
Step-by-step instructions for DIY napkin crafts for Mother's Day
- On a sheet of red cardboard, draw a large heart by hand, and then carefully cut it out with scissors.

- Turn the heart over to you with the white side, attach the template of a child's hand to it and circle it with a simple pencil.

- Take a few white and pink napkins, and cut them into four identical strips. Then cut each strip with scissors into 3x3 cm squares.

- Roll balls-lumps out of napkin squares, trying not to press the paper too hard. The final round should be slightly fluffy, not hard. It is not necessary to wet the wipes with water during the manufacturing process.

- Carefully grease the drawn palm along the contour with glue and lay out with snow-white lumps. Then fill them with the same internal space. Lay the balls close to each other.

- When the palm is filled with balls, set the workpiece aside for a while so that everything sticks well. Then cut off a piece of satin ribbon or braid of a suitable length and use double-sided tape to glue the top to the heart. This is a hanging loop.

- Lubricate the empty surface of the heart from the outside with glue and lay out pink lumps from napkins. Move from the edges to the middle and spread the lumps as close to each other as possible so that there is no gap between them. The balls adjacent to the white palm should be laid out especially carefully so as not to disturb the shape of the hand and fingers.

- Take a white sheet from a regular drawing album, draw a flower with petals on it with a pencil, cut it out with scissors, and glue a bright yellow eye in place of the middle. Twist the edges of the petals slightly and glue the chamomile to the heart.

- Glue a holiday poem handwritten or printed on a postcard onto the back of the product.

DIY crafts for grade 1 on Mother's Day - postcard "Loving Heart" made of paper in stages

In the 1st grade, for Mother's Day, you can make very beautiful and original greeting cards out of paper with your own hands. Children will cope with such work without any difficulties, and mothers will receive bright, spectacular and memorable presents from the kids on their wonderful holiday.
Necessary materials for making a DIY Mother's Day card
- A5 thick tinted paper
- scissors (stationery and curly)
- simple pencil
- corrugated paper
- stapler
- colored paper set
- set of colored viscose napkins
- PVA glue
Step-by-step instructions on how to make a do-it-yourself paper card for Mother's Day in grade 1

DIY crafts for Mother's Day - simple crafts for school

At school on Mother's Day, together with the children, you can make beautiful, but at the same time very simple crafts. To create a mini-present, you will need the most common materials and a very small amount of time. Finished work will look attractive, spectacular and catchy and will definitely please mom on the day of the most tender, inspirational and touching holiday.
Materials needed for a simple Mother's Day craft
- tinted sheets of A5 paper
- set of children's colored paper
- simple pencil
- scissors
- narrow braid
- pearl beads
- glue "Moment"
Step-by-step instructions for making a simple paper craft for Mother's Day at school
- Bend the tinted sheets of A5 format in half, like a traditional folding postcard. Trim each piece around the edge with scissors so that it looks like a tea cup.
- From red and yellow colored paper, cut flowers in the shape of tulips and daisies with scissors.
- Cut long strips from green paper - these will be the stems of the future flower bouquet.
- Glue a piece of white paper of the same shape onto the outer part of the blank for the postcard. From colored paper, cut out the outline of a tea cup 1 centimeter wide and glue it on top. white background. From paper of the same color as the outline, cut out a flower and glue it to the outside of the card.
- Form flowers. To do this, glue red and yellow buds to the green stems, and attach a pearl bead to the place of the middle. Collect flowers in bouquets of three, glue together at the bottom of the stems and attach with glue to the inside of the card.
- Cut the braid into small pieces, tie in a bow and glue over the stems of the bouquet.
- On the second inner side of the postcard, write with your own hand or paste a ready-made beautiful congratulations for Mother's Day.
DIY crafts for Mother's Day from colored paper - a master class

The master class describes in detail the process of making spectacular and original children's crafts for Mother's Day with their own hands. step by step lesson explains how to turn sheets of plain colored paper into a bright, eye-catching and eye-catching bouquet. A child in kindergarten, a grade 1 student, and an older student can easily cope with the task. Well, for those who want to create more unusual work, we advise you to pay attention to another master class showing how to make beautiful postcard for Mother's Day from paper napkins familiar to all.
Necessary materials for a bouquet for Mother's Day made of paper
- colored paper set
- scissors
- simple pencil
- clip
Step-by-step instructions for making a DIY bouquet for Mother's Day from colored paper
- Fold a sheet of green A4 paper in half, but do not bend. Cut the sheet with scissors from the side of the fold, not reaching the edge of about 2-3 centimeters.
- Roll the cut sheet into a tube, fasten the edge with a paper clip so that it does not unfold, and fluff the strips on top.
- Cut out flowers with petals of different shapes and sizes from brightly colored paper. Glue middle circles of contrasting tones into the center of each of them.
- Glue the finished flowers to the edges of the green stripes of grass and place the finished bouquet on a suitable stand.
For each of us, mother is the closest, dearest, dearest person, ready to tirelessly help, love and care. Of course, the best gift every mother in holidays it will be the one that the child was able to make himself, as these crafts for mom with their own hands convey all the children's love and gratitude. Let's look at how you can make beautiful compositions on your own. Perhaps these will be Original gifts made from natural raw materials or do-it-yourself crafts from improvised materials. We have tried to collect different ways, designed for both the smallest craftsmen, and for the older age.
Crafts for Mother's Day with your own hands from fabric
Wonderful bouquets, as well as compositions, will be obtained from fabric flowers. Moreover, a little material is required, so there is no need to buy cuts - there will certainly be small flaps at home. With their help, for example, you can sew voluminous crafts for Mother's Day with your own hands. For such work, you will additionally need a synthetic winterizer filler (cotton wool), a bending strong wire that will hold the stem.
There are more simple options suitable for younger children school age- do-it-yourself applique crafts from the material using pieces of felt. Replace this fabric with thick dishwashing napkins. Flowers are cut out of them, then glued onto cardboard. The middle is decorated with a button.


Crafts for mom on Mother's Day with their own hands from napkins
Try to make a wide variety of crafts for your mother with your own hands using simple multi-colored napkins. This malleable material makes it possible to make beautiful carnations, roses and other flowers.
Mom will surely be pleased with an elegant heart card with the palm of her child. To decorate it, you need to cut out a blank-heart from cardboard, glue a loop to it. Then, from white and red napkins we roll up small balls (they should be fluffy). The child’s palm should be circled on cardboard, smeared with glue, tightly (without gaps) glue white lumps to it, and paste over the rest of the postcard with red. On the reverse side, you can leave congratulations-wishes.
Such a do-it-yourself craft for mom on Mother's Day will always remind her of what kind of baby her grown-up child once was.


Children's crafts for Mother's Day from pompoms and cotton pads
Having learned how to make pompoms, according to the step-by-step instructions of the article, form a variety of lush and soft bouquets from them. At the same time, it is better to choose woolen threads for making pompoms so that they create more voluminous balls. Crafts from artificial flowers with their own hands are often formed using wire in the form of stems, which are well “camouflaged” by winding with green thread.
Cotton pads are a simple, convenient, affordable material from which you can also make flowers, as shown in the photographs of our catalog. If necessary, they are painted different colors.


Mother's Day: DIY crafts for kindergarten
Often, various exhibitions are held in children's institutions, and, sometimes, matinees for the holiday of mothers. Various crafts for Mother's Day with their own hands, children do under the guidance of educators or on their own. For example, a bouquet of children's hands or falling raindrops looks very touching, each of which contains a photograph of a child.
When decorating a group or a hall for a Mother's Day matinee, do-it-yourself crafts for kindergarten can be quite large, such as garlands of multi-colored paper maple leaves. Separate elements were made by all the children of the kindergarten, and the teachers assembled very beautiful “curtains” from them.


Mother's Day: DIY Paper Crafts
Colored paper, as well as cardboard, are very often used in children's creativity because it is quite easy to work with them. By following the instructions in the photos of our article, you can learn it yourself, and you can also show your child how to make beautiful flowers from paper in the way of origami. On Mother's Day, do-it-yourself paper crafts are made in the form of original greeting cards, and a cute composition of birds will undoubtedly touch any mother.


Crafts-gifts with their own hands from natural material
Using natural resources, it is not difficult to create a wide variety of crafts from autumn materials with your own hands. Walking on the street with a child, pick up twigs, acorns, cones, fallen bright multi-colored foliage for creativity. In addition, sunflower seeds, pumpkin seeds, and other natural raw materials are often used.
We tried to present wonderful crafts-gifts with our own hands in the article. For example, a basket of cones. It is quite easy to make it: you will additionally need a plastic bucket, hot glue, with which the cones will be attached. It is also easy to form a basket using a wire that connects the cones into one ensemble.


Hello. You all know that it is always nice to receive gifts for any occasion. And if they are still from our kids, but made with their own hands, then they simply have no price. Any mother, and any father, always enjoy the creativity of their kids, and this is an indisputable fact.
Therefore, on the eve of the approaching Mother's Day holiday, I decided to prepare a special selection, which contains different ideas making children's crafts for this event.
Jobs can be done by kids different ages starting from junior group kindergarten through elementary school. Of course, adult cooperation will be required. And since this will be a surprise for mom, grandparents and dads, educators and teachers should come to the rescue. So dear adults, let's all surprise our most beloved person on earth together.
For those who have forgotten, let me remind you that this special holiday celebrated on the last day of autumn. Therefore, do not forget to choose and make a gift with your child in advance, and also learn to express all your love and gratitude to your mother.
Today, first of all, I will focus on step-by-step processes production of works. Also, I will not leave the ready-made photo options without attention, and will provide you with a bunch of interesting and original ideas.
If suddenly, you don’t like anything (although I doubt it), then go to the article on the topic of manufacturing. There is also a cool selection of homemade presents for our mothers.
We will start with products that are within the power of not only older children, but also kids. I dedicate this section to kindergarten. You can create and craft from any material, be it plasticine, paper, etc.
Bouquet of multi-colored palms (for the younger group)

To do such spiritual work, you need the usual White paper A4 format, paints, water and brushes.
Now make blanks on a white sheet, just draw green stems and “tie” them with a blue ribbon. With a child, paint his palms with any color. Then help him make prints on the twigs. That's all, a chic bouquet is ready!
Also invite the kids to simply mold a gift. Here's what can come out of this idea.

Since younger preschoolers you can make greeting cards.
Postcard with balloons
Choose a photo of your son or daughter and cut it out. With a child, inflate small balloons, tie with multi-colored woolen threads. At the same time, leave long ends. On a white sheet of paper, glue colored paper, slightly smaller than white. Next, glue the photo and balloons. Such a present looks very impressive!

Postcard "Colorful buttons"
Well, this is the easiest option. Ask your child to draw stems or print them on paper in advance. Then choose multi-colored buttons, you can have different sizes, and glue them. Behind help write a congratulation.

with the guys in middle group , you can create such charming butterflies.

First, paint the paper with different colors from light to dark. While the base is drying from colored paper, fold the butterflies according to the diagram below.

Well, then glue them on a dried base and complete everything with a twig and leaves, which can also be made of paper or drawn.
An interesting job that requires artistic skills. Ask the children to draw a portrait of their mother. And then all together make frames.

For senior and preparatory group options are a little more complicated.
For example, you can make such ekibanas. The stand will be corks from plastic bottles. The tree itself is a wooden popsicle stick. Foliage cut out of paper in the form of hearts of different sizes. Glue them together, and then glue on a stick.

A beautiful bouquet is obtained from ordinary cotton pads. Plus, use the quilling technique to decorate.

In this version, you will have to try and cut out the baskets. Make flowers together in any way known to you. We have already talked about how to make tulips. If you haven't read the article, be sure to check it out here.

Of course, flowers are a frequent gift. Try to create a homemade bouquet.

flower vase
You will need: green paper, napkins or corrugated paper, scissors, glue.

Manufacturing process:
1. Take a sheet of green paper and fold it in half. Step back from the bottom about 3 cm and draw a horizontal line with a pencil. In the upper part, draw parallel lines in the range of 1-1.5 cm.

2. The resulting parallel lines must be cut to a horizontal line not reaching 3 cm from the edge.

3. Unfold the slit sheet.

4. Turn the sheet inside out with the other side and fold not exactly edge to edge, but retreating 1 cm.

5. After that, coat with glue and glue.

6. When the paper sticks together well, roll the workpiece into a tube.

7. It turned out a stable vase with petals.

8. Make flowers from a napkin or corrugated paper, as shown in the photo.

9. Glue the finished flowers to the stems.

10. You can decorate the resulting bouquet to your liking, for example, glue sequins or tie with a satin ribbon.

You can also use the idea of decorating pebbles. Paint them with paint, glue felt hearts on top and the souvenir is ready.

Or plasticine, beloved by all children. It will help to create whole pictures.

And I also liked these beads. Mom will definitely be delighted!

DIY crafts for Mother's Day in elementary school
very interesting and creative craft in the form of a fish, made using the technique of appliqué and trimming. Look how lovely.
Rybka

You will need: white cardboard sheet, red cardboard sheet, bright tinted or colored paper, pencil and eraser, glue.
Work process:
1. Take a white sheet of cardboard and draw a fish on it. Cut it out.

2. Make fins and a tail out of red cardboard: draw and cut out.

3. Cut out thin strips from tinted paper. These will be scales.

4. Now fold each strip in half and connect, fixing with glue. Get "droplets".

5. Glue these "flakes" following the drawn line.

6. Fill in the entire body of the fish, while glue each next edge under the previous one.

7. Take the paper from which the muzzle will be made. It can be peach, red or White color. Cut it into small squares. And using the end of a pencil, crush them.

8. Then glue all the details.

9. When filling in the muzzle, make sure that there is no empty space between the paper.

10. After the work done, glue the fins and tail. The gift is ready.

You can also make a vase from a bottle and flowers from any material at hand.

Or, for example, make such a sweet composition. It is done in an elementary way.

And for those who like to work with threads, offer to do some needlework and make a real jewelry box.
If mom is a fashionista, then she will definitely like the next work in the form of a stylish handbag.

Here is another version of a homemade vase. Everything is simple.

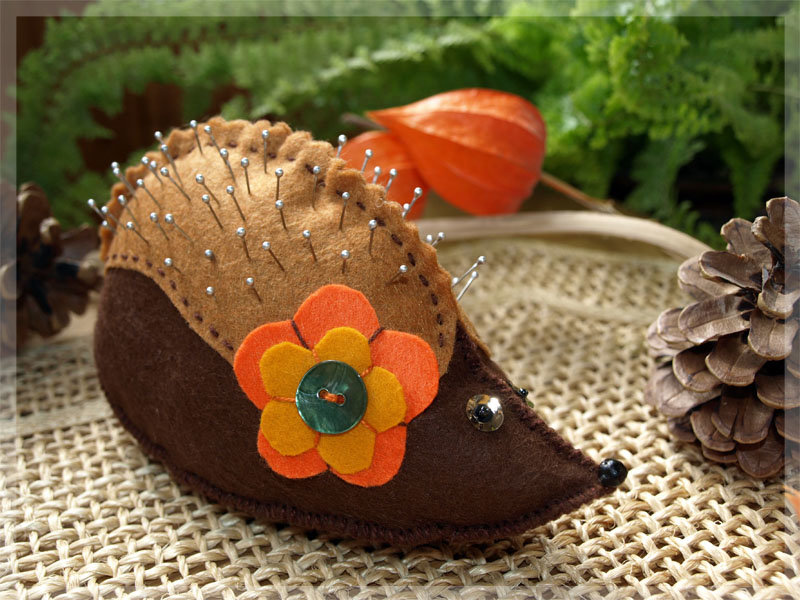
Or, for example, girls can sew needle beds. Always a necessary thing in every home.
For lovers of beading, an option with a bracelet. Here is what it looks like with the diagram.

I also found a cool idea with a pattern on a candle. I think it will be very nice to receive such a gift, and then use it.

Take baking paper and draw a pattern on it. Just remember that it will be transferred to the candle in a mirror image.

Then attach the pattern to a thick candle and fix it. Next, treat the candle with hot air, such as a hairdryer. Beautiful candles are ready.

And don't forget about everyone's favorite postcards.

And from a simple jar, try to make a unique vase.


Simple crafts for mom from colored and corrugated paper
And now I want to offer you products that can be made from plain paper or cardboard. For example, you can make a souvenir in the form of a radiant sun.
Sun

You will need: colored paper, glue, scissors, pencil, stick (wooden skewer), felt-tip pens.

Manufacturing process:
1. Cut out two large circles and one small one. Next, take yellow paper, draw lines at a distance of one cm.

2. Start folding the workpiece like a fan.

3. Then cut the end at an angle.

4. Make another second "fan" and connect them together with glue.

5. From another color, do the same as from yellow paper.

6. Connect all the received parts in a circle, firmly gluing them with glue.

7. Hide the stick in one of the cells. Glue it on too.

8. Draw a face on a small circle.

9. Glue it on the big circle. FROM front side glue the muzzle, and from the wrong side - the second large circle. Decorate the sun as you wish.
I also want to suggest making a shoe with a sweet surprise inside. For the product, it is better to take thick paper or colored cardboard.

Print and cut out the template.

Bend and glue the parts along the dotted lines.


Decorate the shoe. And inside put a transparent bag of organza with marmalade.

Here is an idea with beautiful panel from paper plates.

Well, from corrugated paper, for example, you can make a candy-bouquet composition.

Or create these beautiful flowers.

And how do you like such a touching composition in the form of a heart?

Of course, any flowers look very impressive from corrugated paper, so be creative and fantasize. I suggest making a very simple craft that even toddlers can handle.
flower for mom

You will need: corrugated paper, scissors, glue, disposable spoons and a cup, cotton pad, paints, brush.
Manufacturing process:
1. Fold corrugated paper or a regular napkin several times. Attach a spoon to it and draw a petal a little larger than the spoon itself. Cut out the petals.

2. Glue the petals to the spoon.

3. Make a small ball out of a cotton pad or cotton wool. This is the center of the flower. Glue it on. You can also decorate it with glitter.

4. Make a stand out of plastic cup. You can leave it as it is, or paint over any color with paint. Also paint the remaining white part of the spoon in green color to make a stem. Turn the cup upside down and carefully make a cut. Insert the finished flower into it.
Master class on making cards for Mother's Day + templates
Well, as promised, I throw you a couple of templates for creating postcards on your own. Print them out for the kids and they'll love to color them!


DIY crafts for mom from cotton pads, napkins and pasta
Now I offer another very interesting master class. In it, I will show how you can make a touching craft from ordinary paper napkins in the shape of a heart.
congratulatory heart

You will need: a sheet of red cardboard; stationery glue; pencil; paper napkins (pink and white); narrow satin ribbon or braid; scissors; double sided tape; simple pencil; template in the shape of a child's palm; yellow colored paper; a sheet of white landscape paper.
Manufacturing process:
1. Draw a big heart on red cardboard and cut it out.

2. Now turn the heart over with the white side of the cardboard and circle the child's palm on it with a stencil.

3. Cut the napkins into 4 identical strips. Then cut each strip into squares about 3 by 3.

4. Roll the balls out of these squares, while not crushing the napkins much.

No need to wet wipes!

6. Make a loop out of the ribbon and glue it to the handle with double-sided tape.

7. Lubricate the remaining empty part of the heart with glue and tightly lay out pink lumps from napkins.

8. Make a flower out of plain white and colored paper and glue it on the side.
9. On the front side of the cardboard, that is, red, glue beautiful wish or a rhyme.

And more creative ideas:
- Card;

- Bouquets.


Callas from cotton pads

We will need: thick green paper; long green tubes for a cocktail; cotton buds; yellow gouache or watercolor; PVA glue; white cotton pads; beautiful tape.

Manufacturing process:
1. Take cotton swabs, color one of the ends yellow.

2. When the sticks are dry, take a cocktail tube and insert the stick into it so that the yellow part is visible. Attach a cotton pad to the tube, while making sure that the yellow stamen is in the middle. Twist the disc as shown in the photo and secure with glue at the base.

3. Make the desired number of colors in this way. Also, cut out petals from green thick paper.

4. Take your flowers and petals and wrap and tie them with ribbon.
See what beautiful bouquets you can still create!


Well, it remains for us to consider gifts that are made from pasta. It's actually not a hard job either. You need to come up with a composition, color the pasta and lay them out on the base. In general, look, choose and do not judge strictly).


In children's institutions, do not forget to make collective congratulations, for example, design a wall newspaper or make a group gift.


This concludes my writing. I think that I gave more than enough ideas for making crafts for my mother's holiday. Now it's up to you. Create with children and delight your beloved mothers.