Snowflakes and candlesticks made of polymer clay. We sculpt Christmas decorations from polymer clay New Year's toys from clay for the Christmas tree
While the male half of our team was carefully choosing a green beauty that would decorate our editorial office, the girls were thinking about how to prove themselves in decorating the Christmas tree and make its decoration different from every year. Inspired by a trip to the Christmas tree factory, we decided that we should certainly try to make toys with our own hands. Unfortunately, there were no underground glassblowers among us, and we began to invent alternative options. There are a lot of them, and we will tell about each in detail.
In my area of responsibility, I took clay toys. Polymer clay is very popular with craftsmen: it is easy to use, like plasticine, and hard after drying, like ceramics.
Still, it was scary to master a new craft on your own. I remembered how I saw the wonderful and jewelry crafts of Irina Agladze on the Internet: felted cutie animals, charismatic cats and decorations in the form of food worthy of living in roomboxes.


In general, I plucked up the courage and asked for a visit in order to learn from experience. Irina answered me with the most cordial invitation and even promised to call her friend Evgenia Shatko, a craftswoman, so that we would have more sculpting hands and fantasizing heads. Zhenya has her own language school, where Ira also teaches with her. As if the main characters of Fathers and Sons, the girls were divided into peculiar Slavic and Anglophile Westerners: Ira teaches English, and Zhenya teaches Serbian and Slovenian. And in her free time from lessons, Ira introduces Zhenya to needlework in its most diverse manifestations.
Needless to say, I went to the girls in anticipation of magic. But what was waiting for me in the rented apartment of Ira and her young man, turned out to be more wonderful than all my ideas. Firstly, before modeling, Ira and Zhenya made me drink cocoa with the “Flight” cake (I think I have never lived such a sweet life). And secondly, at every step I came across some incredibly cute and beautiful hand-made Irina.

In the bathroom, a decoupage set was waiting for me with roses so realistic that I thought I could even smell them.

But Irina's beloved man, Denis, began to decoupage the table in the room.

The panels on the kitchen wall are made using the same technique and are combined with delicate curtains and soft cushions for the bench. Ira confirmed my suspicions that the curtains with pillows are also the fruits of her creativity, saying that their family does everything that can be done with their own hands, and that, in general, she is not a big fan of the Provence style, but when she saw it was this magnificent jacquard, which is also sold at a big discount, that decided that the fate of the kitchen was determined in its direction. To each of my enthusiastic exclamations about her skill, Ira modestly answered: “Yes, it’s very simple!”

Seeing my interest in decoupage crafts, the girls offered to make the first clay toy using this technique. And it turned out to be really, really simple. We rolled out plastic from brown clay, cut out a violin from a napkin with a musical theme, removed all the extra layers of napkin, and the violin front side glued to our clay, which was then cut along the contour. To translate the picture, we used perfume, but if available, alcohol and any strong alcohol would do. We decided not to cover our violin with craquelure, let it be as good as new, without cracks. We inserted a hook for a thread - and our toy is ready for firing!

I asked Ira to show a few more easy-to-implement ways that everyone could repeat. Ira thought and said that now we will make a set of patterned toys - a good option for those who like to decorate the Christmas tree in a monotonous manner. Zhenya and I were given tasks to roll clay cords, wrap them in plastics or combine them in a symmetrical way with other cords. I didn’t understand why we were doing this until they began to fold into something pretty on the cut.

Ira revealed to us the secret of the “milfiore” (“many colors”) technique, which is used by Venetian glassblowers. It is by the same principle that they create their intricate, bright and elegant flowers.

Then we cut the resulting bars into thin squares and circles, and from them we laid out an excellent bright canvas, which it was even a pity to cut into toys.

Christmas toys made of polymer clay
Zhenya drew stencils of Christmas trees, mittens and Christmas socks on paper, according to which we cut out toys from the canvas with a paper knife.

According to the same stencils, Ira suggested cutting “knitted” toys as well. I sculpted clay yarn, and Zhenya immediately wove it into two-color braids, which then stick together to form a relief canvas.

It took us less than an hour to produce two sets. And from the remains of white and red sausages, in a few seconds we wound up delicious candy sticks.
Templates also helped us in the manufacture of the following toys. You don’t need to be a sculptor and you don’t even need to have a good eye to sculpt round animals that look like cartoon Smeshariki. To make even circles, we used an ordinary glass (it looked like we were sculpting dumplings), but we rolled out clay with it, like dough, from which we then cut out the details.

Ira adorned the owls with playful eyebrows. She took small clay balls and pressed them with a needle, and very naturalistic feathers were obtained!

Five minutes later, Ira, like a magician, gave me a red poppy! I asked her how she managed to make the fluffy center with stamens so quickly, and the answer was again “very easy” with nail scissors!

By the way, they can also make a Christmas tree.

Over the next ten minutes, the girls made a few more New Year's friends in front of my admiring eyes, and we laid out all our art on a baking sheet. Clay "Sonnet", which Ira prefers for its plasticity, brightness and favorable price, needs to be fired from three to ten minutes.

In general, in five minutes I was already the happy owner of a whole hill of Christmas joys and even one pair of owl earrings for my young niece!

The girls put the new things for our Christmas tree in a box, decoupaged by Ira herself.

Ira invited me to come again, now to the felting lessons, and look at her group workshops on felting, soap making, modeling and other creativity, which she regularly reports on in her
● polymer clay different colors● cookie cutters in the form of heart, star, comet, moon, deer and dachshund
● baking paper
● scissors
● water tank
● wooden stick (eg kebab skewer)
● colorful ribbons
● children's set of tools for working with polymer clay
● a set of rollerballs with "star" motifs, etc.
● brush
● glossy varnish
: Master Class
Step 1


Put polymer clay of any color on baking paper and knead a little on the surface. Roll out the clay with a smooth roller to a thickness of approx. 2 mm. Cut out shapes using cookie cutters. You should always work on baking paper.
Step 2
To change the color of the clay, add a little clay of a different color and knead the mass until a uniform color. To achieve a marbled effect, clay of two colors should be added and kneaded until a marbled pattern appears.do it yourself
Step 3

For striped products, roll out a layer of polymer clay of the same color. Then roll out clay of other colors and cut into strips. Put the strips on a solid layer and roll out until smooth. Now you can cut out the shapes.
Step 4

Install a removable rollerball with a star motif. Moisten the roller with a little water. Draw along a smooth layer along or across and squeeze out the stars.
from yarn
Step 5
Another way to decorate future Christmas toys is to form tiny balls and distribute them over the rolled out layer. Press the balls lightly with your finger and roll them out with a roller. Cut out the shapes.Step 6
Use a wooden stick to make a hole in the top of the figurine for hanging. Send the figures on baking paper to the oven preheated to 110 ° C for 30 minutes. Allow to cool after baking. Remove baking paper. Paint the figurines. After the varnish has dried, insert tapes into the holes. Decorate the Christmas tree with ready-made pendants.
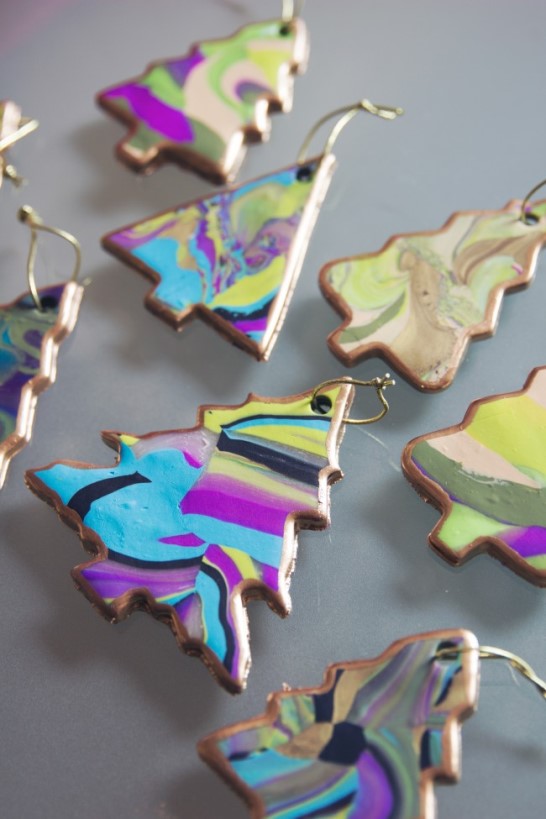
Christmas decorations from polymer clay, made with their own hands, can become not only an exclusive decoration of a home Christmas tree, but also a beautiful souvenir for friends.
Tools and materials Time: 2-4 hours Difficulty: 5/10
- polymer clay of several colors;
- molds for cutting cookies;
- gold acrylic paint;
- brush;
- cocktail straw.
Looking at these exquisite polymer clay Christmas decorations, it's hard to guess that they are handmade at home.
To make your own Christmas tree decorations, you will need very few tools and materials.

Step by step master class
It is not difficult to make Christmas decorations from polymer clay with your own hands. Start by tearing off a few pieces of clay in different colors that you would like to use to make your jewelry.
Step 1: prepare the clay
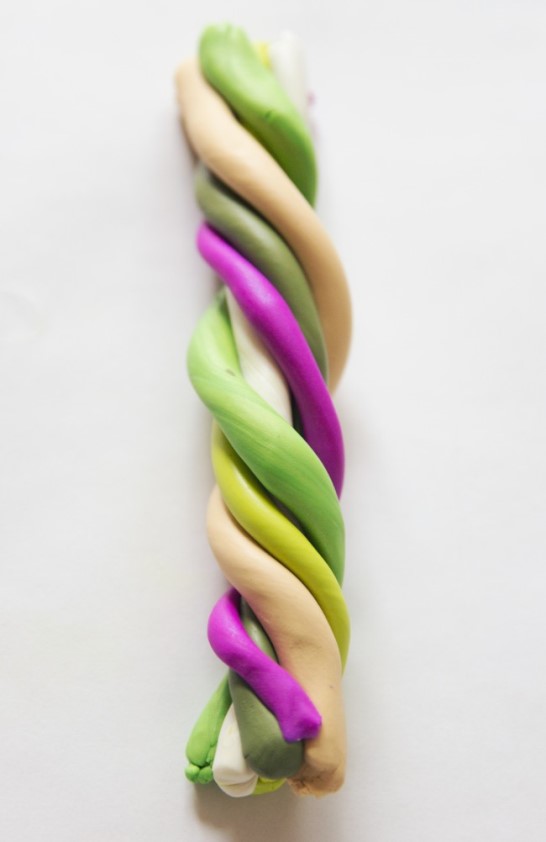
Roll these pieces with your hands into long "sausages" so that they look like in the photo.
It's okay if your "sausages" are of different thicknesses, on the contrary, this will give the decoration, in the end, a more interesting look.

Step 2: make a rope out of clay
After you have made the "sausages", roll them into one thick "rope", as in the photo.
Step 3: roll out the clay
With a rolling pin or an empty bottle, roll out the "rope" until the colors blend and create a beautiful color effect. Be careful not to mix the colors too much and look like a muddy mass.

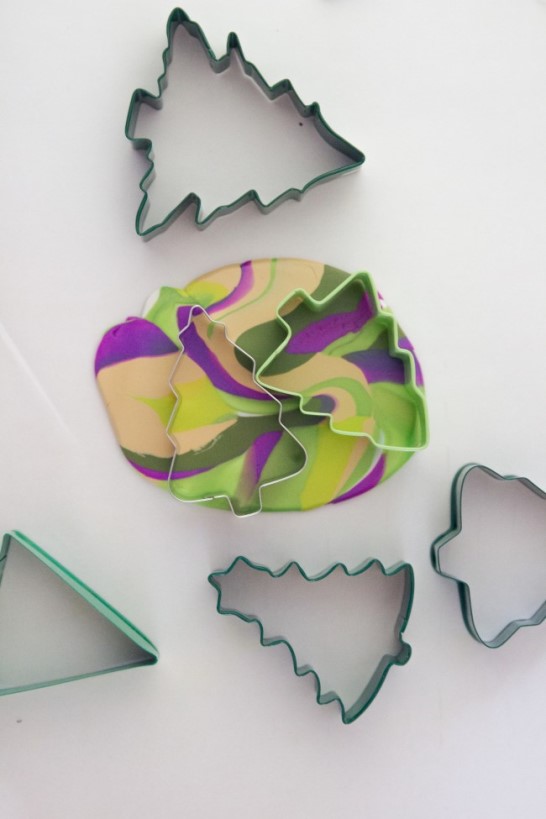
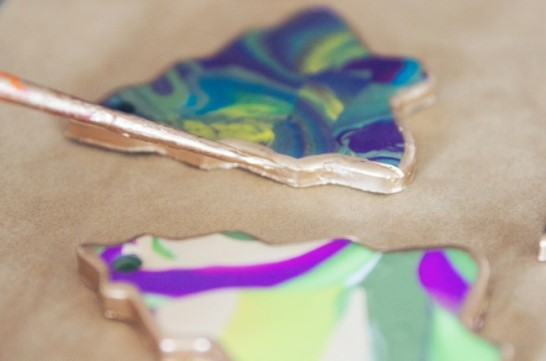
Step 4: cut out the shapes
- Shape the mixed clay into a ball. Again, take a rolling pin or bottle and roll out the clay to a thickness of about 3 mm.
- After that, choose the color part of the clay that you like the most, and use a cookie cutter to cut a figure out of it, as shown in the photo.
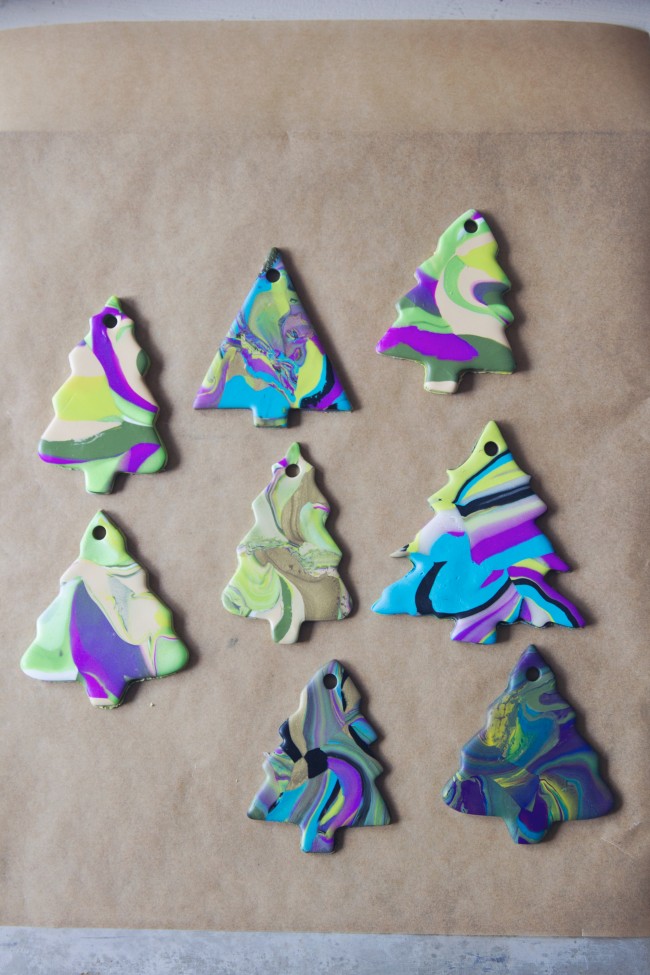
Step 5: sand the product
- Remove the rest of the clay and if there are any bumps or defects around the edges, smooth them with your finger.
- Transfer the polymer clay decorations to a baking sheet lined with parchment paper.
- Take a straw and make holes in the top of each figurine so that you can then stretch a thread or wire through them.
Step 6: Bake the Christmas Trees
- After that, the decorations are ready for "baking". You need to bake products according to the instructions indicated on the packaging of the polymer clay you use, since each manufacturer has its own requirements.
- Remove the baked toys from the oven and let them cool. When they have cooled and become room temperature, cover the edges with a thin brush Christmas decorations gold plated, as shown in the photo.

Step 7: Varnish
After the liquid paint has dried, you can (optionally) coat the surface of the products with a glossy acrylic varnish.

New Year is rushing towards us, which means it's time to start preparing for it. Polymer clay is a wonderful material that makes excellent decor items. In this tutorial, I'll show you how to easily and quickly create new Year mood at home with beautiful candlesticks and polymer clay snowflakes. Everything is so simple that it is suitable for working together with children.

Materials and tools for making snowflakes and candlesticks from polymer clay:
- baked polymer clay
- work surface: glass or ceramic tiles with a flat, smooth surface
- knife or scalpel
- small glass jars
- candle-pills
- boats in the form of a drop, rhombus, asterisks and others
For work, we need white and glowing in the dark plastic. In principle, you can limit yourself to only white or take different colors. Snowflakes made of luminous plastic look beautiful in the evening on the window; children will really like this decoration.
Making snowflakes and candlesticks from polymer clay
Roll out the plastic. The thinner we roll, the more fragile the snowflakes will turn out.

With the reverse side of the blade, we mark the layer into eight equal sectors with three lines. In each sector, we cut a hole with a cutter in the form of a droplet.

Then, with a diamond-shaped boat, we continue to create a pattern, as shown in the photo.


Another kind of snowflake can be obtained by cutting off some parts with a blade.

Here are two types of snowflakes you can make any number you need. The consumption of plastic is small, and the snowflakes themselves are about 9 cm in diameter. We send them to bake in accordance with the instructions for polymer clay. After cooling, carefully remove the snowflakes from the glass and hang them on strings on a Christmas tree, window, or use them to decorate gifts or a festive table.

Now we need a rectangular layer of white or colored plastic of medium thickness.

The width is slightly larger than the height of the glass jar, which will protect the plastic from direct contact with the candle flame. The length of the layer is such as to wrap the jar completely.

Having cut the layer to size, lay it on the glass and cut out any patterns you like with a boat. It is the stars that seem to me to be a suitable pattern for candlesticks.

We wrap the glass jar, carefully smooth the joint.

I wrapped the second jar with a higher layer. In general, you can make a lot of candlesticks and place them, for example, on holiday table or mantelpiece. We send to bake according to the instructions for polymer clay.

Let our candlesticks cool down. If necessary, grind small irregularities with sandpaper. We carefully place the candles inside and admire the beautiful patterns.
Among all kinds of needlework and creativity, a special place is occupied by created toys from polymer clay. Author's products, dolls, plastic souvenirs amaze and delight with their exquisite beauty. But this type of creativity is available not only to professional designers, but also to housewives, as well as mothers. In addition, working with polymer clay is similar to plasticine modeling, which even children do.
Modeling materials
For those who decide to make toys from the main thing - do not buy anything extra. Next, consider what material and additional tools and fixtures are needed at the initial stage of work.
It is not necessary to purchase plastic of various colors. It is enough to buy those shades that will be present in future craft. Polymer clay can be found in specialized departments for creativity. To glue the individual elements, liquid plastic is useful, which is also covered with ready-made toys made of polymer clay. The same role is played by varnishes for plastics. They can be both transparent and matte, as well as with shine. Their use gives products brightness and strength. Apply varnish to the toy with synthetic brushes.

Special fixtures
Expensive tools can initially be replaced with improvised material. Use ceramic or glass floor tiles as a work board. Stacks that create various recesses can be replaced with toothpicks, knitting needles, pins, an awl and other handy material. Also, kits can be useful for creating polymer clay toys. To roll out the plastic, they use a special acrylic roller, which will replace the bottle, containers from toilet water and deodorants or any metal rod.
You also need a stationery sharp knife, comfortable fingertips, in order to avoid your own fingerprints on toys. And the most important thing is a stand for products and various elements for subsequent baking. For the same economy, you can use cardboard boxes by making holes on top, into which, in turn, insert toothpicks with details.

As for self-hardening clay, it does not need to be placed in the oven. Products from it dry at room temperature. But you will also need drying equipment.
MK: we create toys for the Christmas tree from polymer clay
Above, we examined what tools and materials are needed to work with plastic. Before starting, prepare all the equipment.
Since the New Year is approaching, it would be wise to make Christmas decorations from polymer clay. First of all, we will blind the Christmas tree. In the process, you will need plastic in green, brown and red tones.
To depict a spruce crown, mold a cone from clay and make cuts along the entire perimeter at an angle of 45 degrees with nail scissors, thereby creating an imitation of branches with needles. Then from clay Brown color blind a short trunk in the form of a stump.
Don't forget the red star. To do this, prepare a stencil and use it to make a five-pointed figure. As a fastener, carefully thread the wire through the product and place in the oven.

Christmas decorations made of polymer clay can be molded both flat and voluminous. For example, our Christmas tree is a solid three-dimensional product. Let's look at how to make medallion toys.
How to DIY
In special departments selling goods for creativity, molds are offered for applying drawings or any relief. At home, the texture on the medallions can be applied from improvised materials.
Take self-hardening clay and a rolling pin. You can apply relief with various children's molds, lids, culinary figurines and other useful details. Petals, leaves and stems of artificial flowers will also come in handy. For staining, you will need sponges, as well as acrylic varnish.
We begin the work by rolling out the required amount of polymer clay. The remaining plastic is firmly closed from penetrating air. Then we leave prints and stamps prepared in advance on a sheet of clay in a chaotic manner. Then, using a mug, cut out a medallion with a pattern. We make a hole for fastening with a knitting needle or a toothpick. Dry in natural conditions. New Year's toy is ready.

A very exciting activity is modeling from polymer clay. Toys and dolls are surprisingly attractive and natural.