How to make flat paper appliqués. Applications from colored paper, photo examples and lessons with descriptions. Apps for the little ones
One of the most popular materials for children's crafts is colored paper. Children's crafts made of colored paper perfectly develop imagination, perseverance and fine motor skills of the hands, besides, this activity allows you to have fun.
The advantages of colored paper as a material for crafts can be listed and listed, but we will not waste time on this, but will immediately offer you best ideas colored paper crafts that can be realized with a child.


Crafts from children's palms
The child may really like to make various crafts from the palms cut out of colored paper. Here there is really a fantasy where to roam! After all, very interesting works can turn out from the palms!

Crafts from circles
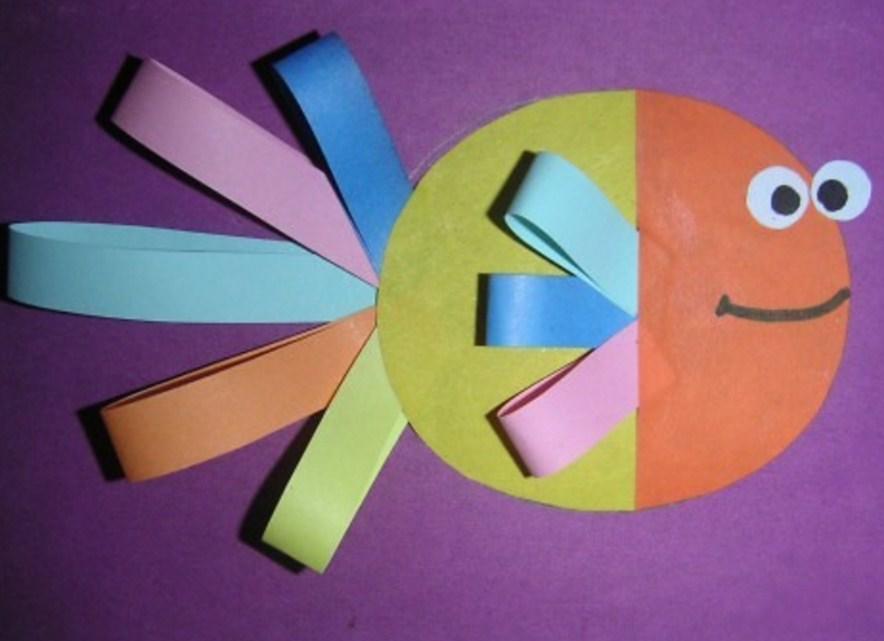
Another way to develop children's imagination. Invite the child to fold some shape from circles of colored paper. Circles can be glued whole or divided into halves.

As for ideas, the simplest thing is to make a snowman out of circles, you can also make animals, fish and birds. You will find photos of colored paper crafts both on our website and on the Internet.

Mosaic from colored paper
Highly beautiful options do-it-yourself crafts are obtained from mosaics. You can download ready-made templates for laying out a mosaic or draw it by hand.

The smallest children can be offered to tear off pieces of colored paper and stick them on a paper base with a template, while older children can cut neat squares with scissors.


Crafts from accordions of colored paper
Everything is simple here, you need to fold a sheet of colored paper with an accordion, and then straighten it a little and make a fish, a bird, a butterfly out of it.

These crafts can be independent, for example, glued to skewers, or can be used for original applications. Simple and interesting master Colored paper craft classes are easy to find.

Crafts from lumps of colored paper
A great way to develop fine motor skills of the baby's hands. For crafts, it is better to use thin colored paper, napkins or corrugated paper.

Just tear off pieces of paper and roll them into balls, and then stick them on the template with PVA glue. The works are beautiful and voluminous.


quilling
Older children can be offered to master the quilling technique, this is when a spring is rolled from thin strips of colored paper, using a knitting needle, pencil or thin stick, and then various compositions for postcards are made from these fragments. Trains fine motor skills and perseverance.


Volumetric crafts from colored paper
Even though the paper is flat, it can be used to make different voluminous crafts. For garlands and postcards, as a rule, several identical parts are cut out, folded in half, and then glued together in halves.

You can make stripes three-dimensional figures, glued on the principle of a ringlet.

And another type of voluminous paper crafts is to print ready-made templates of 3D shapes, cut and glue them according to the instructions. Now they even sell entire albums with templates for voluminous paper figures, there are also detailed instructions how to make craft.

Colored paper garlands
Since we have touched on the topic of garlands, colored paper is ideal for these purposes. From it, you can most quickly make various figures, and at a price such a garland will come out much cheaper than if you use, say, felt, or corrugated paper.

Crafts from paper rings
Remember how we used to make long christmas garlands from rings? It turns out that from these rings you can make not only a chick, but also very interesting crafts: fruits, crowns of trees, hair for dolls drawn on a piece of paper, making voluminous snakes, lambs and other animals.


Colored paper postcards
For the holidays, you can easily make various postcards from colored paper. Children 2-3 years old can do simple postcards in the form of an application, with older children you can already do complex work with volumetric elements. For example, here's how to do voluminous postcard with colored paper daisies.

Volumetric paper card with daisies
For crafts you will need:
- Colored paper, a sheet of cardboard, as well as a plain white sheet of office paper;
- Glue stick;
- Children's safety scissors.

First of all, you need to cut strips of white paper. To make the strips even, mark the same width, and then draw the cut lines with a ruler and a simple pencil.

Now, cut out circles from yellow paper - these will be the middle of our daisies. We return to the white stripes, we will make chamomile petals from them. We glue each strip with two ends in the form of a loop, and then glue it to the middle, which we made yellow.

When the chamomile is ready, you can cut out several leaves from green paper. For a postcard you will need 3-5 daisies. We make the card itself from any sheet of colored paper, fold it in half, and paste our daisies on it.


You can add a postcard with a butterfly. Butterfly cut out of paper bright color. Butterfly templates are easy to find on the Internet. To make the butterfly also acquire volume, bend it in half and stick it on a postcard.

Postcard-application with a rabbit
The next postcard will be with a bunny, it can be made as a gift for Easter. From the materials you will need all the same, as well as doll eyes. By the way, I’ll tell you a little lower how you can make puppet eyes yourself.

According to the template, we cut out all the necessary elements of the postcard from paper: a muzzle of a bunny, two ears made of white paper. From pink paper, cut out a nose and a smaller silhouette of the ears. Cut out grass from green paper.

We collect the figure of a bunny on a sheet of brightly colored paper. Glue puppet eyes on the bunny and draw antennae with a felt-tip pen or ballpoint pen black color.

And now let's digress a little, I'll tell you how you can make puppet eyes for children's crafts on your own. They are made from an ordinary tablet plate, two cells are cut out, and beads, small beads or peppercorns can be used as pupils.

Origami
And the last type of colored paper crafts is origami. For beginners and small children there are simple circuits folding various shapes, for older children, you can suggest doing something more complicated.

For origami, it is best to use double-sided colored paper so that the pale side of the sheet does not “shine”. If your kid is seriously interested in this art, then you can purchase special paper for origami.

Photo of colored paper crafts


Now in all schools, in labor lessons and extracurricular activities, such creativity as the creation of applications from colored paper is very popular. This is mainly done by children primary school, they make a variety of paper and cardboard crafts, make up pictures and voluminous toys on the tree
Application is a painstaking work that develops thinking, perseverance and instills a love of kids for all kinds of crafts. While working on the application, the child learns to handle scissors, glue paper and geometric figures.
A child of 3 years old can do the simplest crafts with their parents. For the smallest, the technique of broken appliqué is used. It can be created without the help of scissors. The child tears off small pieces of paper, smears with glue and sticks on dense sheet cardboard, creating a certain picture.
The older the child becomes, the more spatial thinking is developed in him and you can teach him to perform voluminous crafts. To do this, the paper is folded like an accordion, fastened with glue, and then a specific object is formed and glued to a sheet of cardboard.
A more complex type of paper craft is quilling, which consists in twisting thin strips of paper. To create a picture, folded rolls are glued to cardboard or interconnected.
Light and interesting application toilet paper your baby will love preschool age. To create it, you need a template diagram, toilet paper or paper white napkins, glue and a bright sheet of cardboard.
Toilet paper elephant step by step:
- On cardboard, draw the body of an elephant with a pencil according to the finished template.
- Tear off a small piece of paper, roll it into a ball, spread it with glue and stick it on the elephant's body. So fill in the whole drawing.
- From white paper, cut out the trunk, head and legs. Glue them in place.
- Eyes can be drawn, can be made from pieces of black paper.
You will get an original three-dimensional picture, which can be supplemented at your discretion - with a tree or grass.
Simple cardboard applications for kids 3-5 years old
If you have nothing to do on a rainy day, try to instill in your child a love of needlework. Start with the simplest applications, such as a kitten. But be prepared that you will have to cut out all the details, and allow the baby to glue.

One of the simple cardboard applications is a cut-out postcard. You can make a greeting card for March 8 or for New Year. Moms and dads will remember the labor lesson at school, and it will be interesting for kids to work together with their parents.
The technology for working on a postcard is very simple:
- You will need a piece of cardboard a set of colored paper.
- Fold the cardboard in half.
- Having decided on the pattern, cut out the necessary details. For example, for a snowman - circles of white or blue color, for a flower - oval petals.
- Parents show, and the child uses glue to attach the blanks to the postcard.
In addition to the usual applications, various funny figures can be made from cardboard.
How to entertain a child: paper applique for grade 1 with templates
When dealing with a child before school, parents should teach the baby how to handle paper. Children in kindergarten trying to do simple crafts. Preschoolers work with applications more difficult - it is in their power to make a small picture.
In modern stores, you can find self-adhesive applications that can be stuck on a notebook or decorate a locker at school.
In grade 1, children in a labor lesson use the simplest geometric shapes to create applications - a square, a circle, an oval, a triangle. If the baby does not know how to work with a ruler, you can use stencils. Children cut out figures according to the template and stick them on cardboard.

First-graders can make light applications:
- Animals - dog, kitten, squirrel, zebra and mouse;
- Birds - owl, swallow, chicken;
- Fairy tale - bun, mermaid, hut;
- Nature - the sun, the cloud, the tree.
All these applications will consist of the simplest elements, the head is a circle, the ears are a triangle. Using ordinary PVA glue, they are attached to the base and a simple muzzle of an animal or bird is obtained.
How to make a black and yellow bee:
- From yellow and black paper, cut out 2 circles with a diameter of 4 cm.
- From red paper cut out two identical wings in the shape of a heart, from yellow paper - two wings a little smaller.
- Their black paper to make antennae-stripes.
- Lay black-yellow-black-yellow circles alternately on blue cardboard.
- Lay out the antennae of the bee from the last yellow one.
- Place the wings on the sides bigger size, then stick smaller wings on them.
- Eyes can be drawn or cut out of green paper.
- Glue all the details to the cardboard - the bee is ready!
Developing thinking: paper applique for grade 2 with templates
Having learned how to make elementary crafts from paper and cardboard, having become acquainted with the technique of creating simple applications, children begin to study new creativity - voluminous applications. Having mastered the skills, children will be able to make beautiful postcards mothers and grandmothers on March 8, dad - crafts on February 23 or birthday.

To create the application "Flowers in a vase" you will need:
- Cardboard sheet;
- Colored paper - white, yellow, green, blue;
- Glue stick;
- Pencil;
- Scissors.
Having prepared materials and tools, you can start needlework.
- Make blanks for the application - two squares of white paper 5x5 cm, a yellow circle with a diameter of 4 cm. For a bouquet of 5 daffodils, you need to cut 10 squares and 5 circles according to the template.
- With a simple pencil, draw stripes dividing the square in half - horizontally and vertically.
- On each side of the square, make cuts along the lines, not reaching the middle of about 0.5 cm. You should get a square divided into 4 quadrangles.
- Each square needs to be twisted - put a pencil on the diagonal of the square and wrap the corners on it.
- Similarly, make all 10 large squares.
- Make 5 yellow circles according to the template - the basis for the middle of the flower. Screw the circle folded in half onto the handle, remove and fasten with glue.
- To make a flower, you need to put together two blanks of petals and insert a yellow core. If everything is done correctly, you will get a beautiful daffodil of 8 petals.
- From green paper cut into thin strips - the future leaves of the flower. Bend a little along, give shape.
- According to a pre-prepared template, you need to cut a vase. It can be made of blue color. You can decorate a vase with an arbitrary ornament cut out of paper of a lighter color.
- On an A4 cardboard sheet, first stick a vase so that its bottom coincides with the bottom of the paper. The application is placed vertically.
- Then stick the leaves of daffodils in a chaotic manner, after which you can begin to form a bouquet. Glue the flowers so that they are in the center of the entire application.
Glue all parts well so that after drying they hold firmly. The finished picture can be decorated with a piping of small figures or beads.
Volumetric application for grade 3 with templates
Third grade students can do more complex and laborious work done using the quilling technique or interesting volumetric crafts. Teachers often wonder what kind of paper work to come up with for children so that they are interested.

In the 3rd grade, girls are still playing with dolls, so it will be interesting for them to make voluminous furniture for a dollhouse. The boys can make an airplane, a racing car. On the website of the Country of Masters you can find a sample of three-dimensional paper crafts for every taste - templates for origami, quilling patterns. Schemes and templates can be printed out and performed with the children in the classroom or given homework.
If you run out of ideas, you can always ask the guys what they would like to do in the lesson.
Children's quilling applications are very popular among schoolchildren. This is not only a unique gift, but also a beautiful decoration.
How to make paper applications for children (video)
Paper applications are a great reason to keep children busy for a certain amount of time. This type of creativity can be engaged in even the smallest children - from 3 years old and schoolchildren primary school. Armed with imagination and a craft kit, kids can create incredible paintings and impress their loved ones with their accomplishments.
Fantasy fails and you no longer know what to do with your child? In this article you will find some unusual and interesting ideas for applications that are suitable for both babies and older children.
Application is a long-standing fun not only for many children, but even for adults. After all, gluing something to the base or sewing it on is very interesting. And now there are many different materials, which can be successfully applied in the application and do wonderful and unusual work.
Often, all kinds of elements are used in the works that are easy to find in any home or even on the street: pebbles, shells, beads, beads, pieces of ordinary or lace fabric, buttons and many other different things.
Plots for creating applications can be very diverse:
- it can be the characters of your favorite cartoons
- favorite animals or toys
- Live nature
- different holidays
paper application
Application - Cat in the clearingMost often when we are talking about the application with children, meaning precisely paper application. And this is not just because paper can be found in any stationery store, and the variety of its types is quite large.
- The paper is bright, multi-colored, it is very attractive to the child to work with it.
- It can be of different textures and shapes.
- It is easy to fold, fold, cut out any shape from it and stick it to the paper base.
- Well, the most important thing is that paper is an environmentally friendly and, accordingly, safe material, so it is great for creative work even with the smallest children.
The impact of applique classes on child development
Thanks to the application, children receive the following skills:
- master the coordination of movements
- develop fine motor skills
- learn the basics of composition
- learn colors and how they can be combined
- study various textures
- develop observation and imagination
- learn to fantasize
The application activity contributes to the development of the child's thought processes, he learns to analyze and compare real objects and animals with crafts made with you. The child, working with the application, makes a whole out of several parts and learns to divide the whole into components.
 Application with pasta and beans
 - Like classes in any other type of creativity, the application helps the development of speech, when adults discuss with the child the crafts they create, explain what they do and why, what happens in the end. Working together, children engage in dialogue and increase their erudition
- And of course, this a good option spending time together with a child who will help you establish and strengthen emotional contact
- Below we offer you ideas for crafts using the applique technique. The proposed examples are of varying complexity and require a different amount of time to create. Therefore, choose works according to the age of the child and help him in their creation.
- It will be good if you offer the kid to change the composition, come up with something of his own - this will help him in the development of imagination and creative abilities
Materials for paper application
To make the work look beautiful, you need to carefully cut out the necessary elements and also carefully glue them to the base, but beauty also depends on the selected materials.
The assortment of paper in stores is very large, but not all of it is suitable for appliqué work, and you can make a mistake in choosing glue. Please note the material selection guidelines below.


Paper and cardboard for application
It is better to choose paper that is not very thin, but very thick will not work either. You can take both matte paper and glossy, it can be textured or smooth.
Choose the paper that suits your idea. But pay attention to the fact that traces of glue and fingerprints will be visible on glossy paper, so it is better to give preference to matte paper, then the work will look neater.
- To get started, try working with colored paper, which is produced specifically for the printer. It is in every store and happens different colors. It is quite good in density and matte
- More experienced creators can use coated paper It is also available in different color sets. This paper is glossy and quite thick.
- textured paper will help to focus on any details of the craft. Choose paper of a suitable weight and desired texture, for example, with some kind of embossing or with a velvet effect
- It still happens foil paper, with its help you can make very believable windows in your craft, or water. Such paper is usually produced in medium density, which is just right for the application. Sometimes there is also a holographic effect on such paper.

- A very convenient type of paper for application is self-adhesive paper, but it still needs to be looked for, and color palette very poor. Such paper is convenient in that it does not need glue for gluing, thanks to which it is ideally evenly glued to the base.
- Drawing paper well suited for creating templates, tk. it is dense and its edges do not wrinkle
- Cardboard it is good to use as a basis for work, it can be both white and colored. Due to its density, it will not wrinkle when parts are glued to it. Cardboard also choose the most suitable for your idea, it can be either matte or glossy
Glue and other application tools
To create an applique, the necessary details are cut out of paper and glued to the base cardboard. You can cut out the details along the outer edge with scissors, and in order to cut holes inside it is better to use a clerical knife.
Glue also needs to be selected correctly so that it does not cause deformation of the paper and the craft does not lose its appearance.
- Scissors choose good ones, they should cut the paper well and be sharp. They should be comfortable for the child to hold. It is better if you have scissors with straight blades for cutting parts in a straight line, and the second with rounded blades, which are easy to cut along a curved path.
- In order to cut something inside the part, you will need stationery knife. They are also easy to cut along the contour of the template.
- metal ruler useful for cutting straight lines knife
- You will need substrate for cutting clerical knife, it will protect your furniture from scratches
- In stores you can find curly hole punchers, with their help, you can make various figures from colored or white paper with one click on it. The variety of types of hole punchers is quite large, they differ in size and shape. With their help, you can make a bunch of butterflies and flowers for a forest glade in a matter of minutes, and not cut them out with scissors for half a day.

 Figured hole puncher - Butterfly
 - make the edge of the paper interesting shape following a specific pattern. They are also many different types so to speak, for every taste


- rubber adhesive very convenient for application, because if the part is not glued correctly, before the glue has dried, you can carefully remove it and stick it in another place. Also, traces of glue can be easily removed with a regular eraser. The only drawback of this glue is its smell, so it is better not to use it with babies.
- Available for small children glue stick. It practically does not deform the paper, but traces of it still remain.
- Glue with a brush it will be very convenient to use for kids, because it will be very interesting for them to dip the brush into a jar and apply glue to the part
Additional materials and techniques for application
To make the application special and interesting, you can use other materials.
- Raisins will give, for example, such a detail as the artificial plastic eyes of the little animal, which will move when the position of the picture changes
- Small details in the work do not have to be cut out, they can be drawn with a felt-tip pen or pencil
- Acrylic outline will help highlight the necessary elements of crafts
- In the application, you can use paper beads and lace, these materials will make the work interesting and unusual.
- You can insert the craft into a frame if it turned out to be very beautiful, it is dear to you as a memory or made for a gift.


Application ideas from circles
An unusual applique idea is to use only cut-out paper circles. If you make all the details from the circles, you will get a very interesting and unusual work.
The child will really like this activity, especially if he sees how simple circles of different sizes turn into a cute cat or bird.


Napkin Applique Ideas
For applications, you can use even the most ordinary napkins. They come in different colors, although their choice is not great, as a rule, these are the main colors and a few additional shades. This technique is very simple and can be done even with three-year-old children.

Application using napkin balls is a very exciting activity for children. This technique stimulates the development fine motor skills, because rolling balls is a very painstaking work.
Making this craft is pretty easy:
- prepare the drawing, apply it to the base
- the details of the picture should not be small, it is necessary that there is enough space for gluing the balls
- you will need PVA glue and scissors
- prepare colorful napkins
- choose the size of the frame to decorate finished work
Napkins can still be replaced with corrugated paper, but this is not needed, because. You can find these wipes in any store. The only thing better than corrugated paper is a wide variety of colors.


The drawing can not be applied to cardboard, but printed on a printer and glued to the base. While it dries, you need to prepare multi-colored balls.
To do this, cut napkins or corrugated paper into squares of the same size and roll balls out of them. You will need a lot of balls for such work, and their number will also depend on the size of the picture and on the size of the balls themselves.

Using PVA glue, napkins need to be glued to the picture, some details can be drawn with a marker or felt-tip pen, it all depends on your imagination and the desire of the young master.
The background of the work can also be made from balls of a suitable color.


Frame your work and you can decorate it with a room or other room in the house or in the garden. This picture will also a good gift for relatives and close people, for example, on a holiday on February 23 or March 8.
Button Applique Ideas
All children love buttons. Probably, each child more than once found his mother's box with them and put things in order in it, choosing the ones he liked the most. Therefore, the application with buttons will be of interest to any child.

From the age of two, the baby can already make a simple picture by gluing buttons in the form of a flower or a butterfly onto the base.
With older children, you can make a hot stand by sticking buttons on the skin or a piece of felt.

With older children, buttons can be glued on with glue, but when working with small ones, it is better to stick double-sided tape on the buttons. If there are a lot of them and there is no possibility to stick on each adhesive tape, you can stick plasticine on the cardboard, and press the buttons on it. Cardboard is better to use glossy, because. plasticine stains may appear on the matte finish.


Cereal Applique Ideas
Cereals can be successfully used not only in the kitchen, but also in creativity. From cereals, wonderful and unusual paintings and crafts are obtained.
As with napkins, you will need a base image. It can be any image drawn, printed or cut from a coloring book. The main thing is that there are no small details in the picture, then its elements can easily be covered with different cereals.


- Apply glue to the picture with a brush. If you will be using different cereals, do not apply glue to the entire pattern at once.
- Glue first one part with glue and let the child pour grits on it. With your fingers, you can press it a little to the base. Anything that doesn't stick, shake it back into the bowl.
- If there are several elements, apply glue on them and sprinkle with grits one by one - this will help to make the work neat


Groats can be used in a variety of ways, and you can even paint it in various colors with gouache. And it's very easy to do it:
- dilute the gouache with a little water
- paint the grits with a brush
- put on a bag or stationery file in one layer
- let dry


The second method is suitable if you need to color a lot of cereals, and it is good because the colored grains do not get your hands dirty when you work with them further:
- place the cereal in a container, rice is well suited
- fill it with water and add so much gouache to get a bright saturated color
- let stand for 12 hours
- drain and dry in one layer


Applications from natural material
Autumn gives us a lot natural material, which can be used in various crafts. From simple leaves that are lying on the streets, you can make a lot of interesting things, including applications. They make funny little men, different animals, landscapes and even plot pictures.
Collecting material for applications is also very fun and easy, because you can find leaves while walking in the park.


You can make a hedgehog from maple leaves, fish from birch, and oak leaves resemble a tree.
Some details of the work can be finished with felt-tip pens or paints.

You can cut out the necessary details from the leaves, i.e. use not a whole leaf, but a cut out element. Use leaves of different colors.
You can pre-dry the leaves or put them in a book for a while so that they align. You can also dry them by ironing them through a sheet of paper.


Dry leaves can be crumbled into crumbs and sprinkled with them on the base on which the glue is applied. After that, shake off the remaining crumb. This activity will be great for younger kids.

VIDEO: Educators and parents - applications for children
larisa kozyreva
Dear colleagues!
For the fifth time in our city and district, the educational festival "Rainbow of Creativity" is being held. Previously, I took part as a student. Gained experience from masters, but this time I decided to show my colleagues my skill.
Today I want to bring to your attention Master Class« Volume application from colored paper» .
The technique is not complicated, but quite interesting, it can be performed, as in school. age, as well as with preschoolers.
Lessons applique contributes to the all-round development of children, forms positive emotions and good mood.
In this technique, volume give various curls, spirals, wound on a pencil or with scissors.
You can cut several blanks of one element and stick one on top of the other, duplicating several times, such applications are called overhead.
Required for work:
Scissors
Pencil
Colored and white paper
Templates
Progress:
1. Choose the basis of the postcard.
2. color the gamut of your postcard.
3. Using curly scissors, we make blanks for the frame.
4. Take a template flower(we have asters, circle and cut out (we make 4 blanks, a leaf-3 pieces, grass, a butterfly-2 pieces (you can use a template, and can: take a strip paper, folded in half, draw one half, cut it out and get a symmetrical blank, cat.
5. Now the main thing: take the workpiece flower and with the help of our fingers we bend our petals in half, without touching the middle flower, so we bend each workpiece flower, leaf, grass and butterfly.
6. We will not stick the entire element, but only the middle-edge of the workpiece.
7. Glue carefully (only the middle, decorate the middle flower bead.


Postcard is ready!
Thank you for your attention. All creative success.
Related publications:
"Forest clearing" application master class. Paper is an amazing material, one of the most accessible for children's creativity. Create fabulous.
Application from colored paper "Kitty". Master Class. Purpose: making appliqués from colored paper. Tasks: - to consolidate the skill.
Master class "Volumetric butterfly". I suggest Master Class"Volumetric butterflies," which we made with the children. So, for work we need:
Dear friends and guests of my page, I offer a master class of a voluminous butterfly, which the children and I did for teamwork. About.
I love doing paper crafts with the guys in my group. I already did a volumetric craft "Water Lily", but a different one. I have developed a different version.
Every mom and dad try to find an exciting activity for their child that will not only keep him busy for a while, but also have a beneficial effect on the comprehensive development of the baby, make the child improve creative thinking, think, fantasize, learn to concentrate.
Colored paper applications are a great option for your child to have a good time. Older children can do this creative activity on their own, kids from a year old will create their first works together with their parents.

The role of applications in child development
Paper application involves the gradual creation of a picture by gluing elements of various shapes and colors onto a cardboard or paper base. After looking various photos paper applications for children, you will understand what this type of activity is and what kind of finished work you can get at the end of the process.

Paper application technology is quite simple. The child himself, or with the help of parents, a nanny, an educator, must come up with what kind of picture he would like to portray, prepare the tools necessary for creative process, make patterns of elements, alternately cut out small details from paper sheets that will be needed to recreate the intended image and glue them sequentially onto the selected base.


So what is the benefit of doing this?
Application creation process:
- develops perseverance;
- improves fine motor skills;
- allows you to remember and distinguish colors and shapes;
- teaches you to be independent;
- instills accuracy;
- teaches patience;
- generates creativity and creative thinking etc.

The role of applications in the development of the child is undoubtedly great. They contribute to the multifaceted and versatile development of the child.

Here are some simple paper appliqué templates that can be useful for the first lessons and introducing kids to the concept of appliqué.

Application examples
Let's try to make a presentation of some of the easiest paper applications with which you can start the process of learning this business.


Ice cream
To create such an application, you need to prepare:
- cardboard or paper base;
- glue;
- pencil;
- scissors;
- colored paper in various shades.

To begin with, on colored leaves, you need to sketch the main elements of the future picture: separately a cone and separately ice cream balls. After, with the help of scissors, it is necessary to cut out these parts. The next step is to glue small items in strict sequence: first, a horn is attached to the base, then, in turn, popsicle balls.

After the end of the action, the resulting picture can be decorated additional details: cherry, chocolate chips (which also need to be cut out of paper).

Using such a simple algorithm of actions, you can make applications of various types: a plate of fruit, a fish, a bunny, and a house.

Volume application
This version of the execution is a little more complicated, but the result is worth it. Consider how to make an unusually beautiful bulk flower from paper. To create it, you will need the materials indicated above, the only clarification is that colored paper should be as thin as possible.

From the base it is necessary to cut out the shape of a flower, it can be, for example, a rosebud or a chamomile inflorescence. After, from paper of different colors it is necessary to cut a lot of small pieces and crumple them with your fingers.


Volumetric winter applications made of paper look very beautiful and believable, which will be a wonderful gift for grandparents. new year holidays. On a cardboard base, you can depict a Christmas tree decorated with colorful balls, and with the help of crumpled pieces of white paper, you can recreate a snowfall or set a snowman.

There are a lot of options for applications created from colored paper, so such an activity will not bother the child, every day he will discover something new and interesting, while improving imaginative and creative thinking, quick wit, perseverance, discipline and intelligence.

Photo of paper applications


