Corrugated paper rose for topiary. Rose topiary: from corrugated paper and napkins, step-by-step instructions from satin ribbons, from dry roses, a master class on how to make, video. Master class: napkin topiary
Topiary can become a highlight in any home, and most importantly, it is believed that it drives away negative energy and brings happiness to the house. Is a symbol vital energy and prosperity.
The word "topiary" came from Ancient Rome, as the art of caring for trees was called. Nowadays, topiary can be easily made with your own hands from improvised materials: cotton pads, napkins, corrugated, crepe paper is often used.
Do-it-yourself topiary is quite simple to make from corrugated paper. The following is a simple master class on making original crafts from paper.

Paper napkin craft
This option is a bit different from corrugated paper topiary. Is one of the cheapest, but definitely suitable for beginners: if you can’t make a masterpiece the first time, then you can safely try again. In addition, napkins are an improvised material, everyone has it in abundance.
To make such a topiary you will need:
- pot;
- stick for the trunk;
- stapler;
- wire;
- gypsum;
- foam ball;
- tapes;
- beads;
- threads.
It should be folded in the middle of the napkin to get the shape of a rectangle. Then add it up to get a square.
Staple the middle with a stapler, trim the edges to make a circle.
Then we lift each layer of the napkin and get a flower. We make enough of them to cover the entire ball.

And now the topiary is ready, it will serve as an excellent decoration or gift.
Corrugated paper option
Corrugated paper topiary is one of the most popular due to its fairly simple technique and the availability various kinds colored paper.
A tree made of crepe (corrugated) paper is performed similarly to the previous method, but with minor changes.

List of required items:
- glue or pins;
- wire;
- stick;
- corrugated paper;
- pot;
- tapes;
- moss (for decoration).
There is another instruction on how to make a do-it-yourself topiary base ball. If available in the house polyurethane foam the base can be made from it. We take Balloon hic, having previously slightly moistened it inside with water, slightly inflate it, put it on a balloon with foam, release the required amount of foam into the ball. We leave to dry for 12 hours, after which we remove the ball. The base is ready.

Next, we make flowers from corrugated paper. We cut off a strip of corrugated paper 5 cm wide. We turn the paper 2/3 on top. Carefully twist the tape. With the help of glue and pins we fix the flowers on the crown. We connect with a tree trunk and with a pot. The product is ready.
Corrugated paper topiary (video)
Topiary from cotton pads
This option is performed a little differently than a paper model, but this method can be noted for one simple reason: this way you can perfectly practice how to make a topiary with your own hands before creating something more serious.
The main difference of this method is the use of cotton pads to create flowers.
We take a cotton pad and first bend one of its edges, and then the second, which should be above the first. We tie the workpiece with a thread slightly above the middle. We turn out the bottom edge, and the flower is ready. Further actions are similar to the previous methods.
Corrugated paper roses (video)
Topiary heart
An unusual way of execution is a topiary heart made of paper or other materials. The peculiarity of this method lies in the complexity of the crown shape itself.
In order to make the base, you will need:
- cardboard;
- cotton pads;
- glue;
- threads.
Cut out the desired heart shape from cardboard. We take cotton pads and, wetting them in glue, glue them onto a cardboard base to give it the desired volume. Then you need to tie it all up with threads and leave to dry. The base is ready.
There may be different ways of gluing the finished base.
You can decorate the crown with coffee beans. Using glue, fix the coffee beans to the base.
Since the base is already ready, you can proceed directly to the design. We cut the organza into 5 cm squares. Then we fold it 2 times diagonally. We bend the corners on one side and the other. Lubricate the base with glue and apply a square to it, hold until the glue hardens.
Thus, we first glue the contour of the heart, and then fill the rest of the space. It is more convenient to do this, moving from the edges to the middle. Next, we attach the trunk to the crown and insert the structure into the pot. The junction of the trunk with the pot can also be decorated with organza.
Topiary care

It will not grow, it will not need to be watered or fertilized. The most important thing is to make sure that it does not fall directly Sun rays as this will cause the fabric to fade. Occasionally, you will have to shake off the dust from it.
And then this unpretentious decoration of the interior will please the eye for quite some time.
Creative corrugated paper topiary - stylish decoration living room, living room or office space. It is believed that it brings prosperity to the owners. In the East, it was called a symbol of new life and prosperity. To work, you need a small amount of crepe paper and a little imagination. The composition will become an unforgettable gift for close people.
The creative process begins with the choice of a foam ball. In a wide range it is presented in the store for needlework. If nothing suitable could be found there, then blanks are easy to make at home. To work, you need a thick wire, which is curly bent. The main thing is not to break the base during partial deformation.
Then the bent wire is wrapped with fabric tape. Its color should be in harmony with the overall style of the composition. During wrapping, it is necessary to fix the tape at several points with a glue gun.

Further instructions are as follows:
- Carefully cut strips of colored paper, the width of which is 1 cm.
- Grind the cut ribbons to the size of squares of different colors.
- It is desirable that the squares are the same size.
- The barrel is made from skewers or sushi sticks.
- Each square is applied to the base of the structure.
To work, you will need a lot of small twisted squares, so it's best to make them with a margin. After that, you need to heat up the electric glue gun and fix the twisted squares on the ball. Designers recommend making sure that the corrugation fits snugly against the base and the adjacent element. It is easy to form a word or a shape from colored pieces, for example, a heart.
The production of the composition is completed by choosing a stand. In this quality, a small flower pot will perform, whose color is in harmony with the style of the topiary. To prepare the container, it is necessary to carefully insert a foam bar to the bottom. The leg of the composition is made from a colored stick (the color scheme is chosen taking into account the style of the craft) or wire, which then needs to be wrapped with tape.
Once the leg is ready and decorated, you need to carefully plant the ball. It remains to fix all the parts in the pot and decorate the space around. For this, moss, flax or tinsel is used. If topiaries are created in nautical style, then small pebbles are used to decorate the free space.
We make flowers from corrugated paper for topiary
A flower bought or made by yourself will help to give the composition a greater personality. It is better to choose the second method for several reasons. In addition to being able to get decorative element the desired color, the master independently creates a form. Certain difficulties may arise at the stage of choosing a creative concept. In this case, you need to turn to different sources of information.
For instance, thematic photos finished works offer many options.

After that, you can proceed to the practical implementation of the idea:
- Purchase sheets of corrugated paper of the desired color.
- Cut off a strip, the width of which is 3-4 cm.
- Turn any of the edges 2/3.
- Form a spiral from the tape.
- It is desirable that the resulting spiral be stronger along the inner, and not along the outer contour.
- Cut off excess tape and fix the free edge with glue.
- Unhurried movements need to straighten the petals.
Flowers created from corrugated paper are fixed on with a thermal gun. It is recommended not to overload the composition big amount paper flowers. Given the size of the ball, it is necessary to cover the entire surface .
How to make a topiary paper ball: practical tips
Far from always, blanks presented in the trading network allow to fully realize the creative idea. In this regard, it is not difficult to make a ball for a future composition on your own. This will not require significant skills, taking no more than 1 day. For work, you will need mounting foam and a standard inflatable ball. The color and texture of the latter does not matter.
Learn how to make a beautiful coffee bean topiary in the following article:
Designers suggest using polystyrene as a starting material, but not everyone agrees with such a formulation of the issue. The material is quite fragile, so without significant work experience it is better not to take it. That is why mounting foam is preferable.
The order of work with it is as follows:
- Moisten the inside of the balloon with water.
- Drain off the liquid carefully.
- Inflate the balloon to medium size.
- Fix the inflated balloon on the tube of the cylinder with polyurethane foam.
- Fill up the balloon.
- It is necessary to take into account the class and density of the product, otherwise it will burst.
- Wait for the composition to harden for 9 hours.
- Cut the balloon with a knife.
- Extract the resulting workpiece.
- Peel off the dense top layer of mounting foam.
The result was a blank with the necessary parameters. If a custom size or shape is required, then creating it is easy with your own hands. To do this, it is necessary to place a balloon with mounting foam that has not yet dried up in a mold with the required parameters. In the future, the workpiece is used as described above.
We decorate the topiary from corrugated paper flowers
It seems erroneous that stepping all stages - the most difficult part of the work. Problems begin just after the completion of the main part, when there is free space. Watching themed videos is a good opportunity to learn how to use it. The flight of fancy should not be limited, but one rule must be strictly observed - do not overload the space, otherwise the abundance of crepe paper will negatively affect the stability of the composition.

- It is allowed to use toilet paper for individual items.
- It is undesirable to use too dark color schemes for crafts.
- When using corrugations, you must make sure that your hands are dry, otherwise the material will not retain its shape.
- The blank in the form of a ball can be changed to a heart, a square, and so on.
- During the execution of complex elements, the instruction should be in front of your eyes.
How to create a beautiful corrugated paper topiary (video)
A self-made topiary is a great addition to the interior. The main thing is to sketch out a sketch of the future composition before starting work on paper. Preliminary preparation will allow you to make the necessary changes in advance, as well as determine the list of required materials. Direct work with materials will require careful and adherence to technical recommendations.
Options for homemade corrugated paper topiary (photo)


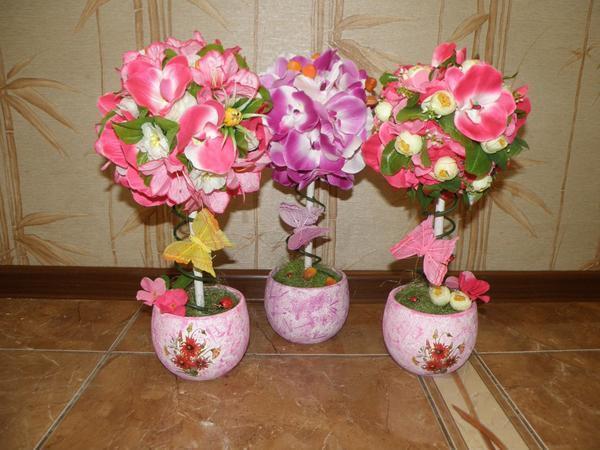
Rose flower topiary is easy to make from floral crepe paper. You can take paper of delicate shades (white, pink, purple) and make a beautiful happiness tree with your own hands. It can be a wonderful decoration for any interior. It's a beautiful or different holiday. The next master class will talk in detail about how to make such a topiary yourself.
Basic materials
To make a topiary, as in the photo, you will need about 5-6 hours of free time and the following materials.
1. Paper for roses: When choosing corrugated paper, it is important to choose floral paper, as ordinary paper does not have sufficient rigidity.
2. A tree trunk can be made from a branch, thick wire, a pencil, or a piece of a narrow pipe.
3. A ball made of ordinary foam, PU foam, tennis, plastic or any other that can be found in the house (I use a regular Christmas tree toy).
4. A flower pot or any other suitable container, from a mug to a disposable cup.
5. Details for decorating the composition: ribbons, rhinestones, beads and the like.
6. Transparent hot glue for attaching roses to the base
7. Mortar like cement for soil in a pot: you can take tile glue, ordinary cement or gypsum. If you take plaster, then a few more pebbles to it.
Stages of work
The master class consists of four main stages:
1. creating a trunk,
2. making flowers from corrugated paper,
3. gluing roses on a round base,
4. planting a plant in a pot,
5. final decoration of the composition.
Preparing the trunk for the topiary
I offer several ideas on how to make a trunk for a topiary.
Option 1. Find a suitable stick, remove everything superfluous from it, and then paint it with paint or wrap it with tape or ordinary threads. It is best to take a wax ribbon for flowers, it is sold in flower wholesalers. 
Option 2. Take a thick wire or cable that can withstand the weight and wrap it with teip tape. A good option- a knitting needle from an old umbrella.
Option 3. Make a chic gypsum trunk of any convenient shape. To do this, you need to take a gypsum mortar and stick it around any solid base, from a stick to a regular one. simple pencil. Dried gypsum paint in any suitable color.
The photo shows how the trunk was made in the topiary for our master class - several thick wires are wrapped with ordinary packing tape not to the end. The lower part is straightened in different directions, then we will glue the tree to the pot for it.
Base ball
For our topiary, the foundation is chosen in the form Christmas ball. In addition to it, you can take any suitable base. If there is nothing in the house, then it can simply be made according to the papier-mâché principle using a slightly inflated balloon or in this even simpler way.
We crush several newspapers into a ball, give them a spherical shape. Then we wrap it with threads and pass with glue. At the end, we paint with paints to match the main color of the corrugated paper prepared for flowers.
We stick the trunk into the base and now we turn to the manufacture of roses.
How to make flowers?
Creating roses is the most time-consuming step. But a master class on creating paper roses will certainly come in handy in the future in the most different types creativity. For example, to decorate the lid or. The following photos show the entire process in detail. 
1. Take 30 cm of corrugated paper and cut them off the roll. Now cut lengthwise into strips 30 long and 5 cm wide.
2. With your fingers, stretch the strip of paper a little, making the edge uneven. We bend a third of the width inward along the entire length, again slightly stretch the edge. The photo shows how uneven it turns out in the end. 
3. Now we turn the strip into a flower, holding the bottom with our fingers, forming small folds. Twist should be loose and not too tight (as in the photo). From time to time I fix the layers at the bottom with a drop of hot glue so that everything stays on.
4. Now we need to make many, many paper roses so that they are enough for our entire ball.
There are several more ways to create paper roses. For example, original version describes in detail the following video master class.
flower ball
We pass to a pleasant stage - we create with our own hands flower ball. Flowers can be glued both with instant glue and with a heat gun. The last option, in my opinion, is more convenient.

We glue the first rose on top, the next - next to it. Be sure to place the flowers in neat rows and plant close to each other so that the base does not shine through between them. After the entire ball is filled, all roses must fluff the petals, making them even more voluminous.

Landing
A beautiful flower pot can be decorated with nothing. If the pot is rustic or not very suitable, then you can simply wrap it with a cloth, as in the example in the photo. The fabric is again attached to the hot melt adhesive. 
We lower the stem to the bottom of the pot and fix it with hot glue. Now it stands on its own and it's time to knead the solution for the "soil". Many people ask how to dilute gypsum for topiary and even ask to write a separate master class on this topic. But in fact, everything you need to know can be described in one sentence: feel free to make a solution like thick sour cream or even liquid porridge by eye. Pour the porridge into a pot and wait about a day until it dries completely. After that, it remains only to decorate the composition.
Decor
For decoration, everything that is suitable in the house will do. I found the remains of white corrugated paper, which I cut into 1x1 cm squares and glued directly to the tile adhesive using the trimming technique. White fluffy grass was additionally decorated with several transparent beads.

I glue the same beads on the flowers on the ball. At the end, I tie a bow on the trunk from the same packing tape.
The master class has come to an end. This is such a delicate purple topiary!
Topiary is a beautiful and harmonious plant, appropriate in any interior.

Today's master class was devoted to working with floral corrugation. However, you can make a topiary with your own hands not only from paper roses, but also from a wide variety of materials. a master class on topiary from ordinary napkins is described in detail. You can also watch a step-by-step coffee bean master class or a review article on the most different materials to make a tree of happiness.
Topiary ("tree of happiness", "European tree") is decorative tree small size, which decorates interiors and exteriors, and is also often used for. Topiaries are good because they look very beautiful, and you can make them with your own hands in just 1 evening from improvised materials.
- This means that you can make several jewelry at once, for example, one pair - for New Year's serving, another for Easter, and a couple more for the mantelpiece.
In this material you will find 1 basic instruction on how to make a do-it-yourself topiary for beginners, as well as 3 step by step master class in addition to it, and 45 photo ideas for inspiration.
Basic instruction for beginners
Topiaries of even the most complex design are made according to approximately the same principle. Having mastered the basic manufacturing technology, you can create a variety of topiary, changing only the materials for decoration.
So, to make a mini-tree with your own hands, you will need to create it:
- Crown;
- Trunk;
- The base of the tree.
Step 1. Design planning
Topiary can be different not only in design, but also in terms of service life. Before starting work, think about why you need a “tree of happiness” and where will it live? The purpose and future place of the topiary will determine its style, color scheme and even materials for its creation.
If you want to make topiary for, then materials that are not too durable can be used - paper, napkins, sweets, fresh flowers, fruits. If you want to make a topiary as a gift or for interior decoration, then it is better to use a more reliable decor - cones, artificial flowers, coffee beans, ribbons, organza, etc.
In the next selection of photos, you can get design ideas for themed and festive topiaries.

Sweet candy topiary for a children's party

Halloween decoration with potted candy

Halloween decorations from pumpkin seeds, ribbons and sweets in tea cans

Easter trees made from eggs, artificial flowers, satin ribbons and moss

Christmas topiary made of artificial leaves and holly berries, cones and ribbons with a branch trunk

Candy tree for the holiday table

Topiary for festive serving table made of artificial flowers, natural branches, dry moss and satin ribbons


And here is a selection of photo examples of the design of exclusively interior topiary (scroll through!).


Step 2. Prepare materials
To make a topiary with your own hands, you will need:
- Styrofoam ball with a diameter of 8-12 cm(available at many stationery and art stores) or floral foam ball (available at gardening and flower shops).

If desired, the ball can be made independently from polystyrene foam, the same floral foam, polyurethane foam, papier-mâché, etc. However, the base of the crown can be not only in the shape of a ball, but also in the form of a heart, a star, a number, a letter, an animal figurine and etc.
- Crown decor - depending on your idea, use flowers, satin ribbons, organza, coffee beans, banknotes etc.
- Trunk - it can be made from a dry and clean branch, a simple pencil or any other stick. In addition, a tall candlestick can replace the trunk and pot.
- Barrel decor– the trunk can be at least covered matte varnish or paint. And as a maximum - wrap one or two tapes.
- Planter - It is most convenient to pour the mixture into a clay pot, but any pretty cups, mugs, vintage buckets, etc. will also work.
- Fixing mixture- it is best to make a do-it-yourself topiary with a mixture of alabaster, as it quickly hardens, almost does not crack and is cheap. You can also use cement-sand mortar, gypsum or putty. However, not only binder mixtures can fix a tree in a pot, but also the same foam, floral foam or stones.
- Everything for mixing- container, water, stick, etc.
- Decor for masking the fixing mixture– to create an imitation of soil cover, it is best to use natural materials: dry moss, small pebbles, expanded clay, sisal fiber. Artificial moss and stones are also suitable. In the pots of "edible" topiary, you can put sweets and dragees.
- Glue gun and some glue sticks- if necessary, it can be replaced with glue like "Moment", but it's best not to do this, since the glue in the gun is more convenient, and most importantly, it allows you to remove random "cobwebs".
- Scissors or cutter.
- Tailor's studs with a very small head(optional, used in addition to or instead of glue, for example, for fastening beads).
- Side cutters or nippers for cutting the trunk or any decorative elements.
At the preparatory stage, divide the decorative details for the crown into groups - for example, large, medium and small. So it will be more convenient for you to alternate the decor and distribute it evenly over the ball.
Step 3Create the Crown
First, you need to mark the ball - mark the place for attaching the trunk and mark the border around it, beyond which you do not need to go for some time, sticking the decor. Thanks to this technique, in the future you can easily fix the barrel in the ball without ruining the decor.

As soon as the glue warms up, proceed to the design of the ball in the following order: “trying on” the part without glue - applying glue to the right place - fixing the part. Remember that you need to act quickly so that the glue does not have time to soak into the foam. That is why the decor is better to apply and try on first.

Here are a few more nuances:
- You need to stick the decor on the ball, starting with large elements and ending with small ones. For example, if you are making artificial flower topiary, first glue the largest buds on the ball, then the medium ones, and only then the small flowers and additional beads.
- Some decor can be attached to the ball with tailor's studs. But it is best to combine carnations with glue.
- If some details have wire bases (for example, the same artificial flowers), then about 2 cm should be left from their “tails”. Then you can not only glue the decor, but also stick it into the ball.
- To make the white base ball less noticeable in the gaps between the glued parts, it can be painted to match the decor.
Now we need to work with the trunk. As already mentioned, making it with your own hands is not at all difficult from a branch, pencil or any stick.
If you use a branch, then you can not paint it, but only cover it with a matte varnish so that the natural beauty of the tree is visible. If you use a wooden stick, then it can only be slightly tinted, artificially aged, etc. If you want to completely mask the surface of the trunk, then you can wrap satin ribbons, fabric, paper, rope around it, or completely paint it.
What length should it be? Since the barrel deepens both into the pot and into the ball, its length can be calculated using the following formula:
- Stem length = 1/3 ball diameter + pot height + desired stem length between crown and pot.
To fix the barrel, you need to make a hole in the ball with a depth of about 2-3 cm at the marking site with an awl and a knife (depending on its size). When the hole is ready, fill its bottom with hot glue and put the crown on the trunk until it stops. Then continue to hold the barrel and gradually fill the hole with glue around the barrel.

- Keep in mind that the hot glue will melt the styrofoam and deepen the hole even more. To prevent the trunk from going deeper into the crown by more than 1/3 of its diameter, small pieces of paper can be laid between the layers of glue.
As soon as the barrel is fixed in the ball, mask the attachment point with decor.
Step 5. Prepare the binder mixture and fix the tree in the pot
It's time to "plant" the resulting tree in a pot. For this you need:
- Stepping back from the edge of the pot about 2.5 cm, put a mark - the mixture will be poured to this level. If there is a hole in the bottom of the pot, you need to cover it with tape or hot glue.

- Dilute the mixture according to the manufacturer's instructions and fill the pot with it.
- Align and fix the topiary in the pot, holding its stem until the mixture hardens.
- Leave the mixture overnight or overnight until completely dry.

Hint: As already noted, it is best to use alabaster as a binder mixture. To fill 1 medium pot, it is necessary to dilute approximately 1 kg of alabaster with 600 ml of water. The mixture is kneaded for about 1-2 minutes until the consistency of thick sour cream, and then quickly poured into a pot and the topiary is fixed in it for 2-3 minutes.
Hooray! The topiary is almost ready, it remains only to create an imitation of soil in a pot and mask the fixing mixture. If you are using sisal fiber (see photo), shells, artificial grass or moss, then they need to be fixed with a small amount of glue.

Master class 1. Corrugated paper topiary
Topiary with paper flowers is especially suitable for decorating a festive table or festive decoration interior. So, for example, this rose topiary was made for Valentine's Day.

Materials:
- Base ball with a diameter of 12 cm;
- Corrugated (crepe paper) of medium density (corrugated paper in the form of a tape is used in the master class, but you can use regular rolls);
- Floral foam bars and/or any fixative mixture (see basic instructions);
- Planter or flowerpot for the base of the topiary;
- The trunk is about 30 cm long;
- Dry moss for pot decor;
- Ribbon for decorating the trunk;
- Glue gun.
Step 1. Cut the corrugated paper into strips 60 cm long and about 4.5-5 cm wide. If the paper is too thick and hard, knead the strips a little to make them more plastic.
Step 2. Now you need to roll the resulting ribbons into rosebuds. This is done very simply, just a couple of workouts and the principle becomes clear. Take one of the resulting paper ribbons and fold it 1/3 as shown in the photo below.

Then fold one end of the ribbon diagonally at a 45-degree angle and start rolling it into a roll. After three turns, you will get the core of the bud. Now wrap the free end to the outside, and continue to turn the core of the rose - voila, you have the first petal.


Step 4. Once the crown is completely covered with roses, attach the stem to it (see Basic Instructions). In this master class, the barrel was pre-painted with white spray paint.


Step 6 Lay dry moss on the "soil" and glue it in some places with hot glue. And finally, tie a bow on the trunk.

The following selection of photos presents other topiary design ideas that you can do with your own hands according to this master class, not only from corrugated paper, but also from satin ribbons, tissue paper, etc.


By the way, not only roses can be made from paper, but also lush peonies or hydrangeas. Methods for making such flowers are easy to find on the Internet.
November 2nd, 2014  ale4ka

The topiary or the tree of happiness is not only a bright note of the interior, but also brings prosperity to the house along with its appearance and drives away negative energy. Topiary of flowers is a symbol of prosperity, fertility and the birth of a new life. This tree will bring prosperity and prosperity to your family. In addition, a do-it-yourself topiary made of paper will be an original and sincere gift for your family and friends.
Today there are many various techniques and ways to create topiary. Their production has long been put on stream. But a do-it-yourself tree of happiness compares favorably with a purchased one. After all, working on its creation, you willy-nilly invest a piece of your soul. This activity will certainly captivate you, and the finished result will give you aesthetic and moral pleasure. To creative process you can also attract your children, I think it will also be very interesting for them to twist paper flowers, especially if you first tell them the legend about magical properties home topiary.
I bring to your attention a master class on creating a topiary from corrugated roses "Pink Happiness".
For work we need:
- Corrugated paper in dark and pale pink for roses;
- Green crepe paper;
- Transparent glue "Moment";
- PVA glue;
- Chinese chopsticks;
- soda twine;
- Sewing threads;
- Building gypsum (alabaster);
- Pot or mug;
- Napkins.

Making flowers for topiary
First, let's prepare sheets of dark and pale pink corrugated paper. In order to get a rose, cut the paper into long strips three centimeters wide. We bend the upper corner of the strip twice and, like a candy wrapper, twist the upper edge of the tape. It turns out a kind of pigtail, we make such a “pigtail” until the end of the tape.

Loosely wrap the ribbon into a tube and fasten the resulting rose at the base with a thread, straighten the flower so that its petals “bloom”. Such roses need to be made about 25-30 pieces.

These pretty roses should be the result:

The video below details the process of creating crepe paper roses:
Creating the base and trunk for the topiary
I used 4 as a trunk Chinese chopsticks, you can have a dried branch, a plastic or metal stick. We tightly wrap the sticks folded together with twine, from time to time lubricating them with PVA glue.
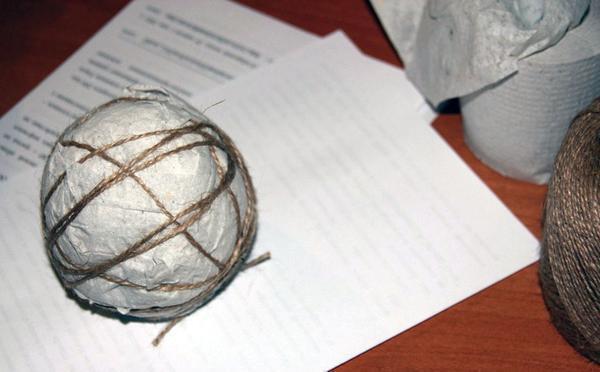
For the base ball, you can use an old newspaper, toilet paper or napkins. Also, the base can be made of polystyrene foam, polyurethane foam, both with your own hands, and buy ready-made.
In this case, we make the base from napkins. To do this, you need to crumple several napkins together, forming a spherical shape. Having achieved the desired volume, we wrap the base ball with twine to give it a more rounded shape. Next, we make a hole in the ball with a knife or scissors, insert the barrel into it or fix the junction with glue.


Now you need to prepare a solution of building gypsum, stir the gypsum with water, bringing it to the consistency of thick sour cream. Fill the pot with gypsum mortar, about 3/4 full and vertically immerse the stem for the topiary into it. Fix the structure in such a position that the gypsum can completely cover the trunk and harden.

The surface of the filler in the pot can be masked with sisal, multi-colored decorative stones, beads, shells, artificial flowers, roses or ribbons.

crown decoration
Now the most enjoyable part master class - decoration crowns with previously prepared flowers. To do this, grease the base of the roses with glue and place them tightly in a free order on the surface of the base ball.

As an additional decoration, we cut out green leaves from corrugated or crepe paper and glue them to the base ball between the roses. Also, gaps can be filled with ribbons, beads or lagurus, or any other decorative material that seems most appropriate to you in this composition.

We ended up with such a lovely corrugated paper topiary!
"Tree of happiness" stands on the window
Happiness will accumulate, give me.
Yes, we dream that we will grow Happiness,
In the shop, having bought a blank - a stump,
Believing, of course, that drops of happiness
Soon they will merge into a seething stream.
(c) Rushania Mukhtarov