Ways of tying shoelaces: original and practical. How to tie shoelaces on sneakers with and without a bow, beautiful lacing options How to tie a bow on shoes
The ability to tie shoelaces is one of the basic self-care skills that we learn back in early childhood. Having mastered it once, few people think about the fact that it is possible to lace up shoes in some other way than as mom once showed.
Completely in vain! An ornate rope pattern on boots can be a small but memorable highlight of your everyday look.
What are the laces?
It happens that shoes wear out much more slowly than laces. And frayed and stained ropes, and even tied in a bow, can greatly spoil the look of even luxury shoes, making them sloppy and untidy. In this case, the question arises of choosing new ties.
What types of laces does the range offer?
- flat- perhaps the most common type of ties. Used in sports sneakers and everyday sneakers. Securely fix shoes on the foot.
- Round- most often seen on classic models with a small number of lacing holes. They are used more as an accessory than a fixation element.
- "Hickies" or "Lazy Laces"- are bending thin strips of plastic with rivets. You don't have to tie your laces with them! They look great on bright sports shoes and sneakers.
- LED- appeared on the wave of popularity of sneakers with luminous soles. To this day, they are quite popular, albeit a kind of accessory for shoes. among young people whose life is connected with parties. There are several varieties of luminous shoelaces - battery-operated round ones and flat ones impregnated with fluorescent paint.
Attention! Round laces should not be pulled tight. Because of their shape, they will put pressure on the blood vessels and cause a lot of discomfort when walking.
Among other things, pay attention to the material from which the laces are made.
The market leader is synthetics, as it is the most wear-resistant and non-marking, but in addition to it, you can find strings from:
- Leather (natural and artificial) - for lacing classic shoes.
- Cotton and jute - for sports and casual models.
The video shows what lazy shoe laces are:
Bow lace options
Ladder
If you do it right, you'll get on your boots drawing emitting a ladder:
- Pass both ends of the cord into the inside of the boot, so that you get a “straight” line from the bottom.
- Align the length so that the left side is equal to the right.
- Thread the lace on the right into the hole opposite the row above - the thread should come out from the outside. Then return it to the right row in the parallel hole.
- Thread the string on the left into the free hole on the right (two rows higher) and then thread it into the parallel slot on the left.
- Continue lacing until you see a characteristic pattern consisting of straight lines on the outer row and zigzags on the inner row.
Zipper
This type of lacing is more like weaving and is quite time consuming.

But the spectacular result is worth all the effort!
- Pass the thread from the inside through the bottom holes, and pull it out. The left side must be equal to the right.
- Pull both ends under the loop formed and cross so that the left end is above the right.
- Pass the laces through the following holes, and weave in the same way as in the previous step.
- Repeat the steps until the end until you get a pattern that resembles a zipper.
Center loop
This type of lacing is especially looks spectacular if you use a two-color lace (for example, the left side is white, the right side is black).
- Pull the cord from the inside and pull both ends of the thread out - make sure they are the same length.
- Weave the left and right ends together, wrapping one around the other.
- Pass the left side of the lace through the left hole, the right side through the right hole.
Repeat the steps until you get a pattern consisting of parallel knots in the center.

suitcase
This lacing looks fun on sneakers and any other shoe with wide lacing hole spacing. There must be at least 6 in each row.
- Pass the tie through the third holes from the bottom and align in length.
- Insert the left and right ends of the cord into the holes below them and take them out a row below.
- Pass the laces through the third holes from the top (above the very beginning of weaving).
- Lace up the remaining rows with a classic zigzag and tie in a bow. As a result, you should get the shape of a “pouch” or suitcase.
Chaotic diamonds
This pattern looks beautiful if you use flat bright laces. Suitable for sports shoes.
Technique:
- Pass both ends of the cord through the bottom holes on the inside and pull out.
- Flatten.
- Weave them so that the left side is above the right.
- Pass both ends through the holes 4 rows higher on the outside and then through the third holes from the bottom on the inside.
- Repeat weaving to the very edge to get a pattern of angular diamonds.
Lace options without a bow
Lacing without a bow looks neat and concise. It also reduces the chance of unlacing while running or walking.
chess canvas
Prepare four wide, long and flat ties in advance, 2 pieces of each color.

Technique:
- Take the cord, tie a knot at its end and thread it from bottom to top through the bottom hole on the left.
- Insert it into the opposite hole from top to bottom, and then into the hole above it from bottom to top and insert the tip of the lace into the hole on the left side again.
- Continue lacing in this way all the way to the edge, threading the rope through each of the holes, as if "sewing" the edges.
- Tie a knot under the last hole.
- Take a different color of lace and fasten it together with the knot of the previous lace on the inside near the bottom hole on the left.
- Start braiding rows with it, threading the cord from below, then from above (baskets are weaved in a similar way), and when you reach the top edge, continue weaving down.
- Repeat the steps until you run out of space, and then thread the cord inward and secure with a knot. As a result you will get effective pattern from checkers.
Watch a video showing how to lace up a checkerboard pattern:
Mirror reflection
Result very similar to the classic zigzag, but slightly different thanks to the symmetry and hidden knot.
- Pass the cord through the bottom holes inward and pull both ends outward.
- Swap them by taking the left end in right hand, and the right to the left.
- Insert both ends inward into the holes one row up opposite each other.
- Continue lacing all the way to the top, and tie the loose ends under the tongue.
Parallel rows
Looks simple yet amazing! Where did the inner rows of lacing go?

Technique:
- Pass both ends of the cord through the bottom slots inward. Compare length.
- Insert the left end of the cord into the third hole from the bottom in the left row, and then into the parallel one in the right row.
- the same, only in mirror image, do it on the right side.
- Weave to the very top of the sneaker, and hide the ends of the cord with a knot, tying them together when they “meet” at the leftmost hole.
As a result, you should get straight rows parallel to each other.
How to lacing "Parallel rows" is shown in the video:
Depending on the type of shoes
Of course, lacing is a rather spacious field for experimentation, but there are still certain rules that should be followed in order for the shoes to look appropriate.
For classic shoes
Classic shoes and boots - this is what should give the image of solidity and harmoniously complement business style in clothes. Besides, such models have fewer holes - a total of 6 to 8.
Zigzag
The traditional way of lacing shoes, familiar from childhood.

Appropriate for all models and is fast.
Reference! Most often, boots are sold already laced in a zigzag pattern.
Diagonal
Almost the same as the zigzag, only one end of the lace is threaded into the bottom hole from the bottom up, the other from the top down. Thanks to this small nuance, you can make the left shoe mirror the right one.
Under and over
It is called so because the laces cross first under the rows and then above them and vice versa. Thanks to this, you can get a cross right in the center of the boot, provided that there are at least 5 lacing holes on each side.

Parallel rows
This method was described above as a way to get lacing without a bow. On boots, it is performed in exactly the same way, with only one difference - the bow is still tied.
reverse diamond
This lacing is also called "military", as it is widely used in European armies. It looks like one horizontal and two vertical stripes perpendicular to each other.
In order to get such a picture, do the following:
- Pass the cord through the bottom holes from the outside, cross under the rows and pull out through the slots above the row.
- Pass the left end of the lace inside the hole a row higher, as well as the right one. You should get 2 lines parallel to each other.
- Cross the cords under the rows and pull out through the outermost holes.
- Tie a neat bow.
How to tie laces on classic shoes is described in the video:
For sports and casual shoes
On sneakers, sneakers, boots and fashionable boots, you can let your imagination run wild and embody how classic options, and newfangled.
Or maybe you can come up with something of your own?
- Zizgag-classic and timeless zigzag will be appropriate on any model. The bow can be left or hidden.
- Ladder- the most famous among non-traditional lacing methods.
- Under and over- looks great on high boots and boots. Rows of crosses are obtained.
- Parallel rows- goes well with low leather low shoes. The bow can be left or hidden.
- Diamond- it is done in the same way as the reverse rhombus, only all actions are performed exactly the opposite. As a result, you get a pattern of wide crosses. Looks great at high women's boots up to the knee.
Reference! Try lacing your shoes with Roman numerals. Attention will be provided to you!
It would seem - what could be easier than lacing up your boots? But even in this simple matter there are many nuances that need to be taken into account - from the material of the lace itself, to the lacing pattern. Do not deny yourself the pleasure of feeling "dressed to the brim" from head to toe!
Laces are the most important detail of sneakers, affecting the safety and comfort of the athlete's foot during competitions or training. Therefore, the ability to tie shoelaces on sneakers is correctly considered a necessary skill that should be brought to automatism.
The physiological characteristics of the legs of each person can vary significantly. For example, the width or instep of the foot. Thus, you need to choose the most suitable way tying shoelaces to make the legs as comfortable as possible. In addition, evenly distribute the pressure and degree of fixation.
If a person uses different types of sports shoes in everyday life, then most often he is interested in the question of how to tie shoelaces on sneakers in a beautiful, original and fashionable way. In fact, the crisscross version with a bow, familiar to everyone since childhood, is a classic, but far from the only way lacing and you can easily master several other techniques.
Next, we’ll take a step-by-step look at how to tie shoelaces on sneakers and highlight the most interesting and popular ways of lacing both with and without a bow. In addition, we will learn how to make sure that the laces on sneakers are never untied.
Recommendation. Look carefully at the photo diagram and read the step-by-step instructions.
HOW TO TIE LACES ON SNEAKERS WITH A BOW - STEP BY STEP 12 WAYS
Ladder (ladder)

Then pass each part through the hole opposite from the outside.
Again, thread both parts through the hole opposite from the outside and interlace as indicated in the previous step, only now part A should be above part B.
Reach the same way to the upper holes on the sneaker.
Zipper (zipper)

After that, pull both parts under the loop and interlace with each other so that part B is above part A.
Repeat steps 2 and 3 until the last holes on the top of the shoe.
Double back (double turn)

Pass the lace from the outside down through the second holes from the top, forming two equal parts - A (orange) and B (red).
Pass each piece through the fourth hole from the top on the outside.
Then weave both parts again. Now part B should be above part A.
Thread both pieces through the last lower holes on the outside, and then through the second holes from the bottom on the inside.
For the last step, thread each piece into the empty top holes. First the third, and then the first.
Loop back (reverse loop)

Pass the lace through the bottom holes on the inside and pull both ends up to get two equal parts - A (orange) and B (red).
Bind both parts as indicated in the photo diagram. As you can see, in the future, each part of the lace will be located only on one side of the sneaker.
Work your way up to the top of the shoe by threading through each hole from the inside while weaving both parts of the lace together (step 2).
Bush walk (forest walk)

First, thread the lace into the bottom holes from the inside, forming two equal parts - A (orange) and B (red).
After that, from the outside, pass part B through the third hole from the bottom, and part A through the fourth.
Then pull both parts from the inside through the holes opposite.
At the last stage, repeat the steps similar to steps 3 and 4 (see photo).
Saw tooth (saw teeth)

Pass the lace through the bottom holes from the outside and align the two parts - A (orange) and B (red).
Pull part A through the inside of the second hole from the bottom, and then through the outside of the second hole opposite.
Pull part B diagonally under part A and thread through the third hole from the bottom on the inside, and then through the third hole from the bottom on the outside opposite.
Get to the top of the shoe by following step 3 on part A and step 2 on part B.
Foot bag (suitcase for legs)

Pull the string through the third holes from the bottom from the inside and form two equal parts - A (orange) and B (red).
Pass both parts through the holes second from the bottom from the outside.
Pass both pieces through the bottom holes on the inside, and then pull through the third holes from the top on the outside.
Pass part A through the second and first (diagonally) hole from the top from the inside.
Do part B in the same way as step 5.
Hash (hash)

Pass the lace through the bottom holes on the inside and pull both ends up to get two equal parts - A (orange) and B (red).
Twist the string so that part B is above part A.
Pass both pieces through the fourth holes from the bottom on the outside, and then through the third holes from the bottom on the inside.
Repeat steps 2 and 3 to the top of the shoe.
Twistie (torsion)

Pass the string through the bottom holes from the inside and pull both ends up to get two equal parts - A (orange) and B (red).
Weave both parts together (full turn).
Pass each part through the second holes from the bottom on the inside.
Continue steps 2 and 3 until you reach the top of the shoe.
Riding bow (riding)

Place the lace diagonally inside the shoe and pull part A (orange) through the bottom hole on the left and part B through the top hole on the right.
Repeat step 2 until you reach exactly the middle of the shoe.
Starting at the bottom of the shoe, do steps 2 and 3 on Part A.
Lattice (mesh)

Pull the string through the bottom holes on the inside and pull both ends up to get two equal parts - A (orange) and B (red).
Then twist the cord so that part A is above part B and thread through the fourth holes from the bottom on the outside of each of them.
Now thread both parts of the lace through the holes fifth from the bottom opposite from the inside.
Then pass both parts into the holes third from the bottom opposite from the inside.
Weave both parts again, observing the structure of the previous weave (see photo), and thread the ends of the lace through the upper holes from the inside.
Bi-color (two-color)

Prepare two different in color and slightly elongated laces. For example, orange (part A) and red (part B). In this case, part B should be somewhere 25-30% longer.
Tie the two pieces together tightly and carefully trim the ponytails.
Starting from the lower right side, pull part B up to the top of the shoe through the holes, as indicated in the photo.
Starting from the second hole from the bottom on the right side, follow the same steps as step 3 on part A.
HOW TO TIE LACES ON SNEAKERS WITHOUT A BOW - STEP BY STEP 3 WAYS
Checkboard (chessboard)
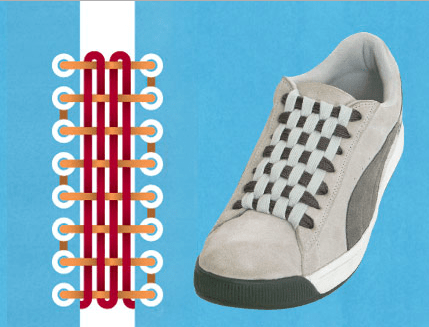
Prepare two different colored laces. For example, orange (part A) and red (part B). It is desirable that the laces are long and wide.
Starting from the bottom left, pull part A through each hole of the shoe to the top (see photo).
Interlace part B with part A (see photo).
In the last step, carefully tuck the ends of each piece of lace into the inside of the sneakers.
Display (display)

Pass the lace through the bottom holes on the outside and pull both ends up to get two equal parts - A (orange) and B (red).
Hidden Knot (hidden knot)

Pass the lace through the bottom holes on the outside and pull both ends up to get two equal parts - A (orange) and B (red).
Pass part A through the second hole from the bottom on the inside, and then through the second opposite from the outside.
Pass part B through the third hole from the bottom from the inside, and then through the third hole opposite from the outside.
By analogy with step 3, and on the two uppermost holes with step 2, pull both parts of the lace to the top of the sneaker.
HOW TO TIE THE LACES ON SNEAKERS SO THEY DO NOT UNLOCK
What to do if the laces on sneakers are constantly untied, and even at the most inopportune moment and no knot helps? In the early 90s of the last century, especially for professional athletes, Salomon developed and patented the QuickLace system, which allows you to very easily and quickly adjust the lacing on your shoes. The device is designed in such a way that the laces on the sneakers are guaranteed not to come undone.

In general, there are an incredible number of options for tying shoelaces. For example, in the collection of the famous Australian "lacing specialist" Ian Figen today there are 50 different methods. If desired, anyone can come up with some new way and give sports shoes a unique look. In a word, wear the best men's sneakers, play sports and learn how to tie your shoelaces correctly and beautifully.
My greetings to all! Laces - important detail affecting safety when walking and running. Therefore, you need to learn how to lace them up so that you can automatically perform this procedure. See how you can tie your shoelaces to make walking and running comfortable.
Lace tying options
More recently, this detail was usually tied up, without options. But time does not stand still. Each person has different physiological features, so the usual way of lacing is not suitable for everyone.
Developed different ways of this procedure, which are suitable for your foot. The youth fell in love with the convenience. Having several pairs of similar shoes, young people try to lace them up in an unusual way to be fashionable and beautiful.
Bow options
Consider how to make lacing with a bow.

- First, thread the cord through the lower rings from the inner side, make both parts equal in length - A (orange) and B (red).
- Then cut segments A and B through the hole from the outside opposite.
- Cross the cord so that part B is over part A and both parts pass along the sides, as in the photo.
- Again, pass both parts into rings opposite the outside, twist as indicated in the previous step, only now A should be over B.
- Bring to the top holes on .

- Pass the cord through the bottom holes from the inside, also make equal parts - A and B.
- Pass both parts under the loop, interlace so that half B is above A.
- Pull each part through the blocks second from the bottom, then twist again as above.
- Repeat steps 2 and 3 to the top holes.

- Pass the cord from the outside down through the rings 2nd from the top, forming two equal pieces of cord - A (orange) and B (red).
- Cross the cord so that A is over B.
- Pull each part through the 4th ring from the top from the outside.
- Interlace both parts again so that B goes over part A.
- Pass both parts into the last lower blocks from the outside, then into the 2nd holes from the bottom from the inside.
- In the next step, draw each segment into the empty holes at the top. First in the 3rd, then in the first.
Read also
Hello everyone. It can be said that Nordic walking with sticks “burst” into the lives of many of our compatriots ....
Other options
The next option, called tie it correctly, following the picture.

Will give a leg the new kind.

The original version of lacing with a bow called , easy to repeat if you follow the pattern.

Read also
How should you wear a headscarf and scarf this fall? Do you know what scarves are in fashion these days? And how beautiful to tie a scarf or ...
Thin strings can be laced up in the form of a rope.

- Pass the cord through the rings at the bottom on the inside, make two identical parts - A (orange) and B (red).
- Interlace the pieces with each other, making a full turn.
- Slide each of them into the 2nd holes from the bottom from the inner sidewalls and do this until you lace everything up.
Ornament of wide laces
Wide drawstrings can create an original grid and decorate a sports one.

- Pull the ties through the bottom blocks from the inner side of the sneaker, get 2 parts - A and B.
- Bind so that A is above B, then thread each of the parts through the 4th rings from the bottom from the outside.
- Next, pass both parts through the 5th holes from the bottom opposite from the inner sidewall.
- Weave each part together again (step 2), then thread through the 2nd holes from the bottom from the outside.
- Next, pass both parts into the 3rd hole from the bottom opposite from the inner sidewall.
- Weave both parts again, following the order of the previous weaving, thread the ends of the cord through the upper blocks from the inner side.
You can make weaving from a two-color tie.

Read also
Hello. Have you seen the red thread on the arm of the artists? Why are they wearing it? Today we will find out what is needed and how ...
How to lace up so that they do not untie? There are many ways, for example "chessboard".

For this method, you need to prepare 2 cords, different in color - orange (A) and red (B). It must be long laces, and even better to be wide.
- We start from the bottom left. Pull part A through each hole of the shoe to the top, as in the photo.
- Interlace B with A.
- Next, tuck the ends of each piece inward. This is the version without the bow.
The next option is simple, it can be done according to the drawing.

On sports sneakers, when you need to quickly fasten, and with one hand, take this method into service. Make one knot at the tip, lace up according to the pattern. When you need to reinforce your sneakers, pull on the second end of the tie. In the picture he of blue color.

star on sneakers
Lacing "Star" looks very bright and unusual. Take thin or flat ties and get started.

- From the bottom, with the blue end of the tie, we go up, changing direction once.
- The yellow or right tip is first led diagonally to the left, then goes down one hole.
- With this end we make a horizontal segment, climb a hole higher, make a horizontal segment in the opposite direction.
- Again we go down to the hole below, then we lead diagonally to the top. It turns out an even "star".
And the military and athletes tie like that.

The tie looks unusual, which is designed for skates, roller skates and any other shoes where rigid fixation of the foot is required.
- Go with one tip on top.
- Then throw a loop.
- Make one row with loops, then repeat.
- At the end, do the same, only from the inside.

On running shoes, you can see 2 holes for ties, located just above and beyond the upper blocks in the main row:
- lace up crosswise, leaving the top two pairs of holes;
- we draw the end of the right tie through the uppermost hole on the left;
- then immediately through the remaining lower one, also on the left, we get a loop;
- we do the same on the right;
- take the ends of the laces, thread through opposite loops;
- tie with a double knot.


Sports sneakers should be tied already on the leg. Untie, too, without removing.
It is important for cyclists not to get caught on the ties so that they do not come undone during training or competition. From the drawing, it is easy to learn how to attach cycling shoes.
Decorative way - "World Wide Web".
This technique is suitable for high-top sneakers that young people like to wear. We start with a gray segment - the middle of the cord. Following the scheme, you will get a successful way of lacing high shoes.
- The cord is threaded from the outside inward into the lower rings.
- One side of the tie (yellow) comes out through the top rings.
- The other side (blue) goes one ring higher.
- Continue to the end of the holes.
How to tie for girls
The most popular and simple method of lacing high boots.

Secret: the ties are intertwined at the top, then stretched inside.
- Pass the cord from the outside inward, stretch it.
- Inside, stretch it up, skipping one "floor" of the rings.
- Pass the zavzki, crossing the outside.
- Repeat from top to bottom.
To better understand the scheme of different lacing, watch the video.
Finally. I am sure that you will not be tormented by the question: how to tie shoelaces on sneakers. Try different variants to have every day new drawing on the foot.
Sounds incredible, but it exists great amount ways to tie shoelaces. In this article we will describe the most reliable and fastest of them.
Let's start with two ways of lacing boots that are familiar to all. I think that many people use one of them daily.
Standard way to tie shoes  Bunny ears
Let's start with the method of Ian Figen from Australia. He thought of using a very fast and reliable knot in everyday life and now he is actively talking about his method to people. By the way, most of the images are borrowed from the Ayan website.
 Ain Figen's method
 The next knot is called the surgeon's knot. It may also be called the Sherpa knot. This is no accident. The knitting method is not the easiest, but the reliability is amazing. For several days of testing, this knot has not untied even once.
 surgeon's knot
 The best representative of the list in my opinion is a double sliding knot. It ties very easily and stays on very well.
 Double slip knot
 Now pick up your shoes and without further delay master the method you like most, and preferably all at once. I hope that your children will never take seriously the words: “And your lace is untied!”.
Today, there are many ways to tie shoelaces on sneakers - and in order to hide them, you need to know how to lace shoes correctly. For many people, lacing up sneakers and sneakers is not only a way of fixing shoes on the foot, but also a means of self-expression. Increasingly, teenagers can see multi-colored laces that complement the image and make it even more colorful. Below we will talk about popular methods of lacing shoes that will allow you to hide the bow inside.
Beautiful methods of lacing the ends inside
Many amateurs often have their shoelaces untied. To prevent this from happening, there are several proven methods, thanks to which you can not only lace up your shoes securely, but also hide the ends inside.
hidden knot

A popular way to tie shoelaces on sneakers without a bow. Step by step technique:

The secret of this method is that the bow is hidden in the inner side of the loops, and only the created pattern is visible in the frontal zone.
tangled trail

It is considered one of the most difficult ways, but outwardly it looks very unusual. Step by step description:

Just a few minutes and they will look new and very attractive. This method of tying is useful for those who are used to drawing attention to their person.
criss-cross

A simple method that is especially suitable for . The technique is as follows:

This method is perfect for both men's and women's shoes.
No bow

An ideal method for those whose laces are constantly untied. Step by step description:
- Take the left end of the aglet and insert it into the left hole on the outside of the shoe. With the right end, do the same only on the opposite side;
- Alternately perform these movements, the ends of the laces can be tied into a knot from the wrong side.
The "No bow" method allows you to beautifully hide the laces inside the shoe.
with three holes

This method visually lengthens short laces. Step by step description:
- Take and thread the aglet through the lower loops, leave the ends inside the shoe;
- Pull the aglet vertically through the next pair of holes;
- Cross the ends and insert them into the following holes;
- Continue doing the same steps until the end. Tie a knot inside the shoe.
The "Three Hole" method is best used only for sneakers with short laces, as well as for boots, topsiders, etc.
Straight lacing

Straight lacing will make the shoes attractive in appearance and make you stand out among your friends. Step by step description:

Straight lacing will look good on high top sneakers.
Hidden knot lacing

When the knot is hidden inside the shoe, it looks beautiful and attractive:
- It is recommended to tie the sneakers using the straight lacing method. The right end should be longer than the left;
- Leave the left side of the lace unlaced, and the right side must be brought to the top of the shoe;
- Pass both parts inside the shoe and tie the laces.
This method is ideal for tying the laces on sneakers so that they are not visible. As practice shows, lacing with a hidden knot is especially popular with athletes.
The video below shows original way super-fast lacing without any knot.
Web

The "Web" method has become especially popular recently. Visually, this lacing looks amazing and grabs the attention of passers-by. Step by step technique:

On the Internet, you can find many photos and videos where users share their secrets of lacing sneakers.
Chess board

This method requires two laces. different colors(for example, orange and blue). It takes a lot of practice to get good results. Step by step technique:

This type of fashionable lacing is especially often used by skateboarders and cyclists to emphasize their individuality.