Do-it-yourself drawing for dad on February 23. How to make voluminous postcards with your own hands to school
Today in stores you can find a huge selection of the most incredible postcards "Happy Defender of the Fatherland Day." But you must admit, such a little thing is more interesting if you do it yourself. After all, she is fraught with all the warmth of a loving heart. We also offer you to learn how to make a postcard for February 23 with your own hands, with photo and video instructions that will help you make a masterpiece.
The best ideas for postcards for Defender of the Fatherland Day
Now we will present 8 original ideas for do-it-yourself postcards, which can be made quickly from improvised materials: colored paper, fabric, beads, so it will be interesting, well, as usual, we leave you cool photo ideas for your unique postcard.
Postcard "Military equipment"

For the product you will need:
- dense colored paper;
- ruler;
- scissors;
- glue;
- yellow foil;
- pencil.
Manufacturing process:
Take the white dense sheet paper and fold it properly. First, twice. Get a "book". Then each half also needs to be folded in half, only in different directions. Something resembling an accordion will come out. After that, you need to cut off three strips of paper: red, green and blue. On one side we glue the red and blue stripes in such a way that we get a combination of the colors of the Russian flag.
Green, you need to glue on the other side. It is on it that the figures will be placed. After that, on multi-colored paper, you need to draw military equipment. That is, a tank, an aircraft, a ship, etc. and cut. Images should not be large, because they will need to be placed in the resulting blank. And, most importantly, each drawing should have a “leg”. It is this part that needs to be smeared with glue and fixed on the green field of the postcard.
After that, you need to cut out a two, a three, and several stars of different sizes from gold foil. Post this brilliant decor at your discretion.
Postcard "Air"
For the product you will need:
- very thick white cardboard;
- colorful candy sticks;
- good glue;
- scissors;
- pencils;
- colored paper.
Manufacturing process:
From thick cardboard you need to cut a rectangle of the desired size. This is a blank for a future postcard. Then glue multi-colored sticks around the perimeter of the product. They must be placed in such a way that the product looks bright. That is, alternating at will. Get a "frame".
Postcard "Military shirt"

To create you will need:
- white sheet of paper;
- paints;
- scissors.
Manufacturing process:
First, take a piece of paper and fold it in half. The sides need to be bent inward so that four folds are obtained. From the upper edges we make sleeves. To do this, they need to be bent like the wings of an airplane. After that, the sheet must be turned over to the other side and bend the bottom edge. Turn over again and bend the upper corners towards the center of the workpiece. It turned out the collar of our "shirt".
After that, you need to bend the bottom edge of the postcard and tuck it under the "collar". Additionally, you can make a tie, bow tie, pocket or buttons. Decorate the "shirt" in military style with paints. On the reverse side, stick a piece of paper according to the size of the product and write beautiful congratulations. It can be decorated with yellow foil stars.
Postcard "Marine"

We will need:
- thick paper of different colors;
- scissors;
- glue;
- pencil.
Manufacturing process:
Draw waves and clouds on blue paper and cut them out. From the white-sail of the ship. From brown - the basis for it. From yellow - the sun. Next, we take light blue cardboard and glue all the blanks to it, placing them in the right places. It turned out a postcard with an application on the marine theme.
On the back write original congratulations and decorate with pencils or felt-tip pens.
Postcard "Order"

For the product you will need:
- white cardboard;
- scissors;
- colored paper;
- pencil.
Manufacturing process:
A sheet of cardboard should be folded in half. If you get too big a "book" you can cut off the excess. On a sheet of red paper you need to draw a star and cut it out. Glue the star on the front side of the workpiece. Its size is allowed to vary at your discretion. You can cut it out the size of the entire page, or you can make a small star and stick it in the corner.
After that, you need to cut out a circle from yellow paper, the diameter of which will harmoniously fit into the size of the star. And glue such a blank in its center. On the mug with a marker or felt-tip pen, you need to draw a two and a three. The presence of foil or other shiny paper will be a good reason to make additional decor in the form of stars or small stripes. Ready! It remains only to write a warm greeting on the back.
Postcard "Star"
For work you will need:
- colored paper;
- scissors;
- glue;
- cardboard;
- pencil;
- ruler.
Manufacturing method:
On red paper, you need to draw a star with additional stripes - allowances. Cut out the workpiece along the contour. Allowances are bent and fixed inside the star. Mark the lines of the rays. On them you need to bend the product well. The star will be big.
After that, we cut out a similar blank from cardboard according to the size of the three-dimensional star. Glue a red star to it. Volumetric postcard is ready. You can decorate with sequins along the contour, and place a good congratulation on the reverse side.
Postcard "Unusual"
To work you need:
- red and white cardboard;
- beads;
- decorative tape;
- pencil;
- scissors;
- beads.
Manufacturing process:
From red cardboard you need to cut three stars different sizes. In the center of each, you need to fix a bead. Fold white cardboard in half. Glue strips of decorative tape on the corners. Place stars in the center. Ready! In the middle of the card, you can write a greeting. Stars for such a postcard can be made not only from plain paper. Fabric and leather are also suitable for this.
Postcard "Original"
You will need:
- thick white cardboard;
- glue;
- scissors;
- matches.
Manufacturing process:
Cardboard cut out in shape big star. The workpiece must be well lubricated with glue. Then we glue matches over the entire area of \u200b\u200bthe star. You need to do this quickly before the glue dries. We put the matches tightly so that there is no free space between them.
Next, let's move on to decor. You probably have some army-themed pictures or images that dedicated to the Day defender of the Fatherland. Cut out this picture. And after the workpiece is completely dry and the matches are firmly fixed, glue on them. If there are no such drawings, you can do it yourself. Cut out of multi-colored paper or draw with pencils, and then fix it on matches. On the reverse side, you can write a few kind words.


Summary: Postcards for February 23 do it yourself. Do-it-yourself cards for dad and grandfather on February 23. Defender of the Fatherland Day. Postcards for the day of the defender of the fatherland.
On February 23, dad or grandfather will be pleased to receive a hand-made postcard from the child. Postcards for February 23, which we offer in this section, are decorated with plain or voluminous applications made of colored paper. There are very simple applications available even for children 3-5 years old. There are more difficult crafts for older preschool and younger children school age. For young children, prepare in advance, cut out all the details of the picture so that they only have to stick them on the postcard. Adult children can cut out parts of the application themselves. It will be interesting to make an origami postcard for a child for dad or grandfather. You can find origami schemes on our website.
Dads love technology, so postcards for February 23 with her image will come in handy. Make an application with a typewriter, airplane, rocket. The application can be both simple and voluminous.
Boat application. applique ship
Even a three-year-old can make a simple paper boat application. On the site Pochemu4ka.ru you can download a ready-made template for making a simple application of a paper boat. See link >>>>
Here are more complex examples. voluminous applications with pictures of ships. How to make such postcards by February 23 with your own hands can be guessed from the photographs.


Application machine. Application machine
We invite you to decorate a postcard for dad on February 23 with an unusual application in the form of a typewriter made of candy wrappers. Master class on making this postcard on February 23, see the link >>>>

applique plane

Application rocket
Finally, from transport, a rocket application is also suitable for decorating a postcard for dad or a postcard for grandfather. In the window, the child can paste his own photo or a photo of his beloved dad / grandfather. You can download a ready-made rocket template.


Another interesting option do-it-yourself postcards for dad - postcard origami shirt. There are many ways to make postcards of this type, we will talk about the main ones, starting with simple options and ending with more complex origami postcards.
The easiest way is to fold a rectangular piece of paper in half. From the back of the card, cut off a strip of paper from the top. In front, make two shallow cuts on the sides and bend them towards the center to make a "collar" of the shirt. Separately cut out a tie, decorate it with pieces of colored paper, and then stick it on a postcard.

But everything is the same, only the "collar" of the card-shirt is made on the other side (that's why it is double) and decorated with buttons. Detailed instructions(with photo) for the manufacture of this postcard by February 23, see the link. A ready-made tie template can be downloaded.

When making such a postcard by February 23, you can use a ready-made template from the Krokotak.com website. Download template.
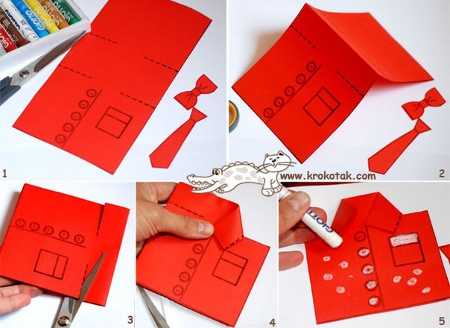
How to make an elegant card with a child in the form of a business suit with a tie as a gift for dad on February 23, see and read on this site.


Make such original postcard origami for February 23 as a gift to dad or grandfather is much easier than it might seem at first glance. With a little help from an adult, even an older child can do it. preschool age. detailed wizard class see below.

1. Fold a piece of rectangular paper in half.
2. Bend the sides towards the center.
3.4. Bend the edges of the sheet as shown in photos #3 and #4. Now you are making the sleeves of the future shirt.
5. Turn the paper over and fold over the top edge.
6.7. Turn your workpiece back and bend the top corners towards the center as shown in photos #6, #7 and #7a. Now you are making a collar.
8. You just have to fold the bottom edge and tuck it under the collar. Postcard for February 23 is ready!


Or you can write a congratulation for dad or grandfather directly on a piece of paper from which you will fold a shirt using the origami technique.


You probably noticed that the paper shirts in the photo are decorated with ties. A tie can simply be cut out of paper, or you can fold it, like a shirt, using the origami technique.
An interesting idea is to decorate a postcard shirt with real buttons, and instead of a tie, make a pasta bow tie of the same shape. Pre-paint the pasta with paint, preferably waterproof acrylic.


Instead of making a card-shirt, you can glue a pocket on a greeting card, decorate it and put a congratulation in it. Simple and tasteful!

3. Do-it-yourself postcard for dad. How to make a card for dad
Another do-it-yourself postcard for dad can be made in the form of a suitcase with tools. You can download ready-made tool templates. Print and cut them out. Let the child color the instruments and on the back of each of them write one positive quality of his dad. You will understand how to make a suitcase from a sheet of colored cardboard if you carefully consider the photos below.

4. Postcard for grandfather. DIY card for grandfather
If your grandfather or dad is fond of fishing, then the following do-it-yourself postcard by February 23 will be appropriate for him. To make it, in addition to colored paper, you will need a thin rope. From it you will make a fishing line for a fishing rod.
The winter period is rich in holidays. recently cleared out New Year, and now a series of dates no less pleasant to the heart is approaching. How to congratulate on Valentine's Day, I already wrote. And now the time has come for our men, and to give them postcards for February 23, made by hand.
Work is in full swing in kindergartens and schools. Kids enthusiastically draw, sculpt, cut, glue various crafts to surprise and delight your dads and grandfathers.
With the help of simple materials, you can make voluminous greeting cards, compose a poem with your mother, or write kind and heartfelt words in your own words.
An unusual postcard is suitable for the defenders of the fatherland and for any other holiday.
For work you will need:
- Colored cardboard sheet
- Scissors
- simple pencil

- Fold a sheet of A4 cardboard in half

- Circle the palm with a pencil and cut out the contours

- Let's take colored cardboard and cut off a strip 4-5 cm wide. If you have scissors with a curly edge, then it's better to use them - the result will be more interesting. If not, don't worry, cut in a straight line.
- Bend it in half, then two more times in half. It will turn out a small folding bed, like a children's book
- Now we fold it with an accordion
- Let's roll from the edges again

- Cut out the number 23 and glue it to the palm. If you do not have a sheet with numbers, then you can draw or cut out from colored paper

- On the strip, which was folded like an accordion, we will write a wish and decorate it with rhinestones
- Let's not forget about the palms, we will also dress them up and put a signature

- Glue the wish first to one palm, then combine them and glue them on the other side to the second palm. So a gift with a surprise for the holiday of strong-willed men is ready.
Do-it-yourself postcards for February 23 for kindergarten
Children are very fond of crafting and giving various crafts to their parents. Now it's the turn of dads to receive a gift for the Defender of the Fatherland Day.
Let's cook:
- Corrugated cardboard - 1 sheet
- Corrugated cardboard strips - 3 pcs.
- aircraft stickers
- colored paper
- Double-sided tape
- Glue, scissors, paints
- simple pencil
- Asterisks
Process steps:

- We take cardboard of blue color and fold it in half
- We cut the strips to the desired length and glue them along the edges - we get a frame. Draw clouds

- Preparing a sheet of paper blue color. We stick airplane stickers on it and cut along the contour, leaving edges of 3-5 mm
- We glue the planes on the postcard on double-sided tape

- We cut out the numbers and letters and stick them on the picture with adhesive tape. We scatter on it and the contour of the picture of the star.
We make postcards with applique for dad and grandfather
This master class is perfect for kids from kindergarten.
You will need:
- Colored paper in different colors
- Glue stick
- Scissors
- simple pencil
- Ruler with circles of different diameters
Execution steps:
If you do not have a ruler with circles on the farm, then we use improvised materials. For a large circle, a plate is suitable. For smaller circles, round objects with diameters of approximately 6, 4, 1.5 cm

- First, prepare the details for the future rocket
- We circle the first part with a plate. From it we will make a case
- Then we cut out 4 parts with a diameter of 6 cm - this is the nose and legs
- Two parts of 4 cm each are portholes
- And 10-12 pieces of the smallest for the universe

- The details are ready. Now let's take a look at the body. Take the largest circle, mark a point anywhere on the circle, and bend the wings on both sides. It should look like a triangle

- With one circle of red color we go around the nose of the rocket
- Fold two more in half
- And we turn one like a rocket body - a triangle
- We glue the sides of the rocket together
- Glue the nose
- Glue the legs to the base. In the middle of a triangle, and on the sides, circles folded in half
- Now it's the turn of the portholes

- Take a prepared sheet of black paper depicting the sky and attach a rocket to the glue with the reverse side
- And the final chord remained - to scatter the planets across the sky, between which our rocket rushes.
Making a postcard using quilling for boys
Quilling is an exciting activity for those who love to craft from simple materials. Strips of paper are twisted into a tube, and various three-dimensional compositions are performed on the basis.
Prepare for work:
- Two-tone quilling paper
- Sheet of cardboard for the base of the postcard
- Quilling tool or any device for winding tubes
- Die-cut pictures on which you can write a wish
- PVA glue and glue stick
- Brush
- Scissors
On the holiday of the defender of the fatherland we will make a tank, because the boys love to play war games.

- Bend cardboard for the base in half
- Cut out half of the base from colored paper in a contrasting color and stick it on. Here you can write a wish or poems

- Now, using a quilling tool, we wind the paper, form a petal of the required shape and glue the tip with a glue stick. If there is no tool, you can use a regular pencil. Having practiced, and with it you can easily wind the necessary parts

- We will prepare nine petals of the same color, and from a contrasting shade we twist six washers for caterpillar wheels and one large petal with two sharp edges

- Now we twist the numbers 2 and 3 and curls for decoration
- We glue the body of the tank and the wheels onto the PVA. We place numbers in the upper left corner and decorate with curls.

Die-cut pictures can be replaced with ones cut out of colored paper with scissors with curly edges. And write a wish.
How to make an origami Defender's Day card
A beautiful congratulation can be made using the origami technique. This postcard will serve great gift not only on February 23, but also on May 9.
Prepare for creativity:
- Cardboard
- colored paper
- Scissors
- Ribbons
- Striped paper

- First, let's make the base for the postcard. Cut out a rectangle of the desired size from cardboard. Approximately 15*20
- Glue colored paper on it. Or, alternatively, scrapbooking paper with various designs. Decorate the sides with ribbons and shape the edges with scissors

- Let's make a shirt out of striped paper. You can make it from any other, even polka dots. It will still look great
- Fold the sheet in half
- Then unfold and fold both sides to the middle again.

- We turn the paper face down, once again go through the folds and wrap the corner at the bottom right at a right angle, and do the same with the left side

- We bend the sides to the middle and take the ruler. We apply below and lift the paper up. We apply the ruler a second time and wrap the paper up again

- Expand and see the rectangles. We apply the ruler diagonally and fold on both sides. Creases formed

- We take the creases and pull up until folding. This is how the figure turned out

- Turn over to the other side, Apply the ruler to the top and turn off a small strip for the shirt collar
- Turn over again and bend obliquely to the center on both sides, leaving space for the neck

- From below we bend to the width of the rectangle. The length of the shirt is up to you. You can leave it like that, or you can bend it until the length of the shirt suits you.

- We cut out a tie on paper, try it on, bending around the corner, and glue it in the center

- We unfold and piece by piece glue all the details
- On the basis we find a place where we put the shirt on the glue
- Now we print on a printer or write by hand a wish or appeal. The width of the tape is 3.5 cm, on both sides we cut out the corners and bend them to give the inscription volume
- We glue the ends to the postcard, hook it up in the middle so that it does not stick and that's it.
How to make a star on February 23 with your own hands from paper for classmates
I'll tell you how to do it volumetric star in a simple way. You will need a template according to which it is easiest to make crafts. But you can draw yourself. There is nothing difficult in this.

Prepare colored cardboard or paper, glue and scissors
Cut out two pieces according to the template. Can be used different colors or do in one color scheme. Red marks the places that need to be glued. All lines inside the star are bent and pressed through with the help of improvised materials. For example, with the edge of a ruler or pen rods (of course, which has already served its purpose).

We bend the places for gluing and grease with glue. It is better to use glue stick. From him, the paper does not get wet and does not spread. Lubricate the necessary places with glue, connect the two halves and press firmly against each other.
And another way to create a star is drawn in stages in the figure. Follow the steps and get a beautiful five-pointed star.

Video on how to make a sweet gift of candy for your beloved men
Men are even more sweet tooth than we women. And an interestingly designed candy bouquet will not leave indifferent any man - neither small nor big.
Ideas for inspiration
I have selected various postcards for you. Get inspired and create your masterpieces.


Undoubtedly, you can go to any store that sells greeting cards, congratulations can not be counted, because February 23 is the day of the defenders of the Fatherland. However, if you make a gift with your own hands, then it is doubly pleasant. After all, by giving such a thing, a person gives a part of himself. How to make postcards from February 23 with your own hands beautifully and tastefully?
Here are some interesting ideas with which you can prepare postcards yourself for February 23. At the same time, the materials are very affordable. Surely you will be interested.
The first postcard is called "Military equipment". To make it, take paper. The sheet should be dense and white. Bend it in half. Next, you need to fold on different sides, making an accordion. Cut off strips of colored paper (3 pieces): one blue, the second red, the third green. The first two are glued on one of the sides, thus making the Russian flag. But the green one is glued on the second side, on which various figures will subsequently be placed.
Now we take multi-colored paper and draw equipment, but not any, namely military. For example, it can be a tank or a ship. You don't need to take big pictures. The main thing is to make a leg, grease it with glue, attach it to a postcard. Then we take gold foil, cut out the numbers 2 and 3 from it, various stars and attach it.
Now we will have a postcard for February 23 "Air". We take cardboard. It must be thick and white color. From it we cut out the desired rectangle. Next, you need multi-colored sticks, they are usually available along with sweets. Glue them to form a frame. After we make an airplane and glue it in the very center. You will need pencils with which clouds are drawn and congratulations are written.
If you are still wondering how to beautiful postcard on February 23 with your own hands, here interesting idea. It's called "Military Shirt". Prepare the paper to be folded in half. Now again so that you get folds - 4 pieces. The top ones are the sleeves. We bend them like airplane wings. We turn over, find the edge below, bend it. Flip. Bend the corners from above to the center, the shirt has a collar.
Instructions for making a military shirt
Now we find the edge below, bend over, pack it under the collar. We decorate with a tie, pockets, shoulder straps, and so on, to get a military postcard for the holiday. Take the paints. On the other hand, glue some beautiful piece of paper, and then write some poem or just a congratulation there. Now you can take the foil, make stars out of it and decorate.
Nautical postcard will appeal not only to sailors. So, take the blue paper. Now we need to draw the waves. Next you need clouds. They all need to be cut out. On white paper, you need to draw, and then cut out the sails. Brown is useful for the base. Yellow is for the sun. You will need light blue cardboard. It needs to be glued on. It turns out cool postcard which you made with your own hands for the Defender of the Fatherland Day, and write a congratulation on the other side.

Nautical postcard
To make an order, take a sheet of cardboard, fold it in half. Now prepare red paper, draw a star on it and glue it with front side. The size of this item can be completely different. It can be big or very small. Then draw a circle on yellow paper, which should coincide with the center of the star. Glue, draw 23, attach foil, shiny paper. Now the main thing is congratulations.
If you still have a question about how to make postcards for February 23 with your own hands for grandfather, then a star will help you. Draw a star on red paper. We leave allowances. When cut out, bend them inside. We outline the rays. The product needs to be bent along them, then our star will be voluminous. Next, we cut out exactly the same object from cardboard and glue the red one to it. We decorate with something along the contour, and on the other side we write congratulations on the day of the defender of the fatherland.

And here is an unusual card for dad. We take cardboard, red, cut out 3 stars. They must be different. Glue a bead in the center of each of them. We take white cardboard and bend it in half. Glue decorative tape to the corners. In the center we will have stars. The middle is perfect for greetings. It is not necessary to take paper, the fabric will look beautiful too.

Unusual postcard
The original postcard for February 23 will appeal to all men. We take cardboard, draw the shape of a star. We glue it very well, now we take matches and glue it. You need to do this quickly, otherwise the glue will dry out. In this case, the matches must be laid very tightly. Cut out any pictures where present military theme. We are waiting for our workpiece to dry. Glue on top. If there are no drawings, we will draw them ourselves.
We present you a very original postcard on February 23 for a friend that you can make yourself. Take the sheet. Bend it in half. Bend the ends back. Take sheets of paper: green, red and blue. In addition, you will need a branch, bronze, which you can draw yourself. Make a pedestal. It is glued to the fold. It remains to make figures various equipment and attach them. After that, you only need to make different stars, as well as numbers.

original postcard
Here is another voluminous greeting card for my brother on February 23rd. You will need cardboard or paper, dyed on both sides. A sample of a sailboat neatly presented below on 2 sheets is cut out, after which the ship itself is glued together. And below you need to cut the anchor. It remains only to attach a wish for the holiday.
Next, here is a curly congratulation. It is only necessary to pre-make the blank below. Then it just needs to be cut off. Then we take some beautiful paper or a magazine, we make a star from it, glue it on the outside.
We present to your attention a postcard for the holiday, made in the form of St. George's ribbon. Take cardboard red or burgundy. After that, you need a special mesh for flowers, called floral. It can be gold or brown. Cut out a square. Now we need paper - orange and black. From it we construct a St. George ribbon. We attach the square to the cardboard, and glue the tape on top. After which we need corrugated cardboard, preferably gold, but white is also possible. We make a star out of it.

St. George ribbon postcard
Then we take the foil and cut out exactly the same object, after which we paste it on top. Or you can paint with bronze paint. On the left we will write congratulations, for which you can use a printer or the same paint. Now it remains only to attach the star on top of the ribbon.
Anyone can make an application himself. To do this, first think about what we will produce. Let's make an airplane. To do this, take blue paper, and also white and yellow. On white paper, draw an airplane and clouds. On yellow - the sun. Then cut it all out. Glue the sun, the plane is on top, and the clouds are nearby. It remains only to sign our application.
We will make a volumetric postcard with our own hands. Why do we need double-sided cardboard. Bend it in half and turn it upside down. Make 2 cuts, which should be exactly perpendicular to the fold. Next, bend this small square. Open the card and this square must be bent inward. Get a step. Then draw any figure. It could be a soldier or a sailor. Then we attach equipment on the topic, that is, an airplane or a submarine. Then we make the Russian flag and add it. We draw the number 23 and sign.
This postcard is very stylish. Take pasta in the form of bows. Then they need to be painted. Next, take a brush and decode them. Then you need colored paper, preferably blue. From it you need to make a rectangle, bend it in half, in length. You should get a rectangle measuring 5 by 10 cm. Step back one and a half centimeters from one edge and draw a line.
Where the fold is, step back 3.5 cm. We will have a small rectangle, it must be cut off, after which a drawn line will remain, which must be cut another centimeter. You will get a collar, then mark 2.8 cm on the fold line and draw a line. From below you need to measure 4.5, make a line. This will be the sleeve. Cut out, unroll. Then you need cardboard. Colored paper is glued to it. The finished shirt is attached on the left. Now take PVA and make a butterfly out of one pasta. Attach the rest to the second side. Next, buttons and congratulations are made.
Now it will also be a very interesting and beautiful postcard. All you need is not very great artistic ability, as well as paints, pencils, and a piece of paper. You should draw a tank on it. First, the caterpillars are drawn, do not forget about the wheels and the muzzle. On this machine, you need to write the number 23 and stick a foil star. But that's not all! Carefully cut out your creation, turn it over and glue on the magnet. Then you can attach your tank to the refrigerator. They will surely see him there!
In addition, we can say that if you have Photoshop skills, then you yourself can make a beautiful postcard for Defenders of the Fatherland Day on your own.
On February 23, dad or grandfather will be pleased to receive a hand-made postcard from the child. Postcards for February 23, which we offer in this section, are decorated with plain or voluminous applications made of colored paper. There are very simple applications available even for children 2-5 years old. There are more difficult crafts for children of senior preschool and primary school age. For young children, prepare in advance, cut out all the details of the picture so that they only have to stick them on the postcard. Adult children can cut out parts of the application themselves.
Dads love technology, so postcards for February 23 with her image will come in handy. Make an application with a typewriter, airplane, rocket. The application can be both simple and voluminous.
Boat application.
Even a three-year-old can make a simple paper boat application. On the site Pochemu4ka.ru you can download a ready-made template for making a simple application of a paper boat. See link >>>>
And here are examples of more complex three-dimensional applications depicting ships. How to make such postcards by February 23 with your own hands can be guessed from the photographs.
Application machine.
We invite you to decorate a postcard for dad on February 23 with an unusual application in the form of a typewriter made of candy wrappers. Master class on making this postcard on February 23, see the link >>>>
applique planeApplication rocket
Finally, from transport, a rocket application is also suitable for decorating a postcard for dad or a postcard for grandfather. In the window, the child can paste his own photo or a photo of his beloved dad / grandfather. You can download a ready-made rocket template.
And here is a three-dimensional postcard for February 23 with the image of a rocket.
Another interesting option for a do-it-yourself postcard for dad is an origami shirt postcard. There are many ways to make this type of postcards, we will talk about the main ones, starting with simple options and ending with more complex origami postcards.
The easiest way is to fold a rectangular piece of paper in half. From the back of the card, cut off a strip of paper from the top. In front, make two shallow cuts on the sides and bend them towards the center to make a "collar" of the shirt. Separately cut out a tie, decorate it with pieces of colored paper, and then stick it on a postcard.
But everything is the same, only the "collar" of the card-shirt is made on the other side (that's why it is double) and decorated with buttons. For detailed instructions (with photo) on making this postcard by February 23, see the link. A ready-made tie template can be downloaded.
The Country of Masters website offers a more interesting version of this voluminous postcard for February 23. A postcard in the photo below with a surprise! An elegant vest can be unbuttoned and a note or a congratulation can be found in the inner pocket. In order to make such an unusual tie, you will need a few candy wrappers. The use of "wrapper design" allows you to give the image of the costume a unique holiday look. For a detailed master class on making this postcard on February 23, see the link. Do-it-yourself postcard for February 23. Postcard origami
Making such an original origami card for February 23 as a gift to dad or grandfather is much easier than it might seem at first glance. With a little help from an adult, even a child of preschool age can do it. See the detailed master class below.
1. Fold a piece of rectangular paper in half.
2. Bend the sides towards the center.
3.4. Bend the edges of the sheet as shown in photos #3 and #4. Now you are making the sleeves of the future shirt.
5. Turn the paper over and fold over the top edge.
6.7. Turn your workpiece back and bend the top corners towards the center as shown in photos #6, #7 and #7a. Now you are making a collar.
8. You just have to fold the bottom edge and tuck it under the collar. Postcard for February 23 is ready!
You can decorate it with a homemade tie and write a congratulation for dad or grandfather inside the card or directly on it.
Instead of making a card-shirt, you can glue on greeting card pocket, decorate it and put a congratulation in it. Simple and tasteful!
3. Do-it-yourself postcard for dad.
Another do-it-yourself postcard for dad can be made in the form of a suitcase with tools. You can download ready-made tool templates. Print and cut them out. Let the child color the instruments and on the back of each of them write one positive quality of his dad. You will understand how to make a suitcase from a sheet of colored cardboard if you carefully consider the photos below.
4. Postcard for grandfather.
If your grandfather or dad is fond of fishing, then the following do-it-yourself postcard by February 23 will be appropriate for him. To make it, in addition to colored paper, you will need a thin rope. From it you will make a fishing line for a fishing rod.