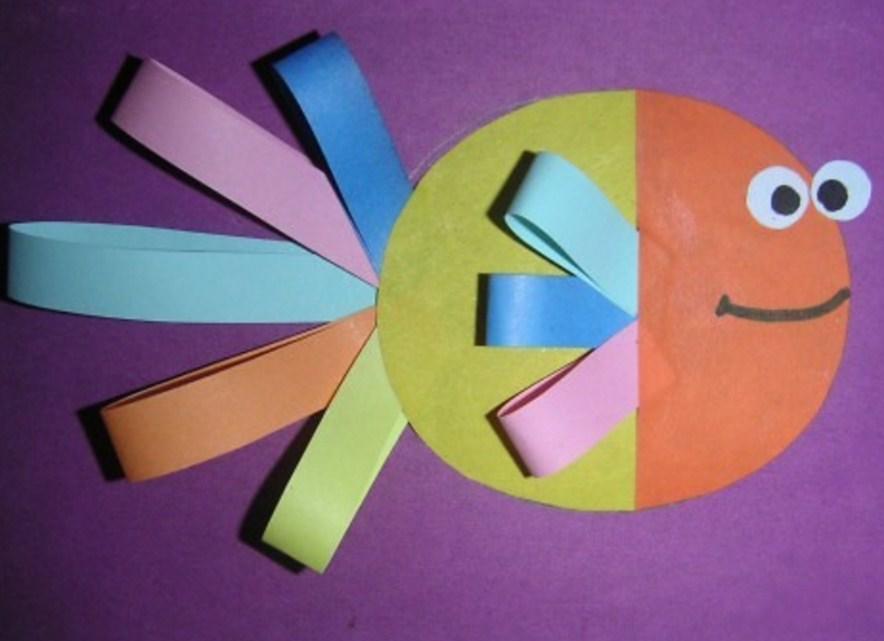
How to make voluminous applications from paper. Non-traditional application techniques: types, descriptions, photographs. paper goldfish
Volumetric paper application - a unique look children's creativity which can be used to glue volumetric figures animals, robots, cartoon characters, houses and even letters of the alphabet. The templates and diagrams that are on our website will help you with this.
How to do it right?
Although the name "volumetric appliqué" sounds unusual, it is not difficult to make it. To do this, just print ready-made templates or diagrams, cut them out and glue them along the fold lines. Application templates are made in such a way that by bending and gluing them along the marked lines, you can get a three-dimensional toy.
Most of the templates are already in color, so you will need to print them on a color printer. However, there are also colorless schemes, on which only conditional lines are indicated. It is enough to apply glue to the side parts of the workpiece and fold it as required by the scheme. If you decide to color such a blank, you must do this in advance, since it will be difficult to color the application in bulk.
Here are some examples of such applications.
Templates
Pyramid
This is the simplest application that a child can easily make.
- Print the template.
- Cut along the outline.
- If you want to make a colored pyramid, you need to color it before forming the pyramid, or simply cut out a template from colored paper.
- Bend the parts of the workpiece intended for gluing.
- Spread them with glue and form a pyramid.
Magical forest
Colored toys
This application is a little more complicated, but the principle of its operation is the same. It does not need to be painted: just print it on a color printer.
- Cut out the printed template.
- Fold the template along the fold lines.
- Lubricate the "wings" with glue and assemble SpongeBob.
- Check that the glued parts are firmly attached.
poppy flower
And now let's try a more complex application - we will make a poppy flower.
- Print out flower templates. If you decide to make a bouquet, you will need several blanks.
- Cut out the components of the appliqué.
- Lay the flower corolla blanks on top of each other so that the petals of the upper one are in the gaps between the petals of the lower one.
- Glue the whisk, giving it a three-dimensional shape.
- Glue the black center inside.
- Glue the leaves on the outside of the flower at equal distances from each other.
- If you are forming a bouquet, then each flower can be placed on a wire stem wrapped in colored paper. Also, flowers can be glued on a postcard or a pre-prepared base.
Such voluminous applications will look natural and just great.
Templates
So you can make almost any flowers by printing blanks from the site or by preparing voluminous applications from different colored paper. Here, for example, is a magnificent carnation. However, unlike the poppy, this appliqué is more complicated, since you will have to form a corolla of a flower from six parts.
dog house
And here is another more complex application. From three main parts, you can fold a booth for a dog.
- Print out the templates and cut them out along the outline.
- Fold along the fold lines.
- Attach the walls to the base of the booth, forming a cube with two pentagonal walls.
- Glue the green roof on top.
The booth is ready. If you don't have a color printer at home, you can cut out the details from colored paper or simply color the blanks.
Corrugated paper
To a greater extent, corrugated paper has to create a volumetric application. It is initially a little convex, and if you use this quality correctly, you can do interesting things.
cornflowers
- Prepare the base for the application. It can be cardboard or thick colored paper, which is not impregnated with glue.
- We apply the contours of the drawing on the base in advance.
- From corrugated paper of blue color(you can take paper of any shade) cut out small squares measuring 1 sq.cm.
- Place a pencil in the center of each square and twist it slightly so that the squares take on a three-dimensional look.
- Without removing the pencil, apply glue to the end of the square and stick it.
- Fill the whole picture with such squares.
This technique of application of corrugated paper is called "trimming". It is good because the flaws are almost invisible. It is simple enough that even toddlers can do it.
hedgehogs
These voluminous applications made of colored corrugated paper are simple, but they look just great.
- Prepare the base. It can be a box of sweets, colored paper, a postcard, etc.
- Fold a sheet of crepe paper 4 or 5 times.
- Draw 2 circles. To make them even, you can use a compass, a cup or a glass.
- Cut out the circles. For one hedgehog, 10-15 circles are required.
- Glue the circles, applying glue only in the center. The edges must remain free.
- Make frequent cuts and fluff the ends.
- Cut out a triangular muzzle of a hedgehog from cardboard and glue it to the body.
- Place the hedgehogs on the base.
- Eyes, mouth and nose can be drawn with a black felt-tip pen or cut out of black paper and glued on.
- In the same way, flowers and grass for a clearing can be made from corrugated paper by folding the paper and making cuts on it.
Here are some hedgehogs you can get.
How to make a 3D paper card?
Applications from ordinary colored or corrugated paper can be made at home, in kindergarten or aesthetic center. They are extremely useful for toddlers, as they develop a sense of color, artistic taste, spatial thinking and a sense of composition. Cutting and gluing will have a beneficial effect on children's fine motor skills and speech development.
Let your imagination run wild with your kids!
Helpful Hints
Young children are very fond of new and interesting things.
You can interest them in unusual craftsmade from simple and familiar things.
It is worth noting that the creation of applications contributes to the development of the child's imagination. In addition, the baby develops motor skills and perseverance.
Try to make the child work independently, helping only to turn the whole process into an interesting game.
Paper application: "Still life"

You will need:
Plain (packing) cardboard
colored cardboard
Color corrugated cardboard
colored paper
Scissors
PVA glue
1. Prepare corrugated cardboard white color and cut an oval out of it, approximately 30 x 45 cm in size. This oval will serve as a fruit dish.
2. Use regular cardboard to cut strips 2-3 cm wide and different lengths.
3. Prepare orange cardboard and cut out 2 circles from it, these will be your oranges. Glue small pieces of thick cardboard on the opposite side of the oranges.
4. Take green paper and cut out 15-20 leaves from it. They can be of different sizes. You can use sheets different shades green.
5. Leaves should be glued to the top edge of the dish. Glue the oranges the same way (see image).

6. Take cardboard yellow color and cut a pear out of it. Cut out a circle from red paper.

7. To make apples, take bright red cardboard and cut out fruits from it. For bananas, yellow corrugated paper is suitable.

8. Glue pieces of thick cardboard to the back of the fruit.
9. Now glue all the fruits to the dish.
10. Use red corrugated cardboard to cut 4-5 cherries out of it. You can cut 4-5 plums from blue cardboard.
11. Prepare a shiny green cardboard and cut out 10-12 circles of different diameters from it. This will be your grape.

12. You can arrange the grapes on a dish close to each other so that you get a bunch of grapes. Leaves from colored paper can be added to the grapes.
13. Use yellow and brown paper to cut out apple and pear tails. Glue these ponytails to the craft.
Applications for children: "Leaves"


Children's applications: "Animals from leaves"
In autumn, you can walk through the forest and collect fallen leaves, which have a very beautiful color. In addition, you can find chestnuts, acorns, branches and cones, which can also be used to create a beautiful appliqué.
From the leaves you can make animals, vivid landscapes or just beautiful patterns.

1. First, the leaves must be washed and dried.

3. In order to glue the leaves to the paper, use ordinary PVA glue.
4. You can use scissors to correct or change the shape of the leaves.
* For more realistic animals in the application, try to prepare animal templates first.


Applications from colored paper: "Butterflies"
This simple applique will look very nice in the house, and the child will love to make it, because it is simple and entertaining.

You will need:
Unusual paper (you can just color or velvet)
White sheet as a base.
Pencil
Scissors
1. Circle the child's palms on paper with a pencil.
2. Cut out the resulting palms from paper.
3. Now glue paper palms to the base (see image).
4. Make the body and head of the butterfly. They can be drawn with paints, pencils or felt-tip pens, or they can be cut out of colored paper. Draw the mustache.
5. Butterfly wings can be decorated. You can use plasticine, glitter, stickers and more.
6. Leave the craft to dry, and in the meantime draw the face of a butterfly.
7. Then the butterfly can be cut out on the office. It can be hung over the baby's bed, decorate walls or flowers.
DIY applications: "Lamb"
From ordinary paper napkins the child can make a funny lamb.

Its fur is made from small rolled paper balls.
Incompletely glued details, such as a cloud, grass and butterfly wings, as well as a bull's muzzle, can create a volume effect.
If the baby blows on the grass, its tips will sway, and if on a butterfly, it will seem to start moving its wings.
You will need:
colored cardboard
Paper towels
Pencil
PVA glue
colored paper
For the background, use colored cardboard.
1. First cut out the muzzle and ears of the bull.

2. Glue the details to the colored cardboard, remembering to take into account the torso, as well as the height of your future grass.
3. Prepare a paper towel. Tear it into small pieces, from which then roll the balls.
* You can use napkins different colors, then you get a cheerful multi-colored lamb.
4. Draw the outline of the torso and head with a pencil.
5. Start gluing pieces of the crumpled paper towel to the lamb's body.

6. Cut out grass from green paper and glue it to the base of the appliqué.
7. You can add a butterfly or other appliqué embellishments. Butterfly can be cut out of colored paper.
Paper applications for children: "Chickens"

You will need:
White and yellow paper
Cardboard for the base
simple pencil
felt-tip pens
1. Prepare a white sheet of paper and draw an egg on it with a pencil.
2. Draw a curved line in the center of the drawn egg.
3. Cut out the egg and cut it into two parts along a curved line - the egg seems to have split.
4. Prepare yellow paper, draw an egg on it and cut it out. From this oval we will make a hatched chicken.
5. Now the yellow oval needs to be glued onto cardboard (the basis of the entire application). Draw eyes, beak, legs and wings on the oval with a marker to make a chicken.
6. Glue the bottom of the white egg over the chicken, covering the bottom half. And stick the other half next to or on the head of the chicken.
Application for a child (3-4 years old): "Towel for a grandmother"

You will need:
colored paper
Velvet paper
Crepe paper
Double-sided colored paper
Scissors
PVA glue
1. Let the child cut out all kinds of patterns from colored paper - circles, squares, stripes.
* You can draw an ornament in advance to know what details to cut. This is how you teach your child to plan.
* Try to draw patterns yourself, and let the child cut them out. Or ask your child to repeat your patterns on separate paper.
2. Place all the patterns on a sheet of double-sided colored paper or cardboard so that you get an interesting pattern. That way you get an idea of how things will look.
3. On opposite sides of the carpet, make a fringe.
4. It's time to glue the details of the pattern for the rug, after which you can give the craft to your grandmother.
Volume application from paper: "Sprig of mountain ash"

You will need:
Napkins (color red, orange, green)
Cardboard or thick paper
Scissors
PVA glue
Drawing or printout of rowan
1. Prepare a red or orange color. Tear or cut small squares or rectangles from it and roll them into small balls.
* You can ask the child what such a ball looks like, and then together remember all the familiar berries.
* Let the child roll up as many of these rowan berries as he wants.
2. To make leaves, you need a green napkin. From such a napkin, cut rowan leaves. One leaf consists of several layers of green napkin.
To make a leaf, you need to fold the napkin in half lengthwise, then twist one of the ends to make a twig.
3. After making several branches, you can glue the leaves.
* You can use several shades of green to make the application more realistic.
Application "Daisy flowers"

You will need:
Colored paper (white, yellow, green)
Colored cardboard (in this case blue color)

For one flower:
1. Cut out one circle from yellow paper - this will be the middle of the flower.
2. From white paper, cut a strip 5 mm wide and 7-8 cm long.
2.1 Fold the strip into a loop and glue the ends together.
* Petal can be any size.
2.2 You need to make some more petals.
3. To collect a flower, stick the petals on a yellow circle (this must be done from the wrong side).
4. Glue all the flowers on a sheet of colored cardboard. You can add some green leaves from colored double-sided paper.
* Can make flowers different sizes and from paper of different colors.
Application in kindergarten: "Lake"

You will need:
colored paper
Cardboard (in this case, blue)
watermelon seeds
Plasticine (optional)
PVA glue
Scissors.
1. Prepare blue cardboard and cut out a large oval from it, which will serve as the basis for the entire application.
2. We make water lilies.
Prepare two-sided colored paper. From it you can make water lilies, reeds and sedge.

2.1 First draw water lily leaves on green paper, and then cut them out.
2.2 To make three-dimensional flowers, use yellow double-sided paper, from which you need to cut out several small identical circles.
2.3 Now make a fold on each yellow circle - you will get a small cap.
2.4. Use glue to create inflorescences from blanks - just insert one cap into another and glue them together.
3. Glue the leaf along with the flower to a large oval that plays the role of a lake.
4. We make reeds.
Prepare green and brown paper.

4.1 Roll the green paper into a tube to make a stem (for convenience, you can use a toothpick to wrap the paper around it).
4.2 From the bottom, you need to cut the paper and bend it a little, so you can glue the stem to the base.
4.3 Now the top of the stem can be sealed with brown paper.
5. We make bushes.
Prepare rectangles from several shades of green paper. Cut these rectangles with noodles, make bushes out of them, and then glue them along the banks of the lake.
6. We make local inhabitants.
You can do this item if you want to further decorate your application.

Try to make a green island decorated with plasticine berries. Glue this island in the center of the composition.
* You can also make a rocky shore by gluing a few watermelon seeds to the base.
* To create the inhabitants of the lake, use colored paper, from which you can cut out an oval and dragonfly wings.
* To give the dragonfly volume, try making a crease at the base of the wings.
* Glue the dragonfly on one of the leaves of the water lily or just on the base.
Fabric applications: decorating the bag
If you want to make a beautiful handbag for yourself or your daughter, then such a simple application will suit you perfectly.
This method is quite simple, and the result will pleasantly surprise you.
DIY paper application for children
Master Class. Volume application from colored paper with elements of corrugation "Forest clearing"

Tsypushkina Tatyana Igorevna, teacher, organizer of the MBOU DOD "District House of Children's Creativity", Chernoistochinsk, Sverdlovsk Region.
Master Class Designed for older preschool and younger children school age.
Paper- this is the most common material for creating applications.
Application- the easiest and most affordable way to create artwork, which preserves the realistic basis of the image itself. This makes it possible to widely use the application not only for design purposes (in the manufacture of visual aids, aids for various games, toys, flags, souvenirs for holidays, design of wall newspapers, exhibitions, preschool premises), but also in creating paintings.
Target: To teach how to make a voluminous application from colored paper with corrugated elements.
Tasks:
- to introduce children to the technique of shirring and creating three-dimensional modules for appliqué;
- develop a creative approach to creative work;
- develop fine motor skills hands;
- to form the skills of accurate work, cultivate patience and perseverance.
Volumetric applications doing is not as difficult as it might seem at first glance, with the help of an adult, a child of any age can do it. It is better to start with simple works, where only individual elements will be voluminous.
Performing an application from paper, the child receives additional knowledge and practical skills, while expanding his horizons. Paper work develops Creative skills, logical thinking, aesthetic perception.
To create volumetric applications "Forest clearing" you will need: colored paper of different colors, the basis for the application (a picture of a forest clearing or colored cardboard) a pencil, a ruler, PVA glue, scissors, a frame (A4 format).
First you need to make separate modules for the application.
1. We do SUN
From yellow paper we cut out a rectangle measuring 11x15 cm (the size is indicated taking into account the size of the frame for the A4 application). We corrugate the resulting rectangle along the short side (we fold it with an accordion with an edge step of 5-7 mm).

We fold the corrugated blank with a fan exactly in half and glue the ribs. It turns out "semi-sun".

2. We do Hedgehog
From paper Brown color cut out a rectangle measuring 15x21 cm (1/2 A4 sheet). We fold it with an accordion and glue it, in the same way as we did the blank for the sun. Hedgehog spines are ready.

For the muzzle of the hedgehog, cut out a 10x10 cm square from pink paper and fold it into a triangle. At the base of the triangle, on the left side, measure about 6 cm and bend the corner to the top, forming a hedgehog nose.


Using glue, glue the needles to the body. Draw the eyes, nose and mouth. It turned out a wonderful, cheerful Hedgehog!

3. We do FLOWER
We cut out three rectangles from orange paper, 7x10 cm in size. We corrugate each rectangle (we fold it with an accordion with an edge step of 5-7 mm). We fold the resulting blanks in half and glue the edges. We glue the fans together in a circle.


We decorate the middle of the flower with circles of colored paper with a diameter of 4 and 2 cm.


Doing LEAVES for a flower.
We cut out a square of green colored paper measuring 10x10 cm, cut it diagonally into two triangles.

We corrugate each triangle and glue the ends. It turns out two leaves.

4. Doing BUTTERFLY.
To make a butterfly with sharp wings, you need to draw a figure on colored paper in the form of a square connected to a circle.

We cut out this "butterfly" template from colored paper, we corrugate the figure starting from a sharp corner. We drag the workpiece with a strip of paper, fix it. Gently straighten and form butterfly wings.


For the manufacture of the second type of butterflies, we take colored rectangles and round off the corners. Each rectangle is corrugated along the long side.

Then we put the two rectangles together and drag it with a strip of colored paper (as in the first version), fix it with glue, and form wings.

All corrugated appliqué elements are ready.
Using fantasy and imagination, we assemble a composition on a pre-prepared background, in our case, this is a picture of a forest clearing printed on a printer.


Application- although laborious, but quite a fascinating type of needlework, having mastered simple tricks cutting and corrugating individual components of the image, you can move on to mastering more complex techniques. With the help of voluminous paper application, you can create unusual images.
Every mom and dad try to find an exciting activity for their child that will not only keep him busy for a while, but also have a beneficial effect on the comprehensive development of the baby, make the child improve creative thinking, think, fantasize, learn to concentrate.
Colored paper applications are a great option for your child to have a good time. Older children can do this creative activity on their own, kids from a year old will create their first works together with their parents.

The role of applications in child development
Paper application involves the gradual creation of a picture by gluing elements of various shapes and colors onto a cardboard or paper base. After looking various photos paper applications for children, you will understand what this type of activity is, and what finished work can be obtained at the end of the process.

Paper application technology is quite simple. The child himself, or with the help of parents, a nanny, an educator, must come up with what kind of picture he would like to portray, prepare the tools necessary for creative process, make patterns of elements, alternately cut out small details from paper sheets that will be needed to recreate the intended image and glue them sequentially onto the selected base.


So what is the benefit of doing this?
Application creation process:
- develops perseverance;
- improves fine motor skills;
- allows you to remember and distinguish colors and shapes;
- teaches you to be independent;
- instills accuracy;
- teaches patience;
- generates creativity and creative thinking etc.

The role of applications in the development of the child is undoubtedly great. They contribute to the multifaceted and versatile development of the child.

Here are some simple paper appliqué templates that can be useful for the first lessons and introducing kids to the concept of appliqué.

Application examples
Let's try to make a presentation of some of the easiest paper applications with which you can start the process of learning this business.


Ice cream
To create such an application, you need to prepare:
- cardboard or paper base;
- glue;
- pencil;
- scissors;
- colored paper in various shades.

To begin with, on colored leaves, you need to sketch the main elements of the future picture: separately a cone and separately ice cream balls. After, with the help of scissors, it is necessary to cut out these parts. The next step is to glue small items in strict sequence: first, a horn is attached to the base, then, in turn, popsicle balls.

After the end of the action, the resulting picture can be decorated additional details: cherry, chocolate chips (which also need to be cut out of paper).

With the help of such a simple algorithm of actions, you can make applications different types: and a plate of fruit, and a fish, and a bunny, and a house.

Volume application
This version of the execution is a little more complicated, but the result is worth it. Consider how to make an unusually beautiful bulk flower from paper. To create it, you will need the materials indicated above, the only clarification is that colored paper should be as thin as possible.

From the base it is necessary to cut out the shape of a flower, it can be, for example, a rosebud or a chamomile inflorescence. After, from paper of different colors it is necessary to cut a lot of small pieces and crumple them with your fingers.


Volumetric winter applications made of paper look very beautiful and believable, which will be a wonderful gift for grandparents. new year holidays. On a cardboard base, you can depict a Christmas tree decorated with colorful balls, and with the help of crumpled pieces of white paper, you can recreate a snowfall or set a snowman.


There are a lot of options for applications created from colored paper, so such an activity will not bother the child, every day he will discover something new and interesting, while improving imaginative and creative thinking, quick wit, perseverance, discipline and intelligence.

Photo of paper applications


Now in all schools, in labor lessons and extracurricular activities, such creativity as the creation of applications from colored paper is very popular. This is mainly done by children primary school, they make a variety of paper and cardboard crafts, make up pictures and voluminous toys on the tree
Application is a painstaking work that develops thinking, perseverance and instills a love of kids for all kinds of crafts. While working on the application, the child learns to handle scissors, glue paper and geometric figures.
A child of 3 years old can do the simplest crafts with their parents. For the smallest, the technique of broken appliqué is used. It can be created without the help of scissors. The child tears off small pieces of paper, smears with glue and sticks on dense sheet cardboard, creating a certain picture.
The older the child becomes, the more spatial thinking is developed in him and you can teach him to perform voluminous crafts. To do this, the paper is folded like an accordion, fastened with glue, and then a specific object is formed and glued to a sheet of cardboard.
A more complex type of paper craft is quilling, which consists in twisting thin strips of paper. To create a picture, folded rolls are glued to cardboard or interconnected.
Light and interesting application from toilet paper your baby will like preschool age. To create it, you need a template diagram, toilet paper or paper white napkins, glue and a bright sheet of cardboard.
Toilet paper elephant step by step:
- On cardboard, draw the body of an elephant with a pencil according to the finished template.
- Tear off a small piece of paper, roll it into a ball, spread it with glue and stick it on the elephant's body. So fill in the whole drawing.
- From white paper, cut out the trunk, head and legs. Glue them in place.
- Eyes can be drawn, can be made from pieces of black paper.
You will get an original three-dimensional picture, which can be supplemented at your discretion - with a tree or grass.
Simple cardboard applications for kids 3-5 years old
If you have nothing to do on a rainy day, try to instill in your child a love of needlework. Start with the simplest applications, such as a kitten. But be prepared that you will have to cut out all the details, and allow the baby to glue.

One of the simple cardboard applications is a cut-out postcard. You can make a greeting card for March 8 or for New Year. Moms and dads will remember the labor lesson at school, and it will be interesting for kids to work together with their parents.
The technology for working on a postcard is very simple:
- You will need a piece of cardboard a set of colored paper.
- Fold the cardboard in half.
- Having decided on the pattern, cut out the necessary details. For example, for a snowman - circles of white or blue color, for a flower - oval petals.
- Parents show, and the child uses glue to attach the blanks to the postcard.
In addition to the usual applications, various funny figures can be made from cardboard.
How to entertain a child: paper applique for grade 1 with templates
When dealing with a child before school, parents should teach the baby how to handle paper. Children in kindergarten try to make the simplest crafts. Preschoolers work with applications more difficult - it is in their power to make a small picture.
In modern stores, you can find self-adhesive applications that can be stuck on a notebook or decorate a locker at school.
In grade 1, children in a labor lesson use the simplest geometric shapes to create applications - a square, a circle, an oval, a triangle. If the baby does not know how to work with a ruler, you can use stencils. Children cut out figures according to the template and stick them on cardboard.

First-graders can make light applications:
- Animals - dog, kitten, squirrel, zebra and mouse;
- Birds - owl, swallow, chicken;
- Fairy tale - bun, mermaid, hut;
- Nature - the sun, the cloud, the tree.
All these applications will consist of the simplest elements, the head is a circle, the ears are a triangle. Using ordinary PVA glue, they are attached to the base and a simple muzzle of an animal or bird is obtained.
How to make a black and yellow bee:
- From yellow and black paper, cut out 2 circles with a diameter of 4 cm.
- From red paper cut out two identical wings in the shape of a heart, from yellow paper - two wings a little smaller.
- Their black paper to make antennae-stripes.
- Lay black-yellow-black-yellow circles alternately on blue cardboard.
- Lay out the antennae of the bee from the last yellow one.
- Place the wings on the sides bigger size, then stick smaller wings on them.
- Eyes can be drawn or cut out of green paper.
- Glue all the details to the cardboard - the bee is ready!
Developing thinking: paper applique for grade 2 with templates
Having learned how to make elementary crafts from paper and cardboard, having got acquainted with the technique of creating the simplest applications, children begin to study a new creativity - voluminous applications. Having mastered the skills, children will be able to make beautiful postcards mothers and grandmothers on March 8, dad - crafts on February 23 or birthday.

To create the application "Flowers in a vase" you will need:
- Cardboard sheet;
- Colored paper - white, yellow, green, blue;
- Glue stick;
- Pencil;
- Scissors.
Having prepared materials and tools, you can start needlework.
- Make blanks for the application - two squares of white paper 5x5 cm, a yellow circle with a diameter of 4 cm. For a bouquet of 5 daffodils, you need to cut 10 squares and 5 circles according to the template.
- With a simple pencil, draw stripes dividing the square in half - horizontally and vertically.
- On each side of the square, make cuts along the lines, not reaching the middle of about 0.5 cm. You should get a square divided into 4 quadrangles.
- Each square needs to be twisted - put a pencil on the diagonal of the square and wrap the corners on it.
- Similarly, make all 10 large squares.
- Make 5 yellow circles according to the template - the basis for the middle of the flower. Screw the circle folded in half onto the handle, remove and fasten with glue.
- To make a flower, you need to put together two blanks of petals and insert a yellow core. If everything is done correctly, you will get a beautiful daffodil of 8 petals.
- From green paper cut into thin strips - the future leaves of the flower. Bend a little along, give shape.
- According to a pre-prepared template, you need to cut a vase. It can be made blue. You can decorate a vase with an arbitrary ornament cut out of paper of a lighter color.
- On an A4 cardboard sheet, first stick a vase so that its bottom coincides with the bottom of the paper. The application is placed vertically.
- Then stick the leaves of daffodils in a chaotic manner, after which you can begin to form a bouquet. Glue the flowers so that they are in the center of the entire application.
Glue all parts well so that after drying they hold firmly. The finished picture can be decorated with a piping of small figures or beads.
Volumetric application for grade 3 with templates
Third grade students can do more complex and laborious work done using the quilling technique or interesting volumetric crafts. Teachers often wonder what kind of paper work to come up with for children so that they are interested.

In the 3rd grade, girls are still playing with dolls, so it will be interesting for them to make voluminous furniture for a dollhouse. The boys can make an airplane, a racing car. On the website of the Country of Masters you can find a sample of three-dimensional paper crafts for every taste - templates for origami, quilling patterns. Schemes and templates can be printed out and performed with the children in the classroom or given homework.
If you run out of ideas, you can always ask the guys what they would like to do in the lesson.
Children's quilling applications are very popular among schoolchildren. This is not only a unique gift, but also a beautiful decoration.
How to make paper applications for children (video)
Paper applications are a great reason to keep children busy for a certain amount of time. This type of creativity can be engaged in even the smallest children - from 3 years old and schoolchildren primary school. Armed with imagination and a craft kit, kids can create incredible paintings and impress their loved ones with their accomplishments.