Crafts in the kindergarten on the theme of Easter chimes. Children's Easter crafts. Crochet egg tying patterns
Good morning everyone! Just a little more and another one will come Orthodox holiday, which will be celebrated by all residents of Russia, and not only. It's about about Easter, namely, what crafts can be done with preschool and school age to this day.
You can make such wonderful souvenirs and creations with your children right at home, because all you need is your desire and desire. Therefore, I propose to think about this topic right now and choose what you want to do, and then give it to someone or just decorate your home.

If you want to find a more complex little thing, then you might like this option from salt dough.

I also like compositions so that there are a lot of toys and it is bright and eye-catching.

Master class on making Eggs from foamiran
Are you familiar with this fabric material? I think yes, how cool he is, just like the felt, I'm in love with him. I propose to make such a craft in the form of a fridge magnet. You can, in principle, hang it on a string, like a pendant.
We will need:
- foam egg - 1 pc.
- scissors
- cutter
- foamiran (1 mm) 2 colors - yellow and white
- magnet
- glue gun
- factory eyes

Stages of work:
1. Take a hair dryer and heat the fabric, and you need to do this quickly, and stretch over the egg.

2. They pulled it on like this, and then they put a hair dryer on, held it for 11 seconds and that’s it, turned it off, waited until the fabric cooled down.

3. These are the blanks you get.

4. Now, using a cutter or a clerical knife, cut the stencil into half.

5. First put the egg in yellow foamiran.

6. And then in white, cut off the excess fabric.

7. Then cut the white one in half, you can imitate cracks as if, cut in a zigzag, there are also such special wavy scissors.

8. Then prepare the eyes, make your own paws, beak.

9. Well, now the most important thing is the assembly. Glue the yellow template carefully first.

10. Then proceed to white.

11. After that, start shaping the legs, eyes and mouth, glue the parts with a glue gun.

12. What a wonderful baby turned out, wee-wee-wee.

13. On the other hand, glue a magnet, you can take a vinyl one.

14. It turned out two young weirdos, you can make a boy and a girl, and pin more bows or other patterns to your taste.

As an option, you can do something else, for example, such a charm in the form of a flower with a handle.

Original crafts for Easter for a school competition
Any student approaches this issue quite responsibly and he really wants his work to become the best. You can come up with a whole host of options. But, of course, it would be better if you make Easter symbols. For example, here are such funny chickens that are made from ordinary woolen knitting threads.
You can take this step-by-step instruction as a basis.

You can use another option. In any case, the result should please you. Here they even made a mother-hen, and plus a plate-shaped stand was woven from the same threads.

You can also make pysanky from threads, are you surprised? But I'm not, after watching this video and you will learn how to craft.
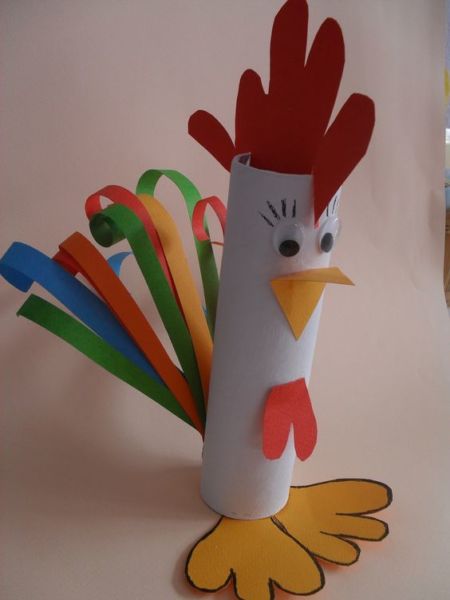
For kids elementary school you can make a mischievous cockerel, which is made of a paper cylinder.
Or I'm still hooked genious idea, make chicks out of what they say was. And I had cases from Kinder Surprise. Here is such a funny family turned yellow))).


You can also make such a little thing in the form of chicks from cardboard and thread.

And if you want to make a splash on everyone, then make a product out of gypsum. I think that the commission and the jury will definitely mark such a cool souvenir and thank you with a gift.

There are also thoughts of souvenirs and gifts made of beads, but I will also say a lot of work and skill, I remember I was fond of this occupation as a child, now there are not enough hands to sit down. But just for you I found easy way weaving, or rather, it will be just for beginners, you just have to put beads or beads on a thread, and then stick them on the surface of the egg.
Of course, this will make things a lot easier for you. After all, you can also weave, but for this you need to understand the schemes and all the symbols. And here, any beginner can handle it, so catch it.

Take the main thing good glue, for example PVA, and one more thought, you can not put on a thread, but simply glue each bead separately, but this is more difficult.

As for the patterns themselves, if you are a master and know how to weave, then I propose to make such a grid.

It turns out just great, class!

Or do you like the mosaic technique? I have the schematic from her.

And how do you like this work, wow, breathtaking.

And if you still have any questions, then it’s better to take this model and do the work with this author of this master class.
Of course, if you are fond of needlework or knitting, then you can also make a souvenir, for example, this one. If you need a diagram, then I will gladly send it to you, it is taken from one magazine. What all the same cute and cheerful little bunnies came out, or Easter cakes for needles.

But, by the way, you can also make knitted lilies of the valley, because it already smells like spring!

If you are good at drawing, then paint a picture.

Or with the help of glue and cardboard, as well as all kinds of cereals, such an Easter masterpiece.

And here's another such thought for you, if you have multi-colored pasta lying around in your house, then you can also make such work out of them. What a charm, isn't it?!

How to make paper Easter gifts quickly and easily
In my opinion, it is these works that are most popular, because it is precisely such materials that everyone has in the house. The first thing that comes to my mind is egg cups. And what, they drew, cut out, then they gave it to the kids to paint and another children's miracle masterpiece is ready.


Make yourself such freaks, cut out and color the details, whoever needs the templates, ask, I will send it by e-mail for free. Not really funny animals.


Well, as always, you can’t do without my favorite protrusions. It's just a custom or a tradition. See what Easter bunnies can come out and decorate them too satin ribbons who needs a template, write at the bottom of the article, I will send it for free.

In general, it will be cool and cute.

You can also take any sheet, fold it and glue a cone out of it and you get something that looks like a bird.

With our smallest representatives kindergarten I suggest making a paper craft using a base in the form of circles.

And those who are older will like the hatched chick.

Good work in the form of an application, you can do this in a labor lesson with elementary school students.


You can, of course, combine two types of activity - Art and Technology.

By the way, you can just take ordinary colored pencils and do this, I also have a template for this stand in my piggy bank, so write to anyone who needs it.


You can make a product in a very original way without using glue, and instead take a stapler and fasten the parts, see what happens.

And how do you like this idea of \u200b\u200ba stand, it looks really cool, but can you imagine with what pleasure your children will make it.

I can also offer to print such a blank template.


Or this black and white version on your printer.

An excellent option would be a souvenir on a stick.


Or here is such a green meadow with birds.

I also took a closer look at such a simple idea as a fridge magnet, which can be decorated with rhinestones or scrapbooking materials.

Well, in conclusion, I would like to show the stages of the work of volumetric crafts.

Step-by-step instructions for creating crafts from cotton pads and sticks for Easter for children
We will probably begin to create right away a small and very charming little yellow little rascal, called Chick. We need a bunch of cotton buds, or rather their tips. The part you will need to paint in yellow by dipping in gouache, and leave some white. Make this craft, that is, the base of plasticine, and then just stick the sticks into it.
Important! You can draw eyes yourself or find a picture and print it out on a printer.

For your next job, you will need your good mood and of course materials.
We will need:
- cotton pad
- disposable spoon
- colored paper
- felt-tip pen
Stages of work:
1. First of all, make blanks, that is, cut out the beak and scallop from colored paper. This photo shows everything.

2. Next, draw the wings and then glue them onto a cotton pad. Put a spoon in the center and cover with a second cotton pad. Draw a muzzle and voila, such a charm can sit in your pot with your favorite flowers and crow).
What else can you do? I had ice cream sticks lying around, so I connected them together and glued the eyes and beak, it turned out to be a wonderful animal. By the way, don't forget about the paws.

Probably the easiest option would be such a product, which can also be made with a child of any age, you need to paint the discs with gouache or watercolors, and then build such beauty.

You can arrange it in the form of an application, and using cereals, it also looks great, and it resembles a picture of a bird pecking at grains.

In general, choose according to your taste and color, and do not forget to write your reviews and wishes.


See what a baby chicken turned out, though white.

You can make a picture, together in willows and also from cotton pads. Does it really look great? Yes, and unusual and beautiful!

Beautiful crafts for Holy Sunday for kindergarten
Of course, for preschoolers, ideas of what is easier are needed. so that the kids themselves can cope with the task and can amaze everyone.
What could be easier and faster if you teach them such a funny toy-fun, they also call it a walker. Once, by the way, we did, remember? When it came to puppet theater, I gave you ready-made templates.


Ha, and when I saw this face, I generally blossomed, I never cease to be surprised that so many crafts have been invented from the usual hand of our kids, well, you just can’t count them.

You can, together with the guys preparatory or senior group engage in visual activities and make just such a chicken (cockerel), which will have multi-colored wings.

And for the children of the second youngest and middle group, here is such a simple masterpiece. Just for one thing, you can repeat what kind of bird this is, and where her eyes and other parts of her body are.

Or here is such a funny design from the baby's legs and paints.

You can also make an application on ordinary paper plates.

Here is another unusual pencil case.

You can even make it using the origami technique, although you only have to fold the sheet once. For young talents, that's it.
And finally, such a type of work as felting or dipping anything, such as sponges for washing dishes or soft balls. And you can do it with a regular clothespin. It looks bright and stylish, just beautiful and original.
I also liked the idea of a fun family that you can make collectively with your children.

By the way, you can combine paper products with threads, or use cereals instead of threads.

I was also captivated by this work, so simple and at the same time original.

And I propose to make such a charm a common or joint work at school or kindergarten.

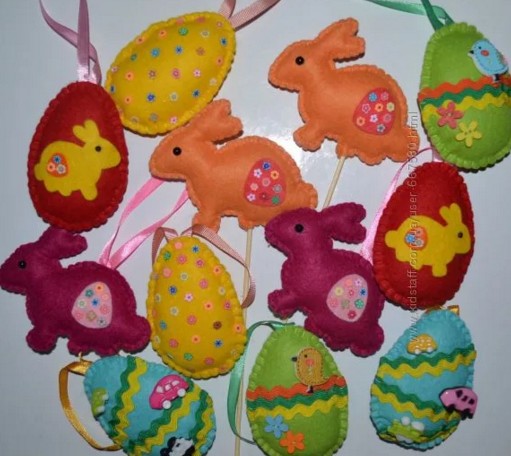
Easter crafts from felt
Generally felt toys began to be in demand not only among children, but also among adults, because it is always easier to sew such a present than to take any other material, felt in this regard is an unpretentious material that is easy to work with because it does not crumble. And patterns are obtained even for beginners.
On this topic, I had a separate one, from it, if you are fond of this kind of activity, you will find a lot of useful things, I'm sure it will come in handy for you.
In this note, I will show you the finished products. How do you like this family?

But, nevertheless, I want to show one master class that may be useful to you someday.
We will need:
- scissors
- needle and thread
- buttons and rhinestones
- cotton wool or synthetic winterizer
- lace
- vinyl magnet

Stages of work:
1. Draw a sample egg, or you can print it on a printer.

2. Then attach the stencil to the felt and outline with a pencil. Cut out the resulting parts with scissors, you need to make two eggs.

3. Then take and cut the template into three parts, as shown in this picture.

4. Attach the middle to the green felt and circle, and then cut it out.

5. Sew this green decoration onto the egg.

6. Sew on and decorate, you can say decorate with lace or some other decor. It already looks amazing.

7. Then draw letters with a pencil and embroider the inscription, you can probably guess which one, of course, XB.

8. Then sew on buttons, sequins, or you can take beads for scrapbooking, in general, what you have.

9. Walk the edges with a seam, but you can still lay a synthetic winterizer or cotton wool inside, and then proceed to the next step.

10. Take Moment glue and stick a vinyl magnet, such a gift will be for you or your friends on the refrigerator.

You can of course do it on sticks.

And also in the form of a pendant or keychain.
In general, such beauty will not leave anyone indifferent, that's for sure.

Master class from improvised means Easter tree at home
I want to tell you right away that you can do such a craft pretty quickly if you use this step-by-step instruction.

In fact, the work will be quite creative and your children will not resist this business either.
Do not forget to wash the eggs well with water and soda. For 1 liter of water, take 2 tablespoons of baking soda.

Use a toothpick for piercing and acrylic paint for coloring.


Prepare everything you need for work:

Then put the napkin in front of you and twist it into a tourniquet in this way. Fasten the middle with threads.

And then turn the product over to the opposite side.

And voila, crumple in half.

A couple more strokes, hand movements:

And you will see a beast resembling a bunny.

Give him eyes and a ponytail.


And needlewomen can still quite sew carrots.

Video on how to make an egg from pasta for a contest
I'll tell you honestly, I was shocked when I saw this awesome video, can you imagine it's really true, such a miracle, well, just fly away from ordinary noodles. Cool! Share this information on social networks, just click on the button at the bottom of this article.
Well, in conclusion, I already wanted to say goodbye to you, I came across such a masterpiece, which is made of papier-mâché, this design hooked me very much, I show it to you.

Still, sometimes you wonder how almost nothing comes out of it.

Do-it-yourself paper and sisal egg stand
A very wonderful and cute little thing will turn out if you use this MK, which is presented in pictures that contain a description and sequence of actions.


That's it for me, I'm ending this post. See you in the next articles. Write reviews, comment, visit more often, you will find a lot of interesting and completely new things that you don’t even know about. Goodbye everybody!
Sincerely, Ekaterina Mantsurova
This review article of "Cross" is dedicated to everyone who loves Easter and wants to prepare for it in advance. Behind last years we have written and published over 20 DIY Easter craft tutorials. To make it easier for you to navigate in all the variety of ideas and choose those crafts that you want to do for Easter this year, we offer you a list of all our Easter articles and master classes.
You need to start, of course, with the largest and most complete article about, in which there are about 64 great ideas! Here you will also learn about the history of the holiday, as well as how to make Easter eggs (we analyze in detail all the existing blanks for creating decorative eggs) and rabbits, baskets and candles, napkins and postcards for Easter. The article includes photo and video tutorials, as well as many photos with ready-made crafts that will inspire your creativity. 
Perhaps, after viewing the above article, you will already decide on the choice of crafts. But do not rush, and suddenly new master classes will inspire you even more!))
Easter egg decoration
Let's start with handmade Easter eggs. The easiest way to decorate an egg is decoupage. You can decoupage on boiled eggs and bless them in the church, you can use empty eggshells or wooden blanks. The choice depends on whether you want to keep the souvenirs you made or just decorate the eggs directly for the festive table. The article Decoupage an Easter egg with your own hands will answer all your questions regarding this technique.

The next way to decorate an egg is also quite simple. You can take any egg-shaped blank as a basis (even wooden, even plastic, even foam), but the author offers his own unique way to create a blank - from polyurethane foam!

The next master class combines both decoupage and gluing the workpiece with a decorative cord, but the result is very different from the previous ones! See for yourself by looking at MK Easter egg decorated with napkins and jute.


One of the most difficult ways is braiding an Easter egg with beads. But he is also one of the most beautiful, your efforts will not be in vain!

And since we are talking about Easter eggs, it is worth paying attention to another very interesting idea - an Easter wreath on the door, made of eggshell and natural materials. They can decorate front door or any other door in the house, or you can just hang it in the kitchen, for example, next to the festive table.

Easter Bunnies
It has become customary that rabbits, along with eggs, are also considered Easter souvenirs. There are also many techniques for making Easter bunnies. In the article Easter bunnies that bring good luck! you will learn where the tradition of making rabbits for Easter came from, and also watch the workshops on creating rabbits in different techniques needlework.


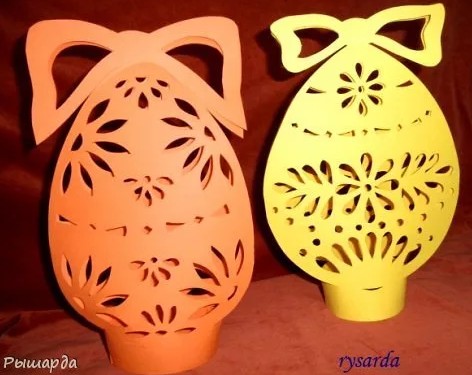
Easter vytynanki and silhouette carving for the Easter holiday


For those who crochet, master class Easter egg cover in the form of a chicken.

We give a second life to the most ordinary things🙂 here.

Nest with polymer clay Easter eggs - this craft will take a little more time, but it's worth it! The magnet will take its rightful place on the refrigerator, it turns out very nice)

And the most original, most unpredictable souvenir that you can make for Easter is Easter egg jelly soap. Not everyone will definitely do this, so your souvenir will definitely stand out from many others!

Crafts AFTER Easter (Eggshell Crafts)
Yes, yes, I was not mistaken in the title) It is after the Easter holiday, when eggshells accumulate in abundance in every house, you can also get creative! very original (photo and video master classes can be found at the link).


Here's the one I got Easter guide according to articles and master classes of the Cross. I really hope that you find what you were looking for or something that inspires you to create. Happy Easter to you!
What crafts can be done for Easter with children?
- The bright holiday of Easter is eagerly awaited not only by adults, but also by children.
- For kids, Easter is a special time of fun and joy. But most of all, children look forward to receiving symbolic gift and handing out pre-prepared crafts.
- This article has collected step by step descriptions children's Easter crafts of different levels of complexity.
- Prepare your own Easter souvenir from improvised materials a few days before the holiday or a couple of hours - you choose. Get inspired and get creative with your kids.
DIY crafts for Easter from napkins
You can quickly make an Easter craft from napkins. You just need to wrap a boiled egg with a napkin and tie a beautiful ribbon. You can replace napkins with corrugated paper.
Another way to make crafts from napkins:
- Prepare a drawing on which a layer of napkins will be applied.
- Decide on the colors and pick up the napkins of the right shades.
- Cut a lot of squares from 2x2 cm napkins.
Crumple each square into a small ball. - Stick balls of napkins inside the drawn contours.
- You can make a postcard with a spread or cut a figure along the contour.

An Easter composition would be incomplete without an egg stand. It is possible to make it from napkins:
- add up paper napkin diagonally


- bend the corners of the formed triangle up, connecting them with the upper corner

- we twist the bottom edge of the resulting square with a roller approximately to the midline

We roll half of the formed square with a roller
- turn the structure over and connect the lower corners under the roller

- fasten them with a staple
- turn the future basket over again (the paperclip should be at the back) and straighten the ends of the workpiece

Options for crafts from napkins:


Video: Do-it-yourself chicken, cockerel from napkins. Master Class
Video: Easter bunnies from napkins
DIY crafts for Easter from pasta
Pasta is also used in the manufacture various crafts. We offer you several lightweight options for creating an Easter souvenir from pasta.
Method one: the original Easter egg
Let's cook necessary materials and tools:
- wooden or styrofoam eggs
- glue (it is better to take PVA, then there will be no traces of glue on the finished craft
- tassel
- bright colors
- stand on which ready product will dry
- pasta in the form of small stars
- dry glitter
Let's start creating!

- Let's apply a layer of glue evenly on the blank of the future Easter egg and start gluing pasta stars in even rows (but only raw ones!).


- If desired, you can use small pasta of various shapes, as well as glue them on the workpiece in any order.
- Leave the egg for a while so that the glue dries well.
- We check if the glue has dried up and, if all the stars hold well on the Easter egg blank, cover the product with paint. We use a brush for this.

- To decorate the egg with sparkles, smear the desired place with glue, and sprinkle with dry sparkles. After the glue dries, shake off excess glitter.

- These bright souvenir eggs you can make with your child and decorate the room for Easter by putting crafts in a basket.

You can make angels from pasta of various shapes.
For crafts you will need the following pasta:
- asterisks
- horns
- spirals
- vermicelli
A self-made angel can be placed next to Easter eggs, placed in a basket or placed next to willow branches.
We will need:
- pasta
- sticks
- glue (Moment or a thermal gun will do)
- PVA glue
- pre-prepared salt dough balls or store-bought styrofoam or wooden round blanks
How to make a pasta angel:
- We glue the pasta in the form of a wheel to a thick tube.
- We apply glue to a ball of salt dough or a foam blank and connect it to the body.
We glue a small ribbon on the back.


- We select the pasta for the wings that is suitable in shape and size (we have pasta-bows) and stick it on top of the ribbon.

- We use small vermicelli for the hair of an angel: we smear his head with PVA glue and immerse it in a bowl with vermicelli or lay it out in even rows.
- Macaroni-horns are used for pens. We glue them near the wings.


- We just have to cover the angel with paint. You can use golden paint, white or silver.

- Why do you need a wand? To glue it inside the body of an angel and place it in an Easter basket.


Video: Crafts for Easter from pasta
Video: Pasta basket. Pasta products. creative work
DIY crafts for Easter from cotton pads
Without the image of a chicken, an angel, it is difficult to imagine the Easter holiday. Let's try to make something interesting simple craft- a bright and cute chicken that can become an element of the decor of the Easter basket or decorate the room during the holiday.
For work you will need:
- cotton pads
- yellow egg dye
- colored paper or cardboard sheets of the desired color
- scissors
- chenille wire
Let's get to work:
- Dilute the paint with water and dip cotton pads into the solution. For one chicken, you will need two yellow-colored disks. We leave them to dry.
- From chenille wire suitable color let's make paws.

- Cut out a comb from red paper or orange color, wings and beak.
- We place the parts cut out of colored paper between two cotton pads and glue them.
- For the chicken eye, you can use toy blanks or cut out of paper and draw a black pupil. Glue eyes on both sides.

You can make angels from cotton pads that will complement any interior.
How to make an angel out of cotton pads?
- We divide the cotton pad into two parts.
- We put the bead in the center of one of the parts of the cotton pad.
We process the edges of the cotton pad with zigzag scissors for a more aesthetic appearance of the product.

Tie a button with thread
- We bend a disk with a bead inside in a circle and wind the thread under the bead. We straighten the resulting "skirt" from a cotton pad.
- Fold the second part in half. We wrap the edges of the workpiece at the same distance from the center. After that, wrap the edges to the center.

Making the wings and body
- Having dipped a toothpick in glue, unfold a slightly twisted cotton bud and paste it inside.
Glue the wings to the body.

We connect the parts with glue and apply shiny paint dots on the wings
- It remains only to apply a halo stripe on the head and dots on the wings of glitter paint and the delicate angel is ready!

Other options for crafts from cotton pads:

Easter crafts from cotton pads


What do-it-yourself Easter crafts to do quickly?
In this section you will find descriptions of Easter crafts that can be done in 15 minutes:


paper chicken
For work you will need:
- paper plates or cardboard
- paints
- colored paper

- Cut out a circle from a paper plate.
- Fold the circle in half
- Cut out wings, eyes, crest and beak from colored paper
- Glue to the plate


Easter egg stand:
This craft can be done with children in kindergarten.
For work you will need:
- white and green colored paper
- white yarn pompom
- scissors, pencil, glue
- pink marker
- shell or wooden egg

- To make an egg stand, we will transfer the outlines of a rabbit onto paper: this is a figurine with ears, paws and a strip for attaching around the egg. Color the middle of the ears in pink.

- The length of the strip should be such that the egg is on a stand, which will be obtained after gluing the wide strips of the workpiece. Let's cut it out.
- Draw a strip of grass on green paper and cut it out. With this strip we will paste over the white strip-stand.
- Bend the hind legs forward. Glue on the pom-pom tail.

- We put the egg on the stand and glue the front paws together.
- The craft is ready. If you wish, you can finish the muzzle of the rabbit, and draw a few flowers on the grass.

Other options for making an Easter egg stand


Easter themed postcard
- A greeting card can be made from a sheet of cardboard. Draw or cut out of colored paper, felt a chicken, a rabbit, an Easter egg. You can decorate the postcard with lace, appliqué, pieces of felt, buttons.
- If you are not interested in making a regular application, then create a voluminous one at the place of the paper fold. You can make movable joints, or make a chicken peeking out of an eggshell. To do this, cut out the top of the shell from thick cardboard and fasten it on one side of the postcard.
- A postcard that you or your child made with your own hands will bring special warm emotions to the one who receives it as a gift.


Salt dough crafts for Easter
We propose to make simple but beautiful Easter crafts from salt dough.
For work you will need:
- salty dough
- glass of water
- several different brushes
- stack
- paints (preferably gouache)
- rolling pin
- plungers or suitable baby molds
- a raw egg
Let's get to work!

- First you need to blow out the contents of the egg by making holes at opposite ends.
- Let's make long sausages from salt dough and roll them out with a rolling pin into flat ribbons.

- Take one ribbon and wrap it around the egg. We take the tape again and glue it until half of the egg is hidden under a layer of dough.
- We sculpt an egg stand, using a juice cap or a plastic bottle, and put a wooden egg on it.


- Using molds or a plunger, we prepare flowers for decoration and, having moistened with water the place where each flower will be attached, we put the cut-out decor blanks.
We supplement the composition with leaves cut from salt dough.

Cut out flowers for decoration. We use plugers or children's molds for this.
- Inside the egg there will be a bird, a chicken or a candle, which also needs to be molded from the dough.

- Dry the product. To make the drying process faster, place the product in the oven and dry over low heat with the door open for 2 hours. Then leave with the door closed until cool and repeat until the product is dry enough.


- Remove the egg shell from the dried product.
Inside the craft we place the previously prepared figure from salt dough.

- We decorate the craft, decorate it with beads or beads, varnish it. Salt Dough Easter Chicken
For work you will need:
- ready-made salt dough
- paints
- tassel
We make a cake from salt dough - the base of the nest.
- We will make the walls of the nest with the effect of weaving by passing the salt dough through a garlic press. Lay out the resulting strips around the perimeter of the nest.

Cooking a cake - the base of the nest

- Let's start making the body of the chicken. We blind the cake again and stretch the edges up to make a neck. We stick a match inside the neck, so that later we can fix the head on it.

- The hen's head is spherical. Add black pepper eyes, make a comb and a beak.

- Attach the head to the body. We put the chicken in the nest. We dry the structure.


- We make wings and attach them to the body of the chicken.
We make a tail and also attach it to the body, beautifully straightening the edges.


Easter Egg for a chicken, you can blind yourself. To do this, you need a Kinder Surprise egg. It just needs to be wrapped salt dough and dry. After that, we apply a layer of paint and an inscription. We cover the entire craft and the egg with varnish.
Another way to make an Easter egg stand:


Crafts for Easter from felt do it yourself
What can be done from felt for Easter with children - watch the video.
Video: Felt Chicken. Detailed master class
Video: Easter egg made of felt
Video: DIY Easter baskets made of felt
DIY crafts for Easter from corrugated paper and cardboard: schemes


Easter paper hen


Video: DIY Easter crafts from corrugated paper
Crafts from foamiran for Easter: templates


Templates for flowers from foamiran
Fabric crafts for Easter: schemes
Textile Easter chicken bags:
- These chickens will decorate festive table or become a bright element of the decor of the kitchen interior. Such a chicken can be presented as a souvenir for Easter to relatives and friends.
- A real or decorative egg is placed in a hen-handbag and the hen becomes the keeper of Easter eggs. In addition, the needlewoman always has a lot of colorful shreds of the remaining fabric, which are a pity to throw away.
- A great way to use them is to sew original souvenirs.
For work you will need:
- shreds of fabric
- floss threads
- scissors
- needle and thread for stitching
- ruler
- pattern
The entire manufacturing process is shown in the photo.


 Tilda bird
A cute textile bird made on the principle of a tilde doll will become a cozy craft for Easter. Such a bright gift can be given to relatives or friends.
For work you will need:
- pieces of cotton, one or different colors
- a piece of dark fabric for the beak
- filler (synthetic winterizer, holofiber)
- 3 buttons
- ribbons and lace
- acrylic paint
- threads
- needle
- scissors
- piece of chalk or soap for pattern
- wooden stick
- sewing machine (if any)

How to sew a tilde bird
- We draw and cut out a pattern from paper: body, wings (if you wish, you can make a bird without wings), beak.
 We immediately fix the beak between the two parts of the bird, sew it, leaving room for turning the workpiece. By the same principle, you can sew Easter bunnies and chickens. You will need templates for making patterns:


Easter egg hat with bunny ears

And here's how you can sew a bright souvenir - an Easter egg.
For work you will need:
- shreds of fabrics (you can take chintz, cotton, linen with ornaments and patterns)
- pattern (its size can be changed depending on which egg you want to sew: in life size, small - for a needle bed, a little more or very large, which will then be used as a sofa cushion)
Draw a pattern on paper and cut it out.
- We apply the pattern to the fabric on the wrong side, circle with a pencil or chalk. Cut out, transferring the points from the pattern to the fabric at the same time.
- We fold the two parts right side inward point to point and sew.
- Repeat with the second pair of flaps.
- We fold the two halves of the workpiece side by side, and turn one of them on the front side. We put the turned part inside the other part.
- We connect the parts with pins. The main thing here is that the edges do not go beyond each other. Sew together, leaving an opening for turning.
- Turning out an Easter craft.
- We give volume to the Easter craft by stuffing it with padding polyester.
- Close the left hole with a hidden seam.


We turn inside out


Crafts for Easter from kinder eggs
What crafts can be done for Easter from kinder eggs you will learn by watching the video.
Video: Making a chicken from a container from Kinder Surprise
Video: How to make an Easter chicken: do-it-yourself Easter crafts
Crafts for Easter from ribbons with your own hands
How to make Easter souvenirs from ribbons? The video below reveals the secrets of creating original Easter eggs.
Video: Easter eggs from satin ribbons
Video: Artichoke Easter souvenir
Crafts from plasticine for Easter
The video tutorial will tell you how to make an Easter bunny from plasticine.
Video: DIY Easter crafts
From the video you will learn what plasticine crafts you can do with children to decorate the house for Easter.
Video: Three super cool crafts for Easter with kids
DIY Easter crafts for the competition
The videos below will inspire you to create an original Easter craft for the competition.
Video: Easter composition - Nest with a bird. Master Class
Video: DIY Easter decor
I always associate Easter with the sun and light. With pleasure she painted testicles and made applications for her relatives. I liked to walk down the street and shout "Christ is Risen!".
Growing up, I began to understand what it is for me family celebration when there is peace and tranquility in the soul. The approach of spring and warmth is already felt, and a strong feeling is formed that something magical is about to happen.
The child also wants to instill respect for this holiday, and one of the stages of such education is to make crafts.
As we know that the symbols of Easter - the egg, the chicken - the meanings are symbolic and imply Life. In the Christian holiday there was no Easter Bunny. He came from Western traditions, but it's interesting to make him too.
With kids, it will be very easy to make paper crafts. She easily takes any form, so it will be interesting for the baby to work with her.
There are a lot of paper and cardboard ideas, so let's start with cute hare and chicken figures.

You can draw any shapes, or just a testicle, to which add eyes and a mouth.

We divide half of the figure with a horizontal line.

And from it at a distance of 1 cm we draw parallel lines.

Carefully start cutting. You also need to cut five strips of a different color 1 centimeter wide.

One edge of the strips of a different color must be glued. Tape or glue will work for this. If you have tape, then wrap it on the wrong side.

Thread the strips, alternating them with the main ones. Get the weaving technique.

All stripes should be the same width, then the result will look neater.
And here is another idea of cute testicles, which are made in pockets for pets.

Paper stand in the shape of a laying hen. Very bright and themed piece.

Here, according to this template, you can cut out the laying hen and glue the stand itself.

An interesting version of the stand from the egg tray and cardboard chicken.

All with the same paper tray, you can make another version of the coasters.

The tray must be cut so that there is one separator and one place for the egg. In front of the separator, remove all unnecessary paper and backing.

Let's paint the workpiece in White color and glue the eyes, beak and scallop.

The diagram is shown below.

We cut out according to the template, bend all the allowances and side parts so that the basket can take a semicircular shape.

We glue the allowances and front sides pens.

For those who make postcards, I found such a cute chick. I could not pass by him, by the way, made in the scrapbooking technique. It was necessary to think of making button eyes like that.

For the next application, we will take a lot of multi-colored stripes and two sheets of cardboard. One will be the basis on which we will stick all the strips in order one under the other.
And in another sheet of cardboard, we will cut an oval in the shape of an egg and glue it on top of the workpiece.

From cardboard, we can also create such wonderful coasters in the form of bunnies. From cardboard cut out a strip 8 centimeters wide. We form a circle, having previously measured it in the widest part of the egg. And glue the sides with hot glue or connect with a stapler. Then we measure the bottom and glue it from below. It remains only to add ears and eyes.

A cute present again in the shape of an eggshell can be made in five minutes.

Use this template, which you can immediately send to print.

And any child will be delighted with a themed garland. Look how rosy and festive she looks, I immediately wanted to smile and start creating.

And here are the silhouettes of bunnies for cutting.

Make more preparations. Paper is better to take double-sided and thick.

We glue the tail, it can be made from cotton or strands and connect all the silhouettes.

You can create a funny and very simple congratulation on this bright holiday in the form of a postcard.

And a funny wreath for you to inspire. For him, you need to find tapes, disposable plate and many different backgrounds printed on paper.

To cut identical ovals, you will need a form. These helpers are sold in craft stores or the cookie department.

On the glue, laying on top of each other, begin to form egg rows.

Paper ideas always exist great amount. As you can see, all crafts are created very quickly, and they are easy to dispose of if you do not want to keep them as a keepsake.
Easter crafts from felt
Chickens, baskets and testicles are made from felt.
I liked the idea when the fabric is shaped like an egg and decorated beautifully. Of these, you can fold a wreath or hang it on willows, thus making an Easter tree.

Attach loops or string to the blanks so that you can decorate willow or curtains with them.

The shape of the egg is very simple, but at the same time gives a lot of scope to the imagination.

See how the craftswoman came up with how to put blanks on skewers. So it is more convenient to hold them, and you can still stick them in the ground with flowers or put them in a vase.

In felt, it is important to seal the edges well so that the inner filling in the form of cotton wool or padding polyester does not climb out through the seams, otherwise the present will not look neat.

Felt comes in different thicknesses. Do not buy too thick, on such a testicle it will look rough and awkward. It is optimal to choose a thickness of 1.5 millimeters.
Crochet egg patterns
Incredible beautiful crafts obtained when the egg is crocheted. A delicate openwork composition on the table will immediately attract the attention of guests, and delight you with its beauty.
For inspiration, here are a few knitting patterns so that you can start preparing now.

You can simply alternate double crochets of different colors or use one of the patterns below.

Here are three more knitting patterns. They are immediately shown how they will look on the egg.

And this is what an egg looks like, tied with single crochet or “rubber band”. It also looks very cool.

We do not take a real egg, it is too fragile for needlework. Let's use balloon, inflating it to about the same size as the testicle.
Easter crafts from plastic bottles to school
A very cute and functional idea that any schoolchild will make. Make a storage container.
It is not a shame to show such a craft at school and it is convenient to use it in everyday life. You can store small things in it and fill it with felt circles, then you get an excellent decor option for the nursery.

Funny animals, right? For them, you will need any bottle, but a small volume is better, a napkin for cakes and decor. The entire master class is shown on the collage.

Also, bottles can be made into a basket in which the child carefully lays out his own painted testicles.

Specifically, in this idea, I think the teeth are superfluous, but I do not insist on this.
How to make a craft from satin ribbons
Ribbons can be used to interesting decor eggs. Of course, we again take not the real one with a thin shell, but a home-made base. It is better to buy it, but it can be made from foam rubber or polystyrene.

Also, such forms in the form of eggs are created from papier-mâché. There are a lot of base options.
In extreme cases, you can take an egg, break it at the top and carefully pour the protein and yolk through a small hole, and use the almost intact shell as a base.

Secure the edges of the ribbons with tape or hot glue.

And we wrap, each time fixing the ends from below. Try to keep the strips pressed tightly and there are no gaps between them.
I also put pieces of double-sided tape on the sides so that the tapes do not move relative to each other.
Master class from improvised means at home (threads, dough, etc.)
I really liked the thread shell. This is such a cute app.
And after all, you can put anything inside, you want a chicken, but you want colorful eggs and sweets. The idea is just wonderful.

For this craft, we will use threads, paste or PVA glue and a balloon.
We inflate the balloon, tightly tie the tail so that it does not decrease in size until our design dries.

Cooking paste. To do this, take 1 liter of water and 4 tbsp. flour.
Pour water into flour and stir to break up lumps.
Then put the mixture on the stove and heat, bringing to a state of viscous and sticky consistency. Leave it to cool and then test for stickiness. It must grip well.

We wrap the ball with threads, generously smearing each layer with a glue mixture. You can not save it, because the product is completely natural and easy to manufacture, if the required volume is suddenly not enough.

We are waiting for the paste to dry completely and burst the ball inside. To see the inside, you need to carefully cut out the circle with scissors.

I also liked the children's idea with puff pastry. It turns out very colorful and harmless.

Knead the dough in a ratio of 1:1. So, we will take 1 glass of flour, 1 glass of salt. This will be our base, then we will introduce five tbsp. sunflower oil and add one glass of flour until a soft and elastic dough is obtained.

We give the test finished form, make holes, mark the pattern and dry.

You can dry for a day in the sun or 3-4 hours in a warm oven.
Now it remains to paint the blanks with gouache or food coloring.

Thread a string through the holes and decorate the branches, thus creating an Easter tree.

An interesting option for creating an application using a potato stamp.

Cut off a piece from the tuber. We pre-rinse the peel well so that the earth does not crumble on the craft.

We give the insides of the stamp a simple pattern in the form of zigzags, circles or other simple geometric shapes. We try to make the distance between the lines of the pattern.

We paint the protruding elements and apply to paper.

Here's what might happen. Believe me, such work will captivate a child for a couple of hours.

If you still have napkins and disposable spoons from last year's picnic, we will use them too.

And from a disposable cup we will create a bunny face.

The fantasy of needlewomen and mothers knows no bounds. And ordinary household items can be crafted.
Simple crafts for Easter from cotton pads
The little ones also have something to do, for example, make wonderful chickens from cotton pads. They need to be not only glued in the right places, but also painted in the right color. At the beak, sprinkle cereals on the glue, a cell or semolina will do.
child and fine motor skills will develop both fantasy and a warm attitude towards Easter will already begin to form.

More interesting and simple idea. Self-adhesive paper can be used for the beak and eyes.

We use a cotton pad and a disposable spoon. For the wings you will need a piece of paper.

Easter crafts are done quickly and the child does not have time to get tired or overtired.
How to braid an egg with beads and weaving patterns
I consider the process of weaving the shape with beads also a handicraft. It goes not so much as decorating eggs, but is interesting in itself creative work. Yes, and you can take not the testicles themselves, as I wrote above, but also any other basis.

The process starts from the very top. A row of six beads is made, then added between them, first one bead, then two. And it turns out the increase in width.

As soon as you reach the widest part of the base, then, according to the same principle, as you started, proportionally reduce the number of beads.

Here's another interesting scheme for weaving.

And you can make crafts in the shape of a Easter cake, it turns out very believable and festive.

Thank you, dear readers, for your attention, bookmark the article so as not to lose it when you want to start creating with your baby.
Chicken eggs without internal contents are painted with nail polish of two colors and fixed on skewers. They are decorated with dry leaves. Used in composition natural material- willow branches, dead wood. The bouquet is in a jar. which is decorated with wrapping paper and tied with a ribbon.
Leader: Ivanova Vera Olegovna.

64. “Stand for Easter eggs made of felt “Basket basket“ Natalia Shcheblykina. .

65. Easter card"Small miracle". .

Submitted the following works Ilyina Yulia Vladimirovna, teacher additional education, Kyzyl.
“I congratulate everyone on the holidays and I hasten to send you photos of Easter crafts by children who study in my creative association “Souvenir Workshop”. The works are made in different techniques and from various materials.
66. Easter bouquet. Zabrodina Anna, 12 years.

67. Easter goose. Sedova Katya, 13 years old.

68. Rainbow egg. Spirina Katya, 13 years old.

69. Easter card. Baygildina Angelika, 10 years.

70. Easter basket. Malygina Katya, 12 years.

71. "My name is Yakovleva Arina I am in 1st grade, I am 7 years old. I love making salt dough crafts. My craft is dedicated to Easter. Preparing for Easter, people are filled with joy and faith. From Maundy Thursday, a favorite action begins - coloring and painting eggs. juicy greens and bright colours Easter eggs created a festive mood. I also want to give you a little piece of this holiday.

72. Easter composition " Easter Bunny". Kochetova Nadezhda Ivanovna, Gubkin. Teacher of additional education, MBU DO "Station of young naturalists".

73. " Here I am". Rogacheva Alina.
The picture is made in the technique of plasticine painting.
Teacher Borovchenko Nadezhda Khisamutdinovna.
Club for children with disabilities "We are special".
![]()
74.Fedorov Maxim. The egg is made using the papier-mâché technique, decorated with colored threads, flowers, sequins, and beads. Plate in papier-mâché technique. Teacher Borovchenko Nadezhda Khisamutdinovna. Club for children with disabilities "We are special", settlement Mikhailovka.

75.Sorokin Alexey.

76.Utesheva Nastya. The chicken is made of fabric, decorated with bows and beads. basket woven from paper tubes, testicles are made from salt dough. Teacher Borovchenko Nadezhda Khisamutdinovna. Club for children with disabilities "We are special".

77. Work Shlykova Anna, 12 years. Easter egg painting.

78. Lashko Anastasia, 12 years. MOU lyceum "MOK No. 2", Dzhankoy, Republic of Crimea. Circle "Home design", hands. Khaveji Venera Alekseevna.
“I have been studying in the Home Design club for 2 years, where we make home interior decoration items. Own panel "Bear" I will give it to my niece for Easter. He will wake up in the morning, look at the Mishka-girl and smile.

79. Maksimova Valeria, 12 years. MOU lyceum "MOK No. 2", Dzhankoy, Republic of Crimea. Circle "Interior Design", hands. Khaveji Venera Alekseevna.
“I love making gifts for everyone. By Easter, I designed several funny panels using the “carpet thread” technique. This job " funny goat"I'll give Grandma."

80. "Easter Egg"- application. did Ludmila Shmeleva 8 years old, the city of Tver, 2/2 class of the secondary school in Tver. 83. Easter topiary.


85. Panel “Ready for EASTER…”

86. Raisa Denisova.
We wrapped an egg-shaped balloon with a half-woolen thread dipped in PVA glue. When the thread dried, a hole was cut out on the front. A nest was placed inside the egg (tow and strips of colored paper and willow twigs), and a bright, cute chicken cut out of colored velvet paper was placed in the nest. Similar Master Class
Kosykh Egor and Lydia won!
We will email the winners how to claim their prizes. Diplomas to participants of competition I will send within a week.
Thank you all very much! So many great ideas!
Now we begin the last stage of the competition -. 🙂