Download Happy New Year cards. To make a postcard from thread you will need
Funny winter holiday New Year– this is a joy not only for children. Many adults also, with undisguised trepidation, await the onset of New Year's Eve, to once again plunge into the atmosphere of a magical time when one year comes to replace another. On the New Year, you can hope for a fabulous miracle, for the fulfillment of your most cherished dreams.
And, if the New Year celebrations begin on the evening of December 31, then preparations for a wonderful holiday will begin much earlier. You need to think through everything down to the smallest detail - what to cook, what outfit to wear, how to surprise guests, how to decorate the Christmas tree and apartment, and, most importantly, what to give to your family and friends.
Any gift will be dear and meaningful, and a gift made with one’s own hand will even bring joy and good mood not only to the recipient, but also to the donor.
On New Year's Eve, it's time to remember the good old tradition of giving each other New Year's cards. Despite our age of nanotechnology with its modern means communications, it’s still not worth pushing real, “live” postcards into the background. After all, it’s an incomparable feeling – to pick up a colorful hand-made card and, literally, breathe in a piece of New Year's mood and atmosphere.
Want to do DIY postcard for New Year 2017 and please your friends, family and loved ones? Our site will help you with this. It would not be a shame to give a stylish craft to a colleague and, thereby, congratulate the employee on the New Year and wish him happiness.
You can make a New Year's card with your child and make your grandparents happy. Making a greeting card for a friend or relative is not at all difficult, and the joy from such a manifestation of attention will linger in the soul for a long time.
Postcard “Cockerel” using quilling technique
To make the “Cockerel” postcard you will need:
- multi-colored strips for quilling;
- glue;
- a sheet of cardboard for the base;
- pencil or template;
- decorations and decor.
Step 1. On thick paper you need to draw a drawing of a cockerel.
Step 2. Twist each strip according to the instructions and, after dropping a drop of glue to prevent the bobbin from unwinding, give it the desired shape with your fingers.
Step 3. Having made a lot of bobbins, you can begin to “assemble” the cockerel, filling the space of the drawing, simply by gluing paper parcels onto the most common PVA glue.
Step 4. When the cockerel is already ready, you can add some chic to the card by decorating it with sparkles, beads, snowflakes, ribbons and other cute decorative elements. You can also write wishes for happiness in the New Year.
New Year card using corrugated paper

To make a New Year's card from corrugated paper You will need:
- colored cardboard or colored thick paper;
- corrugated paper;
- scissors;
- glue or double-sided tape;
- any decorations you wish (beads, sequins, seed beads, sparkles, etc.).
Step 1. Fold a sheet of cardboard or thick paper in half.
Step 2. Using a simple pencil or double-sided tape (if you take double-sided tape, you won’t need glue) you need to outline a certain layout of the future Christmas tree.
Step 3. Prepare rectangular pieces of corrugated paper different lengths.
Step 4. Glue the strips of corrugated paper a little so that you get a Christmas tree.
Step 5. All that remains is to decorate the card to your taste and/or add a cute inscription wishing you happy holidays.

To make an embroidered New Year's card you will need:
- a sheet of cardboard for the base of the card;
- knitting threads or floss different colors;
- button, needle or pin;
- masking tape;
- printout of words or drawing;
- small decorations.
Step 1. Fold a piece of cardboard or construction paper in half.
Step 2. Print out the words or design you want to embroider and temporarily attach it to the card using masking tape.
Step 3. Now very carefully use a needle or pin to make holes along the contour of the inscription or design.
Step 4. To fill the design with embroidery, use different colored threads and a sewing needle. It is advisable to first “outline” the outline, and then “color” the inside.
Step 5. When the card is ready, you can slightly embellish it to your taste using ribbons, bows, beads, etc.
New Year card made of threads

To make a postcard from thread you will need:
- dense colored paper or cardboard;
- knitting threads (preferably thick and different colors);
- scissors;
- glue;
- decorations and decor.
Step 1. Fold a sheet of colored cardboard in half and set it aside for now.
Step 2. The threads need to be cut into pieces of different lengths (in descending or increasing order).
Step 3. Now you can start gluing the threads, starting with the longest, and gradually moving up and adding threads of shorter lengths to complete the thread herringbone. Alternate colors as you like.
Step 4. Glue a couple of small pieces of thread of the same length under the base of the Christmas tree to depict the trunk of a New Year's tree.
Step 5. A few beads or sequins will look good on such a laconic Christmas tree.
DIY New Year's card “Geometric Christmas tree”

To make a “Geometric Herringbone” postcard you will need:
- a thick sheet of white paper (ideally green cardboard on one side and white on the other);
- stationery knife;
- ruler and pencil or printout of the drawing.
Step 1. Fold the cardboard in half green inside.
Step 2. Using a pencil and a ruler, try to draw a triangle evenly, and divide it inside into small identical triangles. It will be easier to draw diagonal lines - first in one direction and then in the other, retreating the same distance.
Step 4. Using a utility knife, carefully cut out the triangles without touching the base.
Step 5. Now fold the small triangles down from the outside of the card. The original New Year's greeting card is ready!
Postcard for the New Year 2017 “Accordion Christmas tree”

To make the “Accordion Christmas Tree” postcard you will need:
- thick colored paper or colored cardboard;
- colored paper (you can take green or any other color);
- scissors;
- glue or double-sided tape;
- various decorations (glitters, tinsel, sequins, etc.).
Step 1. Fold a sheet of cardboard in half - this is the base of the postcard. After folding the thick paper, set it aside for now.
Step 2. From green (or other) colored paper you need to cut out six rectangles of the same length, but different heights (each next rectangle should be 2 cm smaller than the previous one).
Step 3. Now fold each of the rectangles into an accordion shape. Try to make the accordion “step” the same for all rectangles.
Step 4. Fold each accordion in half and, starting from the largest to the smallest, glue it inside the card at the fold from bottom to top.
Step 5. To top it off, snowflakes, sparkles and so on. If you wish, you can write a few warm words or a nice phrase with congratulations.
New Year's card "Fir trees made of felt"

To make a felt postcard you will need:
- sheets of felt of different colors;
- glue;
- scissors;
- colored cardboard or colored thick paper.
Step 1. Cut strips, trapezoids, or triangles from felt in different colors and sizes (observing the order of increasing or decreasing the size).
Step 2. Now you can glue all the details and, if desired, add glitter or write congratulations on the New Year and Christmas holidays.

To make a postcard with buttons you will need:
- a sheet of thick paper or cardboard;
- buttons of different sizes;
- multi-colored glossy paper;
- glue;
- scissors;
- decorations.
Step 1. Glue buttons onto a sheet of cardboard so that you get the outline of a Christmas tree.
Step 2. Cut out squares of different sizes from multi-colored paper - these will be gifts that need to be glued under the button Christmas tree.
Step 3. All that remains is to decorate the card to your taste and you can give it away!
The festive season is the right time to congratulate your family and friends, wishing them happiness in the new year. Unfortunately, it is not always possible to do this in person. Therefore, the custom arose of sending each other kind words. Today, postcards are not only sent by mail, but also attached to. You can buy a New Year's card in a store - but it will never compare with the one you made with your own hands, putting sincere feelings into every detail. Here is a selection of ideas for creating New Year's cards. Most of them are extremely simple and suitable for children's creativity, while others will appeal to experienced needlewomen.
Postcard with volumetric balls
Simple and colorful New Year cards with 3D elementsIs it possible to imagine the New Year without shiny ones? Christmas decorations? This unusual card will surely bring a happy smile to the recipient. To make it, you will need:
- a compass or object with a round bottom
- designer paper with six different patterns
- sheet of white cardboard
- thin satin ribbon
- pencil
- scissors
- glue or double-sided tape
Fold a sheet of white cardstock to form the card base. From paper of each color, cut out a circle with a diameter of about 5 centimeters and bend it in half. Take three circles and glue them along the fold line to make balls like in the photo. You can use paper with four or more prints, but they must match well with each other. Glue the finished balls to the base of the card. Attach ribbons above them, making bows at the base of the balls. Leave space for wishes at the bottom of the card.
Postcard made of colored threads
 Handmade postcard with Christmas tree from colored threads
 The forest beauty is the main symbol of the New Year. And in such an unusual embodiment, both adults and children will like it! To create this craft you will need:
- three sheets of cardboard or thick paper
- scissors
- PVA glue
- Double-sided tape
- dense threads of different colors
- colored pens
- ruler
- decorative beads
- paper snowflakes
- ribbon
Fold a sheet of colored cardboard or thick paper in half. It will serve as the basis for the postcard. Cut out a rectangle from paper of a different color and stick it closer to the top of the card. Cut a triangle from the third sheet of cardboard. Wrap it with multi-colored threads, securing them to the back of the tenderloin. Decorate the Christmas tree with shiny balls of multi-colored beads and glue the tree to the card. Decorate the craft with an elegant ribbon and don’t forget to print and stick a congratulatory inscription.
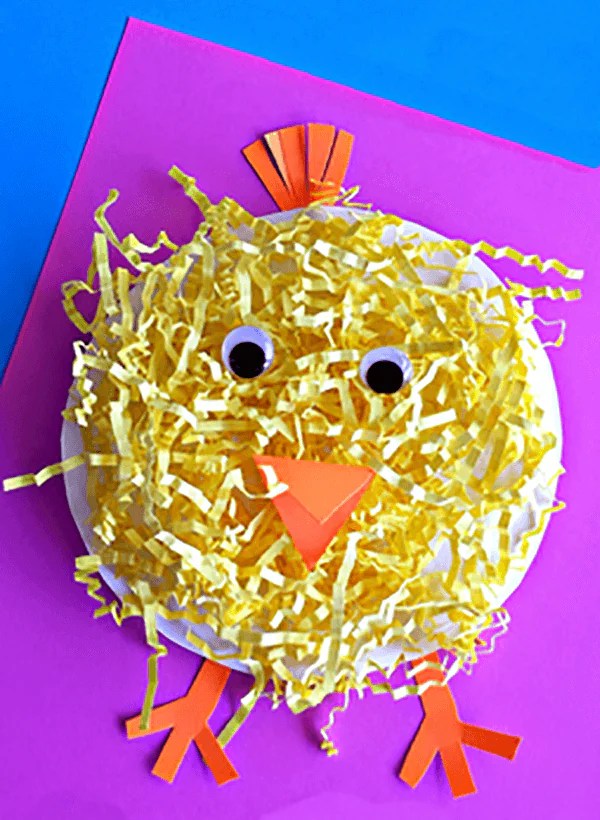
Postcard "Snowman"
 A funny and easy-to-make postcard with a snowman
 A postcard with a funny snowman just seems complicated. In fact, even a schoolboy can make it! A novice scrapbooker will need:
- one or two sheets of thick cardboard
- white and colored paper
- scissors
- pencil
- compass
- glue or double-sided tape
First, make the base for the card. It is desirable that it has the shape of a square. The background can be made multi-layered, as in the photo, or decorated with paper snowflakes, but this is not necessary. Cut out three circles of different sizes from white paper. Shade their edges with a simple pencil to make the craft seem voluminous. Glue the circles one on top of the other - and you will get the body of a snowman. From colored paper, cut out a scarf, hands, carrot nose and eyes of our hero and glue them to the craft.
Openwork card with snowflakes
 Experiment with the shape, size and number of snowflakes!
 December days are not always blessed with beautiful snowfall. But to create a snowy New Year's atmosphere, sometimes such a wonderful card is enough! To create it you will need:
- sheet of colored cardboard
- sheet of white paper
- scissors
- simple pencil
- white ink pen
Surely you had to cut out paper snowflakes as a child. If you suddenly forgot how to do this, we remind you of a simple technology. Place a round object (for example, a plate) on an A4 sheet of paper and trace its outline with a simple pencil. Cut out the circle. Fold it, select it and transfer it to the resulting fragment of the sheet. Cut out the snowflake along the contour, unfold it and iron it. Fold the cardboard in half and glue one or more snowflakes to it. Don't forget to sign the card!
Felt fabric cards

Felt is the favorite material of many needlewomen. It is easy to use, inexpensive, and most importantly, looks great in the most various crafts! To make cards from colored scraps, stock up on the following materials:
- pieces of felt in different colors
- thick brown paper
- scissors
- glue or rope optional
Think about the patterns and number of cards you want to make in advance. Some simple ideas can be seen in the picture above, but experienced scrapbookers can choose a more complex plot. Cut out the necessary details from the fabric and create a composition. Then glue the fragments to the paper - and your cute card is ready!
Ideas for New Year's cards are not limited to the options on this list. After all, you can always combine several techniques in one work or come up with an unusual plot. We wish you inspiration and great holidays!
With the approaching New Year 2017, we are all starting to look for New Year's gifts, and with them New Year's greeting cards. If buying a New Year's card is not an option for you, if you still prefer handmade items, then this article will be useful for you.
The news port “site” in this article has prepared for you several ideas for making New Year’s cards with the symbol of 2017, the red fiery Rooster.
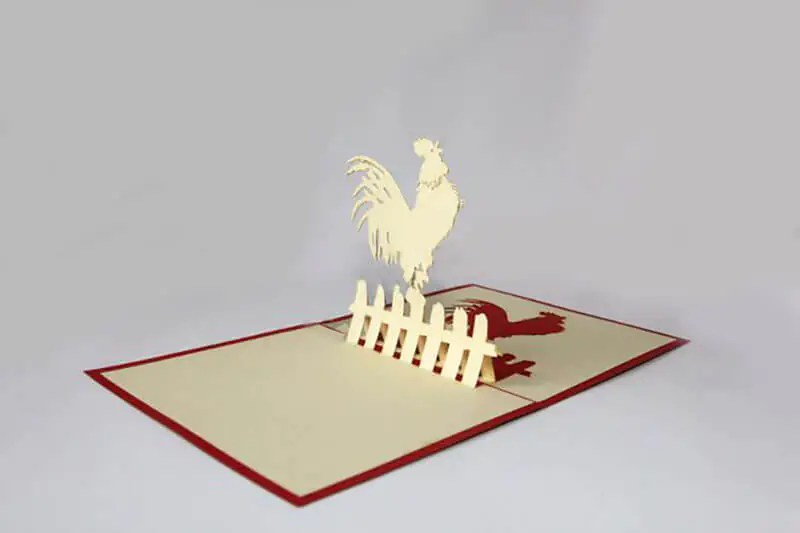
DIY postcard with Rooster

This charming Cockerel in the shape of a lush heart will be able to convey all the warmest and most tender congratulatory speeches to your family and friends, loved ones and friends, work colleagues and just acquaintances.
To make a decoration for a postcard, the Rooster itself, you will need thick colored paper or cardboard, scissors and glue.
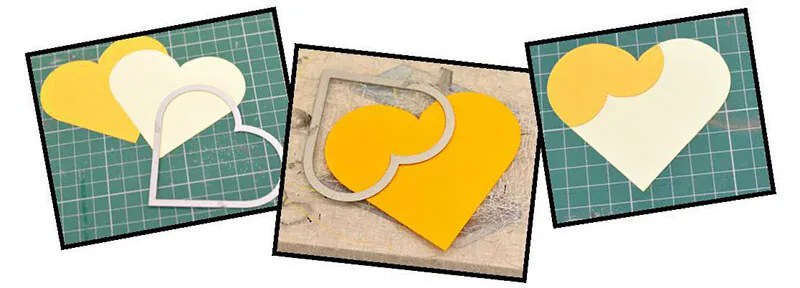
From colored paper you need to cut out the necessary parts, which, without exception, are heart-shaped. Symbolic isn't it? From a thin strip of colored paper yellow color twist a spiral that will become the legs of the cockerel.

Now form a Cockerel on the front side greeting card and secure everything with glue. Don't forget to sign the card!
Do-it-yourself voluminous postcard with a Rooster
A very unusual option for decorating a greeting card.
Made from thick cardboard or plastic disposable plate cut out an even circle that would fit on front side greeting card.

Now cut thin strips of colored paper and glue it to the prepared circle.
Now all that remains is to cut out the red legs, beak and comb.
And don't forget about the lively eyes!

DIY New Year card with Rooster
At first glance, this postcard looks completely normal. But you just have to unfold it and scenes of outlandish beauty appear before you.

It is not known for certain when the first postcard appeared, but some historians believe that not so long ago - only 200 years ago. The “grandmother” of the modern postcard is business card with wishes, which the Chinese sent to those whom they could not see on the holiday. They even had a certain system of symbols: for example, the image bat meant a wish for family happiness, and the fish symbolized wealth and prosperity.
In 1795, the first series of Christmas cards was released in Europe, the author of which was the artist Dobson, unknown until then. They depicted a still popular scene: a family around a decorated Christmas tree. Five years later, these postcards were already sold along with letter paper and envelopes.
Postcards appeared in Russia much later - only in 1872. Initially, they were not illustrated: one side was intended for writing an address, and on the other a message was written. The first “color” postcards contained images of Moscow sights, and soon they became a real work of art: they were used to decorate living spaces, were collected, and pasted into personalized albums.
In pre-revolutionary Russia, postcards were no worse than modern ones: they were decorated with dried flowers, decorated with beads, sparkles that looked like real snow, and even scented; Embossing and gilding were also widely used.
New Year's cards most often depicted old Russian rituals, forests and huts buried in snow, church domes and, of course, Father Frost and the Snow Maiden, racing on three beautiful horses, carefree children and angels.

After 1917, greeting cards ceased to be issued almost completely. However, it was not possible to eradicate the tradition of sending holiday greetings to family and friends. The first Soviet New Year's cards featured images of the Kremlin towers, Father Frost and the Snow Maiden.

Today, in the age of computer technology, the main role in greeting illustrations belongs to original drawings. The most popular illustrators creating New Year's stories are artists from England, America, Canada and, of course, Russia.
One can only admire the works of the Englishman Joseph Holodook. His cute snowmen decorating New Year's cards for 2017 have fans all over the world. Many people even collect a collection of these postcards with the famous series of snowmen.


Postcard illustrations by American Donna Green touch to the core. Her work is dedicated exclusively to children. Together with the main characters of winter stories - children who skate, decorate a Christmas tree, listen to grandmother's fairy tales, we seem to be immersed in a distant and cloudless country of childhood.


Fans of beautiful winter landscapes with unique corners of Russian nature will undoubtedly admire postcards with drawings by Russian woman Irina Marinina. Tree branches dressed in fluffy snow, cheerful bullfinches, windows of houses with intricate frosty patterns take us to a real Russian winter, shrouded in a festive atmosphere.

The works of Marina Fedotova are real works of art. Detailed to the smallest detail, Santa Claus is made in the style of Russian illustrations folk tales. Small details and a captivating plot evoke a storm of emotions and make the artist’s works truly priceless. Congratulate a loved one like this beautiful postcard everyone can.


2017 is the Year of the Fire Rooster, and, of course, we cannot do without postcards depicting the symbol of the coming year.


20 ideas for decorating apartment walls with your own hands
15 most expensive photos
On the eve of the New Year, everyone is wondering what gift to give to their loved ones, friends or colleagues. Everyone wants their gift to be special and to evoke only sincerely positive emotions. Old good tradition It is considered to give each other New Year's greeting cards. A bright, hand-made holiday card will undoubtedly only cause admiration. Especially in the age of modern digital technologies, when most are limited to just one click to send an electronic greeting.
DIY cards for the New Year 2017.
Making a New Year's card with your own hands is a great way to show your imagination and please your loved ones and family. an original surprise. After all, a gift made with your own hand is charged with enormous positive energy, your love and care for your loved one. Postcard self-made will be a great addition to your main New Year's gift. Moreover, such creativity is very much to the liking of the symbol of 2017 - the Fire Rooster.
Creating such a postcard will not require large financial costs and time; it is worth stocking up with only a few creative items, which will be described in detail in each of the examples, and inspiration.
So, let's start with the most simple options New Year's crafts that even children can make. In the following examples we will provide a step-by-step guide on how to make a New Year's card yourself.
Postcard "Cockerel 2017".
 Postcard "Cockerel 2017". with your own hands
 An interesting and relevant design for a New Year's card will be the image of the main symbol of the coming year - the Fire Rooster.
This method is quite simple and creating such a postcard will not cause difficulties even for a primary school student.
You will need:
- an image of any rooster you like;
- thick cardboard;
- paper;
- scissors;
- glue;
- additional decorative elements, if desired.
The first thing you need to do is select and print any suitable picture of a cockerel that you like. When the template is ready, you can start creating the base of the card. To do this, take thick cardboard and bend it in half. You can choose any form of postcard; we will give one example of the form of such a postcard. For example, to make it more original, you can do different sizes front and back of the postcard. To do this, take our template, measure its borders, and cut off the rest of the front side. Thus, it turns out that the front part will be narrower than the back. Using this principle, you can make rounded corners or give any other shape - the main thing is to use your imagination.
After you have prepared the base itself, you can begin to design appearance: glue the selected template onto the front side and cover the inside with white paper, where you write beautiful congratulations Happy New Year 2017.
According to your wishes and preferences, you can decorate the card with additional decorative elements: rhinestones, beads, sparkles.
It will be a pleasant surprise if you add sweet gift in the form of a chocolate candy. To do this, you need to make two holes and thread the threads with which such a surprise will be tied. Its location can be anywhere in the product, the main thing is that it is harmoniously combined with the image itself.
Postcard with New Year's embroidery.

Such a postcard will not leave even the most fastidious recipients indifferent. After all, here you invest your strength and soul not only in collecting ready-made parts and giving them festive look, but you also create these very details with your own hands. For embroidery, you can choose any pattern that matches the theme of the New Year. It could be Santa Claus funny snowman, holiday tree, christmas balls, symbol of 2017 – Fire Rooster and other.
To create such a New Year's craft you will need: glue, scissors, embroidery, satin ribbons, etc. more decorative elements, optional.
As in the first option, we first prepare the base of the postcard and give it the desired shape. Then we glue the embroidery and decorate the edges of the picture. This can be done in the following ways: use satin ribbon, half beads, rhinestones and sparkles. Such a postcard in itself is already finished product and does not require special additions in the form of sparkles and sequins, but if you think that they will only complement the overall look, then add them. If the card is intended for a friend, sister or mother, you can use a bow made of satin ribbon; such decor will make the product more pretty.
Holiday card with glitter.

This version of this postcard is so simple that you can even do it with your children without fear for its safety. You will need: glitter, cardboard, pencil, glue.
First we decide on the cover. We choose what you would like to depict on the front side of the New Year's craft. Next, we redraw the image onto cardboard and fill the entire area of the picture with glue. Sprinkle glitter on the glue and wait until it dries completely. Here you can use glitter of different colors and sizes, depending on your design.
As an alternative to sparkles, sequins, beads, rhinestones, and multi-colored sand can be used here.
Postcard for the New Year 2017 with a wreath in miniature.
An original gift would be a postcard with details made from vegetation. In this case, pine (spruce) branches or thorns, fastened in a circle, are perfect. You can also use parts of an artificial Christmas tree. If you use whole branches, the composition will take on a voluminous appearance; pine needles can also be formed into a New Year's wreath. Here you should give free rein to your imagination and experiment.
The principle of operation is also based on gluing and festive decoration. We glue the vegetation onto the finished cardboard base (you can attach it with a thread and a needle) and form a wreath from it. Give the product a bright, festive look according to your taste. Write inside the postcard nice wish- your New Year's card is ready.
 Photo: New Year cards"Christmas trees."
 Without a doubt, the main attribute of the New Year is a Christmas tree with garlands and balls. This item will also be relevant for creating a greeting card. There are a great many ways to make such a card. In all the examples given, a sheet of any thick cardboard is taken as a base and folded in half, forming two equal halves.
- Multi-colored Christmas tree
This Christmas tree is prepared as follows:
- first decide what kind of Christmas tree you want to make: shape, size, appearance;
- strips of different lengths and colors are cut from colored paper (you can use colored duct tape or braid);
- the finished strips are glued to the front side of the product in an order reminiscent of the shape of a Christmas tree. This can be a tree with horizontally glued, chaotically located colored stripes or cut out triangles in a sequential order. The main condition is compliance with the outline shapes of the tree;
- don’t forget to make a tree trunk;
- The final stage will be decoration with decorative elements.
- Christmas tree made of buttons
Never rush to throw away old and unnecessary things, such as buttons, pieces of fabric, leftover ribbons, decorative flowers, etc. Little things like this can be useful for creating many things. original gifts. Especially now, when hand-made things are becoming especially popular.
To create such a Christmas tree you will need: glue (thread with a needle), buttons, satin ribbon, scissors.
Step by step guide:
- First decide how the buttons will be attached to the craft. This can be done with glue or sewn on with thread - this method will look more impressive;
- if you choose the sewing method, then you should take care of the appearance of the inside and cover the knots with a sheet of white paper;
- We attach a pre-made bow to the top of the finished Christmas tree. Thick threads and ribbons can be used as material for the bow;
- Alternatively, you can make a base for your Christmas tree by cutting out a shape from thick cardboard or fabric and sew buttons onto this base. Then just ready Christmas tree craft glue to the card base. This way you will hide knots and irregularities as much as possible during the sewing process.
- Velvety Christmas tree
An example of such a New Year's craft will require a minimum amount of materials and your time. But, nevertheless, this will not lose its effectiveness.
The following materials will be required:
- colored paper;
- scissors;
- glue.
To begin, you need to cut long strips of colored paper, about 2 cm wide. To get 11 flowers, you must have 22 strips. When the strips are cut, we proceed to making the flower itself. To do this, take two strips and apply them to each other - you get a double strip. We make frequent cuts along the edge of such a strip and roll it into a tube, having first secured its edge with glue. You will get a small roll with fringe around the edges. Next, these cuts must be carefully pressed with your fingers to form a roll with one fluffy side. We glue the furry flowers to the base of the card and decorate with sparkles.
To get a more beautiful Christmas tree, it is advisable to use at least 10 flowers. You can choose any colors that best suit the New Year's theme. For example, take white and green.
- Christmas tree made of threads
To create this craft you will need:
- colored threads for knitting;
- glue;
- scissors;
- cardboard;
- half beads, rhinestones.
First, we take thick cardboard and cut out a tall triangle - this will be the base for the Christmas tree (you choose the size of the triangle yourself). Next, we take the knitting threads and begin to wrap the base, placing each new layer of threads horizontally to each other. The color of the thread can be any, as well as their thickness and quality. In addition to knitting threads, you can use floss threads or thin satin ribbon.
We glue the finished thread tree to the base prepared in advance and decorate it as desired. Inside the card we write warm wishes for the New Year.
The art of scrapbooking.
 Photo: DIY postcard
 Scrapbooking is a type of handicraft based on the creation of family or personal albums and photo albums. The principle of this technique is to cut out notes, interesting notes, photographs and paste the clippings into an album. Now this concept has acquired a broader meaning and implies any handmade design of albums, gift packaging, postcards using applications.
Using this design method, you can also create an original New Year's craft, which will be a pleasant surprise for anyone.
To create such a postcard you will need:
- scrap paper;
- glue;
- scissors;
- pencil;
- large beads for decoration.
- Initially, it is necessary to cut the scrap paper into small rectangles of different lengths, so that later these rectangles can be rolled into tubes;
- Next, we proceed to what was mentioned a little above: we twist the finished rectangles. To do this, use a pencil or any other cylindrical object.
- To prevent the edges of the tube from unwinding, we glue them and let them dry;
- Then we glue the finished tubes together in decreasing order, that is, the bottom tube should be the longest and so on until the shortest.
- Thus, you should get a Christmas tree, which we glue to the base of the card;
- The final stage is decoration according to your taste.
The art of quilling.
Quilling is a type of decorative art that involves creating voluminous and flat applications from strips of paper twisted into spirals. You can also find such a name as paper rolling. The main part of this technique is the spiral, which is later given the required shape.
Using the quilling technique, you can create compositions of any complexity and shape. To do this you need:
- Decide on the design that you want to depict on the greeting card;
- Redraw the image template onto the front side of the product;
- Twist the required number of spirals and give them the desired shape;
- Glue the finished spirals along the contour and area of the template.
- Decorate the craft.
There are a great many options for postcards for the New Year 2017, you just have to choose the one that suits you - and feel free to get down to business. Give free rein to your imagination!