New Year's crafts. DIY Christmas tree toy with children Easy crafts in the garden for the new year
All children, without exception, love to make beautiful and bright crafts. And especially for these kids, there are many ideas for crafts. But all of them are mainly designed for older children. And it is very difficult for kids who do not go to school to make such. However, today in this article we have collected New Year's crafts that you can make in the kindergarten. All these ideas are very simple in their execution. Therefore, your child who attends kindergarten will enjoy making them.
Simple crafts for kindergarten.
Crafts from cones in the garden.
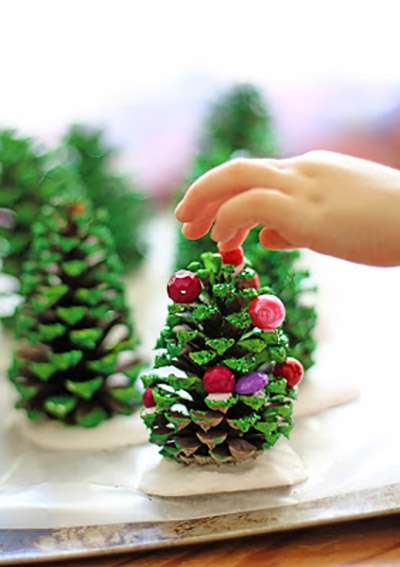
Cones are the natural material that is most often used to create crafts. Indeed, from the cones you will be able to make many interesting crafts. In particular, in order to make a Christmas tree, you need to paint the cone green. It should also be glued to thick cardboard, which will serve as a stand. But to decorate the Christmas tree is plasticine balls.
And to make gnomes, you should attach a plasticine ball to the bump, which will be the head of the craft. You can also use a wooden ball. Be sure to draw facial features on the ball. Make a cap out of plasticine and you will get a funny gnome.

Also, from a cone, it will be possible to make a snowman skier for kindergarten. For this purpose, you simply have to paint the bump white. Attach a plasticine carrot to the product. We complement the craft with a scarf and headphones that we make from felt.

Christmas tree made of glue.
If you have cookie cutters at home, then you can create something original from them. Use stationery glue. Squeeze it into a mold and sprinkle it with beads and beads. Now it is worth waiting for the moment when the Christmas tree dries. Thus, you will be able to make a beautiful pendant for the Christmas tree in the garden.

New Year's bells from plastic cups.
The next Christmas tree pendant can be made from simple plastic cups. You should paint them with golden paint. After that, the bells should dry. We pass the chenille wire into the bottom of the cup and fix it from the inside. And outside we make a loop out of it. Tie a craft with a red satin ribbon and your bell will be ready.

Simple and bright Christmas tree.
To decorate the kindergarten for the New Year, make a Christmas tree with your child. Making it is very simple. To do this, cut out 3 triangles from colored paper. This will be the base of the Christmas tree. Now we decorate our Christmas tree with paper crafts. They are very easy to make and your child will definitely enjoy the process of creating such crafts.

Simple Christmas trees for kindergarten
It is also very easy to make a voluminous Christmas tree. To do this, we make a cone out of cardboard and glue it with green circles.

If you fasten the cone with a stapler. And decorate it with green sand or other elements, you can also get cute crafts.

Another cute Christmas tree can be made with green cardboard for children. You just twist it and fix it with a stapler. Now you just decorate your Christmas tree.

The next Christmas tree should be made from chenille wire. Don't forget to decorate it and attach pendants.

Application - mittens.
In the next case, we take a sheet of cardboard and circle the child's hands on it. Cut out and decorate the palms with buttons and cotton wool.

Snowman made of plastic plates.
We connect a pair of disposable plates together. We paste on it the details of the face and other details. Do not forget to glue paper mittens to crafts.

Snowflake from an old bushing.
Cut the cylinder into several pieces. Connect the parts of the cylinder together with glue. Then decorate with sprinkles or glitter.

Finally
As you can see, in order to make DIY Christmas crafts for kindergarten, you just need to turn on your imagination. Help your child create crafts. Surely, he will like this activity and he will be happy to create New Year's attributes for the holiday.
The New Year 2020 is coming soon and this is a great occasion to make simple and beautiful crafts with your own hands from improvised materials: cones, paper, tubes and much more. They can not only show off at school exhibitions, but also decorate an apartment, but also present as an invaluable gift to your family and friends. We have prepared the best crafts for the New Year for you and we will start our article with crafts of the symbol of 2020, which will be held under the sign of the Yellow Metal Rat, and we decided to show you a simple and useful craft.
Symbol of 2020 from paper and cardboard
In order to make this Christmas craft you will need:
- Cardboard
- colored paper
- Scissors
Carefully make a toy:
- We cut out our future rat, as well as its details and clothes.
- Using glue, we glue crafts, clothes and small parts. The toy is ready!
Clay rat craft

Even a child can make such a simple craft, prepare:
- Polymer clay
- rolling pin
Working process:
- We roll a ball of clay, then stretch it out and give it the shape of an egg.
- With the help of a knife, we designate the paws and the circle on the sides of the rat.
- We take clay of a different color, form a scarf and attach it to the figure
- We make small balls from the clay of the main color, then press them down, forming the feet and palms. Fingers can be marked with a needle. Attaching them to the shape
- Making and attaching the ponytail
- We make the head of a rat. To do this, roll the ball, then gently pull it out to make it as similar as possible to the muzzle of a rat
- Let's make the eyes of a rat. You can make them in one color, or you can mold them using white, black and blue clay.
- It remains to bake the resulting figure, according to the instructions on the packaging of polymer clay. The craft is ready!
Crafts for the New Year 2020 felt rat

Even a schoolboy can make a rat out of felt, for this, prepare:
- Rat torso template, dress for her and a flower for decoration (you can print or draw and cut yourself)
- Felt of the desired color
- Needle, thread
- The lace is thin
Making a rat:
- According to the finished template, we cut out their felt of different colors, the body of a rat, a dress and a flower
- We fold the body and dress together and carefully stitch along the edge. It is better to do this in the "needle forward" technique.
- We sew a tail on the rat, using a lace or thick threads for this.
- Now we embroider the muzzle of a rat with colored threads: eyes and antennae
- We sew a flower. The craft is ready!
balloon snowman

To make this beautiful craft you will need:
- 3 balloons
- Thick white thread
- Decoration accessories
Manufacturing process:
- inflate three balloons according to the principle of a snowman figure (large, medium and small)
- We carefully lubricate the thread with glue and wrap the balls in turn. We are waiting for drying
- We collect three balls together and fix with the same glue
- We decorate the snowman with accessories, designate the eyes, nose, mouth, etc.
- Snowman is ready!
paper lantern


Making this simple craft will take quite a bit of time:
- colored paper
- Scissors
The manufacturing process is very simple:
Following this instruction, we measure and cut out the necessary parts from paper, glue them with glue. The craft is ready!
Beautiful DIY candlesticks: 3 ideas
One of the most popular and understandable gifts for everyone are candlesticks. They can be given to anyone, whether a colleague or a close relative. A young man, a student, and a person of age will be happy with such a present. You can make a candlestick with your own hands from improvised materials, and the cost of a souvenir will please those who do not have a large budget.
To make an original candlestick, you will need a glass cup and regular nail polish in different colors. On the glass from the outside, you can draw any pattern using varnishes, and after drying, the pattern will not be erased or washed off with water. The choice of drawing depends only on the preferences and imagination of the author himself.
Idea #1

To make an original Christmas tree candlestick, you need a green ribbon, several small branches of spruce or pine, white, blue and green nail polish, and a small heat-resistant glass cup.
On the outside of the glass, you need to draw snowflakes, Christmas trees, or simply write a congratulation by hand for the coming New Year. If the candlestick is large, then you can leave fingerprints on it as a keepsake. From above you need to put a few branches around the perimeter of the glass and tie them with a ribbon. Make a bow out of the ends of the ribbon.
Idea #2

A lace candlestick is an original little thing that will appeal to the female sex. On a smooth glass of heat-resistant glass, you need to stick a lace ribbon. In the work, you can use Moment glue or a glue gun. Do not worry if the edges of the fabric protrude slightly beyond the edges of the glass - this will give the souvenir an extra zest.
Idea #3

A small candlestick made of twigs is a good gift for those who appreciate handmade things and know how to use them in the interior. Along the perimeter of a transparent glass cup, small branches cut to the size of the container are glued with a glue gun. The branches must be dry, pre-treated with an antiseptic. If such a present seems small for a gift, then a few more candlesticks of different sizes can be made into the kit. They will look great on a shelf together.
Aromatic bath bombs

A gift in the form of a set of bath bombs looks stylish and original. With the help of such balls, you can perfectly relieve stress, relax in a foamy bath. Products are completely safe for human health, as they contain only natural ingredients that do not cause allergies.

To make a bomb with your own hands, you will need:
- 4 tablespoons of baking soda;
- 2 tablespoons of citric acid;
- A few drops of any essential oil;
- 2 tablespoons of cosmetic sea salt.
Mix all dry ingredients thoroughly in a separate container, add a few drops of your favorite essential oil to them. For example, you can use the essential oil of lavender, bergamot, orange or lemon, rose. Then the mixture must be gradually moistened with water from a spray bottle until it begins to hold its shape when compressed. When it will be possible to sculpt "snowballs" from the powder, this means that bombs can be formed. The mixture can be compacted tightly into any shape, making funny bears for children or a flower for adults out of it. In this position, the bomb should dry for several days, after which it can be used.
Instead of colored food dyes, you can use natural ones - coffee, colored sea salt, cocoa.
Boot for gifts

A handmade boot for gifts is a wonderful interior decoration. Even a beginner can sew it and give it to each family member. To do this, you need to draw a pattern of the desired size on paper and cut out all the details of the future product on it. Then they are sewn with a machine, choosing a not too small line. Remember that the boot must have a lining, which is also sewn according to a paper pattern. The lining is fixed on the top of the boot with a hidden seam, after which a loop is attached so that the souvenir can be hung on a hook.
Amulet with your own hands

An interesting option for a New Year's souvenir can be an amulet, which is given as a symbol of prosperity, happiness, abundance of money, love, career growth. It can be a small ball - Temari, which can bring laughter, happiness, health into the house. Or original amulets for the home that will protect you from everything negative for a whole year. And you can make "temari" in 10-15 minutes, thanks to our video, which is below.
Do-it-yourself New Year's clapperboard

Everything is appropriate in the New Year: both noise and fun. Therefore, a bright holiday cracker will be a great craft. After all, who among us has not dreamed of finding himself in the rain of brilliant confetti. This DIY craft is done very easily and quickly from simple improvised materials, and to make it easier for you, we found suitable videos with a master class.
New Year's diary

A super cool craft for the New Year is a diary in which you can plan and schedule all your tasks and meetings for the whole year. Ideally, if the symbol of the upcoming year of the Rooster is depicted on it. On the first page, you can write your wishes to a person in the New Year. It would seem banal, but such a necessary and cute gift that can be made in just 30 minutes if you watch our video with detailed instructions.
Christmas cookies

If you have a wonderful relationship at work and you need to congratulate a large number of colleagues, do not rush to buy expensive New Year's souvenirs for everyone. You can also congratulate in a very original way with confectionery products made in the form of small symbols of the holiday. It can be cakes, sweets or cookies. They can be made with your own hands or ordered in almost every pastry shop. Such gifts will not only delight your colleagues, but also serve as an excellent dessert.
Ingredients:
- 1.5 cups wheat flour
- 1 cup of sugar
- 2 pcs. egg
- 125 g butter
- 1 tsp soda
- 1 tsp cinnamon
- 1 tsp nutmeg
- 3 tbsp honey
- 1 tsp citric acid
- a pinch of salt
Cooking:
- In a convenient dish, add honey, water, sugar, stir and heat over medium heat.
- Add soy sauce, oil and spices and stir until smooth.
- Let it cool down a bit, then salt it.
- Then transfer everything to the pan, add flour and knead the elastic dough.
- Then put it in a cold place for 40 minutes.
- Roll out the dough with a thickness of 1-2 mm, cut out with molds.
- Transfer the cookies to a sheet and bake in an oven preheated to 180 degrees for about 5 minutes.
- And finally, you can decorate with anything you like: caramel, chocolate, eggnog with dye.
Video cooking instructions
DIY Christmas tree star

You can make a beautiful decoration for the Christmas tree with your own hands, using only those materials that are at home. Economical and stylish.
What we need:
- PVA glue;
- Thread for knitting;
- Styrofoam;
- Matches;
- Possible template for a Christmas tree.
Cooking process:
- Pour glue into a small bowl, dilute it with water if necessary.
- Prepare a template for the future star and attach matches to the foam.
- It is good to impregnate the thread with glue. And we begin to wrap the matches counterclockwise, alternately above the match, under the match. Pre-fix the end of the thread on one of the matches.
- Then we fill the entire space with a thread. We leave our masterpiece to dry.
- We tie a rope to our asterisk from above and can be hung on a Christmas tree. Our original toy is ready.
Christmas tree made of cotton pads

How can the New Year be without a Christmas tree? Recently, most people are accustomed to putting up and decorating an artificial Christmas tree. We can make it with our own hands. Festive and elegant.
What is necessary:
- A large number of cotton pads (more than three packs);
- White paint;
- stapler;
- Convenient scissors;
- Glue;
- Beads and braid;
- A2 format cardboard.
Cooking process:
- First we need to prepare the needles for our Christmas tree. To do this, you need to fold the cotton pad in half, then again and fasten it with a stapler.
- We take a sheet of A2 format, twist it with a bag, align the bottom with scissors.
- But we begin to glue our needles from below. Lubricate the fold with glue and fix on the base. We pass each row again with glue.
- Row by row we glue the cone.
- Then we decorate our Christmas tree at our discretion, stick stars. The top can be decorated with a big star. The Christmas tree should look beautiful and stylish.
Snowman from disposable cups

A beautiful, original masterpiece from absolutely inexpensive materials can be prepared for everyone. Your craft will be appreciated, take the time to please yourself and your loved ones.
What we need:
- Plastic disposable cups;
- Cardboard, preferably black and gold;
- stapler;
- Textile;
- Carrot.
Manufacturing process:
- We fasten the cups with a stapler, forming the torso in the form of a ball, and then the head.
- When the snowman frame is ready, we attach a nose from a carrot, and we make eyes and a scarf from shreds of fabric.
- We make a hat from cardboard, make a circle and a cylinder. We glue. Decorate with a golden ribbon. Our cute snowman is ready.
Original Christmas tree made of threads

Do you want to come up with something extraordinary and extravagant? Try to make a voluminous Christmas tree from threads. It will decorate your interior and add a touch of novelty.
What is needed for manufacturing:
- Woolen threads;
- Convenient scissors;
- Glue;
- Thick paper;
- Film;
- Incomplete tablespoon of starch;
- Four tablespoons of water;
- Decoration elements.
Manufacturing process:
- Make a cone of thick paper, cut and align the bottom, glue.
- Mix the glue with starch well;
- Cut the thread, the longer the better. And leave to soak in glue and starch for at least twenty minutes.
- We take the film and carefully wrap our cone.
- Next, we pull the thread out of the solution and wind it around the cone in random order.
- After that, let it dry for a day.
- Then we take out the cone. We decorate our Christmas tree with decor: beads, confetti. Our stylish Christmas tree is ready. Nothing complicated, but unusually beautiful.
Souvenir "Snow Tale"

Everyone in childhood loved to play with a ball of snow. He fascinated, there was something intriguing and mysterious about him. It's time to create this fairy tale with your own hands. It turns out that it is not so difficult. And if you also involve a child in the process, then this will become an exciting adventure.
Materials required for manufacturing:
- Glass jar of any size, lid;
- Any small details in the form of figures of people, animals, plants;
- Glue waterproof;
- Glycerol;
- Distilled water;
- snowball
Manufacturing process:
- We take the figures and glue them inside the jar, as we like, we can put it on the lid;
- Now you can pour water and dilute glycerin in it. Thanks to glycerin, the snowball will fall to the bottom of the jar slowly.
- Add glitter and turn the jar over. If they settle quickly, you need to add more glycerin.
Add glycerin until we reach the desired result. Our fabulous toy is ready.
Snowflake

Now I want to tell you about a very original New Year's craft that you can make from salt dough with your daughter.
Necessary materials:
- For the dough, 1 cup of flour and salt and 0.5 cups of water;
- Gouache blue;
- Ribbon;
- Glue;
- Sequins.
Work process:
- Knead the dough and add blue paint to it.
- We roll 7 peas and make a flower out of them as in the photo. We make small indentations in them with a toothpick.
- We roll the flagellum and make an element out of it as shown in the photo. To him we sculpt the second one. We attach the resulting part to the center of the snowflake.
- We make 5 more of the same rays.
- When the snowflake dries, cover it with paint again on both sides.
- We apply glue in a thin layer and sprinkle with sparkles and the snowflake is ready with our own hands.
Salt Dough Candlestick

New Year is the most desired and fabulous holiday of the year, and preparing for it is a very interesting and exciting activity. Traditionally, on New Year's Eve, kindergartens host exhibitions of bright crafts and creative works of kids that decorate the kindergarten on the most magical days of the New Year holiday. Of course, parents help the kids, who must be creative in creating crafts, come up with a plot and help the child bring the matter to the end. Today we will offer you a variety of DIY ideas for kindergarten crafts for the New Year 2020. We offer you a variety of crafts that are not difficult to perform, as well as master classes in their manufacture with children. Each of the crafts is interesting in itself, but they can also become part of the original composition.
Original Christmas trees with their own hands.
The main attribute of the New Year - the Christmas tree can be made from a wide variety of materials. Paper, fabric, salt dough, natural material are used. Let's look at several options for creating wonderful crafts for kindergarten.
Beautiful Christmas tree made of paper.
To make a Christmas tree, green colored paper is required, from which 3 cones are cut. It is desirable that the cones differ in size. Then these cones are put on top of each other and glued together.
Then the paper from the bottom of each cone is cut, and the Christmas tree itself is decorated with balls of beads of different colors using Moment glue or hot melt glue.


Herringbone from cotton pads.
It is very easy to make a beautiful Christmas tree from cotton pads. This can easily be done by the child himself without the help of adults. In addition to cotton pads, you will need green gouache, a sheet of cardboard that acts as the base, and glue.

- First, all discs on one side are painted green.
- Each disc is rolled into a cone and glued together.
- Glue ordinary discs to the cardboard base, which will resemble a snow cover in their appearance. Painted discs are glued on top of them in such a way as to form a beautiful Christmas tree. As a decor, multi-colored beads are used, which are attached to the Christmas tree with glue.
You can also make other elements from cotton pads, such as the sun and a snowman. 
Elegant Christmas tree made of corrugated paper.
If you work a little, then with the help of corrugated paper you can make an elegant and beautiful Christmas tree.


To do this, prepare:
- green crepe paper,
- A4 size cardboard sheet,
- Scissors and PVA glue, a simple pencil.
- Christmas tree decorations.
Working process:

An unusual and very interesting material for children's creativity is ordinary pasta of various types. Of these, children under the supervision of adults can make such a wonderful Christmas tree. At the same time, adults should monitor children's compliance with the rules for working with scissors, Moment glue, hot melt adhesive and spray paint. 
Materials:
- dense landscape sheet,
- pasta (spirals and bows),
- spray acrylic paint in green and gold colors,
- glue "Moment Crystal", glue gun.
- scissors, pencil.
- On the sheet we draw a blank for the cone of the Christmas tree, cut it out and carefully glue it.
- Using Moment Crystal glue, we begin to glue the spirals.
- We glue the next rows of pasta at an angle, slightly overlapping the previous row.
Our tree is almost ready. It remains to paint it with green spray paint, observing safety rules. We paint bows with golden paint. Let's wait a bit, when the Christmas tree and bows dry up and with glue from the thermal gun we fasten the bows to the Christmas tree.

Santa Claus from colored paper
Well, what is the New Year without Santa Claus? 
Has your child in the garden been assigned the task of creating New Year's crafts with their own hands? Do not despair. We will provide maximum information and successive master classes with photos to resolve this issue.
Do not take all the responsibility on yourself, do crafts with your child. We guarantee that your child will get the maximum pleasure from working together.
To prepare New Year's crafts, inventory needed:
- cardboard paper;
- needle;
- threads;
- colored paper;
- scissors;
- balloons;
- PVA glue, adhesive tape;
- some felt of different colors;
- toothpicks;
- small marmalade;
- New Year's tinsel;
- disposable bowl;
- disposable cups;
- cotton wool;
- spray paint (gold or silver);
- ringing beads;
- buttons;
- satin ribbon;
- kapron sock;
- pompon;
- foil.
New Year's craft No. 1. Christmas tree made of paper
- Form a cone out of cardboard paper.
- Prepare three shades of green paper.
- It is necessary to cut a large number of circles of the same size. For convenience, take a Coke lid - this will be a stencil for mugs.
- We glue the finished mugs to the cone base. Start at the bottom. Fix the circles only by the upper edge, dropping glue on it. The main part of the mug should hang freely and be slightly protruding from the base, thus creating the effect of fluffiness and volume.
- As for flowers, it is best to glue the circles in a chaotic manner, without observing the color scheme, then the Christmas tree will look more spectacular.
- You can put the tree in a bowl, with small New Year's tinsel. The bowl will play the role of a clearing.
Craft in kindergarten number 2. Felt Christmas tree toy

- Cut several strips of felt 10 cm wide. Cut these strips into thin strips from edge to middle, on both sides.
- Twist the cut material into a roll and tie in the middle with a thin ribbon. Next, fluff all the strips, giving the craft a shape of a blanket for a hat.
- New Year's crafts in kindergarten is ready.
Craft number 3. Christmas tree-marmalade

- From cardboard paper we form a cone for the base.
- Break off the sharp end of each toothpick on one side.
- With the blunt end, pierce a few gummies and put them on a toothpick.
- Insert the sharp end into the cone.
- Form a Christmas tree from below. Push each new row of toothpicks more into the cone so that the tree looks like a cone and the “twigs” are better held.
- Give crafts to children only under the supervision of adults.
Craft number 4. Christmas tree from New Year's tinsel

1. And again we form a cone for the base.
2. Take a piece of green tinsel with white tips.
3. Lubricate the cone base with glue.
4. At the base of the cone, fasten the end of the tinsel with a stapler or sew with a needle and thread.
5. Twist the tinsel from the bottom up.
6. Thus, a green Christmas tree is obtained, “sprinkled with snow.”
Craft number 5. Glue Christmas tree decoration.

1. Prepare glue, preferably transparent (silicone), a Christmas tree cookie cutter and multi-colored sequins.
2. Pour the glue into the mold, before that place it in a plate so that the container is half full, and sprinkle sequins on top.
3. At the time of the glue hardening, place some kind of weight on top of the mold, for example, a glass of water.
4. After 3-4 hours, when the glue has hardened, push it out of the mold with light finger pressure.
5. Poke a hole in the top of the Christmas tree and pull the thread.
6. It turned out to be a very beautiful and unusual craft.
Craft number 6. Bells from disposable cups

1. Take paper disposable cups for tea / coffee.
2. Prepare silver or gold spray paint in cans. Paint two cups with paint on top, you can not touch the middle.
3. The bottom of the cup - this will be the top of the bell. Pierce the bottom with a pencil.
4. Take a fluffy wire covered with small New Year's tinsel and form a loop out of it, leaving a long end. Pull the wire into the hole, attach a small ringing ball to the end.
5. Do the same with the second bell.
6. Sang the bells, connect them together in such a way that one is hooked onto the other, so the bells will hang harmoniously (one above the other).
7. Connect the loops on the bells with a beautiful ribbon and form a neat bow.
Everything, the Christmas tree decoration in the form of two bells is ready.
Craft number 7. Christmas tree decorated with buttons

1. We need a foam cone (or cardboard paper) that will make the base of the craft. It should be painted green.
2. Glue buttons of different sizes and shapes with a glue gun in a chaotic manner.
3. To the top of the New Year's tree, sew and attach a star molded from plasticine.
You have an original craft for kindergarten. And most importantly, it is very easy to perform.
Craft number 8. Santa Claus and the Snow Maiden rush to the holiday

For crafts, you will need a little different material: nylon socks, sequins, cotton wool, beads, glue.
1. Prepare two bases in the form of a cut cone, one from blue cardboard, and the second from red, these will be Santa Claus and the Snow Maiden.
2. Now we will make the heads and faces of the New Year's guests. To do this, we take nylon socks and stuff a little cotton wool into them, so that we get a harmonic head to the size of a cut cone. We decorate the head of Santa Claus with cotton wool, we form hair and a beard. We sew a small hat made of red material and sew it to the head. Glue black beads for the eyes, and a larger red bead for the nose. Now sew the head to the cone, and hide the seam under the cotton. Sew the hands from red material and stuff cotton wool into them. Decorate the cuffs of the sleeves with cotton too. Take a drinking straw and decorate it with New Year's tinsel - this will be the staff of Santa Claus. Sew the bag and also fill it with cotton. Attach the bag to the arm or so that the child carries it on his back. Decorate the hem of the cone with cotton wool.
3. We make the head of the Snow Maiden according to the same principle. Weave two small braids from cotton wool and sew them to the hat. Everything else: hands, face, we do the same as for Santa Claus. You get original guests for the New Year.
Craft number 9. simple Christmas tree

Take a fluffy wire trimmed with shiny tinsel. Bend it into a Christmas tree shape, and attach a bell ball to the top.
Craft No. 10 in kindergarten "Winter House"

1. The house must be made of cardboard.
2. From above, the cardboard must be coated with plasticine of different colors. The roof is blue, the base of the house is brown.
3. It remains only to decorate the house with New Year's elements from plasticine (or polymer clay). These are snowflakes, a snowman, children and animals.
In the modern rhythm of life, working mothers have a hard time: there are so many things to do, and then there’s crafts for kindergarten. The very process of creativity with the baby does not cause trouble for the mother, rather, on the contrary, a caring parent is happy to spend time with his child. But thinking about a creative project and generating suitable ideas can be a real unsolvable task. All these homework assignments from educators are by no means a whim, the time spent together on the creation of a common project will bring parents and the child closer, and the positive emotions received will remain in memory.
The baby himself is not yet able to generate ideas, so parents, mom or dad should take care of this issue. In order not to waste precious time on inventing a bicycle, we suggest using ready-made ideas for New Year's crafts in kindergarten and having fun with a pleasant activity.
The master classes of different levels of complexity collected in the article, so you can easily find a suitable craft for both the smallest, who are just starting to learn their capabilities, and for older children who already skillfully handle scissors and these are not their first New Year's crafts! In general, success!
Paper crafts for children
If you still think that only applications can be made from paper, then drop everything and carefully look at our article! Here you will find many different paper crafts for preschoolers that you can proudly present to the entire kindergarten! We urgently drop everything and start creating New Year's paper crafts according to our schemes and templates.
New Year's wreath of paper palms: doing crafts for the New Year in kindergarten
Great craft for kids. So, for a New Year's wreath you will need: a disposable paper plate, green paper, a red ribbon, as well as beads, rhinestones, mini pom-poms and other decorative elements. In a paper plate, cut out the bottom, so that you get a ring. Well, we circle the paper with a child's hand and cut out about 12 prints. Glue them on the ring and decorate. New Year's crafts in kindergarten is ready!
Christmas tree made of paper palms: getting ready for the new year with children
If you don't like Western traditional Christmas decorations, you can make a Christmas tree out of paper palms. To do this, you will need: a paper plate, a paper towel sleeve, a cardboard triangle, colored paper, glue (you can use double-sided tape), decor elements. Cut out a triangle from cardboard (this is the basis of our Christmas tree). Paint the sleeve from the polonets brown. Make three cuts on one side and two on the other. With the side with three cuts, glue the sleeve to the plate, and where there are two cuts, insert a cardboard triangle. Now that the Christmas tree is fixed, it remains to fix paper palms on it. It will be more convenient for kids to glue on double-sided tape. When the Christmas tree is pasted over, it remains only to fix the star and the "toys". We cover the glued swot and the craft is ready!

Garland for the New Year from paper: do-it-yourself Christmas lanterns
For this craft, you will need plain white paper, glue, scissors and thin colored paper, also known as colored tracing paper. We cut out light bulbs from their white paper, cut colored tracing paper into squares. We coat the body of the light bulb with PVA glue and glue it with tracing paper squares. When the glue dries, cut off the excess, fix the light bulbs on a thread and the craft is ready!

Volumetric snowflake for the New Year: doing crafts in kindergarten
One of the obligatory attributes of the New Year are snowflakes. So why not make a snowflake as a Christmas craft? We will make a three-dimensional snowflake, and for this you will need: paper, scissors, glue or a stapler. Take a sheet of A4 paper and fold it like an accordion, then fold the accordion in half. On one side of the accordion, draw a curvy line and cut along it. Now it remains only to glue the halves of the carved accordions together and the snowflake is ready!

DIY crafts for the New Year from paper rings
In order not to think about crafts for the New Year for children for a long time, it is worth remembering your childhood. I don’t know about you, but I remember how I made crafts from colored paper rings. You can make a garland, or you can, for example, a Christmas tree. All you need to make is colored paper, scissors and glue. See the tree diagram below.


New Year's card with finger paints
Grandparents are especially pleased to receive gifts from their grandchildren, which they made with their own hands. Toddlers, of course, will have to help a little. Basically with an idea, they will do the rest themselves! We offer to draw a postcard with finger paints. For children under 3 years old, we strongly recommend using specialized paints, because. the baby may decide to taste the paint. See the master class below.

with your fingers you can draw not only a Christmas tree, it can be a winter landscape, New Year's lanterns, and in general everything you want!

New Year's paper wreath: we make crafts for the New Year with the children
This version of the New Year's wreath is suitable for older children who know how to handle scissors. What will be needed? Green and red paper, ruler, scissors, glue or stapler. We fold a sheet of green paper in half, retreat about 2 cm from the edge and draw it into strips about 1 cm wide. Next, cut it (note that you need to cut it from the side of the paper fold). We open the sheet and fold it into a ring, gluing along the edge (where we indented 2 cm). You can glue it with glue, double-sided tape or a stapler. Now we close our “pipe” into a ring and fix it. The wreath is almost ready, it remains only to decorate it (you can use colored paper, or you can use rhinestones, stickers or sequins).

By the way, we also have ideas for New Year's wreaths and not only from paper!

Preparing for the New Year is sometimes even more pleasant than the celebration itself. The whole family, including the youngest residents, can take part in the process of decorating the interior. You can decorate an apartment or house for the New Year holidays in a variety of ways, but recently New Year's wreaths, which are better known to us from romantic Hollywood Christmas films, have been very popular. However, trendy […]
Volumetric Christmas tree made of paper: we make crafts in kindergarten
From strips of colored paper, you can make a postcard or a picture with a three-dimensional Christmas tree. What you need: whatman paper for the base, green, brown and yellow paper, ruler, scissors, glue. We cut green paper into strips of the same width. We cut out a star from a yellow baga, a stump from a brown one. We glue a stump on whatman paper, fold the strips of green paper with an air loop and glue the ends. We glue a strip of double-sided tape on whatman paper, on which we glue paper loops. We make five rows of loops in this way, each time decreasing by one. Glue a star to the top and the craft is ready!

Or, as an option, a voluminous Christmas tree can be made in this way:

Postcard snowman: crafts for the New Year for children
With kids, you can make a simple, but very original postcard in the form of a snowman. You will need whatman paper (for a postcard), colored paper of orange and any other color, a black felt-tip pen. We make a postcard from whatman paper, in the middle we glue a horizontal strip of colored paper and a smaller strip obliquely (it turned out to be a scarf). We draw eyes, a mouth and buttons. Cut out a carrot from orange paper and glue it on the snowman's face. It remains to sign and the New Year's card is ready!

Mixed media painting: watercolor and wax
An excellent New Year's craft will be a picture using watercolors and wax crayons. You don’t need to run to the store for special crayons, for this you can use an ordinary candle (preferably not colored). Draw something with wax on a piece of paper: it can be a snowflake or Christmas trees in snowdrifts, and then paint it all with watercolors. In places where there is wax, the paint will spread and the baby will get an unusual picture.

Do-it-yourself voluminous Christmas tree made of paper: Christmas crafts for children
A simple voluminous Christmas tree for kids. For the manufacture you will need a square sheet of paper and scissors. We fold the sheet into a triangle and again, make cuts in a checkerboard pattern. Next, unfold the sheet, attach a thread to the top, hang the Christmas tree! The craft is ready! A detailed MK with a photo can be found below.

Christmas paper wreath for children: a step-by-step master class with a photo
Or here is another version of paper crafts for the New Year in kindergarten. For such a wreath, we need: a cardboard ring, green paper, a red bow (you can tie it yourself from a ribbon), scissors, glue (you can double-sided tape). We cut the paper into strips of about 2-2.5 cm. Fold it with an accordion and glue the extreme ends to the cardboard ring. Add a bow and the craft is ready!

Need more paper crafts? We have!

Time inexorably runs forward and now white flies are flying outside the window, slowly sinking to the ground and covering everything around with a snow-white fluffy veil. However, despite the cold, the soul is warm and joyful. And all because suddenly appeared snowflakes herald the onset of the New Year. The most important holiday of the year is already very close, which means it's time to think […]
Crafts for the New Year for children from salt dough
A wonderful New Year's craft can be made from salt dough. To make salt dough you will need: 1 part flour, 1 part salt and ½ part water.
Christmas decorations made from salt dough and twigs
From dough and ordinary twigs, you can make a cute Christmas tree toy. We prepare the branches in advance, they can be collected while walking along the street with the baby (many children themselves pull all sorts of interesting things home from the street). We sculpt two circles from the dough and lay out figures with sticks, for example, a Christmas tree, a snowflake, a house, etc. To keep the sticks well, they need to be slightly pressed into the dough. Next, we send the craft to dry. When the dough is completely hardened, you can proceed to decorating.


Salt dough crafts for children: making New Year's gnomes
In fact, salt dough is the same plasticine, only the dough hardens in air, thus making the craft durable. You can make a huge variety of different crafts from the dough, but for kids, we recommend trying to start with gnomes. The gnome is a cone made of dough, which the child can mold on their own. We send the cones to dry, and then paint. Ready!

Salt dough Christmas applique

A simple New Year's dough craft for beginners
And another option for New Year's crafts for beginners. We cut out round blanks from the dough (this can be done with an ordinary glass). We make holes for the threads along the diameter and send the workpieces to dry. After complete drying, we stretch colored threads into the holes. You can additionally decorate with beads, rhinestones or sparkles. The Christmas tree can be decorated with buttons, beads, lollipops or marmalades. Buttons can be glued both before and after drying, but candies or marmalades should be decorated before drying and dried in the oven (the candies will melt and look like glass decorations).


Christmas tree lollipop from salt dough
For the development of fine motor skills of children, you can make a New Year's candy. To do this, prepare the dough in two colors (without dye and with dye). How to color the dough, we told at the beginning of the article. Roll out sausages of two colors and weave them together with a flagellum. Bend the stick into a cane shape and you can send it to dry.

Salt dough Christmas decorations: a step-by-step master class
We prepare the dough or cold porcelain, roll it out with a rolling pin a few millimeters thick, cut out figures with the help of baking dishes, make a hole for the thread and send the toys to dry. After drying, paint the products and additionally decorate with sparkles. We thread a thread and Christmas toys from the dough are ready!

Bullfinch from a palm print on salt dough: crafts for the New Year for children
A simple version of New Year's crafts made from salt dough is a handprint. From the palm they make a Christmas tree, Santa Claus, and we propose to make a bullfinch - the most winter bird of all city ones!

Enjoyed working with salt dough? Look for more master classes:

A wonderful time, festive and magical is the New Year, for which adults and children prepare gifts and souvenirs for friends and loved ones. It is not necessary to shop in the store, delicious gifts can be prepared independently from improvised materials, such as puff pastry. Crafts are original, bright. Christmas trees are decorated with unique toys, used as original and unusual souvenirs. […]
New Year's crafts in kindergarten from threads
As a material for New Year's crafts, you can use threads for knitting, while we will not knit anything, because children's crafts should be simple and understandable to kids.
Picture of threads for the new year for children
By the New Year holidays, you can learn a new needlework technique with children - pictures from threads. To do this, you need a picture without small details, knitting threads, scissors and glue. Cut the threads into small pieces in advance and prepare the picture. Now the most interesting thing awaits us: spread the outline of the picture with glue and circle it with a thread, press lightly so that the thread does not move. We wait until the glue dries and begin to fill in the middle of the picture (we smear it with glue and fall asleep with finely chopped threads). The craft is ready, the kid is happy!

Do-it-yourself snowflake from threads
From threads for knitting and twigs, you can make an unusual snowflake. We will need five sticks, knitting threads, plasticine or glue. We fasten the sticks in the center in the form of a snowflake. We wrap the middle with threads so that the attachment point is not visible, and then we wrap each stick. As a result, we get quite a pretty snowflake from ordinary twigs and threads.

Lace-up Christmas tree: New Year's craft for the little ones
For the smallest, we offer to make crafts with lacing. Toddlers under 3 years old do not yet have access to all the possibilities of their body, so we suggest developing fine motor skills with the help of lacing. Mom needs to prepare a blank on thick cardboard in advance (herringbone, boot, mitten, Christmas ball or something else), make holes for the thread along the edges with a hole punch. At one end of the thread, you need to tie a knot, and wrap the other with tape so that it is more convenient to pull it through the holes in the cardboard. We show the baby the principle of lacing and enjoy the process!

Thread horse: do-it-yourself toys
You can make real toys out of threads with your own hands, for example, a horse, which will become an excellent Christmas tree decoration. For a horse, you will need knitting threads (the main color and two additional ones for decor), eyes. Step by step photo instructions are below.

Thread angels
An excellent New Year's decoration will be angels made of threads. You can do this craft with kids of any age. For manufacturing you will need: cardboard, threads, ribbons for decoration. Step-by-step photo master class, see below.

Christmas tree made of threads for children: we make crafts for kindergarten
If you plan to do New Year's crafts with children, then, of course, you should choose something simpler. An excellent option would be a Christmas tree made by winding threads on a thick cardboard blank. For manufacturing, you will need: a blank made of thick cardboard, knitting threads, double-sided tape, beads. Glue double-sided tape to the base of the cardboard to secure the thread. Wrap the threads tightly on the cardboard, and in the last row, thread the beads through the thread. Decorate the top with a star button and leave a small thread so that the Christmas tree can be hung.

Christmas tree made of sticks and threads
How about another Christmas tree? only we will make it from ice cream sticks. You will need sticks (you can also use ordinary twigs), paints, glue, knitting threads, decorative elements (mini pompoms, beads, buttons, etc.). We paint the sticks green and glue them in the shape of a triangle. We wrap the structure with threads and decorate. If you plan to decorate with beads, then it is better to put them on threads and then wrap them around. To make the Christmas tree stand as a stand, you can use a clothespin. See the step by step tutorial below.

Do-it-yourself snowman from pom-poms: New Year's MK

Do-it-yourself pompom pig

A large snowman from threads for knitting: we sculpt a snowman without snow

Did you like crafting with thread? See more master classes:

The holidays are just around the corner, which means it's time to start preparing for them. Undoubtedly, the Christmas tree will become the main decoration, which can be decorated with both store-bought toys and home-made ones. However, in addition to the Christmas tree, many are trying to transform the interior, thus creating an atmosphere of celebration and fairy tales. If you want to really transform your home for the New Year, then it's time to […]
Crafts for the New Year from cones
Cones are rightfully considered one of the best materials for New Year's children's crafts. You can make so many different things from a simple Christmas tree decoration, ending with all kinds of little animals and angels.
Owls made of cones and cotton wool: New Year's crafts for children
We offer to make an owl out of an ordinary pine cone. To do this, in addition to the bumps, you will need cotton wool, small pieces of felt and eyes (you can replace them with buttons or draw with a felt-tip pen). MK see below.

Shiny angels: crafts from cones with children. Step by step master class

Christmas decorations from cones: do-it-yourself New Year's crafts
Decorating the Christmas tree is one of the main activities in preparation for the holiday. I want to decorate the forest beauty in a special way. The most special will be the Christmas tree, on which toys are made by hand, in which the soul and warmth of the creator are invested. Our step-by-step master class will help you make an unpretentious Christmas tree toy from ordinary cones with your own hands. If there are children in the house, be sure to involve them in the creative process.

Winter in a jar: making Christmas crafts from cones with children
If you like Christmas balls with snow that you can shake and arrange a real winter blizzard, then you will like this craft. The cone resembles a Christmas tree, so in a jar of snow it looks like a real forest beauty in miniature, who is waiting in the forest for a kind old man.

We have many more cool cone crafts:

The New Year holidays are approaching - the time to give and receive gifts, decorate the Christmas tree and decorate the house. Perhaps we no longer believe in the good old man Santa Claus, we do not expect gifts from him under the Christmas tree, but we definitely expect a miracle, especially on New Year's Eve. A miracle is certainly good, but the realities of life dictate their own rules to us. Work, […]
Crafts for the New Year for children using cotton wool and cotton pads
A truly New Year's crafts makes one simple material that is in every home - cotton wool. Cotton wool and any of its derivatives (cotton balls, cotton pads) perfectly imitate snow and add fluffiness to crafts.
Crafts for the New Year for kids "winter hat"
Very small ones should pick up a simpler craft. For example, you can make a Christmas toy in the form of a winter hat. To do this, draw a simple hat with a pompom and a lapel on paper. There should be no small details, because. the baby will be difficult to handle. We give the hat for coloring. When the coloring is finished, cut out the hat and proceed to the next step. To do this, we need cotton wool or cotton balls and glue. We fill the lapel with pompom cotton wool, having previously smeared these areas with glue. It remains only to glue the rope and you can hang the hat on the Christmas tree! By the way, if you make a lot of hats, they can be combined into a whole garland!

Cotton ball penguin: making crafts for kindergarten for the New Year
In fact, this craft is a regular application using cotton balls. If you do not use cotton balls, they can be replaced with ordinary cotton wool. In addition to the penguin, in this way you can make a snowman, a polar bear. See diagram below.

New Year's crafts from cotton pads: we make angels with our own hands
Wonderful New Year's angels can be made from ordinary cotton pads. Angels can be left white, or you can add some sparkle or color to them. If you most likely have to make the angel yourself, then the children will be happy to take up the decoration! And what could be better than creating Christmas decorations with the whole family!

New Year's crafts from cotton pads: we make a postcard with our own hands
Snowmen from cotton pads can be used not only as independent elements of New Year's decor, but also to decorate postcards or paintings with them. Your kids will get wonderful applications, which can then be given to grandparents as a gift.

Snowflakes from cotton buds
And here is another option for crafts for creative needlewomen - snowflakes from cotton swabs. When the baby needs to be occupied, and there is nothing left of the materials for creativity, it's time to look for an alternative.

Need more cotton pad crafts? We are full!

So, friends! The New Year is just around the corner, there is very little time left, and you still have to make New Year's decorations: for the Christmas tree, as gifts, for decorating the house, and so on. There is no time to run around the shops, which means it's time to think about New Year's crafts from improvised materials, i.e. from what is definitely available at home. One of these […]
New Year's crafts in kindergarten from felt
Another material from which excellent New Year's crafts are made is felt. You can make an incredible variety of different crafts from it, but in this article we are talking about crafts for preschoolers, so we offer only crafts that are easy to perform, without sewing.
DIY mini Christmas trees made of felt
A very simple felt Christmas tree that will be a wonderful decoration for a Christmas tree. You will need 5 squares of 5 different sizes. We string the squares from large to small on a thread, decorate the top with a bead or a button. The craft is ready!

Felt Christmas tree for children: how to make crafts in kindergarten
Or here is another option for a felt Christmas tree that kids can easily handle. Mom will have to prepare in advance a cone base and felt blanks (circles or strips with teeth). Next, we glue these elements onto the cone, starting from the very bottom to the top. Detailed MK can be found in the photo below.

Look for more felt crafts for the New Year in the article:

The New Year holidays are approaching, which means that very soon a forest guest will appear in almost every home in our country. Someone prefers to put up an artificial Christmas tree, someone is a real forest fir tree from the Christmas market, and someone is completely limited to pine branches. However, this is not so important, because the most important sign of the New Year tree is toys. Since ancient times, appeasing forest spirits, people in […]
New Year's crafts from toilet paper rolls for children
Little fidgets are looking forward to the holiday, so mothers have to come up with interesting games and activities every day. If fantasy doesn’t work anymore, our cool workshops on making New Year’s crafts from toilet paper rolls will come to the rescue.
Crafts for the New Year from a toilet paper sleeve: we make an angel in kindergarten
In kindergarten for the New Year, you can make an angel out of a toilet paper roll. For manufacturing, you will need a sleeve, paints, colored paper, an openwork paper napkin, glue. We paint the sleeve in white (2/3) and beige (1/3) colors. Cut out a circle and a rectangle from yellow or brown paper (this is the future hair), cut the edges into small strips. We glue the circle to the base of the angel's head, and twist the strips on a rectangular piece of paper a little with a pencil and glue them along the edge of the head. Now it remains to glue the wings, a halo and draw a face. Angel ready! See photo instructions below:

A simple Christmas tree made from toilet paper cylinders
Let's start with the simplest option. You will need cylinders of different sizes. We paint the base of the future Christmas tree in brown, and the Christmas tree itself in green. We are waiting for complete drying, then we glue the cylinders, apply a little glue on top and decorate the Christmas tree with ribbons, sparkles, sequins and other things.

Brown bear
The cousin of the polar bear is the well-known brown bear. They never meet in the wild, but under our Christmas tree they will finally be able to see each other!

Any more bushings? Do more crafts!

The New Year holidays are approaching, there is less and less time left, and more and more worries and troubles in preparing for the holiday! It is especially difficult for mothers in these pre-holiday days. Little fidgets are looking forward to the holiday, so mothers have to come up with interesting games and activities every day. If fantasy doesn’t work anymore, our cool master classes on making New Year crafts from […]
Children's New Year crafts from pasta
If you are one of those people who are engaged in creativity about once a year, then New Year's crafts from improvised materials are especially relevant to you. In this section of the article, we have collected for you simpler ideas for crafts for the New Year from pasta from which children will come to the wildest delight. Are there horns, spirals, shells, bows? Then let's get started!
New Year's crafts in kindergarten from pasta: we make a deer farm with our own hands
What are good children's crafts? Almost anything can be used as a material! For example, pasta. To make a reindeer from pasta, you will need several types of pasta and fluffy wire (4 wires and 13 pasta for one reindeer). See how to do it in MK.

Snowflakes
Incredibly beautiful snowflakes can be made from pasta. You will find a detailed master class on making snowflakes with your own hands below. And then it remains only to dream a little and make your own unique snowflake. By the way, the finished product can be painted, decorated with sparkles, rhinestones, beads.


Christmas tree made of pasta
From pasta, you can make not only snowflakes, but also a forest beauty. All the same, miracles happen in the new year, so why don’t pasta turn into a Christmas tree?

Garland of curly pasta
You can make a very simple and primitive garland. Even the smallest needlewomen and needlewomen will cope with such a task. Pasta just needs to be strung on a strong thread.


Find more Christmas pasta crafts here:

The New Year holidays are approaching, which means it's time to think about creating a festive atmosphere. For decor, it is not at all necessary to use store-bought accessories. It's time to unleash your creativity and make original crafts with your own hands. If you are one of those people who are engaged in creativity about once a year, then New Year crafts from […]
Crafts in kindergarten for the New Year from improvised materials
New Year's crafts do not have to be made from traditional materials. You can use whatever is at hand. In addition, this way the baby will be able to get to know the world better, he will develop imagination and creative thinking. So the child will understand that things can be used not only for their intended purpose, for example, pasta can not only be eaten, but also used as a material for crafts!
Christmas tree from a disposable plate: a master class for crafts in kindergarten
In kindergarten with a baby, you can prepare a voluminous Christmas tree from a paper plate. You will need: paper plate, scissors, colored paper, thread, paints. Color the plate green. While the plate is drying, we cut out balls from colored paper, with which we then decorate the Christmas tree. When the paint on the plate dries, cut it in a spiral and fasten the thread at the top. Decorate the top with a star, hang paper balls. It remains only to hang the Christmas tree and you can admire the finished craft!

DIY Christmas ball made of beads and fluffy wire: doing crafts for the New Year with children
You can make a real Christmas ball out of fluffy wire and beads. By the way, it won't break. So, for one ball we need 5 fluffy wires and a lot of beads. We twist the wires together in the form of a snowflake. We string beads on each end, leaving about 3 cm of free wire around the edges. We connect the free ends together, twist and form a hook. We bend the wire with beads into a hemisphere and form a ball. The craft is ready!

Clothespin Christmas wreath
If you want to make a Christmas wreath with your child, then you can consider the option with clothespins. What you need: Cardboard base ring, clothespins, green paint, glitter, red ribbon. Color the cardboard ring green so that it does not stand out. Clothespins also need to be painted (you can additionally decorate with sparkles). We attach clothespins to the base and decorate with a red ribbon. The craft is ready!

Christmas tree from paper forms for cupcakes: we make crafts for kindergarten from improvised materials
This craft is perfect for moms who have paper cupcakes all over the place. Well, if you like the idea, but there are no forms at home, you can buy them at any large supermarket. See the step by step tutorial below.

Christmas tree made from ice cream sticks
Great craft for kids. To create, you will need 4 sticks, green paper, paint, glue, glitter, beads (buttons, mini pom-poms), a star for decorating the top. Sticks (3 pcs.) Glue in the shape of a triangle, glue paper to one of the sides, paint the sticks with green paint. When the paint is dry, apply glue to the Christmas tree (as if it were Christmas tinsel) and sprinkle with sparkles. Let dry a bit and shake off excess. Now it remains to add "toys". For this purpose, you can use beads, buttons, mini pom-poms or something else. We glue a star to the top and a stick at the back (the trunk of the Christmas tree). The craft is ready! You can stick a Christmas tree, for example, into a flower pot, so to speak, plant it on an existing flower and enjoy the festive atmosphere!

Do-it-yourself Christmas crafts from disks for children: we make Smeshariki
If your children love the animated film "Smeshariki", then it's time to use your old CDs to make your favorite characters. All you need is to find out from the child which character he likes the most, cut out the Smeshariki templates from paper and stick them on the disk. New Year's craft Smeshariki is ready! You can draw application templates yourself, or you can download them from us for all cartoon characters.

Shaving foam snowman
A fluffy snowman can be made from shaving foam. To do this, in a bowl, mix the foam with glue and glitter. Apply foam to the paper with a brush and the fluffy snowman is ready!
The New Year is just around the corner. Absolutely everyone is looking forward to this holiday, especially children! We associate the New Year with snow and all the accompanying winter fun: sledding, skiing, skating and, of course, a snowman. As soon as the first snow falls, the children run into the yards to make a snowman. And what to do if there is no snow, but the soul […]
New Year's crafts from wine corks
Well, for those who like to drink a glass of another wine after a hard day, crafts made from wine corks will be an excellent option. If there are few traffic jams, you can make a small craft, for example, a deer or a gnome. But if more than a dozen traffic jams have accumulated over the year, you can make a snowflake or even a wreath.

New Year is the most beloved holiday associated with miracles and magic. The celebration of the new year is characterized by folk festivals and joyful meetings. It is impossible not to love this time of the year, when everything around is transformed, and every house or shop window becomes like scenery for a fairy tale. Everyone wants to participate in this transformation, and therefore they try to decorate their homes […]
Snowmen made from old socks
Everyone has old socks with a hole in their toe! Especially when the hole is only on one leg, it’s a pity to throw away socks, but for crafts they are perfect! In addition to socks, you will need rice, rubber bands and buttons. See step by step guide below.

Snowflake made of fluffy wire and crystals
From fluffy wire we make a snowflake. Then we prepare a saline solution for growing crystals (you can buy ready-made in the store). Next, lower the snowflake into the solution and wait. After a few days, crystals will grow on the snowflake blank. Here is such an unusual craft, as well as informative.

Puzzle snowflake
It is difficult to find a child who does not have a mosaic. It is even more difficult to find a child who has all the details in the mosaic. They are constantly going somewhere. Well, if you have such a set that lacks details and it is not interesting to collect a picture from this, do not rush to throw it away. From the remaining details, you can make a New Year's snowflake. Well, shall we create?

If you plan to decorate the whole house with snowflakes, then you need to study other MKs:

Without what it is difficult to imagine the New Year? Of course, without a Christmas tree, Santa Claus, and for us, residents of the northern latitudes, it is extremely difficult to imagine the New Year without snow and snowflakes! If you want to create a truly New Year's atmosphere in the house, then do not be lazy and decorate everything around with snowflakes. Snowflakes can be flat or voluminous, carved or not. In addition, it is worth abandoning the stereotype, […]
Snowmen from old light bulbs
As an improvised material for making New Year's snowman crafts, you can use old burnt out light bulbs. A little glue, glitter and an old unnecessary light bulb turns into an original snowman!
With the approach of the New Year holidays, an irresistible desire to create wakes up, and it is just in time, because we can save some money on Christmas decorations by preparing them ourselves for the holiday. You can create Christmas decorations from anything, for example, from old used light bulbs, if you did not throw them away. Of course, new ones can be used too, if the hands reach for creativity. So, […]
We make a garland for the new year from cocktail tubes

Help us become better: if you notice an error, highlight the fragment and click Ctrl+Enter.