Openwork crochet bandage for girls pattern. Crochet headband for a girl: patterns and master classes. What do we need
I have always noticed how cute little girls look with bright colorful headbands covering their ears. In stores you can find a huge variety of headbands for young fashionistas. And mothers are not far behind. They knit for their beauties wide multi-colored elastic bands with ribbons, beads or flowers. However, girls and women have completely forgotten about such a once fashionable accessory. But why? This hat is great for warm windy weather, when it will be hot in a hat, but you really want to cover your ears.
Why not bring bandages back into our wardrobe? Unusual modern products able to decorate any haircut and will be a great addition to the spring or autumn look. In my master class, I would like to tell you how you can knit an interesting bandage that will compete with berets and hats. In addition, this accessory can be made in 1 day. For knitting I will need: hook No. 4.5 and acrylic + wool threads. I took a thicker yarn so that I could wear a bandage in cool weather.
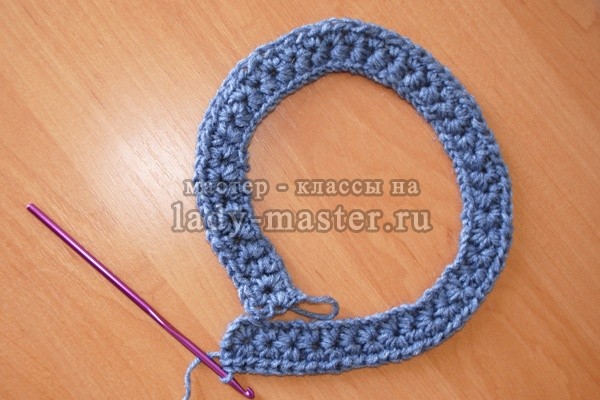
1. First, I collect a chain of air loops, which will correspond to the circumference of the head. I try it on myself. I got a chain of 89 loops. Please note that their number must be odd.

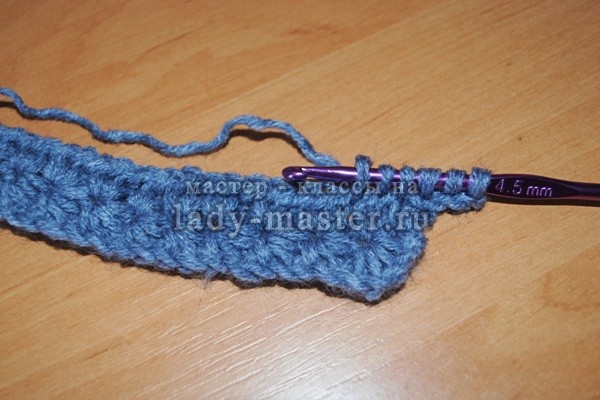
2. The bandage is knitted in straight and reverse rows. First row ( front side) I start with a set of 5 new loops on the hook. Starting with the second chain stitch after the hook, I draw up the thread from 5 loops of the pigtail. This is done according to the principle of making unfinished single crochets: I insert the hook into the loop of the chain, pull the thread, two loops are formed on the hook, but I don’t knit the column further, that is, I don’t tie these loops together, but leave it on the hook and go to next loop chains.

3. When there are 6 loops on the hook, I throw on the thread and pull it through all 6 loops. I knit an air loop so that a hole forms over the 6 loops.

4. Again I dial 6 loops on the hook, but I perform this action as follows: I pull 1 loop from the hole, 1 loop from the last of the 6 loops, 1 loop from the air loop into which the last of the 6 loops was dialed and 1 st from next 2 chain sts. Total 6 loops on the hook.

5. I put the thread on the hook and pull it through all 6 loops, completing the element with 1 air loop.

6. According to the scheme described in paragraphs 4 and 5, I knit a row to the end. In the last air loop, I perform 1 half-column with a crochet and turn the work over.

7. The second row (wrong side) I knit like this: 2 air loops, 2 half-columns with a crochet in the hole of each element. I finish row 1 with a half-column with a crochet in last loop. I'm moving my work.

8. In the first row, I got 44 "stars" and 2 half-columns with a crochet in each hole.
9. The third row (front side) I knit according to the principle of the first. Cast on 3 air loops, pull 1 loop from the 2nd and 3rd air loops from the hook, then 3 loops from the first 3 loops of the row. Total 6 loops on the hook. I yarn over, pull the thread through all 6 loops and finish the element with an air loop.
10. I knit the remaining stars to the end of the row according to this scheme: I pull 1 loop from the hole, 1 loop from the last of the 6 loops, 1 loop from the same loop into which the 6th loop was dialed and 1 loop from the next 2 columns of the previous row. There are 6 loops on the hook.

11. I yarn over, pull the thread through all 6 loops and make an air loop.

12. Having finished the row, I make 1 half-column with a crochet in the last loop and turn the work over. Next, we knit the purl rows according to the example of paragraphs 4, 5, 6 and the facial ones in accordance with paragraphs 9, 10, 11.12.

13. We complete the product with the wrong side. The number of rows will depend on the desired bandage width. I made 8 rows.

Every mother on maternity leave tries to come up with a hobby or do needlework for the benefit of the baby. When everything that is possible is already sewn and connected, it remains to create something new. A good addition to the image of a young beauty will be a headband. Crocheting such a product fits quite easily. How to tie it? What are the easiest knitting patterns?
A crochet headband is suitable for a girl of any age, from a baby to a teenager. The headband can be worn everyday or put on for any event: birthday, matinee, holiday in kindergarten or school, graduation, photo session, etc. It is quite easy to knit a headband with both knitting needles and crochet.
We will talk about how to crochet headbands with a crochet hook. Thus, openwork dressings are obtained for any occasion. In order to start knitting a bandage for a girl, you only need to have a basic knowledge of crochet techniques. And you can peep the schemes with us. Crochet is one of the most accessible, simple and quick ways needlework. But the products crocheted, are insanely beautiful and original.
What materials and tools are needed to crochet a headband for a girl?
- Hook. The hook number is selected depending on the threads with which you will knit. So, if the threads are thin, then the number will be less, if thick - more. Advice! If you have never knitted before, opt for a hook with a wooden handle, so you can prevent hand fatigue.
- Threads. If you are going to knit bandages for everyday use, then you can choose thick threads. For solemn events a knitted bandage made of thinner threads will look more beautiful. Advice! For winter and autumn of the year, choose threads containing wool; for the warm season, you can opt for acrylic or cotton threads.
- Tools: scissors, needle, centimeter, ruler, scrunchie, satin ribbon.
- Headband decor. Many women choose buttons, buttons, beads, sequins, ribbons, rhinestones and much more to decorate the product.
In order to tie a headband, you only need one measurement: the circumference of your head.

Use a measuring tape to take measurements. The width of the bandage is chosen according to your desire.
How to choose a pattern for a headband?
Before proceeding to knit the bandage itself, many women knit a control sample. So you can practice knitting a new pattern, as well as see what width of the bandage is best for your girl.
How can I crochet a headband for a girl?
The first way is longitudinal knitting
 The bandage is knitted to the full width top down or bottom up.
- Bandage with a seam. Dial the required number of loops for the entire circumference of the head. Knit the first row, then turn the product over and knit the second row. Continue knitting until you reach the desired bandage width. Then the edges of the bandage are sewn into a ring. Advice! To make your bandage look beautiful, tie it on both sides with some original pattern. For example, fans of double crochets. You can also link decorative flower and sew it to the bandage or decorate it with a satin ribbon.
- Bandage without a seam. Dial the required number of loops for the entire circumference of the child's head and connect them into a ring. Then the knitting of the product continues in a circle. Important! Using this knitting method, you cannot make a mistake with the number of loops cast on. Otherwise, you will have to completely dissolve the product and knit it first.
The second way is cross knitting
This knitting method is chosen mainly by beginners, because you can easily adjust the length and width of the bandage at the very beginning of work.
At cross knitting rows are knitted from one seam from one side to another.
- Bandage with a seam. A long strip is knitted around the entire circumference of the head, and then its short edges are sewn together. The top of the bandage can be decorated as you wish. Advice! In order for the bandage not to move out and hold firmly on the head, a satin ribbon should be threaded along its entire length. By tightening the tape tighter, you will fix the bandage on your head.
- Bandage with an elastic band. With this version of knitting, the bandages will be taken a little differently. The length of the folded elastic band is subtracted from the girth of the head, the resulting number is the length of the bandage. The elastic is knitted at the very beginning and end of knitting, or you can sew it to the finished product. You can choose absolutely any pattern and decor of such a bandage. Thanks to the hair band, the bandage will be securely fixed on the head.
Now you are convinced that it is very easy to knit a bandage on a child's head. Do not be afraid to fantasize and experiment with the patterns and decor of the headband. Such a product will become a real decoration for a child!
Mother of two children. I'm leading household for more than 7 years - this is my main job. I like to experiment, I constantly try various means, ways, techniques that can make our life easier, more modern, richer. I love my family.
Headbands for newborns are a stylish and fashionable accessory with which every mother can diversify her baby's first hairstyle. Such jewelry should be special so as not to harm the delicate skin of the baby.


Peculiarities
These products are ideal for the first photo shoots and going for a walk. Such accessories are the first decorations for girls, and they look beautiful and appropriate. These products have a decorative function. They add a festive touch to every outfit, making the child's style unique.


Headbands are made from different materials, are intended as a bright accent attire for kids. A distinctive feature of the models is lightness: bandages should not be heavy and massive.


Today, such decorations are made from textiles or yarn. Usually, hypoallergenic materials are used for them, so as not to harm the delicate skin of the baby and not cause allergies. Often the composition of the materials of these accessories is natural, however, synthetic components are often used as decorative elements.


The advantages of such accessories include the ease of their implementation. These decorations can be bought in specialized children's stores or made by yourself with your own hands. It is not difficult to make them, and the process itself will give a lot of good mood.


The design of such jewelry has no boundaries. It can be a narrow model with a wide ruffled side stripe, a small flower and a pair of buttons, or a knitted double stripe of fabric with flowers wrapped in fabric.


This is one of the favorite themes of skilled craftswomen, who often create real masterpieces from a seemingly ordinary headband. Despite the colorful and generous decor of such jewelry, they do not look massive or too pretentious. These are beautiful additions to toddler clothes.


Color solutions
The color palette of these accessories is varied. Usually in the wardrobe of babies there are several such gizmos, selected specifically for a particular outfit. There are also universal models in classic white and beige tones, allowing maximum combinations with any outfit.
One of the most current colors The palettes are pink, crimson, cream, blue and lilac, fuchsia, peach, coral and lime. The pastel scale symbolizes tenderness and is appropriately combined with most items of children's wardrobe at this age.
Less often, mothers acquire accessories for their babies, made in red, turquoise, green. These shades are more capricious and require careful selection of clothes.


Models
Today, the choice of models of such dressings is quite wide. The assortment includes a variety of lace, knitted, knitted products of different widths and volumes. Not only the shape is different, but also the design. It may be completely simple options, products with moderate decor or chic models for photo shoots.
Knitted headbands are convenient because they sit tightly on the head and do not create discomfort. Knitted accessories have the same feature. They do not need to be constantly corrected, they are neat and graceful no less than fabric options. Some mothers make dressings for newborn daughters from nylon tights pink and white.


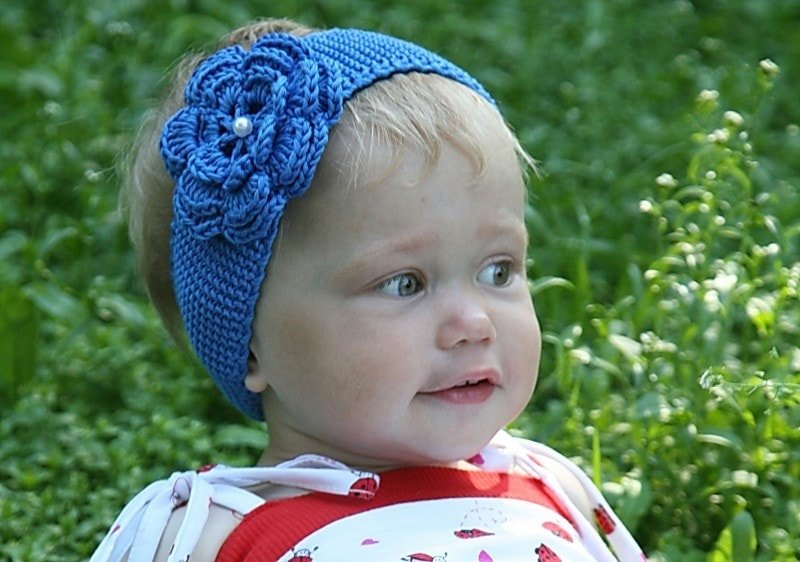
With flowers
The favorite headbands for baby girls are models with a flower. Accessories can be made in the form of an elastic band or a knitted strip, to which a beautiful multilayer flower is glued with hot glue. Its fragments are made from various materials. More often it is chiffon, foamiran, satin ribbons, felt, lace and yarn.


with a bow
A headband decorated with a bow looks charming. Such accessories are appropriate with almost any clothing. Bow - indispensable attribute many girls. It is made from nylon and satin ribbons, can be an independent element of decor or make up a composition with a flower. In this case, the bows are very small and simple.
From foamiran
Accessories with foam rubber decor look incredibly realistic. Fom is easy to use, able to remember the shape after heating on the iron. This feature of the material allows you to accurately reproduce the texture of delicate flower petals and even the smallest veins of leaves. It can be crushed, stretched, forming the desired shape. To create a subtle play of chiaroscuro, the fom can be painted with special crayons. This adds realism to the colors.


Kanzashi
Models in the famous kanzashi technique are compositions of many small blanks interconnected. More often these are square fragments of satin ribbons that are folded different ways until a certain form is obtained. Each element is glued to the base with a special adhesive. This technique is one of the brightest and most original.


With felt decor
Design using felt allows you to create harmonious decorations. This material is easy to use, does not need edge processing and is firmly fixed with threads or special glue. Thanks to the large selection color palette you can choose several different tones of the material for one model, creating the effect of chiaroscuro.


knitted
Crocheted or knitted headbands are rightfully considered the favorites of such jewelry. They are made from thin and soft threads of natural origin. A knitted headband can be openwork or made with a simple 1x1 elastic band. Usually, if the bandage itself is concise, then its decor becomes the accent of the model. More often as decorative element in knitted patterns bows, multi-layer knitted flowers protrude.


in the form of a crown
One of the most extraordinary crochet patterns. If the textile options are more like a bezel. Knitted headbands The crown looks amazing. They are knitted in a circle, dialing the required number of loops, taking into account the volume of the head.
Using different openwork pattern, you can create unique decorations for babies. At the same time, such accessories sometimes do not need additional decor, since they themselves look quite impressive and unusual.


When buying a bandage for a baby or making it yourself, it is worth considering a few nuances:
- it is undesirable to knit an accessory made of woolen yarn, it is not suitable for every child and can cause allergies;
- do not wear jewelry for a long time, not every child will like it;
- the main rule in choosing an accessory is its convenience: discomfort and the ingress of decor elements on the eyes are unacceptable;
- massive products have not only lost their relevance: they interfere with the baby, sometimes causing whims;
- when buying an accessory, you should pay attention to the fact that there are no sharp and small items;
- a headband does not replace a headdress, so in cool weather it is better to wear a hat or cotton cap.


An active mother-needlewoman will not sit still for a minute, so as not to tie new thing to your baby. But when the wardrobe of a young princess is already bursting with hats, booties and dresses, it is difficult to come up with something new. A great addition to the collection will be a crochet headband for a girl. You will find diagrams and descriptions of this product in our article.
A cute ribbon on her head can be the first accessory for a young fashionista. It can be used as an attribute for a photo shoot or simply put on the baby's head during periods of a sharp cold snap. Be that as it may, knitting a headband for a girl with your own hands is quite simple: you just need to steadily follow our instructions.
Necessary materials:
- 1 skein of cotton yarn;
- hook size 3 mm;
- 1 scrunchie;
- sewing needle.
Process description:

Light bandage for baby

The summer version of the baby headband is best knitted using light cotton, linen or worsted yarn. If you are knitting for a newborn baby, additionally make sure that the selected materials are hypoallergenic and only then get to work.
This openwork headband for a girl is crocheted up to 5 mm in size and smaller in a circular pattern.
Necessary materials:
- four-layer worsted yarn;
- crochet hook 5 mm.
Process description:

We create a beautiful accessory with our own hands
During the off-season, when no one wears hats, the weather can be very changeable and dangerous to health. Tie a warm bandage and it will help hide your ears and head from the piercing wind, and a modest decor will be appropriate for any outerwear. In the process of crocheting headbands for women, not only the pattern will help you, but also detailed instructions presented in this tutorial.

Necessary materials:
- crochet hook size 6 mm;
- linen yarn;
- scissors and needle.
Process description:

Evgenia Smirnova
send light into the depths human heart- that's the purpose of the artist
Content
One of the cutest accessories is the headband for girls. Creation of such original item wardrobe is of interest to many mothers, because each wants to create something special for their child. If you also have a burning desire to crochet a headband for a girl, study the tips and master classes below.
How to make a crochet headband

Beginning needlewomen are advised to divide the entire process of creating a bandage into stages. The first step is to choose the right yarn and prepare necessary tools. As for the knitting material, the specific option depends on the intended use. finished product. If some kind of celebration awaits you in the near future, take cotton threads of predominantly light shades. Bright acrylic yarn is suitable for summer heat. To take a walk with the baby in spring or autumn, get woolen threads.
Additionally, decorative elements may be required, such as sequins, beads, buttons or rhinestones. Among the tools, the main one is the hook. Its number is selected based on the type and thickness of the yarn. Beginners in the field of knitting should give preference to a product with a wooden handle. In addition to it, you will need:
- tape measure;
- scissors;
- ruler;
- needle with thread.
If everyone necessary materials and tools are ready, start taking measurements. Using a centimeter, determine the circumference of the baby's head. This will be the desired length of the product. The width is made according to your desire. For babies up to a year old, it varies between 33-35 cm. After taking measurements, make a control sample to see how well the dimensions were determined and the pattern was chosen. In order for the headband to be knitted qualitatively the first time, strictly follow the instructions.
Longitudinal bandage
One of two methods can be used in the dressing process. The first - longitudinal knitting at which the product is seamless. The principle of operation is as follows:
- Dial a chain of air loops. Its length should correspond to the girth of the girl's head. It can also be determined from a control sample. To do this, multiply the number of loops by 1 cm by the size of the girth of the head. With the pattern, dial the chain in multiples of the rapport of 9 loops.
- Close the chain with a ring and continue to knit according to the pattern 1-5 rows.
- Work the next 5 rows in reverse.
Cross knitting

Here the knitting occurs across, i.e. from one side seam to another. The principle of creating a product is to set a chain of air loops of such a length that corresponds to the width of the finished product. Then the first row is knitted, the future accessory is turned over with the reverse side, and the same steps are repeated until the product has a head circumference length.
The finished item is often tied with a hair tie, which is inserted at the beginning of knitting, or you can simply sew the short sides. Then it remains only to decorate the product with decorations to your taste. Often they are small or large flowers, such as roses. Linking them is easy:
- Cast on 30 air loops, turn the chain inside out.
- Raise 3 air loops, make a hole with a crochet in 4 from the hook.
- Knit an air loop again and knit an additional double crochet in the same hole. Continue to the end of the chain.
- Turn over, raise 3 air loops, make 8 columns in all V-shaped holes, and with a crochet. Knit only 1 between the elements of the pattern.
- Twist the resulting strip into a spiral, and place a large bead in the center.
- Sew the flower to the cross seam.