Cool do-it-yourself foam rooster. Craft "Rooster" with their own hands for the New Year. Necessary materials for a paper rooster in elementary school or kindergarten
DIY crafts in the form of roosters will be relevant not only for the holidays in the New Year 2017, but also every year for Easter. And without them, it is simply impossible to imagine an interior in the style of Provence, country or rustic. In this article, we presented 6 step-by-step master classes on how to make cute crafts in the form of roosters for decorating a house, a Christmas tree or a festive table from improvised and even junk materials.
Master class 1. Candy bowl in the form of a rooster
Looking at this elegant candy bowl, it’s hard to imagine that you can make it yourself, and even from ... cardboard boxes for eggs. In fact, to make such a handsome man, it will not take much time, nor the skills of an artist-sculptor. By the way, even a child can do most of the work, so this great idea Christmas crafts for school or kindergarten.
You can decorate with such a candy festive table and surprise your guests. However, it can be filled not only with sweets, but also with tangerines, small presents for contests, notes with predictions. And the cockerel can be put under the Christmas tree along with a gift.
Materials:
- 7 packages for a dozen eggs;
- Scissors;
- Acrylic paints and brushes;
- Hot glue gun;
- PVA glue (at least 250 g);
- Balloon;
- old newspapers;
- White paper.
Instruction:
Step 1. Cut out the cones located in the middle of the tray, then cut their sides into feather petals. Each cone should have 4 feathers.


Step 2. Now we need to make blanks for the head and throat of the rooster according to the principle of building feathers to cones: the head will consist of 5 feathers, the second cone (throat) will consist of 6 feathers, the third cone will consist of 8, the fourth will consist of 10, the fifth will consist of 12 feathers. And finally, make the sixth blank, but already in the form of a fan of 8 feathers, and not in the form of a cone, since this part will cover the beginning of the back. To build feathers, use adhesive tape, gluing it on the inside of the blanks.

Step 3. For now, set aside the cones and cut out the beak, comb and beard of the rooster. The scallop just needs to be drawn and cut. To make a beard, you need to cut a blank from two sidewalls of adjacent cells of the tray (see photo).

The next two photos show the principle of making the beak of our craft. Please note that the beak consists of two cones, because our rooster must crow!

Step 4. Now we begin to form the figure of a rooster, namely the head and throat. Glue all the cones, starting with the smallest and ending with the largest, using a hot glue gun. Glue also the beak, beard and comb.

Step 5. Draw and cut out two blanks in the form of wings 15 cm long, then use a glue gun to cover them with feathers ... from the same cones.

Step 6 Cut feathers for the tail of the rooster from the covers from the trays (4 feathers should be obtained from one cover).

Step 7. Let's move on to making a papier-mâché candy bowl belly:
- inflate balloon and cut strips from white office paper and strips from old newspapers.
- Tightly cover the entire ball with strips soaked in PVA glue (glue can be slightly diluted with water). The first and last layers must be white. There should be at least 4 layers of paper in total.
- The next day, when the paper is completely dry, pop the ball and cut the resulting "egg" into two unequal parts (one half should be slightly larger). Then put a small part in a large one and glue it to make the bowl strong.

Step 8. Attach the head of the rooster to the stomach with a cardboard backing (on the inside). Glue wings and tail to the body of the rooster with hot glue. Our craft in the form of a rooster already looks surprisingly believable!

Step 9 Now it's time to color the candy box. You can choose the shades of paint to your taste, because roosters are different and it is not at all necessary to achieve complete realism. Perhaps your rooster will even be beautiful in all-gold plumage? In the same project, shiny paints were used for the paws, beak, comb and beards, and mother-of-pearl for painting feathers.

Pay attention to the fact that the color transitions on the cockerel are made smoothly - from pearl white to gold and then to green.

Step 10. In order to provide more stability to your candy bowl, glue some kind of square support to the bowl and, of course, two paws made from cones with 3 petals. Finally, paint the paws, fill the bowl with candy and put your handsome man in the most prominent place. Now he is ready to cheer up all the guests at the New Year or Easter table!
Master class 2. Christmas-tree decorations in the form of roosters
In the upcoming 2017, the Christmas tree must be decorated with decorations in the form of roosters. Do it with your own hands Christmas decorations lighter and best made of felt, because it is so bright, affordable and easy to work with.

And here is a video instruction on how to make crafts in the form of heart roosters with your own hands.
In this video you can see general principle making felt crafts in the form of cockerels.


In addition to the cockerel egg, make some more felt pendants and decorate willow branches for Easter
Master class 3. Paper roosters with hanging legs (for children)
And here is an idea for children's crafts on the theme of the symbol of 2017, which can be made both for school / kindergarten, and for decorating the Christmas tree or the walls of the house.

Instruction:
Step 1. Download and print the template, then cut out all the details.

Step 2. Cut one rope, glue the paws to its ends - these are the legs.
Step 3. Put the legs on the bottom loop, bend it along the dotted line and glue it to the body.

Step 4. Glue the top loop.
Step 5. Well, that's all, now it remains only to color the cockerels to your taste.

Master class 4. Panel with a silhouette of a rooster in the style of Provence
The silhouette of a rooster, painted on roughly folded old boards, will be a great decoration, rustic or. And a panel with the symbol of 2017 can be great New Year's gift. The following selection of photos presents several ideas for such crafts.


Materials:
- Wooden boards of small thickness. In this master class, boards from a pallet (pallet) were used, boards disassembled from a wooden fruit box will also work. Whatever boards you pick up, fresh or old, they need to be cleaned and dried before making crafts.
- Saw or jigsaw.
- Small nails.
- Hammer.
- Stain or acrylic paint of the desired color for the background. If desired, you can use chalk paints, which are sold ready-made or diluted independently (from acrylic paints with the addition of gypsum). With their help, it will be easier to create the effect of an old tree.
- White acrylic or chalk paint for the silhouette of a rooster.
- Colorless matte primer for wood (preferably).
- Matte varnish (preferably).
- Brushes.
- Fine grain sandpaper.
- Pencil.
- Paper.
- Stationery or craft knife and scissors.
- Wax for wood transparent or dark (optional).
Instruction:
Step 1. Estimate how many boards you will need to put together a panel of the desired size.
Step 2. Take measurements and cut the boards to the same length. Also prepare two smaller boards - they will act as crossbars and connect all the other boards.
Step 3: Fold the Main Boards front side down, align them, then lay two smaller boards across as shown in the photo below. Now nail each board to the crossbeams.

Step 4. Clean the surface of dust, then apply a primer to the panel in 1-2 layers, allowing each layer to dry. This step is optional as we want a rough and "antique" wood and paint look, but a primer is still needed if you want to extend the life of your painting and make it easier to care for.
Step 5. Now you need to paint the boards, that is, create a background for our rooster. To create the effect of faded paint, a water-based stain of white and blue color applied unevenly. There is another way to paint antique: paint the boards acrylic paint in 1 coat, wait for the paint to dry, then rub the surface with sandpaper in some places or over the entire area.
Step 6. It's time to start making a stencil. If you are making a small panel of approximately A4 size or less, then you can simply print the picture below, after adjusting its dimensions in any photo editor. Then all you have to do is laminate the paper with transparent tape and cut out the silhouette of a rooster using a clerical or breadboard knife. Voila, the stencil is ready!

If you want to make a panel bigger size, for example, A3 format, then the picture will have to be printed in two parts (or more). To do this, upload the rooster silhouette to rasterbator.net, print the resulting PDF file, cut out the details, then assemble them as a mosaic. Then you can laminate the stencil with adhesive tape or transfer the stencil contours from office paper to thicker or laminated paper (see photo).

As you can see, on this stencil, in addition to the silhouette of a bird, the French word “Le Coq” (trans. “rooster”) is carved. You can repeat this idea or come up with your own signature, for example, "Bon appétit!"
Step 7. Fix the stencil on your panel with masking tape and start painting the silhouette with white paint. When the paint is dry, sand some areas of the drawing with fine-grained sandpaper to create an antique effect.

Step 8. Hooray! Almost ready, it remains only to apply a layer of wax on the panel and polish it. Keep in mind that dark wax will give your panel an even more “shabby” look, while transparent wax will simply protect.


Everyone wants this holiday to be remembered forever. Some time before the holidays, everyone starts preparing for the New Year.
In the New Year period, many people try to make crafts with their own hands on their own. In this article, we will tell you how to do crafts on New Year Rooster 2017 in Kindergarten from paper and not only. Show photos and videos.
Crafts for the New Year of the Rooster 2017 in kindergarten.
Children in kindergarten are constantly doing crafts. New Year 2017 is a great occasion to do something with your own hands in kindergarten. Here are a few interesting ideas and show the photo.
Felt Christmas tree toy.
It is very easy to make such a toy with your own hands. Even the smallest child can make it.
- First of all, we make several strips of felt 10 centimeters wide. Then we make cuts on these strips.
- The resulting material is twisted into rolls and tied in the middle with a beautiful thin rope.
- It remains only to fluff the strips and give them the shape of a ball.
This is such an interesting piece.
Beautiful bells from disposable cups.
 Photo: Bells from disposable cups
 Surely you have unnecessary disposable cups of tea or coffee lying around at home. You can make great ones out of them. new Year decoration for the tree. We will tell you how to make such a decoration step by step:
- We take disposable cups.
- We paint them in silver or gold spray paint.
- We make a hole in the bottom.
- Then we take the wire, which is covered with New Year's tinsel and make a loop on it, while leaving a long end.
- We tighten the wire into the hole and attach the ringing ball.
- A beautiful “bouquet” is formed from the bells and hung for decoration.
Christmas tree made of wire with tinsel.

Highly simple craft for the New Year 2017. Even the smallest ones can make it. The main thing is to give children materials and talk about caution.
To make such a wonderful Christmas tree, you will need iron wire, which is covered with festive tinsel. Such wires are now not a problem to buy in stores. You need to bend the wire in the form of a Christmas tree, and attach some kind of star or button to its top.
Craft in kindergarten: a house for children.

In kindergarten, you can make such a wonderful house. For the manufacture you will need cardboard, paints and plasticine. You can also make some New Year's attributes for the house, such as a Christmas tree and a snowman.

A very interesting craft can be made from transparent glue. In order to make such a craft, you need to prepare silicone glue and a Christmas tree-shaped baking dish.
- Pour the glue halfway into the mold.
- Sprinkle sequins on top.
- Then add glue.
- While the glue is curing, put some kind of weight on the mold, for example, a glass of water.
- Make a hole in the upper part of the craft and stretch a beautiful rope.
- The resulting craft can be hung on a Christmas tree.
Beautiful rooster 2017 with your own hands.
It's no secret that 2017 is the year of the fiery rooster. Therefore, it is imperative to make a symbolic craft.
You can make a symbol of 2017 from cardboard. detailed instructions it is not enough to show a few photos here:

 Photo: Rooster 2017


Crafts for the New Year 2017 do it yourself from paper.
Paper is a great creative tool. DIY paper crafts for the New Year 2017 are made quite simply and with minimal material costs.
Can be made from paper great amount interesting crafts for the New Year. Let's show some cool ideas.

To make this wonderful craft, you will need cardboard paper and color.
- Make a cardboard cone.
- Take several shades of green colored paper at once.
- From green colored paper, cut out many circles at once.
- Glue the circles onto the cone. Start from the bottom. Glue on the top edge of the circle.
Here is such a Christmas tree can be made from cardboard and colored paper.
Christmas tree made of tinsel.
 Craft: Christmas tree made of tinsel photo
 You can make a Christmas tree according to the same principle as the previous craft, just decorate it with New Year's tinsel.
Paper snowflakes.


 Photo: DIY crafts for the New Year 2017
Everyone made paper snowflakes before the New Year. You can decorate windows with them, hang them beautifully on a Christmas tree, you can find a lot of applications for them.
Christmas tree from napkins.
 Photo: beautiful Christmas crafts
 Very beautiful Christmas trees obtained from ordinary napkins. This craft is very simple. Even the smallest children can cope with the task of making it. For the manufacture you need only round paper napkins. You can also use wooden skewers. They will become the basis of the Christmas tree.
- Cut the napkins along the radius.
- Glue them in the form of cones.
- Put three of these cones on a skewer.
- It is best to fasten on beads glued to a skewer.
- The last smallest napkin is glued to the very top. It should be smaller than everyone else.
Craft ideas for the New Year 2017: photo.


 Crafts in the Year of the Rooster 2017 photo


Crafts in the year of the Rooster 2017: video.
Video tips from bloggers. How to make crafts for the New Year of the Rooster 2017 with your own hands.
Hello, friends! Isn't it time for us to wish you a Happy New Year? It's already December 6th on the calendar. It's probably too early though. But it’s time to start making all kinds of different holiday paraphernalia.
Today on the ShkolaLa blog there is a master class called “Do-it-yourself Rooster craft for the New Year!” The rooster is a symbol of the upcoming 2017. Therefore, this leader of the poultry yard on the eve of the main magical holiday is especially popular with small and large needleworkers.
Today we will show you how to make three cute roosters. Believe me, it's not that difficult. The main thing is to carefully look at the photo, read the descriptions and repeat after us. Let's start with the cockerel corrugated cardboard.
Beautiful corrugated cardboard rooster
For work we need:

- colored corrugated cardboard;
- scissors;
- ruler;
- pencil;
- doll eyes (if they are not there, then half beads will do or eyes can be cut out of black cardboard);
- silver sequins (or something else for decoration, beautiful and shiny).
From a sheet of brown cardboard cut out 4 strips. Their length is 28 cm (this is the length of a sheet of cardboard), and their width is 2 cm.

We take the first strip and turn it into a roll, fix the tip with glue.

Then, on the same roll, fixing the ends with glue, we wind the remaining three strips. We get this drum. This is the body of our future cockerel.

From the same sheet of cardboard we cut out three more strips 1.5 cm wide.

We roll them into one roll. We get a blank for the head of a rooster. It is slightly smaller than the body.

From a sheet of green corrugated cardboard, cut out seven strips 1 cm wide.

We also roll them into one roll. This will be the rooster stand. In total, we got three such blanks.

Let's take care of the head. First, let's make a comb. To do this, cut out three strips of 1 cm wide from red cardboard.

And from each strip we make a roll. We get three red drums.

Now the beak. From yellow cardboard, cut out a rectangle 4 cm long and 1 cm wide.

We fold it with the letter "M"

Glue the "legs" of the letter "M" to the middle. It turns out here is such a beak in the form of a checkmark.

For the beard, cut out a rectangle 3 cm long and 1 cm wide.

We glue the detail in the form of a droplet.

Now we glue the beak, beard and comb to the head of the rooster.

And then doll eyes. Eyes need to be glued on both sides of the head.

Let's make wings for the rooster. To do this, cut out two strips 1 cm wide from yellow corrugated cardboard.
Note! Two stripes are for one wing. For two wings, you need to cut four stripes.

From these two strips you need to twist the roll. Roll the roll on a pencil.

There should be a small hole inside. The figurine vaguely resembles a bagel.

Now we press on one side of our bagel with our fingers. We get just such a drop. The wing is ready.

We do the second wing in the same way.

Glue the wings on both sides to the body.

And the body itself is glued to the green stand. And from red cardboard we cut out a rectangle 3 cm long, 2 cm wide. Let's make paws out of it.

We glue the rectangle in the form of a droplet.

And glue our paws between the body and the stand.

Now, with the help of glue, we connect the body and head of the rooster.

The symbol of the year is almost ready! The main thing is missing - a chic tail. Now let's deal with him. Preparing another batch of cardboard strips different color. We took yellow, blue and green. All stripes are 1 cm wide. Now about the length: the longest - 10 cm, medium - 7 cm, short - 4 cm.

We glue small pieces in the form of droplets.

Glue medium-sized strips onto small droplets.

And then the longest. Feathers are ready.

We connect the feathers in the tail.

Glue the finished tail to the body.
And one more important point To hold the tail more securely, connect the top feather and comb with glue.

The rooster is ready, and look it will crow! Since the craft is New Year's, we will decorate our bird with sequins.

Such a cockerel is not ashamed to take it to school, and to kindergarten.
Cockerel Brothers
Next in line are a couple more symbols of the New Year. We called them brothers, because they are similar to each other like twins, only feathers, wings and tails are different. They are made in different technique. We will make two roosters in parallel. You can choose and do the one you like best.
To make such roosters, prepare:

- a sheet of white cardboard;
- colored paper(it is better if it is two-sided);
- ruler;
- scissors;
- glue;
- pencil;
- braid "zig-zag";
- doll eyes;
- sequins.
On a sheet of white cardboard, draw a circle with a diameter of about 9 cm. Since our compasses hit somewhere, we circled the plate.

Cut out the circle.

Fold the circle in half and cut along the fold line into two parts.

From each semicircle we will make a cone. In total, we got two cones. This is the basis for the body of the birds.

And now we will make the bases for their heads. From the same white cardboard, we cut out two rectangles 8 cm long and 2.5 cm wide. Let's mark a gluing line on rectangular blanks (about 5 mm wide). At the same time, cut out strips for scallops from red colored paper. They are 7.5 cm long and 2 cm wide.

We make our scallops wavy.

We glue them to the blanks of rooster heads.

We glue the blanks. We get two heads.

Now glue the heads to the bodies. The basics are ready! You can start decorating.

Now we will act separately. Let's start with the rooster, for the decoration of which you will need zig-zag ribbons. Glue colored ribbons on the cockerel's body. We get such a beautiful and bright plumage.

We will also make wings from ribbons. We cut them into segments 7 cm long. For each wing, we use 5 ribbons.

We fold the ribbons like a fan and glue them to the body on both sides.

Since the wings turned out to be long, we bend them in half and glue them to the body. The wings are ready!

We make the tail according to the same principle. Only we take longer ribbons - 10 cm.

And glue the tail to the back of the body.

Now let's deal with the second cockerel. We will make feathers for him from colored paper. Cut out colored triangles. Lots of triangles.

Glue the triangles to the cockerel's body, starting from the bottom. Glue smear only the upper side of the triangle. We leave the lower corner free of glue and slightly lift it from the body. The first tier is ready.

So gradually stick tier by tier on the body. Each subsequent finds a little on the previous one. We decorated the cockerel's neck with a yellow ribbon on top.

Wings will be made from colored stripes. For each wing, cut out 5 strips 6 cm long and 5-7 mm wide.

You need to curl the feathers a little. To do this, wind them on a pencil. We get such curls.

We glue the feathers with a fan.

And glue them on the sides of the body.

We do the tail in the same way. Cut out 9 colored strips 10 cm long and 5-7 mm wide.

Curl them with a pencil.

We glue with a fan.

And glue it to the back of the body like this.

Here they are our handsome men) Only faces are missing. Now we will fix it.

First, we will make beards for the roosters. Cut out small strips 1cm x 3cm. And we mow them a little.

We glue blanks for beards in the form of eyelets.

Glue the beards in place.

We cut out small rhombuses from yellow paper, fold them in half, we get beaks.

These beaks are glued on top of the beards. And at the same time glue the eyes.

Decorate the cockerels with sequins. As a result, we got such a cockerel decorated with braid.

And here it is decorated with colored paper.

And here are our brothers together. They stand and promise us happiness, health and good luck in the coming 2017.

Blog "SchoolLa" wishes you the same!
And also success in study and creativity!
May the coming year of the Rooster be joyful and cheerful!
So that no one is bored and there is enough time for everything!
And in order to new year's eve you found under the Christmas tree not only the cockerels you created, but also a whole bag of gifts from Santa Claus!
Now let's watch the cartoon! This children's cartoon was created in 1955, but is still able to create for both young schoolchildren and their parents. Christmas mood! Good old "Snowman - mailer")
Good luck to you!
And nice creativity)
New 2017 is the year of the Red (Fiery) Rooster, and its figurine or image will become the most sought-after present. The needlewomen of the "Cross" have good tradition: to New Year's holiday prepare thoroughly. And this year will be no exception. Many of us will make or are already making a rooster with our own hands, or even not one, but several at once! After all, it is necessary to please relatives and friends with a handmade symbol of the year, and yourself with an exciting process of creating this very symbol in various techniques handmade.
Creating a kind of GUIDE TO MASTER CLASSES from the Internet is also a tradition of our needlework site, which was born a year ago. For you, dear craftswomen, we have selected a lot of only the best master classes on the net. Admire, look closely, discuss and choose the most colorful rooster! And then sew/tie/draw/blind/weave it. So, in what technique can you work on the eve of the New Year holiday?
If you don't have time to work, don't worry. The article contains links to craftswomen who sell finished work.
Cockerels made of paper and on paper
Making cards with the kids
If you are not a professional card maker, then before you start creating postcards, be sure to read our article "Learning to make New Year's cards with your own hands using the Scrapbooking technique". In it you will find not only a lot of ideas, but also get acquainted with the basic rules for creating postcards.
Any cockerel drawn by your child can be placed on a postcard. If it’s difficult for the kid to figure out how to draw a rooster with his own hands, then show him this step-by-step instruction:

And then, a matter of technology. Cut out the cockerel and make it the central part of the composition. For example, your postcard can be so simple, but cute. At work, use christmas paper and a bright red ribbon, add snowflakes, twigs and other holiday paraphernalia. When you have a basic idea, the process of creating a postcard becomes much easier!

Photo from http://itsapatchworklife.blogspot.ru
If your child likes to color in black and white pictures, give him the opportunity. Print out the rooster postcard template on thick cardboard and let the kid get to work. Further, cutting out the blank-ball, you can add a postcard voluminous snowflakes, glue half-beads imitating christmas balls etc. etc. Unleash your imagination with your baby))

YOU WILL USE
8 more templates for coloring, plus 2 step by step instructions for drawing more realistic roosters you will find in the archive, which you can download quickly and for free!
Take note of the idea with a cockerel on a stick, as on a postcard by Elena Yurchenko. Her cockerels are cut out of felt, but you can cut them out of paper.

Colored paper roosters
Colored paper appliqué can also be placed on greeting card. But such an application itself can act as a postcard. To draw and carefully cut out all the details, the children will need the help of their parents, but they can stick it themselves.

Olga-15 offers to make funny paper cockerels in her master class.

A Rooster blank is a rectangular sheet of flexible paper or thin cardboard folded in half lengthwise. Its size is 13.5 × 10 cm. We make 7-10 inclined cuts along the fold line (after about 1 cm). The angle of their inclination is 50-70 degrees, and the depth is ¾ of the height of the folded sheet.
Ekaterina Ivanova in her video tutorial shows how to make a red rooster using the Origami technique:
Roosters in quilling technique
A very interesting idea is to lay out only a luxurious rooster tail from quilling paper. It's not as confusing as laying out a whole cockerel, and it can turn out very effectively! Here is a rooster without a tail as a basis (how it looked in the original, see the photo below).

Print it on a color printer, and fantasize over the tail later. As an example - one such work (although the tail is modest here, but you will try, right?))

And if you are not afraid to make a whole rooster using the Quilling technique, then you can take this finished postcard as a basis:

Or this template:

A cheat sheet on the main elements of Quilling to help you:

Button appliqué
And here are absolutely stunning handsome roosters, lined with multi-colored buttons, half-beads, rhinestones and beads! As a basis, you can take the contours of cockerels from our archive (link just above).


Crochet Cockerels
Many needlewomen with a hook on “you” and will be happy to knit a cockerel from multi-colored threads. And "Cross" will help you decide on the model and offer several master classes on this type of needlework.

You can also buy cockerels knitted from Svetlana.


Roosters from felt
The fastest and complex options creating the symbol of 2017 - felt roosters. The material is easy to process, keeps the shape of the toy well, does not require seams. Vice versa, hand seams on the face of the product give it a special flavor and charm.


Photo from https://madeheart.com


Photo from the site http://ktototam.ru/
A figurine of a rooster neatly cut out of thick felt will christmas toy, and suspension.

Photo from the site http://ktototam.ru
And if you decorate felt cockerels with embroidery, flowers and other decorative elements, it will turn out generally incredibly beautiful!

Photo from the site http://mmmcrafts.blogspot.ru

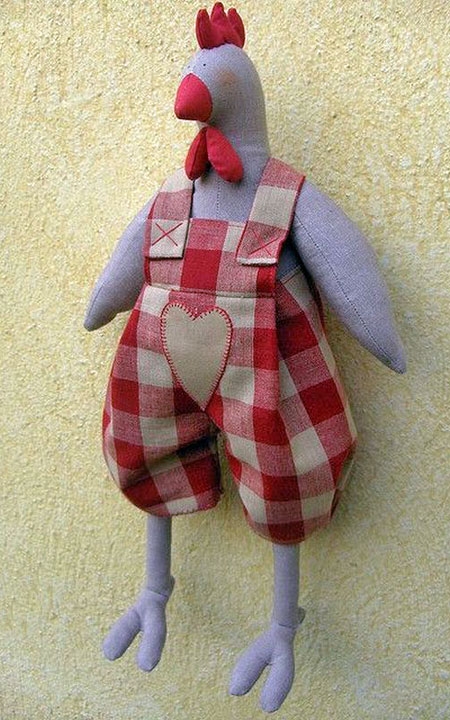
Roosters in Tilda style
Well, how can we do now in our life without the tilde-Rooster? The ToySew website has a master class on sewing this popular toy.

Master Vetic on her blog posted patterns of the Rooster and Hen Goroshkins based on the tilde pattern. An interesting couple will turn out if you make an effort and patience!

And for inspiration:

Cockerel Yurik from Orange Toys
A funny video clip about her tilde roosters was shot by Maria Fedorova (the link to the patterns is in the description of the video!):
Cockerel coffee toys
Aromatic or coffee toys compete with tildes in popularity. There are roosters in this technique.

The coffee cockerel can be like this:

Photo from the site http://zabavochka.com
You can easily sew it yourself using one of the patterns above. “Cross” talked about all the intricacies of creating coffee toys in this master class.
If you think that you can’t cope with such work yourself, contact the master. Julia Charikova has made enough branded coffee scented toys and put them up for sale at this address.

Fur interior toys
Oksana Svyatkovskaya will show her vision of a rooster and show how to sew it correctly ready-made patterns. Her Rooster is sewn from faux fur, but who's to say that it doesn't happen or it's not good?)


In the workshop Everything for creativity (dljatvorchestva) there are a lot of blanks for painting and decoupage. Choose and create!

This is the beauty you can get:


If you don’t want to make a souvenir in the form of a rooster, then you can decorate any wooden surface image of a rooster. There is just limitless scope for creativity! Here are just a few examples for inspiration:


Felted wool roosters
Other craftswomen make wool toys just like real ones! We love and are inspired! And if you really want to buy one of these beauties, then look for them at the Masters Fair (there is a link on each photo).


Elenia collected many different felted Roosters in one place and offered MK to create one of them. Turns out very cute!
Roosters embroidered with a cross, beads and ribbons
Perhaps you love embroidery more than other types of needlework. Then you can place the symbol of the year on a pillowcase, arrange it in the form of a panel, a picture in a frame or a brooch. The main thing is that the image of the Rooster warms your soul. And if you donate your work, find out the preferences of the recipient.
You will find more than 50 different patterns for embroidering roosters and cockerels in a special album
A bit of astrology
The rooster will try to test many for strength, especially those who rely only on luck, and not on their own strengths and capabilities. The Fire Rooster will come into its own from January 28 and will rule until February 15, 2018. The Rooster himself is bright, sociable and elegant. In the coming year, the color of the Rooster and the element that it represents will be reflected in all our undertakings and life moments. The color of 2017 is Red, and the element of fire suggests an incredible desire for excellence, striving for high achievements and unsurpassed heights.
A bright year awaits us with a lot of impressions and events!
For needlewomen, it is worth preparing for the coming year. We have collected in the article several interesting and useful master classes that will definitely help you prepare gifts for your loved ones, decorate a house for the upcoming 2017. So, how can we please the Fire Rooster, win him over and make the coming year easier, more enjoyable and more productive?
DIY red rooster
We invite you to arrange a holiday - a party in the style of a red Rooster. To do this, you need to decorate your home, prepare it for a party in an original and symbolic style. For such a decor, small details of the interior are suitable, which will allow guests to immerse themselves in the atmosphere of the holiday, plunge into a fairy tale and enjoy the coming New Year.
To make it, we need:
3 plastic bottles, 2 plastic plates, 5-6 plastic glasses of red and yellow flowers, 2 disposable spoons.
Tops from plastic bottles must be cut and fastened with adhesive tape, as shown in the picture.
From disposable plates we make such a wonderful tail to our Red Fire Rooster.
From the remains of the plates we make wings and attach the head of the Rooster, made, for example, from a pool ball.
We sew a dress for the New Year's party
What else is important for holding such a party? Of course the costumes! You can just dress in red - this color is a symbol of the coming year and the Fire Rooster will really like it. There is still time to sew a beautiful red dress for yourself, so you will be original, and the Rooster will definitely appreciate your efforts.
Well, let's take one of the master classes as an example. You will understand that sewing a Rooster to decorate your home, or as a gift to guests and loved ones, is not so difficult. A little love for needlework and a desire to please loved ones with the originality of your gift.
Sew a rooster pillow.
This pillow is perfect for your new year party! Guests can comfortably sit on these pillows and then take them home as a keepsake of the 2017 meeting!
And so, let's get started:
Here we will sew such a Cockerel, really handsome!
 |
For tailoring we need:
- Yellow fabric (you can take any other color, or make several different ones) 25 by 56 cm
- Some fabric for decoration (red and polka dots)
- Threads, needles
- Scissors
- Filler (Hollofiber)
- Sintepon
- 2 large buttons

DIY rooster as a gift
All of the above ideas you can use both to decorate your holiday and for gifts for the New Year.