Vase for dried flowers. Roll and salt dough. Salt dough vase with your own hands. Master class with step by step photos Salty vases
From salt dough can be done great amount crafts, for example: flowers, animals, various figurines, inscriptions, numbers, toys, paintings and whatever you want! Modeling from salt dough is called bioceramics. The advantage of salt dough is that it is convenient to work with, this material is absolutely harmless and crafts made from it will please you for several years. In this article, we will look at how to make crafts from salt dough with your own hands.
You will need: a glass of wheat flour, a glass of extra salt, half a glass cold water, a bowl.

Recipe

The finished salt dough should not stick to your hands or crumble. It should be cool and comfortable to sculpt. I recommend watching the video tutorial!
There are two most common ways to dry salt dough. The first way: the finished craft will dry itself. The main thing is that it does not fall directly Sun rays otherwise it will crack. The craft can be put on flat surface and wait a few days. The second way: the finished craft is dried in the oven for 3 to 6 hours (depending on the size of the craft). Drying takes place intermittently. One approach is 1-2 hours. For quick drying in one go, set 75-100 degrees in the oven, and then the craft will dry in an hour. At a temperature of 120 degrees, the craft will dry in 30 minutes, but it is better to dry it naturally.
There are two most common ways to color salt dough. The first way: after drying, the finished craft is painted acrylic paints or gouache, using a brush. The second way: food coloring is diluted in water, then added during the preparation of the dough. When the craft is completely painted and dried, it must be covered with a transparent manicure or furniture varnish in 2-3 layers. Each layer must dry before applying the next. In this way, the craft will last for a long time.

You will need: dyed salt dough, stack, clear nail polish, toothpick.
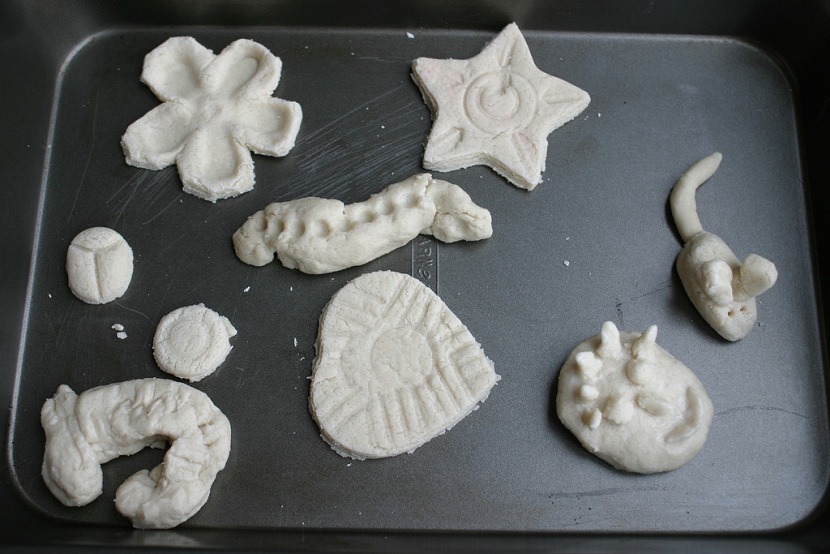
Master Class

Salt dough asterisk is ready!
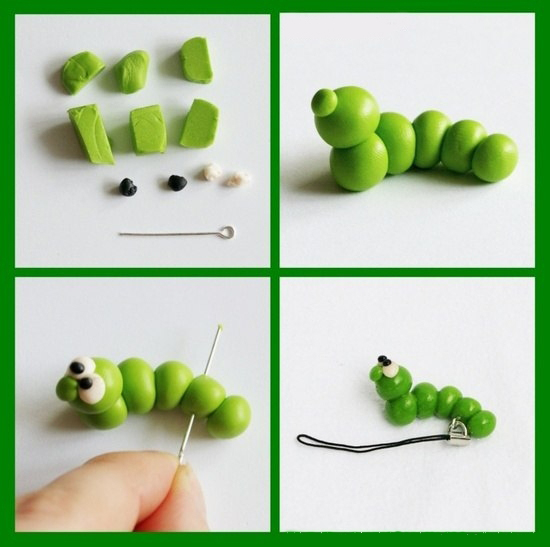
Salt dough caterpillar
You will need: dyed dough, knife, pva glue, toothpick, pendant, transparent nail polish.
Master Class
- Roll out the sausage.
- Cut it into 6 equal pieces.
- Roll up the balls.
- Glue 5 balls together.
- Glue the head.
- Blind the nose and eyes, then glue them.
- Use a toothpick to pierce the hanging spot.
- Dry the craft.
- Attach the hanger.
Salt dough caterpillar is ready!
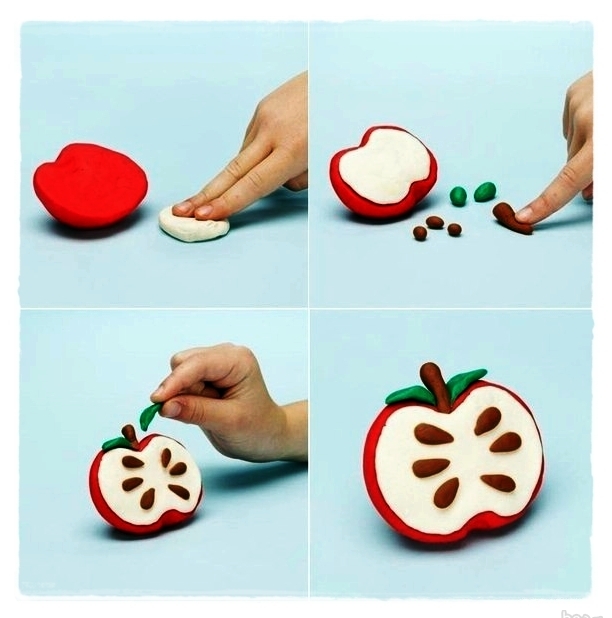
salt dough apple
You will need:
Master Class
- Blind half an apple, make the inside flat, pressing it to a flat surface.
- Blind a thin flat center and glue to the main part.
- Roll up 6 seeds and a stick, then glue to the apple.
- Blind the leaves, then glue them.
- Dry the craft.
- Cover with varnish and wait until completely dry.
Salt dough apple is ready!
Salt dough elephant

You will need: dyed salt dough, pva glue, clear nail polish.
Master Class
- Blind the elephant's body by rolling an elongated ball.
- Blind 4 legs in the shape of plump sausages.
- Blind the proboscis.
- Blind the ears of an elephant in this way: roll up 2 flat cakes, glue cakes of the same shape of a smaller size in a different color to them.
- Blind a small ponytail.
- Blind your eyes.
- Assemble the elephant in the following sequence: glue the legs to the body, then glue the proboscis, then the ears, eyes and tail.
- Dry the craft.
- Cover with varnish and wait until completely dry.
Salt dough elephant is ready!
You will need: salt dough, foil, a vase for sweets or a similar plastic container, gouache, a brush, a transparent nail polish, a modeling board, a knife or a stack.
Master Class


You will need: salt dough, nail scissors, pva glue, acrylic paints or gouache, nail polish brush.
Master Class

Salt dough hedgehog is ready!
Owl (eagle owl) from salt dough

You will need: salt dough, pva glue, nail file, nail scissors, acrylic paints or gouache, brush, wooden board with pendant, transparent nail polish.
Master Class

Salt dough owl is ready!

You will need: salt dough, the base on which the craft will be attached, for example, a plank or plate, a stack or a knife, a sheet of paper, a simple pencil, a garlic crusher, a rolling pin, pva glue, acrylic paints or gouache, a brush, a transparent manicure varnish, a carnation.
Master Class

Salt dough fruit basket is ready! I recommend watching the video tutorial!

You will need: salt dough, a knife, a rolling pin, a simple pencil, a sheet of paper, sandpaper, acrylic paints or gouache, a brush, a transparent manicure varnish, glue gun or pva, the basis for crafts, for example: a board with a frame, a transparent nail polish.
Master Class

Salt dough pencil

You will need: water, flour, extra salt, a cardboard jar for the frame, PVA glue, scissors, a piece of decorative rope or corrugated paper, gouache, brush, button, stacks, acrylic lacquer for crafts, toothbrush.
Master Class
- Knead the salty dough in this way: pour a glass of flour, a glass of salt, add water, then knead to the desired consistency of modeling. Separate part of the dough, add beige gouache, then knead.
- Roll out the cake with a thickness of 10-15 mm.

- Apply PVA glue to the outer rim of the jar and wrap with dough. Cut off the excess with a stack, and smooth the joints with a damp brush.
- Create a small dotted texture with a toothbrush on the surface of the dough.
- Knead the brown dough, roll it into a cake 10-15mm thick.

- Cut a 2" wide strip of brown dough and glue it to the bottom of the jar.
- Make 2 large bases for owl eyes from white dough, then glue them.
- Make a beak from brown dough and glue it.
- Blind eyes from turquoise dough and glue them.
- Roll up 8 strips of pink dough, twist 4 flagella from them and make a bow, then leave it to dry for 2 hours.
- Form owl wings with brown dough drops, then glue them on.

- Weave bundles of beige dough and glue on the neck of the jar.
- Roll up a sausage from white dough, draw a lace texture with a stack and glue it as a collar under the beak.
- Put the craft in a warm place for a day.
- Paint the lower part and wings with brown gouache and decorate with white dots.

- Draw pupils and eyelashes with black gouache, wait until the paint dries, then draw white highlights on the eyes.
- Glue a pink bow over the wing.
- glue a button with a bow from a corrugated strip onto the lace.
- Cover the craft with varnish and wait until it dries completely.
Salt dough pencil is ready!
Dachshund from salt dough

You will need: salt dough, simple pencil, scissors, cardboard, paints, brush, rope, toothpick, foam sponge, clear nail polish, PVA glue.
Master Class

Salt dough dachshund is ready!
Mushroom mushroom from salt dough

You will need: salt dough, light bulb, paints, brush, foil, cardboard, masking tape, superglue, PVA glue, paper napkins, transparent varnish, stack.
Master Class

Mushroom mushroom from salt dough is ready! I recommend watching this video!
Funny pigs from salt dough

You will need: salt dough, paints, brush, foam sponge, stack, thin string, toothpick, black helium pen, PVA glue.
Master Class

Funny pigs from salt dough are ready! I recommend watching this video!

You will need: salt dough, baking sheet, rolling pin, knife, sheet of paper, acrylic paints, brush, ribbon, water, shoehorn, pencil, sandpaper, clear nail polish.
Master Class

Salt dough production technology
Increasing attention has recently been paid to the revival and propaganda various kinds folk-applied art of Russia.
It is no secret that from ancient times in Russia, bread was treated with great respect. How many holidays, rituals are dedicated to him. And the most main holiday the peasants was devoted to harvesting. For this occasion, they baked holiday loaves, pies, braids, rolls and many other delicious masterpieces of culinary art. They were masterpieces, because they were not only incredibly tasty, but also beautifully decorated with various patterns and figures. And the remaining flour, or, as it was called, estimates, was not thrown away (this was considered a great sin). Salt and water were added to it, and various figurines, amulets, totems were molded from this (inedible) dough. And this type of creativity was called in the old days - mucosol.
Over time, other ingredients were added to the salt dough recipe, but the main ingredients - salt, flour and water - remained unchanged.
For example, here are some recipes for making salt dough:
1. Flour and salt are taken in equal proportions 1:1 and ½ part of water. For example, 1 cup of flour, 1 cup of coarse table salt and half a cup of warm water. All this is thoroughly kneaded for 10-15 minutes so that the dough becomes soft, like plasticine and at the same time does not stick to your hands. Then, for 3-4 hours, the finished mass is placed in a cool place for "stability".
2. Flour and salt are taken in equal proportions (1 glass of flour, 1 glass of fine salt), 1 tbsp. the spoon vegetable oil and half a glass of warm water with the addition of 2-3 drops of iodine. The mass is well kneaded and placed in the refrigerator for 2-3 hours.
3. The following method: 2 cups of flour, 1 cup of coarse salt and 1 cup of glue mass (100-150 ml of water and 2 tablespoons of wallpaper paste). Everything is thoroughly mixed.
4. Instead of wallpaper glue, you can use PVA glue: 1 cup of flour, 1 cup of salt and ½ cup of water with PVA glue (50 g of PVA glue for ½ cup of water). Everything is also thoroughly mixed until a homogeneous mass. Salt dough products can be left to dry completely naturally (in a warm place near the stove or battery, or in the sun), but this way the product will not be ready for further processing soon.
In another case, ready-made salt dough elements can be dried in an oven over low heat and at a temperature not exceeding 125 ° C.
As for the coloring of the finished product, there are several ways:
1. Food coloring is added to the dough in the process of kneading the dough (the disadvantage is that the colors are not too saturated).
2. Oil paints look very impressive and colorful (the disadvantage is that the paint dries for a long time on the product).
3. Gouache paints create a dense saturated layer (the disadvantage is that the paint can wear off if not covered with a transparent varnish).
While sculpting, a teenager develops fine motor skills hands (and this also contributes to the development of speech). Modeling develops spatial thinking and imagination. Thanks to modeling, a child or teenager directly learns reality. In addition, while modeling from salt dough, the teenager works with environmentally friendly material.
When making products from salt dough, they use the same techniques and methods of working as with plasticine:
1. At the beginning of work, you need to take care of the workplace (the surface of the table should be covered with oilcloth or a piece of plexiglass), you must have several napkins (paper and cotton).
2. To work with the dough, you will also need a variety of tools: stacks (wooden, metal, wire), various molds, templates, etc.
3. Basic modeling techniques: rolling, rolling, flattening, pinching, pinching, pressing, bending the edge, etc.
From separately molded parts, you can create a whole composition. Composition is a process of creativity, the combination of individual details into an expressive picture.
When making paintings from salt dough, additional material can also be used: fabric patches, beads, beads, buttons, feathers, etc.
Working with salt dough gives children great satisfaction; they work with great interest with this "unusual" material, creating extraordinary, fabulous paintings.
|
Magic house made of salt dough. Master class with step-by-step photo. Master class for teachers, children from 5 years old (with the help of adults), any creative people. Objective: to learn how to make decorative house from a salt dough bottle Tasks: Develop creative and constructive abilities Learn to work with salt dough Purpose: interior decoration, DIY gift Equipment: stack, glass bottle, salty dough, gouache paint, brushes, acrylic varnish. Dough recipe: 1 tbsp... |
|
Master class on creating amulets from salt dough. Author: Antonova Marina Petrovna, educator of MADOU No. 21 "Iskorka", Berdsk The master class is intended for educators, teachers additional education, parents and older children before school age. Purpose: Making amulets for use in GCD on the topic " family customs in Russia”, “Ancient customs in Russia”, etc. Tasks: To learn to use an unconventional drawing technique (pen painting), performing elements: wavy lines, l... |
|
Autumn crafts from salt dough with your own hands Needlework master class: “Vase with fruits” Author: Knyazeva Irina Anatolyevna, educator of Branch No. 1 of MBDOU No. 137 in Penza The master class is designed for preschoolers 6-7 years old, younger students of their parents and teachers. Purpose: Material for role-playing games, for a gift, for interior design. Purpose: making a gift with your own hands, making material for the game Tasks: To arouse interest in the knowledge of nature and reflection of the ideas received ... |
|
autumn wreath from salt dough with your own handsMaster class with a step-by-step photo "A wreath with a still life" from salt dough Author: Kotlyarova Natalya Vladimirovna, educator MBDOU No. 185 Kindergarten"Golden grain", Nizhny Tagil. Purpose: serves as an interior decoration or can be used as a gift Purpose: to introduce children to a fake made using the testoplasty technique Tasks: * develop the ability to work with salt dough; * development creativity children 5-7 years old and teachers D... |
|
Autumn crafts from salt dough for kindergarten. Senior preparatory group "Basket with mushrooms" from salt dough with their own hands. Master class with step by step photos.Master class on making crafts from salt dough "Basket with mushrooms". Senior and preparatory groups. Author: Kunitsa Elena Gennadievna, teacher of MBDOU No. 185 kindergarten "Golden grain", Nizhny Tagil. Purpose: the work can be used as a gift or serve as an interior decoration. Purpose: to introduce... |
|
Sunflower from salt dough with your own hands. Master class with step by step photos Master class on making crafts from salt dough "Sunflower". Senior groupAuthor: Kunitsa Elena Gennadievna, teacher of MBDOU No. 185 kindergarten "Golden grain", Nizhny Tagil. Purpose: the work can be used as a gift or serve as an interior decoration. Purpose: to introduce children to the work made from salt dough. Tasks: * to develop the ability to work with salt dough, * the development of small moto... |
|
Master class on testoplasty for preschool educational institutions: “Flower girl” (modeling from salt dough). Do-it-yourself summer composition. Master class with step-by-step photo.Author of the work: Cherkashina Tatyana Radievna, teacher of additional education, MBDOU kindergarten No. 36 "Rosinka", Belgorod. The master class is designed for children of senior preschool age, teachers and parents. Appointment: the work can be used as a gift to friends for their birthday, to decorate the interior. Purpose: to develop artistic and creative... |
|
Master Class. Testoplastika.Handmade from salt dough. Puzzle "Magic House" Author: Andrey Orekhov, 7 years old, pupil of the MBDOU "Kindergarten of general developmental type No. 125", Voronezh. Head: Vera Alexandrovna Orekhova, teacher of the MBDOU "Kindergarten of a general developmental type No. 125", Voronezh. Description: this master class is intended for children 5-7 years old, teachers, loving parents. Purpose: puzzle craft can be used for the game, as well as as a gift. Purpose: Manufacture... |
|
Crafts from salt dough for children from 6 years old Master class. Testoplasty. Craft from salt dough "Brave boat". Author: Andrey Orekhov, 7 years old Head: Vera Aleksandrovna Orekhova, educator of the MBDOU "Kindergarten of a general developmental type No. 125", Voronezh. Description: this master class is intended for children 5-7 years old, teachers, loving parents and just creative people. Purpose: ready product can serve as an interior decoration or a gift. Purpose: 1.Introduce the technique of dough... |
|
Summer applique from salt dough for childrenMaster class. Testoplasty "Merry Caterpillar". Author: Andrey Orekhov, 7 years old Head: Vera Aleksandrovna Orekhova, educator of MBDOU "Kindergarten of general development type No. 125", Voronezh Description: this master class is intended for children 5-7 years old, teachers, caring parents. Purpose: interior decoration, gift. Purpose: 1. To introduce the technique of testoplasty. 2. Making a souvenir, a gift. Tasks: To teach the basic techniques of modeling from salt ... |
|
Salt dough crafts for kindergarten. Senior and preparatory groupMaster class: Horseshoe for happiness Author data: Churkina Irina Alexandrovna, teacher of the first category of the MADOU "Kindergarten No. 21" of a general developmental type, the city of Sterlitamak, the Republic of Bashkortostan Purpose: Home interior decoration Use: according to old beliefs, a horseshoe brings happiness and good luck to the house, its hung over the door Purpose: The development of the creative abilities of preschool teachers and children of older preschool age, ... |
|
Salt dough crafts preparatory group Kindergarten Master class: "Mushroom box" Author: Brynkin Nikita 6 years old Head: Koltashkina Irina Vasilievna, educator, Kindergarten No. 52 "Cheburashka" The master class is designed for children 6-7 years old. Making a gift for March 8 or a birthday. ……There is always something for skillful hands, If you take a good look around. We will be able to create a miracle ourselves With these skillful hands. Objectives: Comprehensive intellectual and aesthetic development... |
|
Gift for mom. Painting from salt dough Painting from salt dough “Basket with Fruits” A master class on decorating a kindergarten, school, office, etc. Made by Marina Vladimirovna Kadorkina, teacher of MBDOU No. 27 “Golden Key”, Bugulma, Republic of Tatarstan. The master class is designed for children of senior preschool age, school age, teachers and parents. Appointment: - a gift for mother on March 8, - interior design of any room. Objectives: - to form and develop skills and... |
|
Handmade angel. Master class Author: Momotova Lyudmila Vitalievna, MBDOU Kindergarten of a general developmental type No. 15 Murmansk region. Murmansk. This angel is made from salt dough. It is done very simply and easily, but it looks beautiful and original. 1. So the dough recipe: 200 gr. flour 200 gr. fine salt (but for the effect of crystals you can use coarse salt, as shown below) 125 ml. water. 2. Put the resulting dough in a bag so that it dries less. 3. And we proceed to the very stage of p... |
|
Christmas tree toy Santa Claus from salt dough. Master class with step by step photosMaking class Christmas toys"Santa Claus" in unconventional technique- testoplastyAuthor of the work: Lyutikova Tatyana Vladimirovna, teacher of MDOU kindergarten No. 9 "Golden Cockerel", Sverdlovsk region, Novouralsk. The master class is designed for children of senior preschool age, teachers, parents in the manufacture New Year's toys, crafts. The purpose of the master class: interior decoration, making gifts... |
After reviewing the work different masters, I wanted to try to sculpt from salt dough.
I decided to combine the two ideas. Make a vase from a bobbin from a roll of used paper. And decorate it with a vine molded from salt dough.
At work, I still have bobbins from rolls of used paper. So I decided to put them into action.

Materials I used:
Bobbin from a roll of used paper;
PVA glue;
Glue moment "Liquid nails";
White acrylic paint (interior);
Acrylic paints (artistic);
Sandpaper;
masking tape;
Tassels;
Finishing putty acrylic on wood;
Acrylic varnish (furniture);
Stencil;
Palette knife;
Eggshell.

For the salt dough, I used this recipe:
Dough for fine work.
300 g - flour;
200 g of salt;
4 tbsp. l. glycerin (sold in pharmacies);
2 tbsp. l. glue for simple wallpaper + 125-150 ml of water.
Let's get to work.
1. I cut the bobbin from a roll of paper with a hacksaw for metal 50 cm. Then we cut it out from the remnants of the laminate round stand(bottom). My husband helped me cut it with a jigsaw. Cleaned the edges of the blanks with sandpaper (zero).

Having degreased a round billet with alcohol, with the help of glue, the “Liquid Nails” moment glued both blanks together. I waited for them to stick together.
Then I glued the round blank with masking tape and primed the bobbin in two layers with white acrylic paint (interior). I applied the paint with a foam sponge. Dry between layers. When the acrylic paint was dry, I sanded the bobbin with sandpaper to make it relatively smooth. After sanding, be sure to wipe off the remaining dust with a slightly damp cloth.

I picked up the desired color by mixing white acrylic paint (interior) with acrylic paints (artistic) and painted the entire bobbin in two layers with a sponge, did not paint the stand, left it natural. After drying, I sanded again, wiped off the dust and removed the masking tape.
3. We make out a baguette along the upper edge of the vase.
Add a little PVA glue and water to the finishing putty, you get a structural paste. Attach a stencil and apply acrylic putty with a palette knife. Carefully remove the stencil and allow the putty to dry.

When the putty dries, apply the stencil again and paint with golden paint. Carefully remove the stencil and let the paint dry. On the upper edge of the vase, we got a baguette. You can see it on the finished vase.

4. Now let's start stucco molding from salt dough.
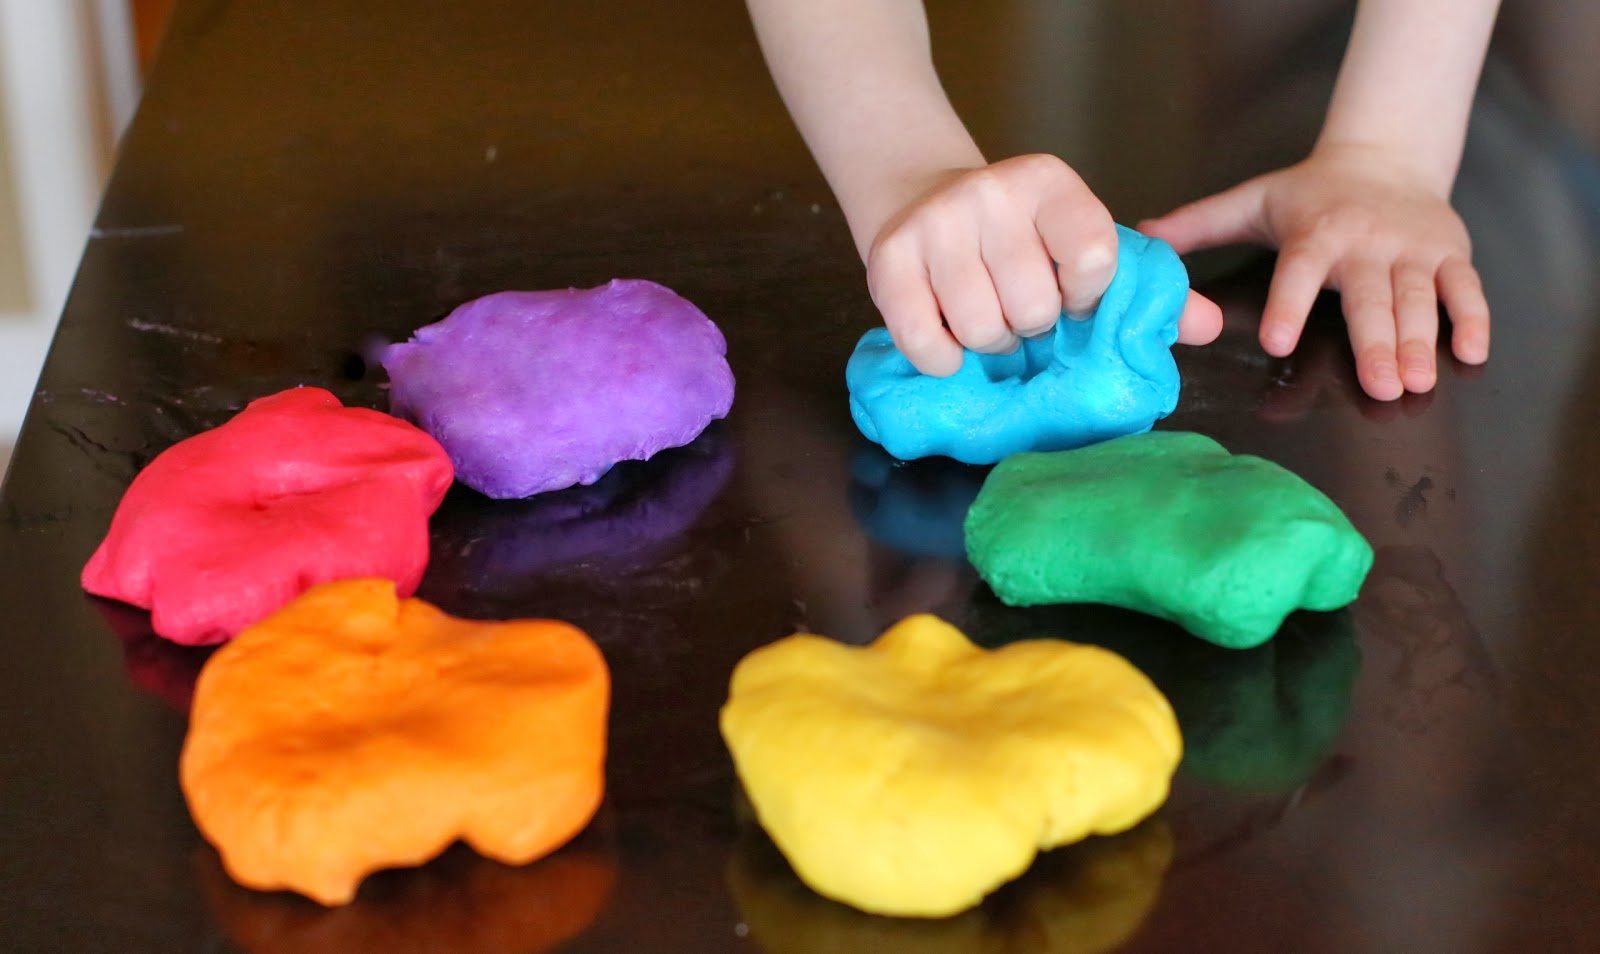
Mix flour, salt and glue, gradually add water and knead the dough. Glycerin was added while kneading the dough. The dough is well kneaded, the dough should not be too thick or soft, it should be elastic. She divided the dough into parts and painted with acrylic paints in the desired colors.
To color the dough, you need to flatten a piece of dough and drop paint on it, then mix thoroughly to get a uniform color. For twigs and tendrils, paint in Brown color. For leaves and grapes in green. And for one more type of grape in burgundy. As the dough dries, the color fades. But this is not scary, since we will decorate the leaves and everything else.
From stiff paper, I cut out templates of grape leaves of different sizes and shapes.

Having thinly rolled out a layer of dough (2-3 mm), I apply templates and cut out leaves on them. With a toothpick I make veins and give the leaves a different shape.
For twigs and tendrils, the dough is simply thinly rolled out with a roll, the desired shape is given and immediately glued to the vase with PVA glue.
Grapes - we roll balls of different diameters and glue them to a vase, laying them in the form of a bunch.
I sculpted all the details of the grapes, shaped them, laid them out and glued them on the glue right away. This process took me several days, as all the details dried right on the vase. In order to lay out the branches of grapes on the back of the vase, you need to wait until the previous ones dry.
I chose the process of drying the details on the vase due to the fact that it is easier for the soft dough to give the shape of the details you need and lay out on the rounded shape of the vase as you like. The bunches of grapes dried out the longest because of the large mass of dough.
The dough is considered dry if it makes a ringing sound when tapped.
5. When all the details of the grapes were glued and dried, between them I made an eggshell crackle.

To do this, the shell, washed and cleaned of the inner film, is well dried. Then we smear with PVA glue the places where we will glue the shell, and apply small pieces, press them so that they crack. We move them apart. When the shell sticks and dries, cover again with PVA glue. Crackle is ready.
6. Now that everything is glued, let's start decorating vine. Here is a matter of taste. You can take any picture with the image of grapes and decorate it.
I have an airbrush, so I painted the leaves and grapes with it, and the twigs and tendrils with a brush. When everything is framed, cover the entire vase several times with acrylic varnish.
The vase is ready, you can put artificial flowers or a composition of dry flowers in it. I have peacock tail feathers in it.
Thank you all for your attention!

sqart for website
For a long time I looked at floor vases made by myself. But my 45 sq.m and my son, who just learned to walk, simply did not leave me such an opportunity. And then there was an opportunity - to try the new kind creativity on an adventurous exchange, which organized our forum "All by myself". And the work began to boil, it really boiled for a long time - a month, but that's what happened.
Description of the execution of the salt dough vase:
1 m of the thickest sewer pipe was bought, sawed off with a hacksaw 80 cm. The excess lies in the pantry - it is waiting in the wings. Cut out the bottom of plastic cover container - glued. At first, the vase was simply painted with an ordinary building primer and acrylic paint - the result was not impressive - the strokes of paint were too obvious. Then I glued a piece of ordinary wallpaper for painting - I painted it - I liked it.

I kneaded the most common salty dough, kept it wrapped in cling film in the refrigerator. I tore off a piece - otherwise the dough quickly winds up and dries. I rolled out the dough into a layer, a regular sheet from an indoor flower served as a template, cut out the amount I needed. She also pierced the veins of the leaves with a knife. Glued on the "Master" glue in a rather chaotic manner.

Then came the turn of the lilac clusters themselves. A small ball is made, a droplet is made from it, which we cut into 2 or 4 parts with manicure scissors. We open them a little - a lilac flower or a bud is ready. A bunch of such small flowers is going to. Glued directly to the base. I dried it near the battery, turning it one side, then the other. I decided to somehow decorate the top - cut out circles from the dough, glued it.

The main sculpting work was completed. I painted the clusters and leaves with watercolors, set off with shiny nail polish. Something was missing - my flowers looked like orphans on a white background - I walked along the convex parts of the wallpaper with blue paint. Birch vase coloring improved appearance. With an interval of a day, giving each time a good dry, covered 3 times with acrylic varnish.
Salt dough crafts, handmade vase will be wonderful home decorations and gifts for relatives and friends. Today we will talk about how to make a wonderful vase from this environmentally friendly material.

You will need:
- green salt dough
- salty dough orange color
- bottle of contact lens cleaner
- adhesive silicone gun
- scissors
- toothpicks
- acrylic paints
- sheet
- a piece of tulle or braid
How to do
We prepare source materials
To make a vase from salt dough, we need green salt dough, orange salt dough, a bottle of contact lens cleaner, a silicone glue gun, scissors, toothpicks, acrylic paints, a piece of paper, a piece of tulle or braid, varnish.

Making salt dough
So, for starters, we make colored salty dough. To do this, we need 3 parts flour, 2 parts fine salt and 1 part water. Mix water with food coloring of the desired color and pour it into salted flour, poured in a slide. We knead the dough well. If it crumbles, add a little water; if it seems watery, add flour. It is important to achieve a uniform color of the dough mass. We make salt dough in other colors we need.

Making the base of the vase
We cut off the top of the bottle of contact lens cleanser and we get the base of the vase. We take green salt dough and evenly distribute it over the surface of the plastic. To level the vase, roll it with your hands on a flat surface.

Making a relief
To make the vase more interesting, take a leaf and begin to carefully apply it to the vase so that prints are obtained.

We sculpt bees and dry
Now we sculpt bees from orange salt dough. To do this, we make an oval part from a piece of mass, then we separate the head from the abdomen with a stack. We break off a piece of a toothpick with a point and insert it into the middle of the head, forming a bee sting. Leave the craft to dry at room temperature for 1-2 days.

We form bees
Now we cover the vase with varnish. We decorate the bees with acrylic paints, making a black head and black stripes. We cut a rectangle from the fabric into the mesh, round the edges, tie it in the middle with a thread and glue it to the bee. We've got lids. It remains only to glue the bees to the vase.
