Tying the edge of the product with a crochet pattern with a description. Finishing the edge of the product with a crochet: diagrams and description. A simple and comfortable hat with a detailed description of the process
To give the newly knitted thing a complete look, you need to carefully tie its edge. At the same time, the knitted fabric will stop twisting, since its edges will become rigid, old thing will acquire completely the new kind. This fairly simple task can be done different ways.
We bring to your attention video tutorials that tell you how to properly tie the edges of knitted products in various ways. It is not difficult to master them, and soon you will be able to give your work beautiful view, which they acquire after strapping.
Very simple edge binding, quite understandable for beginners. The first row is knitted with single crochets, a French mesh is formed in the second and third rows, and fans are arranged on the fourth row, consisting of eight double crochets. This row is the most beautiful. The result is a border with a pattern composed of semicircular elements, the basis of which are connected fans.
For any fabric, it is enough to knit the first initial row, and then you can form a pattern. It makes a good edging for the collars of robes. It is simply sewn to the base material.
Video lesson:

The edge tied in this way becomes even and dense, resembling a pigtail. This method is used to tie armholes and necks, the edges of the sides knitted clothes, created with knitting needles or crochet. This seam strengthens the edges of pockets and scarves. The method got its name because it is not formed in the usual direction from right to left, but vice versa, as if moving backwards.
You can use the same thread for tying with which the thing itself was knitted, but this thread can also be taken in a different color: the colored edging looks neat on any knitted thing, decorating its overall design with an unexpected frame.
Video lesson:

This beautiful finish consists of small pom-poms, each of which is attached to the edge of the material with two posts. It turns out a zigzag pattern, where a neat pompom is located at the top of each zigzag. The pattern looks very nice and smart. It can be used to decorate such large things as knitted blankets, shawls or pillows.
The use of "pompoms" creates a design that complements and highlights the knitted pattern that was used on the base piece. For all the apparent complexity of the pattern, it is created very simply and quite accessible even for beginners.
Video lesson:

This method of tying the edge of knitted items is extremely simple, but looks impressive. Of the four columns without a crochet, a small bead is formed, dense and neat. A number of such beads, located close to each other, can decorate tightly knitted products, but they can also be suitable for patterned blankets or shawls.
Tying is not necessarily done along a straight edge; you can also tie curved surfaces, and even wavy edges. The resulting volumetric edge trim looks very nice if it is made in a different color, contrasting with the color of the main knitting thread.
Video lesson:

If there is a desire not only to strengthen the edges of a knitted item with a strapping, but to decorate them with an interesting pattern, try this knitting option. Their interlacing is formed with simple columns, and a pattern is obtained with arches and openings, repeated in two tiers.
For all the complexity of the pattern, getting it is quite simple - you just need not to get confused in the alternation of loops and in the arrangement of repeating columns. The pattern can be based on a completely arbitrary type of knitted loops, any knitted thing can be edged with it, regardless of whether it was crocheted or knitted. It will still turn out beautiful.
Video lesson:

Five columns with one crochet, knitted in the same loop, form a small neat shell in which the loops make up the edge, and the columns form fan-shaped waves, as in a real shell. This is simple and interesting way how to crochet the edge of a product, giving the edge of any knitted item an interesting look.
It is especially impressive if the shells are knitted from a thread of a different color than the main product, the resulting contrasting pattern perfectly frames any knitting. Even if the product is received by the most in a simple way knitting, its edging in a similar way gives it an interesting unusual look.
Video lesson:

It is proposed to tie the edge with a crochet hook for napkins or handkerchiefs in several versions. Napkins can be any, linen or silk, depending on the thickness of the fabric and the thickness of the thread used for edging. It is quite possible to use bobbin thread number 20-30 to match the tone of the napkin or in a contrasting color.
The handkerchief is cut out of the fabric strictly in the direction of the threads. One centimeter from each edge, one thread is pulled out, and for the resulting grooves we begin to make the strapping. A chain of loops is created along the edge of the napkin, which become the basis of the pattern created from the threads.
Video lesson:

Periodically turning the knitting over and using the instructions for creating the pattern, we get a rather thick cord along the edge of the knitted item, resembling a caterpillar in appearance. A method of knitting such a pattern is also proposed without turning over the entire work, with intercepting the hook, which is convenient if an overall shawl or bedspread is knitted, which are inconvenient to turn over.
It tells in detail how to get a "caterpillar" on indirect, rounded knit edges, both convex and concave. In this way, sleeves, collars, the lower edge of the product and even the edges of caps are tied. It turns out a very decorative pattern.
Video lesson:

A small pattern is knitted from half-columns, fixed on every third loop of the row, and two loops are skipped. The result is a border of repeating small semicircles, following one after another. This border can also be knitted in a circle, detailed instructions are also given for this.
A large border will not come in handy for every thing, but still I want to somehow improve appearance. In this case, a small border turns out to be ideal, which can be knitted from the same thread as the thing itself, or from yarn in a contrasting color. It is quite possible to decorate even a patterned knitted thing with such a border.
Video lesson:

We offer a master class on knitting borders. In every third loop of the thing being tied, a set of columns is made, which forms small neat semicircles. It turns out a simple, but very nice edging with a pattern of small semicircles.
This pattern can edging both solid and patterned knits, organize the edges of plaids and shawls, sweaters and cardigans. It will add grace and airiness to any pattern of the main fabric, harmonizing perfectly with any base knitting pattern. The border has a wave width of three loops, is not too conspicuous and serves as a modest decoration.
Video lesson:
Crocheting is such a vast art that even tying the edges of a variety of products allows you to choose from many possible options. Moreover, details such as crochet a border can give a simple thing, like the most ordinary dress or blouse, an elegant sophisticated look, or, conversely, turn into a ridiculous-looking product that you don’t want to wear, even if it turns out to be the only one in your wardrobe. Therefore, it is so important to learn how to combine crochet styles and successfully apply them in the details that play their role in shaping the style - the edges of the crochet product.
Tablecloths, handkerchiefs, napkins, towels, curtains, sleeves and the neck of any component of the wardrobe will look completely new if you choose the right pattern for crocheting the edge. By the way, this technique is also used if there is a need to “hide” the craftswoman’s mistakes, which can be easily seen with the naked eye on the edges of the products. And also finishing the edge with different knitted patterns that can give a second life to any old little thing that you don’t want to part with at all.
Crocheting the edge of the product - diagrams and description
Choosing the right pattern on the border is already half the battle. This issue has its own subtleties that are important to consider when choosing a pattern for the edge of the product:
- narrow border (up to 1.5 cm) - suitable for light knitted items with openwork motifs, and also ideal for children's clothing;
- Border that passes into the collar (5-8 cm or 15-20 cm) - goes with most knitwear.
- Wide trim pattern (1.5 - 4.5 cm) - looks good on products made of yarn of medium thickness, namely, on the edges of the sleeves and the neck of jumpers and pullovers.
A beautiful pattern along the edge can be knitted directly when creating the whole thing - then you don’t have to suffer by fitting the openwork ribbon to the product, but you can sew on the finished border by tying it in advance. Here the choice is quite simple.
But the options for patterns for tying the edges provide much more space. So what are possible options do needlewomen have trims and decorations for the edge of a knitted product?
- crayfish step

Popular articles:
The most favorite crocheting option among beginner knitters is the crochet step, consisting of single crochets that are knitted from left to right: starting to the right of the working loop. This pattern allows you to maintain the original shape of the canvas, preventing the edge from stretching. This method of tying the edges also has its own varieties.
step from left to right
The hook is inserted into the first loop on the right and a single crochet is knitted. Insert the hook into next loop on the right and knit a single crochet again. And so on to the end of the row.
step from right to left
This option of tying the edges is considered more complex, but also more familiar. With the working loop on the hook, insert the hook into the loop on the left and grab the working thread. Pull up the thread and with both loops on the hook, turn the nose of the hook counterclockwise (see diagram above). After twisting the loops on the hook, yarn over and pull it through both loops on the hook. With one working loop on the hook, insert the hook into the loop on the left (moving away from you) and grab the working thread. Pull out the loop. After twisting the loops on the hook again, yarn over and pull it through both loops on the hook. Continue in the same way. The resulting rad should look something like this.
- Pico
 Crochet pico crochet patterns.
 Pico tying consists in chains of several air loops closed in a circle - from three or more. These loops are ideal for tying cuffs and sleeves.
A number of pico perform on front side products. Chain 1, skip first single crochet, work 1 single crochet into next single crochet. Work a chain of 4 stitches, then single crochet into the first stitch of this chain to make a picot. Work 1 single crochet into each of the next 2 single crochets. Continue knitting picot and 2 single crochets around the edge of the product in the same way. There are also several other options for knitting pico (see diagram above).
- Arched harness or Shell

The pattern is obtained by knitting loops of different heights with the highest loop in the center. The shell can be done in a row, bollarded single crochet, half double crochet and double crochet. The binding is performed on the front side of the product. Chain 1, single crochet 1 into the next stitch. Skip 1 st, work 1 half double crochet, 3 double crochets and 1 half double crochet - all in the next loop. Skip 1 st and single crochet 1 into the next st to secure the edge of the shell. Continue tying the edge of the product with shells in the same way.
- Border of decorative openwork patterns
Here, the form and all kinds of schemes are not limited by anything but the imagination and capabilities of the knitter. There are so many crochet options. openwork border from the simplest to the incredibly complex. Often they are crocheted separately from the entire product and then sewn to the desired edges. Consider several schemes and how to use them on different things.
Neck strapping
Very often, needlewomen are looking for ways to crochet the neck of a sweater or sweater so as to hide the open cuts of the product, and at the same time, the thing has acquired a more interesting and special look. There are many ways to do this, you just have to choose from dozens of schemes the most appropriate strapping style. Consider a few examples of how to beautifully crochet a neck to improve the look of a knitted thing and not ignore the principle of completeness.
- Quick neck tying

This step by step design suitable for beginners and those needlewomen who do not have time to perform more complex neck processing. It turns out beautiful and simple.
A knitted product can be decorated with a neck made in a circle, or the ends of the neck can be joined with a seam.
We take the finished fabric and crochet from the wrong side of the working thread, pull the loop to the front side.
Thus, we collect several loops on the hook. Important: the loops must not be cast on loosely.

Then these loops are thrown onto the knitting needle, after which we continue to dial loops with the hook. We pull the loop with a hook, transfer it to the knitting needle, etc.

Loops are set. Now we knit the first row in such a way that there are front loops from the inside, and purl loops in the front row. If we knit the neck in a circle - we knit the wrong loops. If with a seam - facial.

If you want to achieve a “factory effect” of connecting the collar with the product, we knit the first row with knitting needles as follows: on the wrong side of the product, the first row is knitted with facial loops (the loops will be purl on the front side), and then the first row on the front side looks like the collar is pinned needle.
According to the first knitting option of the first row, the following result is obtained:

Then we knit the neck of the desired length. If this is a loop lapel, close it with knitting needles or crochet, if desired. If it is a stand-up collar, it is better to close the loops with a needle.
- Nice neck finish

This is also a simple crochet option for a beautiful edge, in which the most difficult and important thing is to correctly calculate the rapport of the pattern.
The height of the rapport is the width of the bar. The width of the rapport is the number of loops by which the number of loops of the entire length of the neck is divided without a remainder. For example: plank height 16 rows. 16/2=8. Rapport cannot be less than 8 loops. On 8 loops we will have an openwork decker.
In this case, the neck is 180 loops. The rapport of 12 loops 180:12=15 was determined by the selection method. 15 repetitions of rapport.
It is better to have 2 additional loops for stitching the strap. In my case, this is not the case, but the difference in the neck pattern on the shoulder line is not noticeable.
You need to knit according to the following scheme, in which only odd rows are indicated:

- floral pattern

The pattern for tying is a bush of a chain in three air loops and two double crochets. It is knitted from one point - the base of the chain. The bushes are fixed with a half-column at a certain distance from each other (for example, in two loops of the fixing row of the neck). At the beginning of the row, make one air loop for lifting. Follow the pattern.

Nice sleeve finish
Often, crocheting the sleeve is done in the same pattern as the neckline - in this way, the item is aged in uniform style, which means it looks harmonious. Let's try to knit a few simple patterns.
- Sleeve scallops

First of all, dial a chain of 5 air loops.
Insert the hook under the cast on chain, grab the working thread and pull up the loop.
Grab the working thread again and knit the elongated loop. This is how the first single crochet was obtained, knitted from under the chain, and 2 loops remained on the hook.
Knit the elongated loop, another loop will be added to the hook.
When there are 11 loops on the hook, grab the working thread and knit through all the loops from the hook.
Now secure the scallop by single crochet, stepping back 3 loops from the beginning of the scallop. Scallop to end of row following step by step photo.

It is necessary to work according to the following scheme:

- Large lace border

At the beginning of the row, knit an air loop. Insert the hook under the nearest braid of the edge to be tied. Knit a single crochet. Knit the air loop again.

Insert your hook into the front loop of the upper braid of the single crochet knitted earlier and then insert the hook into the left side loop of the same single crochet. Insert the hook under the nearest braid of the edge to be tied. Pull out the loop. Pick up the thread and knit a single crochet. You need to repeat from 4 to 8 points. The result is such a binding of the edge, which, due to its elasticity, will not tighten the bottom of the product.

Product bottom
You can crochet the bottom of the product with the most different ways, but we will consider one of the easiest options, and more complex and beautiful way strapping, suitable not only for knitted items, but also for towels, tablecloths and other material products.
- Binding the bottom of the Pico item

Along the edge of the product, start knitting with two single crochets.
Next do 3 air loops and guide the hook into the base of the single crochet as shown in the photo. Then double crochet again and 3 chain stitches after them.

- floral border

A row with a floral motif is knitted as follows: ch 3. lifting, 3 CCH in the first arch from the vp, 1 CCH in the next arch. We begin to knit a flower: ch 3, 3 unfinished dc on one loop of the base, knit all loops on the hook = 1st petal. 4 ch, remove the hook from knitting, insert into the upper part of the connected group of columns from right to left, grab last loop chains and drag it through all the loops = a ringlet.
Next petal: *ch3, dc 2 in ring, ch3, sc in ring* (= 2nd petal), repeat from * to * 2 more times. Last petal: ch 3, 3 unfinished dc, work through all loops on the hook (= 5th petal). The flower is ready.
3 CCH through one arch of the previous row, 1 CCH into the next arch, and we begin to knit the next flower.

Video lesson
Decorating the edges of knitted products with a crochet is not an easy task, because first you need to choose a beautiful pattern, then knit it correctly and without unnecessary broaches, and then sew it on so that it looks perfect, and most importantly, in its place. It may be difficult for beginner craftswomen to cope with this task at first, but do not despair. You can always "peep" the secrets of this craft from more experienced craftswomen.
Crochet the edge of the product video:
Details, as you know, can ruin or save any thing. Bound in the different technique the product will have a complete look if it is supplemented with a strapping that is suitable in style. Hook - an indispensable tool for making the original edge knitted blouse, dresses, napkins or tablecloths. The strapping patterns are so diverse that they allow you to decorate with a hook not only the finished thing, but also hide the flaws that often occur when making the edge of the strap, bottom and other details of the knitted product. In addition to interestingly completing the edge, crochet patterns are used to gracefully finish knitting cuffs, collars, tying necks and knitting borders for interior items. Tying the edge with a hook after this article will not be a problem, because we have selected patterns for work especially for you.
The most common ways of processing the edge are the crayfish step, pico, lacing, arched from air loops.
The method of tying the edge with a crochet with diagrams and descriptions
This type is considered the easiest way to make a beautiful neat edge, it is especially in demand in children's models. It is most often performed with single crochets, which are knitted into a loop to the right of the working loop. Such an unconventional move - from left to right - explains the fixed name.
There are several options for knitting a crayfish step, we will show one of them in the video:
Method 2: pico for beginners


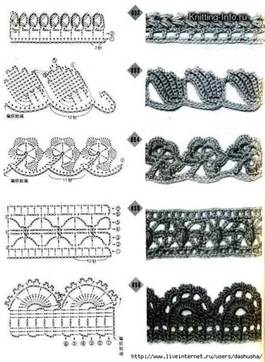
Pico is a slightly more complicated way to crochet an edge. Interesting for tying the edge of the sleeve, cuff, hat, beret. There are several ways to knit a picot, based on the thickness of the thread, the number of air loops connected in a picot is selected. On the chart - different variants this knitting.

Method 3: arched strapping from air loops
It is performed with air loops according to the scheme, it is often used in the border of stoles and shawls, it can be supplemented with a variety of brushes.

Method 4: we knit beautiful openwork
How to tie the edge of the product we need with a hook? Openwork, which combines all of the above patterns, as well as many others that require more complex schemes to create a beautiful product. The choice of an openwork pattern is always determined by the style, the purpose of the product, it depends on the taste of the knitter and her skills in crochet work.
To decorate the bottom of the tablecloth, large napkins where you want to tie a beautiful border, you can use the schemes:


Most common openwork patterns we have collected in a selection of ideas, the schemes are taken from sources found in the public domain.
Elizabeth Rumyantseva
For diligence and art there is nothing impossible.
Content
The final step in crocheting products is tying their sides. This is the final touch in needlework, giving clothes or linen an attractive look, smoothing out minor flaws. Experienced craftswomen perform finishing to get beautiful napkins, towels, bedding.
How to crochet the edge of the product
It will be interesting for beginner needlewomen to learn how to crochet the edge of a knitted product beautifully. Of the popular techniques used in the final stage of finishing, there is a step step, pico technique and openwork patterns. Each of them will look stylish and elegant, and the products will turn out to be sophisticated and complemented. It is not difficult to make the necessary tricks because of the secrets used.
There are 2 binding methods:
- directly on things - allows you not to waste time on neat sewing on individual details, the thing is obtained in a romantic, vintage or ethnic style;
- knitting the details of the border and ruffles separately, followed by stitching - gives things a retro look.
Finishing the sides of things helps:
- attach new style;
- preserve the appearance of products made from loose soft yarn, which can stretch and deform over time;
- decorate;
- hide flaws.

Strapping with a crustacean step
Known on the Internet is the crocheting of the edge of the product using the crayfish step method, which is used to fix the shape of the thing. At the heart of knitting are single crochets, made in the opposite direction - from left to right. During knitting, the thread crosses in a special way and the pattern looks voluminous, beautiful, at the same time fixes the shape and prevents the fabric from stretching. It is used for children's sweaters, scarves, shawls for adults.
To perform, you need to tie the sides with single crochets around the entire perimeter. After that, the thing does not need to be turned over, but on the same side, insert the tool into the loop to the right of it, pull it out and tie the air lifting element. Then again you need to insert the hook into the right loop, grab the thread and knit 2 loops together. Repeat until the end until the whole thing is tied.
How to crochet the edge using the pico technique
Not only for clothes, but also for shoes, crocheting the edge using the pico technique can be used. It looks airy and playful due to its small size. Pico or pique is a chain of several air loops, closed in a ring. There are 2 types of this pattern:
- classic - the hook is inserted at the beginning of the fabric, 3 air loops are dialed, the tool returns to the beginning of knitting, the elements are knitted together.
- trefoil - cast on 3 air loops, make a circle with the help of the SS (connecting column), knit 3 more air elements, enter the tool at the beginning of the second leaf, knit the third leaf, collect them together with the SS.

Openwork crochet edge
Crocheted openwork edging of the edge looks no less attractive, which will require more time and perseverance. You will need hook number 1 for the density of the pattern. First, let's deal with the notation that occurs in the diagrams:
- VP, VP - air loop;
- C1H, CH - column with 1 throw;
- C + number (C3, C4) - a chain of a certain number of VPs;
- BN, RLS - a column without throwing.
Knitting pattern in rows:
- All loops are knitted with BN.
- 3 VP, repeat from CH, C2, CH, C7, skip loop. To knit the angle C13, the last element is connected to the first CH.
- Repeat: BN knit in C2, C4, BN in the middle of C7, C4. In the corners in the middle of C13, 2 BNs are knitted, between them 3 C5.
- Similar to the second.
- Similar to the third, in the corners 3 C6.
- Similar to the second, in the corners of C15.
- The same as the third, in the corners 3 C7.
- 3 VP, repeat: CH, C2, CH, C8. In the corners between CH, Ts17 is knitted.
- Repeat: all Ts8 are tied with 4 BN, picot clove, 4 BN. Ts19 in the corners are tied: 3 BN, clove-picot, 3 BN, clove-picot, 3 BN, clove-picot, 3 BN.

Crochet the edge of the product
There are simple and complex descriptions and crochet patterns. finished product. It is better for beginner craftswomen to go from the basics, gradually complicating the patterns. Experienced needlewomen can try complex, but beautiful patterns that will decorate the thing, make it more attractive. On the Internet you can find ready-made schemes with descriptions, photos, master classes, video tutorials - all this will help to understand the issue and put into practice one of the strapping methods.
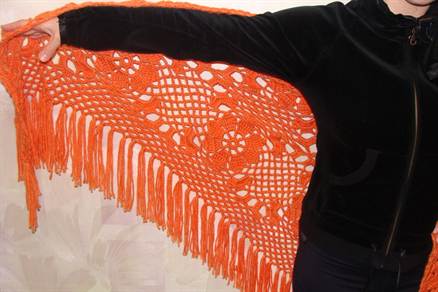
Border for a shawl
To crochet the edge of a shawl, there are several options:
- the finished thing is tied with a row of single crochets, rotated to make arches: rapport of 3 air loops, 2 skips, 1 single crochet;
- you can simply tie a shawl with any technique (crawl step, pico) and make a fluffy fringe - to do this, cut the threads of the desired length, fold 3-4 pieces in half, pass through narrow holes along with the braid;
- a border made of 2 rows will be beautiful: in the first rapport of 2 yarns, an increase in a loop, a yarn with a knitting of 2 loops together, 1 yarn, 1 pass, knitting 4 times 2 loops, 1 GP, 1 CH; in the second row - a rapport of 3 BN, 5 GP.

Strapping the neck of the sweater
To create a tight crochet edge, it will be useful for beginners to know simple tricks and descriptions of armhole trim:
- determine the wrong side of the thing, lay the VP chain on the front side (tambour seam) - pierce the extreme columns in the middle, knit 2 loops from the double crochet, 1 each without it;
- turn the thing inside out towards you, tie the bar - from BN or without it, any openwork pattern.
Crocheting a border for a tablecloth
Pretty festoons will become stylish decoration edges for the corners of the tablecloth. For their execution there is a description, following which you can get a voluminous dense pattern:
- knit the first row with single crochets;
- in the second row, rapport: 1 BN, skip 2 loops, 4 CHs in the next loop (2 VPs are knitted between the columns), skip 2 loops;
- the row ends with a connecting thread.
For a beautiful patterned border, below is the following scheme, which will be simple even for beginners:
- knit the first row of VP;
- the second - BN;
- the third - 1 BN, 2 passes, knit 4 CH and 4 VP from 1 loop, repeat.

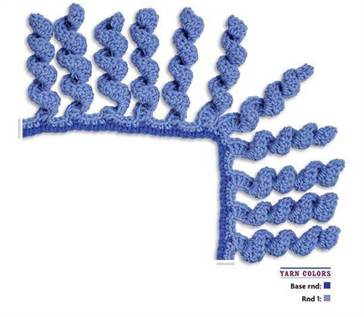
Crocheting the edge of the plaid
Cosy warm blanket can be even brighter with hand-knitted lace trim. It can be knitted separately and attached to a thing, or you can also knit a blanket separately - then the product will be finished with the same or a contrasting thread. The first processing option is called shells:
- 3 VP, a chain of VP in an amount that is a multiple of 6;
- wrong side: 1 sc from 2 loops, then 1 sc from each element;
- 3 VP, skip, 1 CH, rapport - 1VP, skip, 2С1Н, turn;
- 5VP, 1 RLS, rapport - 4 VP, 1 RLS, last 2 - 2 VP, 1 CH;
- VP, RLS, rapport - BN, increase, CH, increase, RLS.
A fringe from a border for a towel will turn out when drawing a spring:
- the base of the VP is knitted with 2 rows of BN;
- VP, BN, rapport - BN, 15 VP, turn, skip, 2 BN from each VP, single crochet in BN at the base.
The mesh border is knitted across in short rows, a description for it:
- 1 С1Н in 6 loops, alternation - VP, skip, С1Н;
- 4 VP, skip, С1Н, VP, С1Н, alternation 3 times - VP, skip, С1Н, alternation three times - VP, С1Н.

crochet grandmother's square - schemes and step by step description you will find them in the presented master classes.
Did you find an error in the text? Select it, press Ctrl + Enter and we'll fix it!
The final step in crocheting products is tying their sides. This is the final touch in needlework, giving clothes or linen an attractive look, smoothing out minor flaws. Experienced craftswomen perform finishing to make beautiful napkins, towels, bedding.
1:1066 1:1076How to crochet the edge of the product
1:1154It will be interesting for beginner needlewomen to learn how to crochet the edge of a knitted product beautifully. Of the popular techniques used in the final stage of finishing, there is a step step, pico technique and openwork patterns. Each of them will look stylish and elegant, and the products will turn out to be sophisticated and complemented. It is not difficult to make the necessary tricks because of the secrets used.
1:18781:9
There are 2 binding methods:
- directly on things - allows you not to waste time on neat sewing on individual details, the thing turns out in a romantic, vintage or ethnic style;
- knitting the details of the border and ruffles separately, followed by stitching - gives things a retro look.
Finishing the sides of things helps:
- give a new style;
- preserve the appearance of products made from loose soft yarn, which can stretch and deform over time;
- decorate;
- hide flaws.

Strapping with a crustacean step
2:1492Known on the Internet is the crocheting of the edge of the product using the crayfish step method, which is used to fix the shape of the thing. At the heart of knitting are single crochets, made in the opposite direction - from left to right. During knitting, the thread crosses in a special way and the pattern looks voluminous, beautiful, at the same time fixes the shape and prevents the fabric from stretching. It is used for children's sweaters, scarves, shawls for adults.
To perform, you need to tie the sides with single crochets around the entire perimeter. After that, the thing does not need to be turned over, but on the same side, insert the tool into the loop to the right of it, pull it out and tie the air lifting element. Then again you need to insert the hook into the right loop, grab the thread and knit 2 loops together. Repeat until the end until the whole thing is tied.
2:29802:9
How to crochet the edge using the pico technique
2:99Not only for clothes, but also for shoes, crocheting the edge using the pico technique can be used. It looks airy and playful due to its small size. Pico or pique is a chain of several air loops, closed in a ring. There are 2 types of this pattern:
2:605- classic - the hook is inserted at the beginning of the fabric, 3 air loops are typed, the tool returns to the beginning of knitting, the elements are knitted together.
- shamrock - dial 3 air loops, make a circle with the help of the SS (connecting column), knit 3 more air elements, enter the tool at the beginning of the second leaf, knit the third leaf, collect them together with the SS.

3:9
openwork edge crochet
3:63Crocheted openwork edging of the edge looks no less attractive, which will require more time and perseverance. You will need hook number 1 for the density of the pattern. First, let's deal with the notation that occurs in the diagrams:
3:476- VP, VP - air loop;
- C1H, CH - column with 1 throw;
- C + number (C3, C4) - a chain of a certain number of VPs;
- BN, RLS - a column without throwing.
Knitting pattern in rows:
- All loops are knitted with BN.
- 3 VP, repeat from CH, C2, CH, C7, skip loop. To knit the angle C13, the last element is connected to the first CH.
- Repeat: BN knit in C2, C4, BN in the middle of C7, C4. In the corners in the middle of C13, 2 BNs are knitted, between them 3 C5.
- Similar to the second.
- Similar to the third, in the corners 3 C6.
- Similar to the second, in the corners of C15.
- The same as the third, in the corners 3 C7.
- 3 VP, repeat: CH, C2, CH, C8. In the corners between CH, Ts17 is knitted.
- Repeat: all Ts8 are tied with 4 BN, picot clove, 4 BN. Ts19 in the corners are tied: 3 BN, clove-picot, 3 BN, clove-picot, 3 BN, clove-picot, 3 BN.

Crochet the edge of the product
4:89There are simple and complex descriptions and patterns for crocheting a finished product. It is better for beginner craftswomen to go from the basics, gradually complicating the patterns. Experienced needlewomen can try complex, but beautiful patterns that will decorate a thing, make it more attractive. On the Internet, you can find ready-made schemes with descriptions, photos, master classes, video tutorials - all this will help you understand the issue and put into practice one of the strapping methods.
4:919 4:929Border for a shawl
4:971To crochet the edge of a shawl, there are several options:
4:1100- the finished thing is tied with a row of single crochets, rotated to make arches: rapport of 3 air loops, 2 skips, 1 single crochet;
- you can simply tie a shawl with any technique (crawl step, pico) and make a fluffy fringe - to do this, cut the threads of the desired length, fold 3-4 pieces in half, pass through narrow holes along with the braid;
- a border made of 2 rows will be beautiful: in the first rapport of 2 yarns, an increase in a loop, a yarn with a knitting of 2 loops together, 1 yarn, 1 pass, knitting 4 times 2 loops, 1 GP, 1 CH; in the second row - a rapport of 3 BN, 5 GP.

5:9
Strapping the neck of the sweater
5:69To create a tight crochet edge, it will be useful for beginners to know simple tricks and descriptions of armhole trim:
5:291- determine the wrong side of the thing, lay the VP chain on the front side (chain stitch) - pierce the extreme columns in the middle, knit 2 loops from the double crochet, 1 each without it;
- turn the thing inside out towards you, tie the bar - from BN or without it, of any openwork pattern.
Crocheting a border for a tablecloth
5:885Pretty scallops make a stylish edge decoration for tablecloth corners. For their execution there is a description, following which you can get a voluminous dense pattern:
5:1188- knit the first row with single crochets;
- in the second row, rapport: 1 BN, skip 2 loops, 4 CHs in the next loop (2 VPs are knitted between the columns), skip 2 loops;
- the row ends with a connecting thread.
For a beautiful patterned border, below is the following scheme, which will be simple even for beginners:
- knit the first row of VP;
- the second - BN;
- the third - 1 BN, 2 passes, knit 4 CH and 4 VP from 1 loop, repeat.

6:9
Crocheting the edge of the plaid
6:81A cozy, warm throw can be made even brighter with a hand-knitted lace trim. It can be knitted separately and attached to a thing, or you can also knit a blanket separately - then the product will be finished with the same or a contrasting thread. The first processing option is called shells:
6:632- 3 VP, a chain of VP in an amount that is a multiple of 6;
- wrong side: 1 sc from 2 loops, then 1 sc from each element;
- 3 VP, skip, 1 CH, rapport - 1VP, skip, 2С1Н, turn;
- 5VP, 1 RLS, rapport - 4 VP, 1 RLS, last 2 - 2 VP, 1 CH;
- VP, RLS, rapport - BN, increase, CH, increase, RLS.
A fringe from a border for a towel will turn out when drawing a spring:
- the base of the VP is knitted with 2 rows of BN;
- VP, BN, rapport - BN, 15 VP, turn, skip, 2 BN from each VP, single crochet in BN at the base.
The mesh border is knitted across in short rows, a description for it:
- 1 C1H in 6 loops, alternation - VP, skip, C1H;
- 4 VP, skip, С1Н, VP, С1Н, alternation 3 times - VP, skip, С1Н, alternation three times - VP, С1Н.

7:9
Crochet lace for tying the edge of the skirt
7:94To process a wide skirt edge, there are options and patterns for knitting lace with various motifs (mesh, flowers, ruffles):
7:309- chain VP, BN;
- 3 VP lifting, rapport - 2 VP, 1 C1N through 2 BN;
- alternation - 8 BN, 10 VP, return to the beginning, fix C10, tie with 3 rapports from 3BN and pico from 3 VP, then 2 BN, pico from 3 VP, 2 BN.
The second option for lace processing of the bottom of the skirt or dress design:
- the VP chain is knitted BN;
- 3 VP lifting, rapport - 2 VP, 1 C1N through 2 BN.