Stencils for drawing flowers. Leaf templates (100 pictures and stencils). Modular Christmas tree ball
Paper flowers will greatly decorate your interior and bring aesthetics and comfort to your living space. For everyone who wanted to learn how to make paper flowers with their own hands, we will show a few simple tutorials/i>. step by step photo for beginners will demonstrate the whole process in detail, and our tips will help you get the job done quickly and without too much fuss. From our article you will learn how to make a paper tulip, how make voluminous flowers for decorating the interior, how to cut a rose from colored paper and much more.
To cut out all this flower-paper variety, we have selected for you beautiful schemes and templates so that you can complete this task easily and quickly.
DIY paper flowers: a master class with step by step photos
Paper flowers have a number of advantages that you will not find in living plants. Firstly, they do not fade, do not require special care and do not cause allergies. With the help of multi-colored paper flowers, you can advantageous to decorate the interior or clothing, volumetric flowers are attached to the wall or on the door, they are placed in large vases and solemnly presented for the holidays. How to make flowers from candies with your own hands, you can find out in one of our previous articles.
But to make your first paper flowers with your own hands, schemes, templates can be printed on a printer. And then - glue the petals according to the proposed instructions.

Dreaming of being given The Scarlet Flower? Make it yourself! Cut out some patterns different size and glue the petals on a special sponge located in the middle of the flower.

And for this purple flower you will need:
- white piece of paper;
- watercolor paints;
- scissors or stationery knife;
- aluminum wire;
- Cork tree;
- paper tape;
- green tape or floral tape.
- Cut a sheet of paper into even strips, not reaching the edge of the sheet.
- Fold the cut leaf into a flower shape.
- Make sheets of paper and fold as in the photo.
- Connect the flower with the leaves and secure with tape.
- Fasten a small piece of cork to the wire and twist it in half.
- Insert the wire into the middle of the flower instead of the stem.
- Wrap the stem with tape and then tape.
- A delicate purple flower is ready.


For a stock, for example, March 8th or May 9th, you can make several origami tulips according to the scheme shown in the photo.

If you have a special stencil, you can make a whole bouquet of scarlet roses and give them to a loved one. Detailed instructions for creating flowers just present in the photo. If there is no stencil, draw the flowers yourself on a sheet of A4 paper yourself.
For other decorative experiments, we offer you a selection of videos for children and adults With detailed instructions how to make crafts in the form of flowers.
Paper cut flower templates
And in this part of our conversation, we will introduce you paper cut flower templates. The shapes and sizes of flowers for every taste - from the most delicate color of an apple tree to bright blue cornflower and fiery red poppy.


A few more templates will diversify your flower gallery.


Large paper flowers for decorating the hall with your own hands: templates and schemes
Paper flowers - a win-win when decorating any room.

Note the short but very detailed master class for the production of volumetric paper flowers.

Application from such a "pink heart" decorate the gift box or a greeting card.

Crepe paper flowers are the most beautiful trend of this season. Such giant paper roses can be formed into a chic bouquet, or you can decorate the hall of a restaurant, cafe or your own apartment with them.
It is not difficult to make a flower with your own hands out of paper, especially if you have instruction and manufacturing scheme. Beautiful roses can be made from simple paper templates.
Popular flowers such as carnations can be easy to make from a regular napkin. These delicate flowers will certainly not wither soon.

Scrapbooking is another popular form of creativity for both children and adults. From special colored paper cut simple flowers for cute bouquets or decor.

Easy scrapbooking ideas - try cutting out roses, leaves and petals from special sheets of paper. And then glue everything on a postcard along with bows and decorative ornaments.
Making flowers can get you so engrossed that you don't notice how you transfer your hobbies to other materials, such as fabric. Such cute flowers can make unusual garland or delicate flower basket.

Unique growth flowers will decorate your holiday.
Mk for the production of growth flowers greatly diversifies your creative life. Purchase a special frame in the store, on which a flower of extraordinary beauty will be attached.

paper sakura, like other spring flowers, will give you a gentle and warm mood.

Try to make this flower using the origami technique.

Or cut from a template.
Video: how to make original paper flowers with your own hands
You may like:
- Knitted crochet rugs: interesting models, diagrams and...
Volumetric paper flowers are used to decorate interiors, furniture, ready-made accessories, gift boxes, postcard. It is not difficult to make them: the process does not require special skills, it captures and gives pleasure. Combine business with pleasure: try making flowers in different ways.
Making paper flowers is a simple process. The material is affordable and inexpensive, it is easy and convenient to work with it, so even beginners who have not previously been engaged in needlework will master the process. Studying detailed master classes will provide an opportunity to find good options and get exclusive jewelry. By the way, popular in 2017-2018.
For manufacturing, you may need:
- Material. It may be ordinary White paper for printing, colored or corrugated, Whatman paper, tracing paper, old newspapers or magazines. Easy to make from soft materials small items, and from dense - large, which should retain their shape.
- Scissors are used to cut parts. Choose quality ones that will cut cardboard.
- Glue: universal, silicone, PVA. The choice depends on the type of paper: the denser and thicker it is, the more securely it should be fixed. For convenience, protection from contamination and good bonding, you can use a glue gun.
- Schemes, templates. If the master class with instructions left questions, a visual demonstration will give answers to them. According to the template, you can make ideal blanks, and detailed diagram will help you figure out how and in what sequence to act.
- Frame materials. If flowers are made from paper with stems and leaves, you will need a wire that performs the functions of reinforcing and fixing the composition.
- Good mood and calmness. Start making if you are calm and determined to succeed. Nervous, angry and worried, you will not achieve a good result and will not get pleasant emotions from the process.
Volume flowers from corrugated paper
 Corrugated paper flowers look attractive. To make them, stock up on materials and tools. Need:
- wire;
- scissors;
- corrugated paper(green, red, white, yellow);
- glue;
- ribbon.
 Process :
- Cut off a strip of wire to prepare the stem.
- From green corrugated paper, cut a strip 1.5-2 cm thick.
- Coat the wire with glue, wrap it with a green strip along the entire length (fix the edges with glue).
- Cut out a strip of red (or other) paper: do not touch the bottom, but cut out semicircles or ellipses on the top. Wrap the edge of the stem with this blank, after coating it with glue.
- Cut out the rest of the petals and glue one by one to the bud. Fluff up the flower.
- Cut out green leaves, fix on the stem.
- The first flower is ready, make the rest, making them multi-colored.
- Collect flowers in a bouquet, tie it with a ribbon.
Advice! You can make large flowers in the same way, increasing the size of all the details several times. This will original decor interior or photo zone at the holiday.
 There is another way: by combining many colors, you get beautiful garland. You will need multi-colored corrugated paper, fishing line or strong thread, scissors, a needle, glue or a stapler.
Description of actions:
- Cut out rectangles from paper: the same size or 1-2 cm different.
- Stack the blanks in stacks of five. For solid colors, combine elements of the same tone, and for making bright jewelry, combine different shades.
- Fold each stack with an accordion. Fix the centers with a stapler or tie with a thread. Round the edges with scissors to make the flowers look gentle and cute.
- Straighten and fluff the edges of paper elements.
- String the resulting buds on a fishing line or thread, piercing them with a needle in the central parts.
Volumetric flowers on the wall
 Large voluminous flowers will become a non-standard wall decor of any room: living room, nursery, bedroom, hallway. Prepare:
- cardboard for the base;
- scissors;
- colored double-sided paper (can be replaced with stickers - small sticky notes glued into a block);
- glue.
 Master Class:
- Cut out a round base from cardboard. Diameter - 13-14 centimeters.
- Prepare paper squares. It is more convenient to use ready-made stickers, since there is no need to prepare details. If there are none, cut out squares of about 7.4x7.5 cm from double-sided colored paper. Quantity for a circle with a diameter of 13-14 centimeters: 24 pieces for the first layer, 22 for the second, 17 for the third, 14 for the 4th and 15 for the core.
- From all the squares, form small bags (like for seeds). A sharp cone should form at the bottom, and a circle with one triangular petal at the top. Connect the edges with glue.
- Take the base, grease the edge with glue and fix the bags with the back sides (parts with protruding triangular petals).
- Glue the second, third and fourth rows in the same way.
- When making the core, glue the central bags to the neighboring ones so that the center turns out to be voluminous and neat.
- Beautiful voluminous flower ready. You can attach it to the wall with double-sided tape or with a carnation and a loop of thread glued to the base.
Card with three-dimensional flowers inside
To please loved one or a friend with a card with a bouquet of paper flowers inside, try to make such a gift with your own hands. Make beautiful voluminous chrysanthemums. You will need:
- colored paper lilac, pink, yellow, white, green (light green) colors;
- a sheet of cardboard for the base;
- thread;
- scissors;
- glue.
Master Class:
- For one flower, you will need five circles of paper: two of the most big size, two medium and one small. Fold the first circle three times in half, cut out two oblong petals from the edge (slightly deepen the cutout towards the center).
- Expand the circle, fold the petals in half to give the composition volume.
- Place two medium circles on the large circle, then a small one. Connect the parts with thread or glue. The center can be decorated with a thread tassel or left as is.
- Make some chrysanthemum buds.
- Prepare the base of the postcard by folding a sheet of cardboard in half.
- Glue the resulting flowers, for example, one in the center on the fold of the cardboard and several on two sides.
- Cut out strips - stems of flowers. Fix them under the buds.
- Cut out the leaves, fold in half and fix near the stems.
- The do-it-yourself postcard is ready, and the flowers seen inside will definitely please the recipient!


There is another option for those who love roses. Need to prepare:
- double-sided colored paper (red, pink or white);
- felt-tip pen or pencil;
- scissors;
- cardboard;
- glue.
 Manufacturing instructions:
- Draw a spiral on paper and cut the workpiece along the line.
- Twist or bend the edges of a long coil of a spiral - this is the center of the future flower.
- Wind the remaining turns of the spiral around the central part, periodically fixing them with glue for the reliability of the composition.
- The edges of the petals can be slightly bent, then the flowers will look more realistic and voluminous.
- Make some more flowers.
- Fold the cardboard sheet in half to form the base of the card.
- Glue the buds inside the card.
If the recipient prefers delicate calla flowers, make this paper card for them. You need:
- double-sided colored paper (corrugated is suitable);
- modeling dough or polymer clay;
- universal glue (glue gun);
- scissors.
 Description:
- Make a stamen - blind from dough or clay. But you can crumple the paper and roll it into a tube.
- Cut out a heart from paper.
- Place a stamen between the rounded parts of the heart, fix it.
- Wrap the stamen in the petal, leaving most of the part out. Glue the joined sides of the heart, carefully turn the edges outward.
- Make a few buds, glue the flowers into a card and give a gift.
Patterns and schemes of volumetric colors
You can make paper flowers using templates or patterns. Having studied the diagram, you will understand the sequence of steps and make the product described by the author identical. For beginners, it is better to use simple and understandable options.
The template will simplify the process as much as possible. You just need to open and download the image, transfer it to a Word document or other file and print the image on paper. But it will not be possible to make large flowers using templates, since the size of the picture is limited by the sheet format. 


Volumetric flowers video
Handmade flowers will become original decoration interior or an exclusive gift for any occasion. Consider all the methods proposed in the article, choose the one you like, study the instructions and start manufacturing.
From birth and throughout life, flowers surround a person. Wherever a person is, and wherever he goes, everywhere you can find living garden, field, forest, indoor flowers. Artificial or painted can also be found everywhere. Floral patterns are widely used in painting walls, dishes, fabrics for clothes and furniture.
Widespread use of flower stencils received when designing stained glass windows, gifts, postcards. With their help, you can create a beautiful and unique design, ceiling and furniture in your apartment, and a children's room, decorated with floral ornaments, will be especially attractive and cozy and delight your child.
Templates
They can be printed and cut out. The use of such stencils has become very popular and is often used in children's creativity, in design projects and among the artworks of various advertising posters and children's books. They are complex and simple:
- complex called because paint is used to create a picture different shade and colors.
- When used in a drawing of one shade - called simple.
You can make it yourself, you need find the right picture, copy on tracing paper or carbon paper onto a sheet of sufficiently thick paper, carefully cut it out and use it where you need it. Application is often used in children's creativity, and in order to get beautiful flower or a chamomile petal, you need to prepare their different flowers in advance, which will help you draw even and neat drawings.


Stencils for download and print
The easiest way is to buy ready-made templates in a specialized store, but you can make them yourself. Choose any drawing you like, print it and transfer it to more thick paper.
Then cut the stencil with scissors, blade or stationery knife. You can use your own stencils in the same way as ready-made ones in the design of surfaces, ceilings and other types of artwork.

Large flower stencil

Chamomile stencil

Tulip stencil

rose stencil

Stencil decorative flower for wallpaper

large flower stencil

Lily flower stencil

bluebell stencil

Flower stencil with leaves

rose stencil

Tulip stencil

Peony stencil
How to use
Using templates, you can apply a pattern to any surface to decorate the room. Choose the flower option you like in a specialized magazine or website, print, cut, apply and paint over. Flowers look very effective against a dark background. With their help, you can decorate the interior of any room.

If you want to decorate the plain clothes of your wardrobe, flower stamps will come to your rescue here. To do this, download the desired image, print it, cut it out and apply it to the fabric with special fabric paint. Or you can cut petals from fabric or leather according to prepared blanks and stick or sew on clothes.

Lace of painted flowers looks very beautiful on plain wallpaper, as well as on the glass of a window or mirror.
To do this, attach it to the glass, circle and paint over with gouache or watercolors. Glass interior door can be turned into a masterpiece of art, using various stamps and multi-colored paints, creating a picture or a real stained glass window.

stencils different colors
They become indispensable helpers in kindergartens, schools, where with their help children create a bright and funny application. Flower stamps help children learn how to draw, develop artistic taste, because the choice of color for a rose, chamomile or other flower completely depends on the child himself, his inner worldview. Educators and teachers practically do not participate in the process of creating a drawing, but only set the topic.

Creeper flowers stencil

Stencil for wallpaper flower and butterfly
Kinds
There are several ways to create templates for creativity, decoration or use in interior design:
- the most simple technique making a flower stamp, this is to put the image on thick paper and carefully cut it out with scissors or a clerical knife;
- creating according to the technique of cutting snowflakes, when a sheet of paper is folded several times and the desired contour is cut with scissors;
- three-dimensional patterns can be obtained by cutting a circle of paper in a spiral and folding it into suitable shape, or by cutting the petals along one edge of a strip of paper and collecting them into a flower.
Floral ornament in interior design
There are many ways to create a unique interior for your home, and a stencil image of flowers decorate any wall. Moreover, you yourself can do all the work with your own hands, using already ready-made options or by making your own from your favorite drawings.
A picture of roses, poppies, tulips, daisies or other plants will look very beautiful, and butterflies that complement the image will help to add airiness and lightness to the whole room.

Wallpaper with a large and colorful ornament looks very fresh and juicy.
According to the method of applying the pattern, stencils are divided into direct and reverse. A straight template is a designed pattern on a piece of paper that is applied to the surface and painted over with paint inside the cut out form.
The reverse pattern is easier to use. carved flower applied to the selected surface, fix, the space around is painted over and left to dry completely. Then the cardboard is removed and the result is a clear picture.
According to the finished template, you can create three-dimensional pattern, to do this, attach it to a vertical surface and apply plaster or plaster according to the pattern, wait until it dries a little and remove the stencil. You can paint it with multi-colored paints, but a monochromatic pattern also looks good.
A beautiful image will transform the interior of your apartment, make it original and unique, in tune with yours. inner world and taste.
All the best and have a bright day! So very soon, after a month, the first flowers will appear, I suggest not to wait for this and make paper flowers yourself. After all, you can give such cute gifts of nature without a reason, but if you need a reason, then do not forget to congratulate your mothers, grandmothers on March 8 or Happy Mother's Day, because these days they always give such crafts.
Let them be paper, but they can be presented so cool and superbly that they will look even better than the living ones, and even more so, they can stand on a table or on a shelf for a single year. And it certainly pleases. Take a look at this picture, do you like it? If yes, then in I showed in stages how you can do such.
In my opinion, today's theme will always be popular, because this is the most beautiful and delicate souvenir that you can give for any occasion. So, I suggest you hang out for a while with me))).
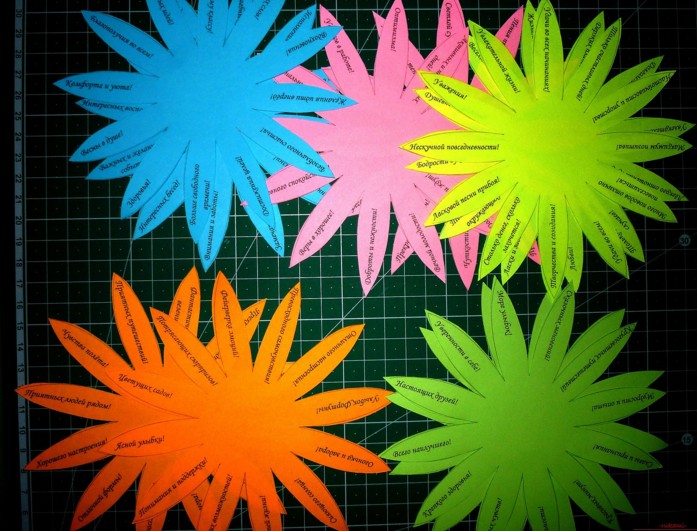
Souvenirs that carry something unusual look unrealistically beautiful and original. I propose to start from the very simple option, but who, you just look. This is a chamomile, but not simple and not fabulous, but with wishes, how nice it would be to give it, don't you think?
Moreover, you can download ready-made templates directly from this site and print on a printer. This is a very cool souvenir that will hook anyone. You can give it for any holiday, for example, a birthday or Teacher's Day.
We will need:
- office sheets of different colors - 5 pcs.
- glue stick
- double sided tape
- rhinestones
- templates
- satin ribbon
- scissors
Stages of work:
1. Get started with the fact that you will need to decide on the shape of the flower. I propose to take such a seven-flower. Print blanks on the printer. The first template will be the same as in this picture, I will send you all the rest to your mail, just write your comment below (there are 10 in total), or you can come up with your own words or messages.

2. Here they are handsome, now take scissors, or you can use a clerical knife and cut along the contour.

3. These are such cute and funny blanks.
4. Cut out a circle of cardboard with a diameter of 5 cm and put the first flower and satin ribbon and put glue or grease in the middle if you use a pencil. So gradually glue everything.

5. Now it remains to beautifully arrange the middle. To do this, take a square, about 3.5x3.5 cm. Bend it like this.

6. Then make a triangle like you are making a frog.
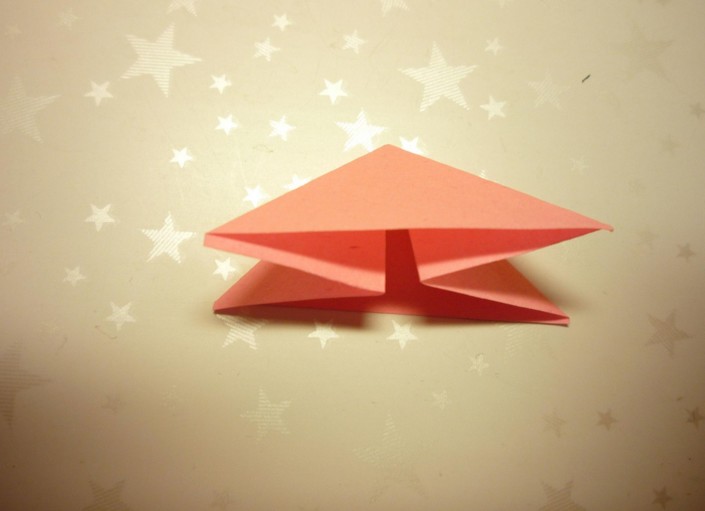
7. Bend the ends forward.
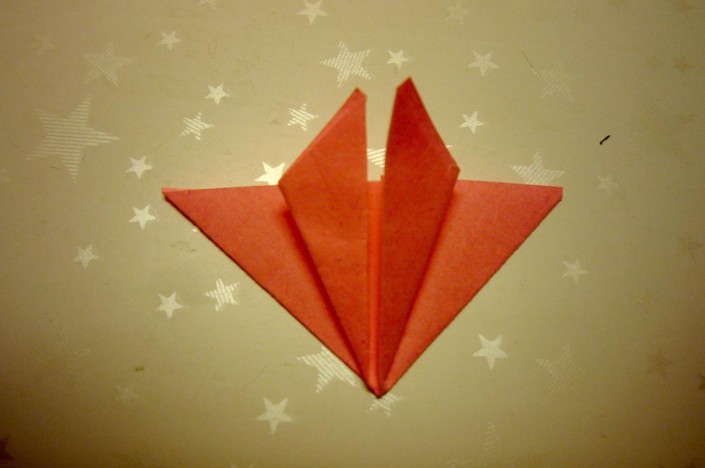
8. These butterflies will turn out.

9. Which will only be connected, glued to each other, and glued on the middle with something interesting, such as a bead or rhinestones. A very original and unique craft turned out, it will definitely please the one for whom you made it.

The most common and uncomplicated, especially for children, is a flower of eights using a hole punch and buttons.

Undoubtedly the king of all flowers are roses, how to make them, to be honest, there are a great many options. I will write about this in more detail sometime. And now take this masterpiece as a basis.

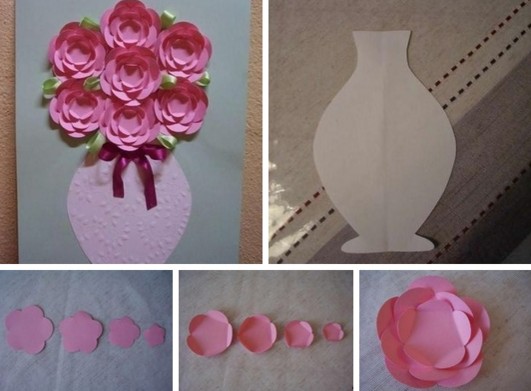
Or here is such a sample, you need to draw 5 flowers from largest to smallest, and then arrange this business in a vase.
Many of you, I know, will be looking for roses, because these are the flowers that are customary to give in most cases. Well, here's your first tutorial. Take crepe paper and make petals out of it. Cut out the strip first, then fold it into an accordion shape and round off the edges. After that, you should wind it on the stem, which can be a stick or something like that.

Also decorate the stick with green corrugated paper.
You can make such a wonderful creation from plain paper, but it is better to use crepe paper or corrugated paper. Draw yourself a spiral in a circle, cut it with a knife, and then wind it on a pencil or crochet hook.

Or use this usual scheme here, you can do this in 5 minutes.


Their steps are absolutely simple. Remember how bookmarks were made in childhood, the system is about the same))).

The flowers themselves can also be twisted to look more interesting, as if they had blossomed for real.

In general, quite a lot of models can be composed and made from paper, the main thing is depending on what the petal will be in shape.

Notice these features for yourself, and you can make daisies, chrysanthemums, dahlias, and even carnations, take a look at the following pictures. You see patterns of petals for cutting.


Or do you prefer lilies with peonies?

And what is this flower? Guessed?

In the form of a brooch, you can make such a charm).

The very first, as you know, snowdrops delight us. And you can make the flowers themselves from pumpkin seeds.

And of course, I could not get past the foamiran, use this material too.

Dandelions follow. Make them from ordinary napkins using a stapler.

Here is such a bright option, it will also be a great solution to surprise everyone.

They remind me of asters.
This view completely captivated me, I fell in love with it at first sight. Really looks like a live or real dahlia.

You can make primrose. You will need squares from which you need to make figures that look like triangles.

On the other hand, also fold to make a triangle and a petal for the future bud. Then glue them together. Make a stem and leaves.

The next option looks great, as if real.

We make crafts from A4 sheet
Not so often, but still you have to make such products from ordinary large sheets. Of course, you can use such luxurious crafts anywhere, they look especially good if you decorate walls or a hall with them, that is, you use them in the interior of the premises.
Each leaf is a large petal that you will have to color in the desired color.

Larger flower options can also be made in the form of a rose. Initially, you will need to use a template.

And then step by step follow all the steps presented.
Video on how to make paper flowers quickly and easily
You won’t believe it, but you can twist a gorgeous bouquet quite simply and in a matter of minutes, watch this video and you will also learn this interesting lesson:
Master class on folding paper tulips
We all folded different figures and used origami at some time in childhood. I remember in the lessons of labor I really liked this lesson. Tulip is usually done using this technique. It turns out voluminous and similar to the original.

You can also make an open bud.

Or take another idea from corrugated paper as a basis, hide candy in a bud. No one will refuse such a gift, that's for sure!

And here's another great idea with disposable spoons. Such a gift can be presented for a birthday and even for a wedding.

Stages of work:
1. Prepare everything you need for work, all components are shown in this picture.

2. Cut scarlet rectangles from corrugated paper and then wrap the spoon with this material, as if twisting slightly along the stick.

3. What does it look like? Of course, the petals.

4. Mask the stick with green paper, while folding the spoons to each other (4 pcs.) To make a stem and a bud. Then cut out the leaves in a certain shape.

5. Decorate the craft in a pot or cup. You can tie a bow or some other pattern.

Step by step instructions for beginners how to make a flower for mom
Now let's learn how to make the simplest option, because for someone the previous ones will seem very complicated, then this present will come to your aid.

We will need:
- paper square shape- 2 sheets

Stages of work:
1. Take a sheet and fold it in half to make a triangle. Then again.

Then draw such semicircular lines as you see in this illustration. Cut out the template and follow the instructions.
2. Expand, open the workpiece and glue a couple of strips to the middle.

This option is suitable for the smallest, for example, for preschoolers.
But with schoolchildren, you can do it even more difficult. The meaning is the same, only bend the petals and glue them differently.

You can also make a red poppy or take a different color, but for this work you will need more wire.

I am very much in love with asters, do you love them?

Do you want to know how these can be done?
We will need:
- magazine old
- scissors
- barbecue sticks

1. Disassemble the magazine into pages, fold each page in half, then again and again.

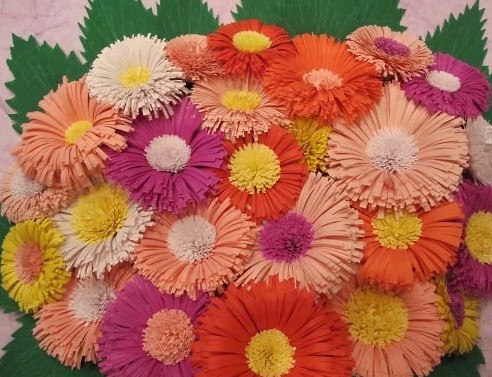
2. Take scissors and cut with weed. To make a fringe.

3. After this charm, wind it on a stick.

4. After that, fluff the product. Cover the stick with green paper.

Something similar can be done to a teacher or, for example, to an aunt or grandmother.
1. You will also need napkins and corrugated paper, plus you will also need a disposable cup or a jar of sour cream.

2. Since the flowers will be large, you can make smaller ones, take a napkin and fold it in half, then in half again, and again. Fasten the middle with a thread or a stapler.

Cut out the petals with scissors, shape them.
3. Now prepare a cup, glue it with corrugated paper, push crumpled newspaper or unnecessary paper inside, also cover it with corrugation and release it as if weed.

4. There should be 10-12 blanks, it all depends on your abilities.

5. Using glue, plant the resulting flowers on the base. Quite modest, but at the same time bright and stylish, such a present will please anyone, especially women or girls.

Learning to make voluminous flowers
From what just do not make such crafts in our time. They even adapted egg molds for this work. For me it's a shock, how and when it could come to anyone's head, but it came, and conquered everyone. At first it looks inconspicuous, and then awesome masterpieces are obtained.

The sample is painted with paint, put on a wire or a stick.

A wonderful souvenir, as they say, from improvised means and how beautiful and funny it looks.

You can agree with such voluminous colors that you can quite easily and quickly decorate any interior of a room or hall, make it irresistible and unforgettable.
You can also use this gorgeous flower garland.

After that, put each blank on a fishing line or thread.

You can also make unforgettable creations from paper bags.

Using the origami technique, you can fold and then glue the parts.
And the coolest three-dimensional view, which I really liked and I advise everyone to do it, is this one:
Love callas? Then take this master class to your note.
You can even make a masterpiece out of ordinary newspapers.

By the way, you can even make Pansies with the kids.

Interesting gift idea Roses with candy
Once I showed you how to make roses and hide sweets in them, remember? Look what a gorgeous bouquet turned out, and we presented it on Valentine's Day, if you forgot, then I remind you.

I also give you this diagram to help you.

You can easily go and follow the step by step instructions.
Or use this video, you can’t do without roses:
That's all for me, I wish you inspiration and excellent work. Come to visit me more often, join my group in contact, write your reviews and comments. Good luck and see you soon! Bye!
Sincerely, Ekaterina Mantsurova
Every woman dreams of being surrounded beautiful flowers. In order for them to always be with you, you can create various flower arrangements right on the walls of the room.
All kinds of flower stencils can be made by hand or purchased at the store.
Flower stencils are a great option for a quick interior change. When using them, you can create real flower arrangements on the walls of your apartment, enjoy a cozy atmosphere.
Advice! Among the many types of flowers, professionals recommend choosing roses and chamomile for wall decoration.
You can make flower stencils with your own hands, armed with thick cardboard or plastic film. Stencils and templates "flowers" are a great way to decorate the living room, the room of a young princess.
Roses or daisies made on a dark background can even be used to decorate the entrance. First, stencils and templates are transferred to a dense material so that they can be used for a long time period. Next, a surface is selected that will be decorated with flowers, and the pattern from the stencil is carefully copied onto the wall.

Using the flower stencil, you can make positive changes to plain elements of clothing.
How to create a paper cut flower stencil? The templates offered in stores are completely ready to use. You just need to stick or sew it on the product, then proceed to transfer the pattern.
Advice! Armed with a “flowers” stencil, you can update the old plain wallpaper.
In addition to wallpaper, such stencils are suitable for decorating windows, ceiling surfaces.
If you arm yourself with watercolors, you can create whole compositions on the windows.
To do this, you first need to attach a stencil to the window, circle it along the contour, then paint over the inside of the picture with certain colors.

Child psychologists are convinced that “flowers” stencils are needed for decorating preschool institutions.
Various stencils of flowers on the wall allow you to create real stained glass windows. For example, if you decide to create a lawn of daisies on the wall of the children's room, they will look great against the background of dark saturated colors. The stencil of roses harmoniously looks on the green wall, and you can also choose light colors for it.
Roses are considered noble flowers, so they are characterized by various shades.
Advice! When creating flower pictures on the walls, you can involve children in the work. They will be able to show their Creative skills, will feel the demand for work related to the design of the room.

When creating flowers for decor with their own hands, the children develop an artistic taste, fine motor skills develop.
Children can make various paper flowers on their own, for such work they do not need the active participation of a teacher.
For joint leisure, you can also use flower stencils. For example, at first, children work with ready-made templates, making the basis of the composition, and then add a picture at their discretion with additional elements.

Rules for making a stencil
In order for the created template to be used for a long period of time, professionals recommend creating them from a durable polymer material. For example, you can arm yourself with a dense film, making a blank in the form of a rectangle out of it. Next is the drawing option.
Advice! In order to make stencils easy to use, it is best to choose simple drawings in which you can draw all the details.
A drawing is applied to the prepared surface, then cuts are carefully made with scissors, then all unnecessary fragments are completely cut out, obtaining a blank ready for use. Without certain skills, it will be quite difficult to immediately make a complex blank with your own hands, so professionals recommend trying to make a simple template first.

Workshops on making flower patterns can be found in design magazines. If you strictly follow all the recommendations of stylists, you can create excellent templates with your own hands that are suitable for decorating walls, ceilings, and window openings.

Create a stencil
Before proceeding with direct painting on the wall, the surface must be carefully prepared. For example, if irregularities are detected, the wall is leveled, then primed.
Advice! For work related to priming the surface, suitable plaster mixes.
The primer of the walls with deep acrylic impregnation is carried out so that a durable and high-quality surface is obtained. Then you can move on to applying the foundation. Professionals recommend choosing white facade paint as a base, you can buy it at any hardware store.

Attention! For the base, it is precisely the facade paint that is intended for exterior finishing work.
After the surface fragment on which the stencil will be used dries, it can be washed with water.
Paint for interior work is not suitable due to the fact that during the operation of the made image, it will gradually be washed off, as a result, the picture will lose its aesthetic appearance.
For decorative work, you will need a color scheme designed for outdoor use. Professional interior designers recommend choosing brushes with artificial bristles for work related to transferring the pattern to the surface of the walls.
Brushes with natural bristles are not suitable for such work (after them, stripes remain on the surface).

In order for the brush to be used several times, immediately after application, it must be washed.
Advice! Cuvettes are required to guide color, dilute several shades of flowers. Colors can be mixed in any clean containers that are on the farm.

Drawing process
If you decide to use a ready-made stencil, you can transfer it from paper to a plastic blank. For example, the remnants of a dense folder for documents are suitable for these purposes. With a marker, you need to transfer the drawing to this base, then cut out the contours of the image with a sharp knife or scalpel.
Advice! If you plan to use large stencils for decorating walls, you can attach the stencil to the wall using tape or special glue.
The glue is first sprayed onto the stencil, and after a few minutes you can stick the template to a specific section of the wall.

Varieties of stencils
If desired, you can choose multi-layer or single-layer stencil options. In the case of choosing a single-layer pattern, you can apply the pattern at a time. The disadvantage of such blanks is the possibility of using only one color.
Multi-layer stencils are suitable for multiple applications. You need to work with them in stages, allowing each layer to dry completely. To get the desired result, you first need to apply the bottom layer, then the next color is added to it. Work is carried out until all the colors selected for a particular image are used.

Conclusion
Many owners of urban and suburban real estate are not limited to using traditional wall and ceiling finishes, they try to use their creative imagination, make stencils to complement plain paint or wallpaper original compositions from roses, daisies, bluebells.

In order for the created drawings to become a true decoration of the interior, it is necessary to consider not only the size of the drawing, but also the colors that will be used for it.