Kinder bouquet step by step for beginners. Bouquet of kinders with their own hands for a great gift. Do-it-yourself bouquet of kinder surprises step by step
How often do we want to give our child or dear person a handmade gift - it's so nice to please your loved ones with exclusive sweet gifts! We will tell you in detail and step by step, how to make a bouquet of kinder surprises with your own hands at home from available materials.
The first step is to consider the size, color and design of your bouquet.
The main cost elements are:
kinder surprises (45-70 rubles / piece for December 2015)
corrugated paper/crepe paper (120-150 rub/roll 50*250cm)
felt (400-600 rubles per roll)
thermal gun (from 800 rubles and more + glue sticks 40 rubles / piece)
holders (100pcs about 300 rubles)
organza, if you decide to use (250-350 rubles / meter)
less
satin ribbons, raffia ribbons, natural flower ribbons, etc. (approximately the cost will be 100-300 rubles per babinka)
wide adhesive tape (30-50 rubles)
any decor (beads, hearts, toys, etc.)


Surely you are interested the size of the future bouquet. For example, a bouquet of 19 kinder surprises will turn out to be about 30 cm in diameter, from 31 kinder - about 35 cm in diameter, from 51 kinder - 45-50 cm. The height of the bouquet is not less than 30 cm, usually varies from 30 to 50 cm.
Where to buy materials for your bouquet? - In any floristic shop, where a huge selection of materials is presented, and you will definitely choose the right color and size. In one store, you are unlikely to find everything you need at once, so you need to be prepared to visit 2-3 or even 5 stores.
Of course, your noble impulses may end at the time of purchasing components, because you will have to invest a substantial amount / buy more materials than you need for one bouquet, spend several days searching for and buying materials, then a day to make a bouquet, but we are in you we believe, therefore,
as promised, we will describe, how to make a bouquet of kinders:
1. We take holders with clips (stick with a cup) in the right amount. We decorate the holders with felt or organza, as a result we get blanks.
2. Then we insert Kinder Surprise inside the holder with fabric - you need to do it carefully so as not to melt the Kinder. Thus, we get a kinder on a stick, decorated with fabric / felt in the color of your bouquet.
photo 2 is expected
3. When your "kinder flowers" are ready, you can begin to form a bouquet:
- Collect the holders in a bouquet and fasten them with tape one by one.
- IMPORTANT! - watch the distance between the kinders in the crown of the bouquet, the location of the kinders, the pattern (if you use kinders different color or use a different color substrate for kinders). As a result, you will receive a finished bouquet core. The case for small - registration ;-)
- You can decorate a bouquet simply with corrugated paper in one or two layers, or corrugated paper with organza, as in these examples /;
To arrange a bouquet simply with corrugated paper in one or several layers: measure the corrugated paper according to your bouquet. If there are several layers of paper, then according to your idea, measure the paper directly according to the bouquet. Then glue the edge of the measured sheet of corrugated paper. Put on the crown, pull it tight with any ribbon on the stem of the bouquet. Do the same with the rest of the corrugated sheets. As a result, you will receive such a bouquet:

To arrange a bouquet in organza, glue the fabric on the corrugation. This will give the bouquet additional volume and a beautiful overflow of color, as in this bouquet.

- After decorating the bouquet in corrugated paper, you can start decorating. The decor of a bouquet of kinders can be satin ribbon bows, beads, small flowers, hearts and much more. Here you can see examples of decorating a bouquet: ;
- Once you have finished decorating the crown of the bouquet, you can tie the bouquet with a beautiful satin ribbon, floral ribbon or raffia ribbon.
- Your bouquet is ready! Enjoy the result and give joy to loved ones!
P.S. Don't be discouraged if you get a slightly different result than you expected. Beautiful bouquets obtained through hard work and long training.
If for any reason you change your mind about doing bouquet of kinder surprises with our own hands, we will be happy to bring your fantasies to life with maximum precision to the details and precision of execution. And you can look at existing works in our catalog and order in any way convenient for you.
Sincerely, Your Plushkin-mir!
Do you want to create a floral arrangement with chocolate eggs? Don't know where to start? After reading the recommendations from the article, you can easily make a bouquet of "Kinder" with your own hands. It's quite easy step by step. The materials that will be required are in every store, and for simple options You most likely have everything you need at home.
Making a bouquet of "Kinder" with your own hands step by step is not at all difficult, as it might seem at first glance. Variants are made different:
- only from chocolate eggs with ribbons, organza, floristic mesh;
- in combination with fresh flowers;
- floral scenes from corrugated paper, capron, chiffon, complemented by "Kinder";
- topiary.
Chocolate eggs can be both main elements and a nice sweet addition. In any case, it will be a universal gift for a child for any holiday.

What will be required
Making a bouquet of "Kinder" with your own hands is easy step by step if you prepare everything in advance. You need to buy the following:
- chocolate eggs;
- skewers for barbecue;
- corrugated paper;
- tape, mesh;
- organza, chiffon, capron;
- bows, ribbons, butterflies;
- Natural flowers.

The composition can be made an independent object, which will be made on a frame made of a plastic tube. Floral sketches look beautiful in baskets, for example, in the shape of a heart. You can also put the bouquet in a vase. It is important that it matches the style of the souvenir and complements the bouquet, and does not spoil its perception.
container, box or base for flower arrangement easy to make from Kinder chocolates. They have a rectangular elongated shape, so it is very useful for creating vertical surfaces. You will need a box of any shape (round, vertically elongated, heart-shaped). Glue chocolates on its surface in a vertical, horizontal direction or alternating both.
In addition to chocolate eggs, flowers and floral decor, for baby gift use toys. Small fit for girls soft bears, bunnies are hearts, and for boys it is best to choose cars.
Do-it-yourself bouquet of "Kinder" step by step
(photo for beginners)
The easiest option is to make tulips, where it acts as the basis of a flower. To make such a composition, as in the following illustration, you need to follow these steps:

- Buy the right amount of "Kinder".
- Prepare the appropriate number of colored napkins.
- Take the first egg and wrap it in a napkin so that the tip is approximately in the center.
- Trim off excess edges.
- Secure the egg along with a floral flight napkin on a kebab skewer.
- Wrap the stem down.
- Cut out leaves from green cardboard or paper and attach them to the stem.
- Also make all the other tulips.
- Connect all the flowers in a bouquet and put in a beautiful vase or wrap with corrugated paper. Decorate with a bow.
Do-it-yourself bouquet of "Kinder" step by step with instructions (more complex version)
Chocolate eggs can be used as the center of fabric flowers.

If you want to learn how to create a bouquet of "Kinder" with your own hands such as in the photo above, read on and do the following:
- Cut the petals for chiffon or nylon according to the pattern.
- Finish the edges of the fabric blanks over a candle flame. This will not allow the material to crumble, and will also give shape. With paper, go straight to the next step.
- Wrap the "Kinder" by folding the "leg", which should be put on a skewer. This is what will keep the flower on the frame.
- Begin to form the structure of the flower by gluing the petals together.
- Make the sepals and wrap the stem with floral tape.
- Make the right amount of flowers.
- Connect everything in a bouquet.
- Wrap the composition with corrugated paper, decorate with a ribbon, butterfly or other decor.
Highly beautiful flowers with the middle of the "Kinder" can be made of nylon on a wire frame. In this case, each petal turns out to be light and translucent and at the same time durable, since it has a wire base along the contour.
If you want to make a composition quickly from the available materials, it is quite possible to use plain paper(Whatman paper), which is easy to paint. Skewers for barbecue are more often used as stems and a frame. If they are not at home or short frames are enough for you, use ordinary toothpicks.
Topiary from "Kinder"
Another stylish gift- a mini-tree in the form of a ball in a pot. Topiary is made from both flowers and sweets. The option with chocolate eggs also turns out to be original.

To make such a ball-bouquet of Kinders with your own hands step by step (photo above), you need to prepare the following:
- spherical foam base, papier-mâché, ball;
- rod for the stem;
- a pot, a vase or a container with filling for it (beads, balls, buttons, lollipops);
- glue or heat gun.
The sequence of work will be as follows:
- Color the base to match the color of the egg wrappers.
- Attach the rod.
- Glue the kinders evenly over the surface.
- Place the stem in a pot and fix it with glue or gypsum slurry, cover it with decor on top.
Conclusion
You saw that a bouquet of "Kinders" with your own hands is done step by step very simply. Choose any of the options where there are few sweets or, conversely, they are the main ones. Give surprises to your little sweet tooth!
For work we need:
kinder surprises 9 pieces, regular tape, double-sided tape (can be white or transparent), teip tape, pliers, scissors, glue gun, floral wire, cellophane or transparent film, corrugated paper (in our case, blue).
We will also need a floral metal frame with sisal, a floral mesh different colors, satin ribbons and decorative butterflies.
We cut the cellophane film into rectangles - 17 cm x 10 cm. We need 9 such rectangles.
We also need 9 rods of floral wire, at the end of which we, with the help of pliers, twist the loop and bend it with the letter G.
The fold turns out to be about 1.5 cm. Cut off a piece of double-sided tape and go around the fold with it, without removing the protective film from the outside.
We take one egg. We remove the protective film from the double-sided adhesive tape pasted on it. And glue, prepared in advance, cellophane.
17 cm - around the circumference of the egg, 10 cm - in height.
Remove the protective film from the adhesive tape on the floral wire. We insert the wire into the inside of the cellophane and press it with an adhesive tape to the bottom of the egg.
We collect the film around the wire rod and wrap it well with threads.
To decorate the threads and cellophane, we use teip tape. We wind it from the base of the egg to the bottom of the wire rod.
If you have pieces of cellophane sticking out along the diameter of the egg, then they can be fixedwith a glue gun
When all the kinders are ready in this way, we prepare 9 pieces of a floral grid for work, 20 cm x 20 cm in size.
They will be in three different colors, since the wrapping of our kinders is also in three different colors.
You will also need a satin ribbon, 0.6 cm wide, matching in color - 9 pieces of 40 cm each.
Try to use the colors that you see in the coloring of the egg wrapper. It is advisable not to use more than 3 colors.
For a green egg wrapper, take a green segment of the floral grid. Wrap the net around the egg and tie tightly with ribbon.
By the same principle, we prepare the rest of the branches.
When all the branches are ready, we collect them in a bouquet and tie them very tightly to each other. To do this, we use either ordinary adhesive tape, or metallized, or satin ribbon.
We prepare a piece of corrugated paper. Length - 46-48 cm. Fold in half and glue along the seam glue gun. We make one edge wavy - we stretch the paper with our fingers. This will be the top.
We dress for a bouquet. If in your opinion it turns out to be too long, then a couple of sections of corrugated paper from below can be cut off.
Handmade gifts often have an extravagant and impressive look. An interestingly designed Kinder Surprise egg can be presented as a main gift or as an addition to the main one, because in addition to a delicious chocolate bar, there is also a small toy inside the egg. We offer several interesting workshops on making bouquets of kinder surprises on your own.
Bouquet 1
Such a bouquet will definitely be a surprise for the one to whom it is presented. It can be both a girl and a boy.

- the desired number of chocolate eggs;
- floral tape;
- double-sided thin tape;
- threads;
- scissors;
- pliers or wire cutters;
- wire (you need to choose medium hardness and thickness);
- transparent polyethylene for flower decoration;
- organza or plastic wrap for the final decoration of the bouquet;
- dry stems, leaves, flowers and ribbons for decoration.

Bouquet 2
Required materials and tools:
- kinder surprises;
- wooden skewers;
- paper napkins of various colors;
- green teip tape;
- scissors;
- green double-sided paper or cardboard.
Master class on making a bouquet:

Bouquet 3
Required materials and tools:
- chocolate kinder surprises;
- a tube of cardboard (you can take it from a roll of paper towels or a roll of bags);
- a piece of foam;
- glue gun;
- double-sided thin transparent tape;
- stationery stapler;
- cardboard;
- food film;
- scissors;
- toothpicks;
- ribbons, decorative mesh, corrugated paper in two colors;
- a piece of fabric to create decorative elements.
Master class on making a bouquet:
- Cut a piece of foam plastic as in the picture and stick it on a cardboard tube.

- Cut the cardboard into a semicircle. The number of blanks should be equal to the number of kinders. Glue a strip of tape to each piece, and then twist them into funnels and secure with a stapler.


- Wrap the egg with cling film, wrap the remaining “tail” of the film around a toothpick and put a funnel on top (you must first remove the top film from the adhesive tape) and wrap it with a decorative mesh.

- Cut the fabric into rectangles measuring 5 by 10 centimeters (about 40 pieces), make blanks as in the picture and attach them to the toothpicks with double-sided tape.


- Cut the ribbons into strips (about 10 centimeters each, you can make different sizes), fold with a loop and attach with tape to a toothpick.

- All created bouquet blanks must be inserted into the foam.

- Wrap the leg of the bouquet with corrugated paper as in the picture, fasten with staples and decorate with a ribbon bow.


Bouquet 4
This is the easiest way to create a bouquet that even a child can handle.
Required materials and tools:
- egg kinder surprise;
- corrugated multi-colored paper;
- wooden skewer or sushi stick;
- green teip tape;
- threads;
- scissors;
- glue;
- stationery stapler.
Master class on making a bouquet:
- Cut corrugated paper into equal pieces. Fold each piece with an accordion and fasten them together with a thread in the center (it is better to start with a light tone of paper and observe smooth transition between shades).

- With scissors, round the edges of the resulting multi-colored accordion, thus forming flower petals.

- Starting from the center, unfold the paper, trying to make the flower more magnificent.

- The edges of the halves of the flower are best glued together, or carefully discreetly fixed with stapler staples.

- To create a “stem”, cut a 1 centimeter wide strip of green paper and wrap it around a wooden stick, periodically gluing the paper to the skewer.

- The leaves of the flower are also cut out of green corrugated paper, strung on the stem created earlier and secured with teip tape or glue.

- With the sharp end of the “stem” stick, it is necessary to pierce the flower in the center, and then insert the egg inside (it must be strung on a stick).

Basket with surprises
Such a basket will be a wonderful gift or addition to the cake at children's parties.
Tools and materials
To create a shopping cart:
- the desired number of kinders;
- a small basket of vines;
- crepe paper of any color;
- decorative mesh;
- thin ribbon;
- hot glue;
- scissors;
- decorative flowers, toys.
For decorating eggs:
- organza;
- ribbon;
- polystyrene (thin, the same size as the bottom of the basket);
- beads, ribbons, rhinestones.
Master class on the design of the basket:
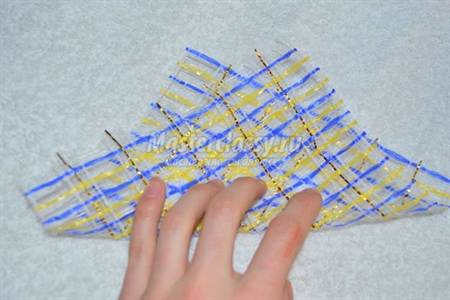
- Carefully attach the crepe paper to the basket with glue. At the bottom of the basket, make ruffles for beauty.


- Cut the decorative mesh into squares (about 10 by 10 centimeters) and glue to the bottom and along the inner perimeter as shown in the photo.

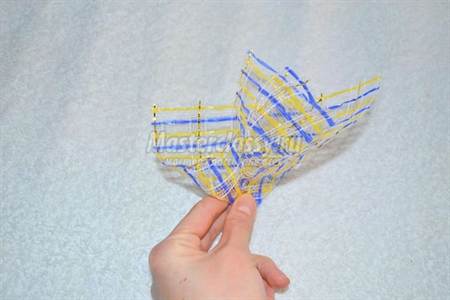
- For the second row, fold the grid squares in a special way (as shown in the photo) and attach with glue to the bottom of the basket.


- Cut crepe paper into long strips (no more than 1 centimeter wide);

- Wrap the handle of the basket with the resulting strips of paper, fix the edges with glue. In addition, wrap the handle with a ribbon and attach decor elements.


- Wrap each egg with organza, inside, under the bottom of the egg, put a small square thick paper(so as not to damage the candy packaging with glue). Tie the organza on top with a ribbon and make a bow (take the ribbon to match the color of the one on the handle of the basket).

- Glue foam to the bottom of the basket, cover it with crepe paper on top to hide all the flaws.

- Ribbon bows can be attached to the decorative mesh.

- To firmly attach the kinders to the basket, they should be put on glue by pressing them to the foam (apply glue to the base of the egg, where paper is laid under the organza).
- At the end of the work, carefully lay the organza between the kinders, attach beads, rhinestones or other decorations if desired.

All people are children to some extent. After all, sometimes you really want an unusual little thing, an extraordinary gift. So the fashion has come to us lately to make gifts with your own hands. It is not only beautiful, but also quite interesting activity. This article will describe how to make your own delicious bouquet of kinders quickly and easily with your own hands. Such an unsurpassed gift will bring everyone only the best emotions!
This type of craft is very easy to implement, you do not need a special needlework skill. Children really like this surprise, because who doesn’t want to get a lot of chocolate eggs, and even with toys inside!
Do-it-yourself bouquet of Kinders as a gift
Many children love sweets, but what if goodies are also in beautiful packaging- it's doubly nice. You can make such a simple bouquet with your child, for example, a gift basket with sweet presents. The simplest master class in which a bouquet of kinder surprises is created will help create unusual gift with your own hands. From such a composition, guests will be delighted. Bouquets are very different and it is not necessary to adhere to the standards, because handmade loves creative ideas.
For a simple bouquet, you need to take eggs, adhesive tape, teip tape, threads.
The wire must be prepared so as not to make a hole in the egg.

Now the kinder must be wrapped with tape, about one third of the part, the rest should be in its original form.


We insert the finished wire, fix it with a thread or a drop of hot glue.

From above, glue it again with adhesive tape, and for beauty, with teip tape.

Wrap each egg with organza, collect in a bouquet. Decorate with leaves or flowers. We wrap it in a beautiful wrapper, and interesting bouquet ready!

DIY creativity
But people dear to you appreciate not only the sincerity of the gift, but also interesting ideas. The same bouquet can be placed in a beautiful basket, and it will turn into a very original gift. It is now so fashionable to give bouquets in baskets!
We make a basket for our kinders
To decorate the basket, you need to wrap it with crepe paper. Stretch gently, align, glue the ends. Glue with hot glue. To make the paper lie flat, try to make undercuts.

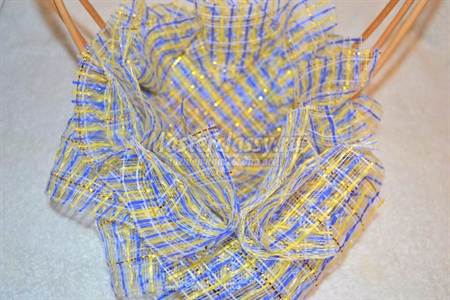
At the bottom of the basket we make a beautiful ruffle strip, so the basket will stand out.

Remove all irregularities very carefully. Simply cut the decorative mesh into squares. They must be glued inside the basket.

Then you need to decorate the basket from the inside, arranging the squares from the decorative mesh in a special way. The photo shows how to fold the square:

All blanks must be fixed inside the basket. Do all the work very carefully.
Now you need to decorate the handle of the basket. Cut long strips from the remaining crepe paper, make them not thick, but thin.

Now you need to wrap the handle of the basket with such strips. Where the paper moves away from the handle, then you need to glue those parts. When this part of the work is ready, then we decorate the handle additionally, wrap it with a beautiful ribbon.

With these ribbons, which decorated the handle, they tie Stuffed Toys. They must be small. And decorate the handle with decorative flowers.

Next comes the turn of work with chocolate eggs. Each egg must be wrapped in organza. This procedure will not damage the chocolate or the packaging itself. Under the egg, in the mesh itself, put a piece of paper. This method will prevent the glue from seeping onto the egg.
The bag must be tied beautiful bow or a special tape to match the one on the handle.

Special work needs to be done to prepare the bottom of our basket. We put a piece of foam on it. It must be glued to the very bottom of the basket.
Before attaching bright kinders, once again make sure that all the irregularities are hidden in the craft. If they are visible to the naked eye, then cover the flaws with crepe paper.
Just glue the pieces or strips onto the foam. If there is a supply of tape, supplement the grid with it.

For the strength of such a bouquet, chocolate eggs must be glued to the bottom of the basket. You need to apply glue where there is a layer of paper near the kinder.

Only minor improvements remain. Place the organza between the eggs. If desired, it can be decorated with rhinestones or beads. If the mesh sticks out somewhere, it is necessary to cut its ends. And here's a great piece of work! You just need to admire your beauty. Your birthday boy will definitely like such a gift, which is simply felt by its originality, individuality. Be sure to take a photo of your work, so you save for your story the beautiful work of your own hands. A very beautiful and elegant gift is sure to please many people, but the most important thing is that it is made with great love!
Video on the topic of the article
A special point in the work is a video on the master class of such bouquets. In them you can see the small nuances of the work that cannot be seen in the description.