Do-it-yourself fabric rug without a hook. Crochet floor rug for beginners: diagram, description, master class, photo. How to crochet a beautiful round, square, oval, rectangular, openwork, star, Japanese rug with your own hands? For experienced m
Rugs, crocheted is not only glorious good tradition our grandmothers, but also the rapidly growing trend of modern interior decoration. Do not underestimate round knitted rugs and consider them a relic of the past. Today it is one of the most popular items that many knitters are rushing to bring to life.
What materials are suitable for knitting rugs
Rugs, rugs, and rugs come in a wide variety of shapes and configurations, but this article will focus on how to crochet a round rug for beginners. This activity is not difficult, although it requires certain investments: time, attention and materials.
What is suitable for the manufacture of such a product:
Techniques that are used to make rugs
It is worth deciding on the technique to be applied in advance, as this will significantly affect the choice of materials. You also need to plan the dimensions of the canvas before crocheting a round rug. For beginners, it is better to choose a small product.
You can tie the rug like this:
- Simple circular expanding rows.
- With laying a volumetric cord inside the row.
- Openwork pattern.
Any of these methods opens up great opportunities for creative natures. Since there are no hard and fast rules, you can safely improvise.
The simplest rug
The use of jute twine is the most fast way making rugs.

Here you can use almost any scheme of a circular fragment: solid or openwork.

The latter always look more attractive. They are a little more difficult to manufacture, but the effort paid off.
Semicircular carpet
Knowing how to crochet a round rug for beginners can come in handy for making semi-circular rugs as well.

Such specific products are extremely convenient for placement on steps or near the door. Under front door they, of course, should not be laid, otherwise they will quickly become unusable, but in a room such as a bedroom, they are in the right place.
To knit such a rug, you will need a thick thread or twine. You can work according to the scheme, which is above.
Sequencing:
- The beginning is a chain air loops(VP) in the amount of 7 pieces, plus 3 VP for lifting.
- Further, 2 (CCH) are performed in each loop, only 1 CCH in the first, since the lifting loops play the role of the second.
- For the second row, you will also need 3 VPs to lift. Next, in the dc of the previous row, 1 dc and 1 VP are knitted, repeat this sequence until the end of the row.
- 3 VP, a magnificent column of three loops with a crochet (PS) and 1 VP, repeat to the end of the row, except for lifting loops.
- 3 VP, 1 CCH is performed in the upper part of the PS, the same as in the VP.
To continue knitting, alternate the fourth and fifth rows. The canvas is increased to the desired size and strapping is performed: 3 CCH with a common base, pico of 3 VPs, 3 CCH in the same base loop. It turns out pointed "bushes". You can skip this step if you wish. Then the rug will turn out with a smooth edge.
The described method is suitable for making a round rug: it is enough to double the number of loops and columns, starting from the first row.
Knitting with lining
Unique and very interesting technique can be great for those who want to know how to crochet a round rug for beginners. This method allows you to create quite dense rugs. Each of their rows is characterized by increased density due to the fact that a cord or jute twine is laid inside it.

Working in this technique is as easy as shelling pears: from the beginning of the first row, bring the cord to the knitting and wind the hook behind it before grabbing the thread to form a single crochet (RLS). To prevent the lining from showing through, you need to use a thicker thread on the front side of the knitting product. This is worth thinking about before crocheting a round rug. For beginners, the scheme of such a rug may be the simplest: for example, the third motif in the first row in the figure with round diagrams. Rows alternate here, in which additions are made (at 12 points) with rows of even knitting. You can apply the expansion method, in which additions are made in each row, but at six points.
How to crochet a round rug for beginners from rags
First of all, you should make sure that such a product does not look old-fashioned and dull. It is better to use the material of one color or several, but similar in tone.

Excessively variegated colors invariably evoke an association with grandmother's knitting from the remnants of various shreds.
The secret to how to crochet a round rug for beginners from rags is to carefully connect their edges. The photo shows that the ends of the textile strip are superimposed on each other and sewn with a blind seam. You can also just tie the edges and leave the ponytails inside out, but this method is not very aesthetic.
Knitting rugs perform large hooks. The best recognized wood and bamboo. They are lightweight and durable. As a rule, you have to use a tool no less than No. 6, No. 8 or even No. 12.
All these methods are suitable for making a home rug. Using unfamiliar methods and materials may require training and experimentation. For example, testing the knitting method with lining before crocheting a round rug for beginners. The photo depicts only the simplest linear method, but you can also diversify knitting: perform some rows by tying a cord, leave others flat. If you use a thread of different thicknesses, you can achieve an impressive relief of the canvas.
However, in any case, it should be remembered that the rug is designed to be walked on. This means that it should be comfortable and completely exclude the possibility of falling. Per three-dimensional patterns or large openings, the leg can catch, so such elements should be used carefully and moderately.
Who among us does not remember the round rugs that our grandmothers crocheted from strips of fabric cut from various old rags. But not everyone knows how to crochet, but you want to have a homemade soft rug.
Such a rug can be woven with your own hands without a hook, using only hands, rags, threads and a needle.To weave patchwork rug, we need:
Various patchwork fabrics
Needle and thread
pins
We start weaving. The rug will also consist of a spirally twisted pigtail, which is woven from three pieces of rag, preferably of a different color (depending on taste). The stiffness of the rug is determined by how tightly the pigtail is woven. The weaker, the fluffier and softer the rug will be. We cut the tapes of the width we need and proceed.
which rug can be woven with your own hands without using a hook, using only hands, rags, threads and a needle.
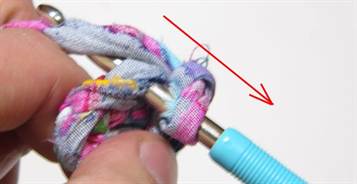
Next, we need to solve the problem - how to continue weaving if the patch is over, without imposing knots. It is quite simple to solve such a problem - we make an incision at the ends of both tapes, cuts as in the figure and thread the tapes one into the other, forming a loop.
After we have a fairly long pigtail. it is necessary to assemble a rug directly from it. Everything is extremely simple here - carefully lay it in a spiral and grab it with a thread.
We bring it to the diameter we need and that's it - the patchwork rug is ready. For lovers of experiments, it can be advised not to sew the spiral turns with threads, but to twist them with an additional tape.


Many housewives love to decorate their home with various products. Made by hand, they create an atmosphere of warmth, coziness and comfort on winter evenings. A good option diversify the interior of the apartment, bring elements of antiquity into it - make a crochet rug, which is easy to make from old things. Please note that the execution scheme is very simple and accessible.
You will need to prepare source materials. Sort out old things. T-shirts, dresses, tights, skirts and others made from knitted and synthetic materials. Cut them in a spiral into strips, wind them into balls.
The width of the strips depends on the density of the material. The thinner it is, the wider the cut strips.
Prepare a hook size 8.5-10. It will be great if the balls turn out to be multi-colored.
We knit a crochet rug from old things with a pattern
The main rule is the observance of the principle of circular knitting.
Dial 3 in. p., connect them into a ring. The first row, knit 6 single crochets. In each next row, 6 columns must be evenly added. In the finished form, the product will be smooth, without bulges and distortions. Knit the rug to the required size.
For a better understanding of the knitting pattern:

To get a more spectacular mat with a convex relief, follow the steps in the diagram. Only knit columns by picking up the back wall of the loop

We make a pentagonal rug according to the scheme
When knitting such a rug, it is better to use soft knitwear. You need to start by knitting a circle of 5 loops. In 1 row - 3 air loops, 2 columns with one crochet in the first loop bottom row, 2 in. p., * 3 columns with a crochet, 2 c. n. * Run the scheme between the asterisks 5 times. In the 2nd row - the same as in the first row. But after 3 double crochets knit 1 air loop and further according to the diagram below.

Knitting a rug in a circle is performed to the required size. Each corner of the star is tied separately.
How to make knitting threads out of unnecessary things
To get long stripes, cut the T-shirt from the bottom up in a spiral. Immediately wrap it in a ball so that the "threads" do not get tangled.
Short strips are easy to connect. Step back from the edge by 1.5 centimeters, cut each strip.

Align the two strips so that their slots match up.

Pass the other end of the upper strip from below through the aligned slots and pull out. As a result, you will get a knot.

In this way, you can fasten all the strips when knitting the product.
Master class on a rug in the form of a path for a corridor
After watching a master class on knitting an original rug, you can make a beautiful carpet path from old things, which is convenient and practical for the corridor.
Cut into strips old T-shirts, T-shirts, skirts. Roll them into balls. It is better if they are different colors.
Run a chain of air loops equal to the width of the future rug. Next, knit with loops with one crochet


When one ball ends, connect another. Sew the ends with thread.

The track is knitted in a rectangular shape, so the fabric will need to be turned over when knitting.

If there is not enough thread, cut more strips of the desired width.

As a result of creativity, you will get a beautiful path for a balcony, cottage or corridor.

Options for the correct use of weaving
Prepare the frame according to the size of the future carpet product, stuff the carnations on two opposite sides. Set the distance at 2.5-3 centimeters apart.
To learn how to weave a rug, including from old things, the following do-it-yourself instructions will help.
Stretch the strips of material. It is advisable to take its colorless shades. This will be the base.

Stretch the working strips first over the thread, then under it.

At the end of the row, pull the strip under the warp and work in the opposite direction.

While weaving the rug, sometimes shift the already finished rows to the initial row. At the end of the work, hide all the knots on the wrong side. Now ready product can be removed from the frame.
Trying to work with knots
The basis is cut strips from old T-shirts about 12-15 centimeters long. You will need quite a lot of strips. Now they need to be rinsed washing machine. As a result, twisted strips are obtained, from which the rug is made.
Place the carpet net on the table, bring a strip of material from below. With a thick crochet hook, pull both ends of the strip and tie them tightly with a knot pull on one side. Now tie the next strip. It is advisable to start from the center of the grid, gradually moving in a circle to its edges.

Knotted rugs can be made in different shapes and colors.
Round rug from unnecessary things
To better understand how to knit a rug, study the following instructions for creating products from old things.
Pre-cut unnecessary knitwear into strips 3 centimeters wide.
To make the rug smooth and beautiful, try to make the strips the same width.
Material use different colors.

Make a loop, insert your hook into it.


Knit a few loops to make a small braid.


The loops are connected in a circle.


Knit an air loop.

Pass the hook through the loop of the circle, pick up the thread and pull it through two loops.

Knit a rug of the desired size according to this pattern. Make a fringe along the contour of the finished rug.

Tip: while the circle being knitted is small, make air loops before each loop.
A simple lesson for beginners


We knit a crochet rug from old things, knitted yarn, bags and much more.
How to create comfort in the house is probably the most popular topic for women of all ages! And regardless of whether the hostess is young or experienced, everyone wants to update and add a cozy zest to their home. Needlewomen are especially good at this, because with your own hands you can create unique masterpieces for very democratic money.
In this article we will tell you (and hopefully inspire) how to knit a rug on the floor in a wide variety of techniques. We hope that after reading this article, you will add at least one exclusive rug to your home!
Rug round crochet on the floor for beginners: scheme, description, master class, photo
There was a time when we actively threw away textile rugs knitted by grandmothers from old yarn and patches even from dachas and summer houses. But a few years ago, just such rugs turned out to be in trend, but with some modifications. So - we knit fashionable grandmother's rugs.
For knitting, we need knitted bright yarn of one or more colors. If it’s too expensive for your budget, you can make such yarn yourself from old knitted T-shirts. Details on how to do this in the video below.
Video: T-shirt yarn. Knitted Improvisation
The yarn is ready, let's start knitting! We take the thickest hook that is in the house and start knitting. Remember, the ease of work and the density of the rug depend on the size of the hook. We knit an air loop and carefully hem with threads No. 40 to match the knitted yarn for convenience. And we start knitting:
1 row: 2 air loops and 11 columns with a crochet.
2 row: 2 air loops and from each loop 2 columns with a crochet (according to the scheme).


3rd row: 2 air loops with a crochet column and 2 columns with a crochet from one loop (according to the diagram).


4 row and subsequent: according to the scheme, each time adding one double crochet column in each section.


We knit the last row to the end and tighten it tightly last loop. As at the beginning of knitting, we hem the edge with threads No. 40 for strength.


Please note that such a rug can be knitted with both plain and multi-colored threads. But it is important that the colors go in sections, and not ripple like our grandmothers. It is this trick that distinguishes fashion models from grandma's rugs.
Crocheted square rug on the floor from old tights: diagram with description and photo
For those who have already cut all the T-shirts, but really want to create, don't be upset and get your tights! In this section, we will teach you how to knit an interesting and very original tights rug! So, we need everything, notice everything! Unnecessary tights and granular filler to choose from, it can be holofiber, silicone, etc.

We cut the tights into different pieces from 10 to 20 cm, different colors tights will give the rug texture. We sew each piece on one side, fill it and tightly tighten it, sew it into a “pebble”. If the tights are thin, we wrap one stone in several layers of tights so that the filler is not visible. We sew the "pebbles" together and sew to the base. Rug of "soft stones" is ready!
Well it's not the only way turn the ordinary into the beautiful. We supplement our master class with several inspiring videos.
Video: TIGHTS RUG
Video: How to knit a rug from old tights?
Crocheted oval rug on the floor from old T-shirts: diagram with description and photo
And in this section, we will show you how to create a beautiful oval rug from old T-shirts or knitted yarn. How exactly to cut and fasten T-shirts, we told in the first section and will not dwell on this.
We collect from 6 and more air loops. Restrictions - the size of the place where the rug will lie. The calculation is simple - the width of the desired product is divided in half and subtracted from the length of the product. Do not forget that when knitting, the chain stretches by 30-40%.

At the end of knitting, you can sew / glue the rug to the base so that it is stiff and does not gather at the edges.
Crocheted rectangular rug on the floor from old jeans: diagram with description and photo
Another simple and original rug, now from old jeans. We will need a large mesh from their hardware store and jeans cut into pieces 5 * 15 cm.


At each crossing of the mesh with a hook, you need to thread a piece denim and tie in a knot so that the ends diverge in different directions. If desired, the tips can be slightly disheveled, then the rug will look even more gentle. Just? Yes! Beautiful - of course! Ideal for youth housing.
The same option looks great with knitted pieces.

Video: Rugs from old things
For those who wish to knit an openwork rug, you can take both a cord and knitted yarn. The essence of knitting does not change from this, but the size and naturally the thickness of the carpet directly depends on the thickness of the yarn. Please note that openwork rugs, unlike dense products, cannot be glued to a dense lining.


We knit quite simply. One air loop is hemmed for strengthening and further according to the schemes below.


Do not forget to thread the last loop at the end as well.
Video: We knit together an oval rug from the Openwork cord
Video: Crochet rug on the floor star from knitted yarn
Crochet rug on the floor in the bathroom from plastic bags
The bathroom rug made of plastic bags looks very impressive. But it will take a lot of effort and time to make it. This is something to keep in mind before you get started.


Preparation: cut from garbage bags(or any other dense) strips of the same thickness (3 cm for those that are thinner and 1.5 cm for dense ones). We cut it lengthwise and then we tie it with neat sea knots.
Since the knitting technique from a row is easier to see once than to read a hundred times, we attach three step by step videos on which you will surely quickly knit your first and possibly not the last rug from the packages.
Video: Crochet Bag Rug, Part 1
Video: Crochet Bag Rug, Part 2
Video: Crochet Bag Rug, Part 3
Video: Making a rug from plastic bags
Rug crochet on the floor in the toilet
And these rugs can be knitted from a wide variety of materials, everything is limited only by your imagination! Below we give a scheme according to which we knit one motif, and then repeat the same six copies.

Now we need to connect the elements according to the following scheme, after which it remains only to wash and starch the openwork rug.
Video: Rug crochet sheets
The turn has come to the delightful rugs for stools. For work, we need all kinds of leftover yarn, or purchase a lot of multi-colored threads.


We knit 12 air loops and connect them into a single ring, after that we knit 5 air loops and knit the core - 24 columns with 5 crochets. The element is ready. Next, we knit exactly as much as required and with threads in that and with a gypsy needle we sew the elements into a single rug.


Video: Crochet rug from motifs with twisted columns (rug crochet)
Sometimes you need a simple, and at the same time durable rug, most often on the veranda, in the hallway or in the country. In order for dust and fine dirt to pass through it well, and for it to be minimally cared for, an unlined rug is required. Rope and thin thread are great for this.


So, we take the rope, fold it as in the photo and sew it with thread No. 40. And then we knit layer by layer with single crochet columns so that the cord is constantly inside. It can be both small and very impressive carpets.


If you need the carpet to be oval, then instead of a circle, the first row is tied with a cord required length and so on, as in knitted rug, only with cord inside.
Video: Cord knitted rug
Video: Crocheted twine rug
You can crochet a rug from old things, shreds, leftover yarn, worn wardrobe items. Such designer rugs will become not only an interior decoration, but also a very practical and cozy addition to it.
Recycling old things with benefit - this is how you can characterize weaving or knitting stylish and practical products from rags with your own hands.
Rugs for children


Utilitarian needlework has entered the practice of many craftswomen. This is not just a hobby, but an opportunity to give new life old things. Having spent a minimum of time and money, you can create a real design masterpiece that will be the highlight of any interior. Do not rush to throw away old T-shirts and shirts, tights with arrows, sheets and pillowcases that have become unusable. There are many interesting ideas on the topic of how to crochet rugs from old things. We offer beginners to learn unusual skills using master classes as an example.
Perfect seamless circle swoosh pattern
We knit a bright carpet
Carpet is a classic cover for a long corridor. Our grandmothers also mastered the principle of waste-free production, making bright, practical and warm rugs knitted from patches.
Advice!
carpet material
We offer a simple lesson on creating a rectangular rug:
- To work, you need a special yarn. To prepare it, you can use old sheets, shirts, any old textiles. If several things are used for the blank, it is desirable that they be of the same texture.
- We cut the material into long strips 1-1.5 cm wide, tie the ribbons together and wind them into a ball.
Advice! To make the rug turn out to be multi-colored, you can alternate the colors of the ribbons.
- It is more convenient to knit rugs with thicker crochet. We first collect a chain of air loops, in the first row we knit single crochets. Having reached the end of the row, we collect one air loop, turn the work inside out and continue to knit. Flipping with front side on the wrong side, and then back, we knit the track of the desired length.
Beginners will like this way of making. Knitting requires basic skills, no special patterns are needed. Despite the very primitive way of knitting, the result will certainly please and surprise. Stylish, bright and practical carpet at no cost will be a decoration for the corridor.
carpet material
Carpet crochet
Openwork rug
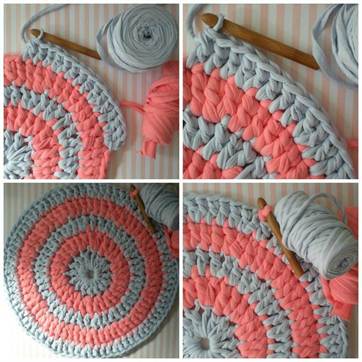
Round openwork rug will be an elegant interior addition to the living room or bedroom. The main component is yarn: we simply cut old knitted T-shirts into strips, stretch each one in length, tie it together and wind it into a ball. You need to tie the ribbons carefully, large knots will violate the aesthetics of the openwork pattern. There is a simple way to connect the ribbons: make slits at the ends, fold them so that they match. Then we pull the other end of the upper strip from below through the aligned slots. The result is an inconspicuous and neat knot.
 This rug will fit perfectly into any interior.
 Let's start knitting:
- For knitting, you need a hook No. 15. We start the process with the "magic ring" - amigurumi. Wrap the yarn around the index finger on the left hand three times, remove it. We will pass the hook into the resulting ring, stretching the end of the working thread. We again stretch the yarn into the loop, forming a sliding loop on the ring.
- The resulting loop must be tied with eleven double crochets. After we knit the connecting element, closing the ring.
- Let's move on to the second row. We knit two double crochets in each lower loop, in total there should be 24 of them.
- We knit the third row by analogy with the second, as a result, we already get 36 double crochets. So knitting gradually expands, forming an even circle.
- In the fourth row we knit a simple openwork pattern. The scheme is as follows: at the beginning of the row, one double crochet, then two air loops, then we let one lower column and knit one double crochet.
- In the fifth row we knit all the columns with a crochet. To make the rug expand evenly, add two double crochets to every fourth column at the bottom.
- Next, add a thread of a different color, the knitting principle is the same. At the end, we fix the work so that the thread does not unwind. A beautiful openwork rug is ready.
Floor mats for the home


Having mastered the lesson of crocheting a rug from old things according to the scheme, you should not stop there. Using the same technique, you can knit not only a rug, but also an elegant bedspread for a sofa in the living room, original seat covers for chairs, napkins. Products are soft, pleasant to the touch, give the owners comfort and warmth in the house.
We knit an openwork rug
Oval rug
A do-it-yourself oval grandmother's rug will be a cozy addition to the bedroom, children's room.
How to knit an oval rug
If you make a practical base of moisture-repellent materials, you can lay a rug in the bathroom. In order to make such a product, a basic skill in the art of crochet is enough. It is knitted according to the scheme, the main elements are simple loops.
A chain of air loops is dialed. The size of the product itself depends on its length. To calculate correctly, just subtract the width of the carpet from its length. Keep in mind that the chain will stretch a little, this must be taken into account when calculating the size. Beginners are better off using visual diagram to make it easier and clearer to work. The rug is knitted in a spiral, alternating columns.
For creative inspiration, use a selection of our ideas and workshops. Experimenting with texture and colors using various patterns, you can knit real masterpieces. Such original crochet knitted rugs will become nice gift for housewarming, bringing comfort and warmth to the house.
How to knit an oval rug