Do-it-yourself denim rose (master class). Do-it-yourself denim rose Denim rose
Today we will make flowers from jeans. Denim has become an integral part of our lives. From everyday and everyday, it began to be used as a festive one. It is decorated with appliqués, sequins, rivets. And can you do beautiful flowers from jeans and decorate your outfit with them.
Necessary materials
To do beautiful flower from jeans, we need: pieces denim, pistons, rivets, scissors, PVA glue.
How to make flowers from denim with your own hands: a master class
To make the flower more rigid and keep its shape well, treat the pieces of denim with a starch solution or gelatin solution, dry and iron.
First, cut out ten petals from pieces of fabric. The shape of the petals can come up with any. The size of the petals should be different. Three strips for stamens, leaves and stems. On the edges of the leaves, you can make a fringe.

We give the petals a shape. To do this, we bend the petals with a hot knife from the wrong side from the edge to the base, and vice versa on the front. The petals will be convex and bent around the edges.
We decorate the petals with rivets: one or two pieces per petal. We leave only one, from which we will make the middle of the flower. To do this, we twist the petal into a tube, and thread the tube into the piston. We cut off the bottom of the middle, making it even, cut it along the edge and coat it with PVA glue.

Glue the middle and five petals to the base.
We make stamens in the following way. We fold the prepared strips for stamens in half and thread them into small caps. Stamens are also glued to the base of the flower.
We arrange the next row of petals so that they lie between the petals of the first row, glue these petals.
You can make another flower and make a composition of two flowers, leaves and a stem.
You can also combine fabrics: for example, combine thick denim with light chiffon. Such flowers are very elegant.
Decorative denim flowers look good on the lapel of a jacket of any color. They can decorate a vest and a skirt. This flower can decorate a belt, bracelet and hair. Yes, almost everywhere, such a hand-made flower will look beautiful. It is only desirable that it be in harmony with the rest of the clothes.
Video materials on the topic of the article
An interesting and understandable master class:
How to make a big rose:
Fashion brooches from old jeans:
Very interesting fabric aster:
Denim rose (master class).
As often happens, a small accessory, seemingly insignificant at first glance, suddenly sets the tone for the entire look as a whole. However, few fashionistas can boast of having hundreds of such bright details in their wardrobe that fit absolutely any outfit. There is an exit. An original thing can be easily and simply created with your own hands. This will require very little free time and a minimum of materials that are likely to be available in every household.
Today we offer to sew a rose from one of the most popular fabrics - jeans. Any needlewoman can turn such a flower into an elegant hairpin, attach it to a hair hoop, use it instead of a brooch or as a decoration for a bag.
You will need:
Denim;
- scissors;
- thread and needle;
- ruler;
- compass;
- protractor;
- marker;
- cardboard for the template.
The first task is to make a template. It is a regular hexagon with a side of 12 cm. A similar hexagon is cut out inside it, but with a side of 6 cm. To facilitate the process, you can do this:
Draw a circle with a radius of 12 cm using a compass;
- in the center draw another circle with a radius of 6 cm;
- mark the circles with a protractor, marking every 60 degrees;
- connect labels straight lines- get hexagons;
- cut out the inner shape.


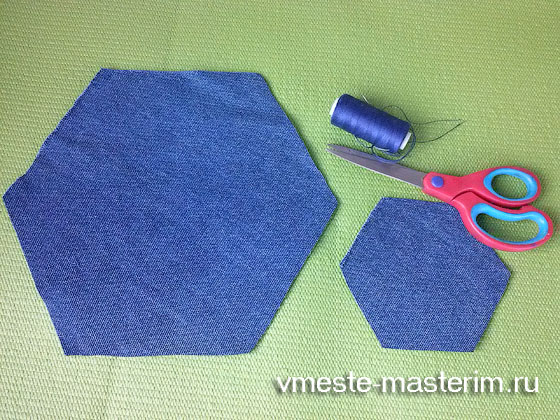
Using the template, mark on the fabric and cut out two blanks - a large and a small hexagon.
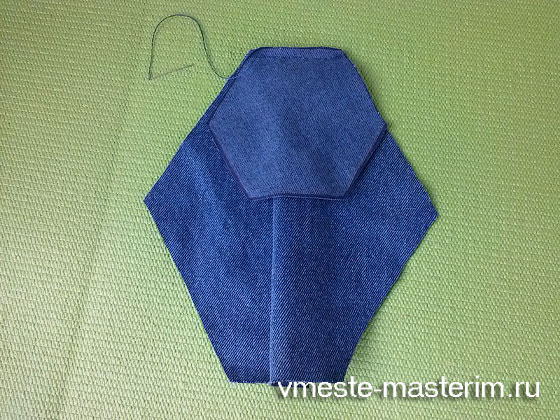
Connect the blanks with the front parts to each other. From the edge of the large figure, form one fold so that its length decreases and coincides with the length of the edge of the small figure. Sew at a distance of 0.5 cm from the edge. Do the same with five of the six faces. Please note that the folds must be bent strictly in one direction.

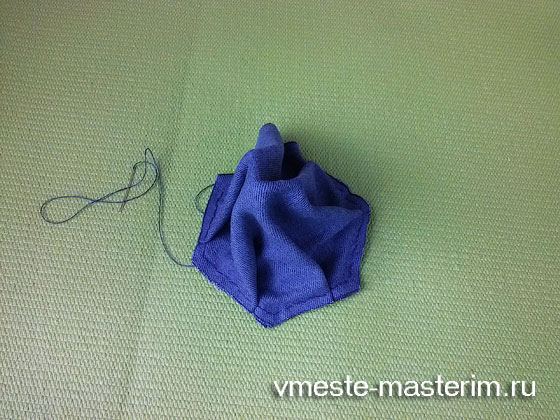
When only one non-stitched edge remains, turn the product inside out. Its shape will resemble a cone. Form a crease on the last edge and carefully sew the outside with a blind seam. Straighten the corners well.


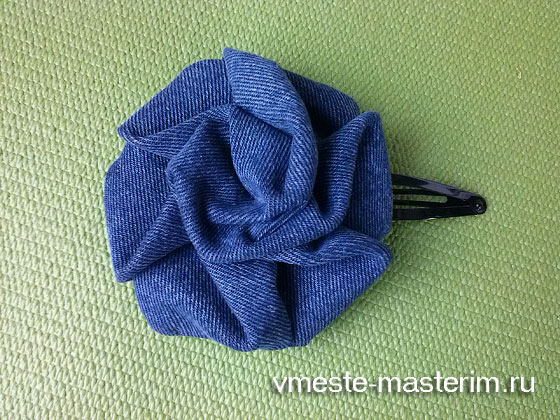
Grasp the top of the cone lightly with your fingers and, scrolling it in the opposite direction in relation to the folds, press the cone all the way down. Fix the center with a thread, connecting the lower and upper part. Rose is ready.

Sew on a loop, elastic band or glue a clip to fix the flower. You can also simply sew a finished accessory to some clothes or create another decoration based on it. bigger size.


As often happens, a small accessory, seemingly insignificant at first glance, suddenly sets the tone for the entire look as a whole.
However, few fashionistas can boast of having hundreds of such bright details in their wardrobe that fit absolutely any outfit.
There is an exit. An original thing can be easily and simply created with your own hands.
This will require very little free time and a minimum of materials that are likely to be available in every household.
Today we offer to sew a rose from one of the most popular fabrics - jeans.
Any needlewoman can turn such a flower into an elegant hairpin, attach it to a hair hoop, use it instead of a brooch or as a decoration for a bag.
You will need:
- denim;
- scissors;
- thread and needle;
- ruler;
- compass;
- protractor;
- marker;
- template cardboard.
The first task is to make a template. It is a regular hexagon with a side of 12 cm.
A similar hexagon is carved inside it, but with a side of 6 cm.
To make the process easier, you can do this:
- draw a circle with a radius of 12 cm using a compass;
- in the center draw another circle with a radius of 6 cm;
- mark circles with a protractor, marking every 60 degrees;
- connect the marks with straight lines - you get hexagons;
- cut out the inner shape.
Using the template, mark on the fabric and cut out two blanks - a large and small hexagon.
Connect the blanks with the front parts to each other. From the edge of the large figure, form one fold so that its length decreases and coincides with the length of the edge of the small figure. Sew at a distance of 0.5 cm from the edge.
Do the same with five of the six faces. Please note that the folds must be bent strictly in one direction.
When only one non-stitched edge remains, turn the product inside out. Its shape will resemble a cone.
Form a crease on the last edge and carefully sew the outside with a blind seam. Straighten the corners well.
Grasp the top of the cone lightly with your fingers and, scrolling it in the opposite direction in relation to the folds, press the cone all the way down.
Fix the center with a thread, connecting the lower and upper part. Rose is ready.
Sew on a loop, elastic band or glue a clip to fix the flower.
You can also simply sew the finished accessory to some clothes or create another larger decoration based on it.
After reviewing many workshops on fabric roses, it turned out that most of them require a lot of time. Therefore, consider a simpler and more affordable way to make beautiful flowers in a minimum of time. One flower takes only 1 minute.
DIY fabric roses master class
To make roses we need:
1. Remains of jeans;
2. Scissors;
3. Threads with a needle (for fixing a ready-made rose);
4. Centimeter.

Cut each leg lengthwise into strips.

This is what it looks like cut up. From one half of the leg, 2 strips are obtained.

All extra fat side seams we cut off from our strips so that they do not interfere with us in the future to twist the rose.

This is how we should be. A big plus is that there is no need to finish the edges of the fabric.

The width and length of the stripes can be completely different. The longer the strip, the wider it can be. If the strip of matter is ukaya, then the length also decreases. I got strips 44 cm long and 10 cm wide.

Now fold our strip in half lengthwise.

And proceed to the formation of the bud. To do this, we bend the edge of our denim tape. We have a corner.


Now let's bend the sharp part of our bag and make one more turn of our bud.

This is how it should look after the rotation. Our sharp corner has now flipped from the inside to the face and came up to the folded edge of the denim strip.

We take and turn the fabric starting from the bud back. Now we have the top edge of the tape become the bottom. We make one more turn of the button.

When turning, the flower should again be near the edge of the folded fabric. Now we are starting to get small.
We continue to alternate two movements:
1. Twist the free left side of the fabric back again.
2. We make a turn of the bud.


Each time you turn the bud is close to the curved edge.

After making a few turns, a flower is already obtained.


Cut off the rest of the material.

We turn to the processing of the wrong side of the flower. We remove the edge of the cut fabric under the crease of the bud. Since the fabric is dense, it holds its shape quite well.

Now it remains only to fix everything with a thread. The main thing is to flash the whole rose through, capturing both the edges and the middle. Having made several punctures, you will stop deformation and untwisting.

Here is such a rose. Twisting a rose takes less than a minute. Then they can decorate clothes or make an original bouquet by first attaching a wire stem to the flower.


Here is such an original brooch - a rosette offers us to make a craftswoman Joan from a denim ribbon. 
To make this flower, Joan needed the following materials and tools:
- hem from a denim sundress,
- sewing needle and strong thread
- brooch base,
- scissors,
- pliers (optional)
- small piece of leather (optional)

Step 1. Take a sleeve from a sundress or any other piece of clothing that has a tucked stitched seam on it. Cut the connecting seam from the sleeve and unfold the piece. 
Step 2. Cut off the tucked seam from the part and you will get a denim ribbon from which you will make a flower. 
Step 3. Roll the tape into a roll as shown in the photo. 
Step 4. In order to fix the result, sew the resulting core of the flower from the wrong side. 
Step 5. To create the petals, sew the ribbon around the core, slightly stretching it. To get more embossed flowers in some places, pull off the tape as shown in the photo. 
Step 6. Form a flower of the required size. 
Step 7. Bend the end of the flower and sew it to the bottom of the rose 
Step 8. Here is how the denim flower should look from the wrong side. 
Step 9. From the same fabric or similar in color, cut out the leaves. 
Step 10 Here are all the details for making the brooch. You can also cut out a circle of leather, which will serve as the basis for the brooch. 
Step 11. Sew or attach the base of the brooch to the leaves and flower. 
Here is such a beautiful brooch turned out by Joan. 
DIY denim flowers
The second master class was prepared by craftswoman Kara, here is what she writes in the preface to her lesson: “Once I went to the Google analytics website, I saw that many people were looking for a master class on creating a flower from denim. I came up with the idea that it would be nice to take a photo lesson on making original flower from old frayed jeans. Here's what I got.

To make this flower you will need:
- a pair of old jeans
- flowers different sizes(templates),
- scissors,
- button,
- threads, needles.

Step 1. Cut out small flower from paper and on the basis of it draw flowers of a larger size, each time adding 0.3-0.5 cm to the outline of the flower.
Step 2 Attach the paper templates to the jeans and cut out the flowers from the fabric.

Step 3. Lay the flowers starting from the largest one on top of the other as in the photo and mark the core with a button. 
Step 4. Sew all parts of the flower together, you will need a thick needle because it is not easy to pierce a layer of denim. 
Step 5. In order to further decorate the flower, you can sew to the center of the product crocheted flower 
Step 6. The core of the flower can be different, my choice is a vintage button.
Step 7. To make the flower look more lively and natural, sprinkle it with just a little water.

Step 8. Crumple the moistened flower as shown in the photo and hold it for several minutes, if it seems to you that this is not enough, additionally pull the petals in different directions. After this procedure, you will get such a pretty "living" flower. 