Royal embroidery on mesh. Draw on a sirloin grid: imitation of fabric in crochet Crochet embroidery on a sirloin grid
Good afternoon to all blog readers!
Today we will talk about the combination of two types of needlework - crochet and embroidery. Embroidery on the grid, I think, any needlewoman will be able to do it.
And first, I invite you to look at the outfits of the English queen and princesses.
Have you ever been to England? Have you been to the Victoria and Albert Museum? What about Kensington Palace? Here I was not. 
Galina Kogan, already known to many readers by her own, visited the above museum and palace for us and, especially for our blog, took a photo of the dresses of Queen Elizabeth, Princess Margaret, Princess Diana, Queen Victoria!
All dresses are embroidered self made. Gorgeous royal dresses! And what lace!


In those ancient times, only very rich people could afford such stunningly beautiful handmade items.
But what prevents us from looking like a queen?
We can make royal embroidery for ourselves and ourselves. Even if not such complex patterns, it is naturally impossible to repeat the masterpieces, then we can quite cope with the work easier. For example, embroider a scarf or a handbag.
Mesh embroidery
Needlework is fraught with great creative possibilities. Embroidery perfectly "gets along" with crochet, two types of needlework, as it were, enrich each other. With these two techniques, you can not only decorate clothes, but also create lovely items for home comfort.
To embroider on a mesh, the fabric mesh itself is first prepared. Some of the threads are pulled out along the warp, and the remaining threads form a grid of squares. The mesh is sheathed and a pattern is embroidered on the cells with dowels, spiders, goats and other seams. Such embroidery creates the impression that the pattern is contained in the fabric itself, and resembles a lace fabric.
But this method requires great skill.
But you can crochet the mesh in loin technique, and then embroider a pattern on it, which is much easier, faster and no less beautiful.
Embroidery by fillet net
The mesh is knitted, immediately completing the pattern, with double crochets (in empty cells between the columns - 1-2 air loops, in filled cells - instead of air loops double crochets).
The hook is taken twice as thick as the thread.
The finished mesh must be moistened from the inside with thick starch and dried.
Then the mesh is attached to a wooden frame and a pattern is embroidered with a thick needle and thread of the same color as the mesh, preferably silk.
original curtains
Using the grid embroidery technique, you can make interesting original curtains for the kitchen. Here are the patterns for embroidery directly curtains and pelmets.


Flowers, leaves, stems and butterflies embroider the flooring with a seam. First, all the cells are filled, and then the pattern is drawn around the contour with a seam forward with a needle in one and in the opposite direction.
The middle of the flowers and small motifs are made with a cross.
The horizontal stripes are embroidered with a stalk stitch.
Using the grid embroidery technique, you can make tablecloths, panels, paintings, decorative pillows.
For example, such a beautiful tablecloth with roses is made using loin technique, and if you also embroider on a grid, it will be charming, elegant, and will look royal!

By the way, I recently posted schemas for . Mesh embroidery will make these pillows even more gorgeous.
I express my deep gratitude to Galina for the pleasure provided and the photos taken for us! Galya is almost becoming my co-author She is just a treasure trove different ideas, you'll see!
Don't miss out on the latest ideas for home comfort! ( Just blog news to your inbox).
Olga Smirnova
P.S. Today I saw an interesting video about a little boy and his wonderful talent. Look! This child has a great future.
Girls, I think those of you who got carried away or were going to knit something in this technique, certainly noticed for themselves the book of Rossana Rafaedli “Embroidery on a sirloin grid”.
The phrase in the description of the book in the online store seduced me too. I quote:
"Thanks to universal schemes, patterns can be used for sirloin knitting crochet."
I don’t know what hit me in the head, but I thought that the book would certainly describe the intricacies of knitting a sirloin net. For me this is very interesting topic, since I have not yet found the perfect way to knit a sirloin mesh.
I bought the book anyway. So, I decided to tell and show a little what a book is.
Not a word is said about crocheting a sirloin net in the book. The author proposes to make a sirloin net in a completely different way: using shuttles and fillet sticks. By the way, fillet sticks can be replaced with knitting needles, handle cases, etc., but the author did not tell where to get these very shuttles or how to replace them. Personally, I have not seen them for sale. Also, you need a frame. Well, it's clear for embroidery.

The grid itself it will actually look like this. I liked it, neat.


Section "Performing embroidery" devoted to only 2 sheets (4 pages). The author shows step by step how to make seams. I think that of all the stitches in knitting, only one can be used, which is called "flooring".

But the rest of the book is banal schemes. From page 20 to page 95, there are only diagrams, diagrams and diagrams. For me personally, the schemes were of no value, well, maybe someday I’ll use something ... As you already understood, only 18 pages are devoted to the very technique of creating a fillet net and seams in the book. By the way, here is the content and an example of the scheme:


Overall, as a knitter, I'm probably disappointed in the book. But for those who decide to take up the creation of a fillet net using a shuttle, this book will surely open the way to a new world.
But the phrase in the description of the book about crocheting was obviously used in vain. It has nothing to do with crochet, only confusing.
If you like this post, please upvote Grid embroidery and its execution technique (video)Grid embroidery and its execution technique (video)
Mesh embroidery or fillet embroidery is a great way to help needlewomen create beautiful and unique things. It is based on the embroidery of empty and filled cells. When they are put together, the desired pattern is obtained.
Ready-made embroidery on the grid will look original and unusual. Things created in this way resemble expensive antiques. The technique presented below is a simple one that is suitable for a large number patterns. 


Preparation for work
To get started, you need a grid. You can make it yourself or buy it at a craft store.
Several ways to independently create the basis for embroidery:
- the mesh is cut out of the fabric. To do this, you need to cut the threads of the fabric in certain places and pull them out;
- for weaving the warp, you can use a specially designed shuttle. At the end of the work, a classic grid is obtained;
- Crochet. Mesh is simple pattern, which even a novice needlewoman can knit. To make empty cells, you need to alternate double crochets along with air loops.
When buying a finished mesh in a store, you need to pay attention to its size and arrangement of cells. 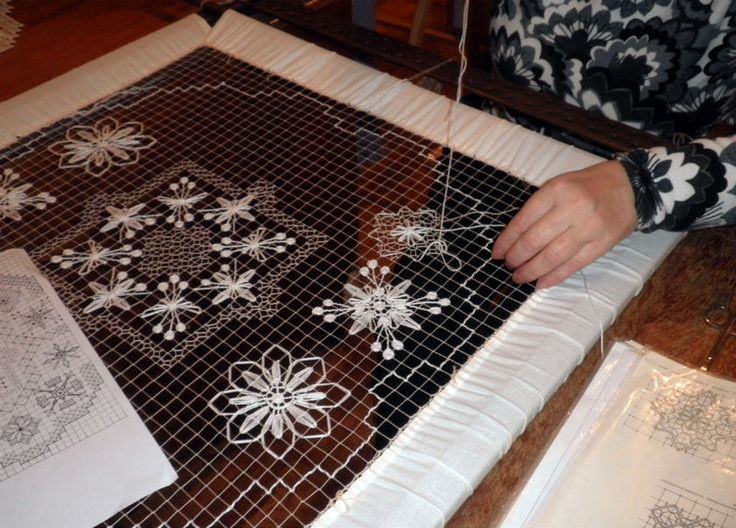
Tips to help you while embroidering:
Mesh embroidery technique

Embroidery on the grid can be done with multi-colored threads. This rule does not apply to embroidering curtains;
Varieties of methods for embroidering on a grid
Such embroidery can be done in two different ways- This is darning and weaving.

How to finish embroidery on the grid

Any embroidery on the mesh must be properly finished. You can get the job done in a few easy ways:
Needlewomen can choose for themselves the most optimal way to fix the working thread on the grid. special attention in such a case, you need to pay attention to the thickness of the thread used for embroidery. If it is thick, then it is better to finish the work using the first method. Otherwise, the borders of the pattern on one side will look ugly and more dense.
Finished embroidery can be used as an independent gift. Some needlewomen insert their work into photo frames to give friends and loved ones a gift. It can be a unique decorative element during the design of a variety of handicrafts.
Application of grid embroidery in the modern world

There are several basic ideas that will help you use ready-made patterns embroidered on the grid:
- thanks to this product, it can be used as a stand for hot dishes;
- embroidery can be stretched onto a cardboard frame to become part of a large number of decorations, or a lid for gift boxes;
- it is customary to decorate towels, tablecloths, and many other things with embroidery patterns on a grid.
Master class for embroidering stripes on a grid
Experienced needlewomen recommend using a mosquito net for work, because it has certain differences from a plastic canvas. This basis includes the main advantage - the arrangement of rows of cells is not at right angles. Craftsmen can break finished work into optimal squares. The direction of embroidery should only go from the corner and strictly diagonally.


Grid embroidery will help all needlewomen create excellent and unique things of their kind. They can be a great gift or present for any event.
Video: different mesh embroidery techniques
Comments
related posts:
 Stitch embroidery types and technique (photo and video)
 Embroidery on knitwear: seam technology
It's no secret that many interesting needlework techniques are born at the junction of completely different directions. Today we will talk about one of them: imitation woven weave through sirloin crochet.
fillet net- an ingenious and surprisingly simple invention in knitting. Anything can be knitted with sirloin mesh, from curtains to hats, from scarves to coats and large openwork tablecloths.
If you alternate the links of the loin mesh with ordinary crochet posts, then you can knit any picture, for example, using a cross stitch pattern.
And what happens if the fillet net is used as the basis for other work? What will come of it?
The idea is not new, craftswomen have been using and creating it for centuries original products, imitating woven fabric. Let's look at a few ways that even a beginner can use, we don't need any special skills other than knitting air loops and crochet posts.
To begin with, we need to tie the base - a sirloin net.
To brush up on the process of knitting a sirloin net, we recommend that you use two free video tutorials: The principle of fillet knitting. fillet net from Evgenia Nazarkina and Loin mesh knitting lesson from the video channel "Knitting Lessons Crochet and knitting". In addition, you can get acquainted with a series of four video tutorials on sirloin knitting from Svetlana Bersanova where you will also find a lot of useful information.
Now that we've figured out how to prepare a sirloin mesh base, let's look at three ways to simulate a woven fabric.
We imitate fabric on a loin mesh: we thread yarn and ribbons.
Looking at this poncho, you will not immediately guess how it is made. From fabric? Related? Crazy Vul?
In fact, this is our case: fabric imitation by pulling threads of yarn for knitting through the cells of a fillet net. We prepare the sirloin base of the desired size, and then we successively pull through the pre-cut yarn threads.
If you play with the colors and texture of the knitting yarn, you can achieve a very close resemblance to the woven fabric. See how wonderful melange threads look. You will find a description of the work in the note.

If in the model knitted poncho we tried to imitate a woven fabric as closely as possible, then Anastasia Maltseva, creating knitted scarf I decided to draw on a sirloin grid to give a twist to everyday things.
Please note that the sirloin stripes alternate with the machine-knitted stripes.
But what if, instead of stripes on the machine, we thread knitted tapes through the holes of the mesh and so on? There can be a great variety of options.
And what if you do without pulling through? And continue the experiment without giving up your favorite hook? The Swedish craftswoman Virkpia found the answer.

In fact, it’s ingeniously simple: we don’t throw a hook, but we continue to knit, or embroider, as you like. The author connected in this way Baby blanket. You can see all the details on the Virkpia blog in the article Braided baby blanket on a sirloin mesh base.
You can go even more creative, instead of knitting and crocheting on a fillet net, use the carpet embroidery technique and make the model even more original. Look how funny motley kids rug can be repeated by note "Where to put the rest of the thread?"
And you can go the other way. We bring to your attention the third way to simulate a bulk woven fabric.
Imitation of fabric on a loin mesh: knitting on a mesh.

A great way to create a voluminous, waving "woven" fabric is knitting in a sirloin net.
Actually, the idea suggests itself. It is not so uncommon when different decorative elements. So why not take it a step further and create a voluminous knit that works great for potholders, rugs, and coats alike?
About it interesting way work with a loin mesh we described in the article " " .
We wish you good luck in your work and mastering new techniques!
Discussion of the article
Where does the mesh come from?
A) we can cut threads in fabric, twist the resulting cells - you get a twisted mesh, cut into the fabric. This approach is typical for traditional folk art.
b) The grid can weave using special fillet needles. It is this mesh that is used for classic fillet embroidery.
Fishing nets, string bags, etc. are woven in the same way. There, instead of a needle, a shuttle is used.
c) The grid can be to tie crochet.
You can also imitate embroidery by knitting a pattern on a grid - you will get the well-known crochet fillet.
Or you can try embroidery on a knitted mesh - it will turn out very interesting decor for knitwear.
d) The grid can take ready.
Embroidery methods.
There are two types of fillet embroidery.
The first one is plain fillet.
Second - fillet guipure.
How do they differ?
Plain fillet similar in meaning counted embroideries, like a cross. With this embroidery, filled and unfilled cells of the grid alternate. Therefore, you can use any patterns for cross stitch.
There are several simple seams to fill the cells. The main ones are linen(darning type) and flooring. Some cells are crossed out, others remain empty - this is how a simple fillet pattern appears.
Guipure fillet uses different tricks such as pulling threads, lace seams, spiders, wheels, columns ... characteristic of needle lace.
With the help of these techniques, flowers, stars, twigs, berries, leaves are embroidered on the grid - and very beautiful patterns are obtained.
Filet-guipure embroidery
Embroidery stitchesDARNING STITCH
The simplest and fast way get a pattern on a fillet grid - fill in individual cells with a darning seam. This seam is sometimes referred to as "flooring". It is used in the event that it is necessary to fill a significant part of the grid - when embroidering curtains, bedspreads, tablecloths. In this case, you can use any pattern for cross-stitch, considering the loin mesh as a canvas. With one stitch, several cells of the fillet are overlapped at once, passing the needle either under the partition, or over it. The next row of flooring bypasses the partitions on the other side.
COVERED DARNING STITCH
The threads of the flooring made in this way do not move apart, and the seam itself is more durable.
If you need to fill one loin cell, the thread is fixed in the upper left corner of the cell and passed under the opposite vertical partition. Then the thread returns to the left partition, describing the figure eight. The entire cell is densely filled with such eights. Then the next cell in the figure is filled.
When it is required to fill in several cells located side by side, the thread is fixed in the upper left corner and passed to the rightmost partition of the row in the same way as in a simple darning seam. Then the thread is carried to the left extreme partition, wrapping around all the vertical partitions along the way. In this case, the threads will intertwine, forming eights in each cell. The left extreme partition is wrapped around and the thread is again directed to the right.
Background seams
PLAIN SEAM
This seam is especially common in old filet work. It imitates plain weave. The thread is fixed in the corner of the fillet cell and pulled through the fillet cell as a warp thread, as if additional partitions are pulled across the cell. If the picture captures several adjacent cells, the "base" stretches over the entire row of cells. At the same time, the mesh partitions are either grabbed with a needle or skipped. A darning seam is laid across the resulting "base", grabbing the threads of the "base" through one. The threads of the "warp" must not be pulled too tight, so a knitting needle is placed on the last cell of the linen pattern, and the "warp" is pulled through it. Then the knitting needle is removed and linen stitches are made in the other direction. Patterns can be made from cells filled with a linen seam. A linen stitch looks more delicate than a darning stitch and requires thinner threads.
SEAM "SPIDER WEBBING" or "TULLE"
The seam "gossamer" with various modifications is used more often than others. This seam consists of air loops. Air loops can be arranged in rows or in a circle.
First row of cells, top. Work is done from left to right. The working thread is attached to the middle of the vertical partition of the fillet cell and a loop is made, grabbing the horizontal partition in the middle. The loop is made only from right to left. In this case, the needle is directed from top to bottom under the fillet thread and over the working thread. The thread is not tightened, but left to hang freely. The thread should hang down to the middle of the vertical partition. Then the thread is led under the vertical partition to the middle of the horizontal partition of the cell adjacent to the right. Continue to sew buttonhole stitches. The loop then remains in front of the vertical partition, then goes beyond it.
The lower part of the first row is led along the lower partitions of the same cells in the same way. In this case, freely hanging loops are fixed.To go to bottom row cells wrap around the left vertical partition of the first cell. Performing buttonhole stitches, the needle is inserted into the loops of the upper row. It turns out a pattern with rings, similar to a tulle weave, so the "web" is sometimes called a tulle seam.
"SPIDER WEB" IN A CIRCLE
The working thread is fixed in the middle of the vertical partition.
First round. Make a loop, capturing the middle of the horizontal partition of the same cell. Make a second loop in the middle of the horizontal partition of the adjacent cell on the right. Then a loop is made, capturing the vertical partition of the same cell. The next loop is made for the vertical partition of the upper cage. So the looped seam bypasses four adjacent cells.Second round. From the middle of the horizontal partition of the fourth cell in a circle, the thread is passed into the hanging loops of the first circle and under the partitions of the cells, forming a ring. The ring is fixed to the horizontal partition and the working thread is directed to the beginning of work. As a result, the resulting pattern does not differ from the "cobweb" in rows.
AIR-LOOP "GOAT"
The thread is fixed in the lower left corner of the cell and carried to the middle of the lower partition. At this point, wrap the septum with a working thread and direct the thread to the middle of the right septum. The thread is passed under the right septum from top to bottom to form a small loop.
Then the thread is directed to the middle of the lower partition of the cage on the right to the middle of the upper partition of the cage on the left over the vertical partition. Next, the thread is laid in zigzags to the top point of the background. It turns out a stretched thread in the form of a "goat" seam. Small loops are formed on the upper and lower partitions. Having filled the entire background in one direction, lay the "goat" in the opposite direction (in the figure - a dark thread). At the intersection of two seams, rhombuses are formed.
WAVE SEAM
The thread from the corner is pulled through two cells vertically under the sirloin knot, they pass to the second row by twisting the vertical partition.
Variations of a wavy seam are possible.A wavy seam can be made not through two, but through one cell. Waves can be more or less frequent
If a second wave is applied crosswise to the laid seam, a dense lattice of rhombuses will be obtained.SEAM "DOUBLE WEBBING"
From left to right and from top to bottom, the needle is passed over the lower sirloin partition, and then up under the sirloin knot, etc.
SEAM "INTERWINDED WEBBING"
Effective but very complex pattern. First, a gossamer seam is performed, and then inclined threads are laid over this pattern in both directions. The threads going from right to left are drawn over the "cobweb" under the sirloin knots, and the threads going from left to right - under the "spider line" and over the sirloin knots. Oblique threads need to be pulled evenly and tightly. The drawing of this background is not very clear, and we do not present it. This is a dense mesh background diagonally.
BACKGROUND OF HORIZONTAL STRIPS
This suture partially duplicates the horizontal cell septa. Crosses are made in four cells, and 2 cells are skipped, passing the thread along the sirloin partition. One row is performed in two steps, in the direction from left to right, then from right to left.
BACKGROUND WITH DOUBLE SEAM
One row is filled with crosses, three rows are left empty, and so on until the end. Then they take a long needle and lay oblique stitches from bottom to top and from right to left under 2 partitions of the third upper cell (counting from bottom to top from a row of crosses). Then from top to bottom and from right to left under the first cell after the crosses. Then the needle is passed from right to left through 3 cells.
GRID BACKGROUND
The working thread is drawn back and forth under 2 vertical partitions over 3 horizontal ones. This covers the entire background. Then the working thread is passed from right to left under those partitions on which the threads of the first row intersect. After that, the thread is directed obliquely through 5 cells to make a long half-cross. In the next row, this half-cross is covered with the same long stitch
RUSSIAN SEAM BACKGROUND
It's easier to start from the top
First row. The thread is passed from left to right under one fillet thread, then obliquely through 4 cells and 1 vertical fillet thread is captured from left to right. Then they again rise 4 cells up from left to right under the second vertical fillet partition, rise again and cover 4 fillet cells, etc. to the end of the row.Second row. The beginning of the first stitch falls in the middle of the stitch of the first row. It is carried out as the first row.
Often background seams are built on a combination of two seams made with threads of different thicknesses. Many of these seams are very ancient, having come down to us from antiquity. Usually this is a darning stitch, made with thicker threads, and one of the openwork stitches.