Funny cats crafts made of felt. Soft toy kitten made of felt. Master class on how to sew felt souvenirs
To sew such a cute cat, you need very few materials and time. It will turn out a nice souvenir for friends or as a keychain for keys or a bag for yourself. The pattern can be enlarged and sew a pillow cat.
paper pattern.
Medium-density felt, in this case, half an A4 sheet is enough.
Threads similar in color to felt.
A felt-tip pen (chalk or soap) for transferring patterns to felt.
Needle.
Filler (synthetic winterizer, sintepuh, cotton wool or trimmings of soft tissues)
Scissors.
Finished eyes and nose (in the absence of ready-made eyes - pieces of white (light beige) and black felt, 2 black beads).
Universal glue (for example, dragon).
Felt for making a soft toy was chosen because it is soft, quite dense, its edges do not crumble when cutting, and there is a huge selection of colors and shades. Also for soft toys, especially large sizes, suitable fleece.
So let's get started.


Lay out the felt flat surface. Circle the pattern along the contour in a direct and mirror image.


Fold the pieces with the right side inward, sew together. You can use machine stitching or sew by hand. Most used hand seam- back with a needle. The seam should be laid, departing from the edge of the part at least 3 mm. You can sew a toy with front side in order not to turn inside out in the future, then it is worth using contrasting threads and sewing with a buttonhole (edge) seam.


Sew along the contour of the toy, not forgetting to leave an unsewn part through which you can turn the sewn toy on the front side.

Turn out carefully, if necessary, use a stick with a blunt end (pencil or pen without a rod). At this stage, in the absence of ready-made eyes and nose, cut out circles for the eyes from white (light beige) felt, sew pupils from black beads, cut out a nose from black felt. Sew on the eyes and nose before stuffing the toy.

To give volume to the cat, you need to take a soft filler, such as synthetic winterizer, synthetic fluff, in extreme cases, cotton wool, you can use trimmings of soft tissues. Using a blunt-ended stick, spread the stuffing evenly over the toy, paying attention to the tail and paws. The degree of fullness is determined visually, too tight stuffing can damage the seams.

After all the filler is placed in the toy, you should sew up the hole with neat stitches from the outside.

Attach the finished eyes and nose, if necessary, correct their position before gluing. Glue with universal glue suitable for gluing fabrics and other materials (eg Dragon).

To decorate the finished cat, you can use ribbon bows, hats, or nameplates. In this case, the cat just got tangled in the green tape.
P.S. The toy is quite simple to make, and can be made with children 5-6 years old. Joint creativity brings joy to communication, develops perseverance and needlework skills. And the result is a beautiful soft bright toy, valuable because it is made with your own hands, a particle of the soul is invested.

Felt cats are cute creatures that will decorate any home. It is unlikely that anyone will argue with this. Everyone loves kittens, so decor items with their participation will be great gifts for your loved ones.
On Aliexpress, you can buy inexpensive high-quality felt in 60 different shades (look at this link). Choose the size you want and specify the color you want in the order message.
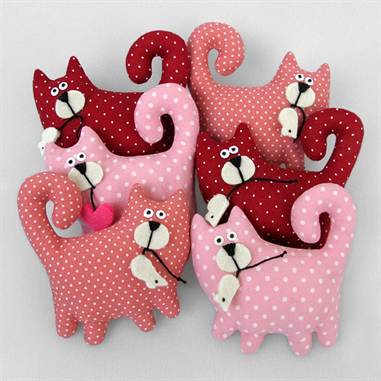
We offer you a pattern with cats, with which you can create unique and very original accessories with your own hands. These soft toys look cute and very funny.
Such crafts will take root perfectly in a house where there are children. Whatever you decorate (pillow, potholder, towel, etc.), your child will definitely like it. However, adults are also unlikely to remain indifferent.


In the photographs you will find several interesting ideas on the use of patterns of seals. You can enlarge or reduce the stencil to the desired size and transfer the image to any material.


Then everything is in your hands. Feel free to make a soft toy out of a pattern (stuff it with padding polyester - it will turn out great!), decorate household and kitchen utensils with felt kittens, make felt brooches, make appliqués on children's things. In a word, where you want to see cats, plant them there!


We live in a time when it is already difficult to surprise a child with a toy gift. There are a lot of toys now, for every taste, color and wallet. Only a handmade toy has always been much more appreciated. The process of creating a cat from felt with patterns is so easy that some of its manufacturing steps can be entrusted to a child.
On the example of this master class with step by step photos we will learn how to make a cat out of felt. This material is so dense and holds its shape well that any toy will be perfectly made from it. And what a pleasant touch it is! Surely your child will want to take such a toy with him to bed. By varying the size of the craft, you can make both a small key chain and a toy or even a large sofa cushion.
In order to sew a cat out of felt, we need:
- felt (three colors: gray, red and brown);
- threads in tone with a needle;
- filler for toys (synthetic winterizer, cotton wool, foam rubber);
- buttons or beads, and satin ribbon for decoration;
- thick paper or cardboard for patterns;
- marker or pencil;
- scissors;
- pins;
- glue.
First you need to choose felt. It is advisable to choose a medium-density felt, such a felt is perfect for sewing (it is dense and at the same time soft). color scheme you can choose at your discretion, thereby creating a unique masterpiece.
After you decide on the choice of felt, you can proceed to the choice of filler. The filler determines how the product will keep its shape, as well as how it can be cleaned in the future. Synthetic filler is perfect for machine washing, it is perfectly washable and dries quickly without deforming. The amount of filler also affects appearance toys, a large amount will make the toy voluminous, and with a small amount of filler you will get a pillow toy on which you can lie. Threads also play an important role, since the seam will be superficial when sewing, it is very important to select the color of the threads tone on tone. With an internal seam, the color of the threads is not critical.
pattern making
Now let's start making crafts. To do this, draw a cat pattern on thick paper. Draw a cat to your liking and the size that you need.
You need to draw the details of the pattern on paper folded in half, so it will turn out symmetrically, later the toy will turn out to be even.
The pattern can also be downloaded from the Internet and printed on a printer. Then the printed pattern must be glued onto cardboard or thick paper and only after that proceed to the outline with chalk on felt. Each detail of the pattern after drawing must be cut out.


Then, on a flat surface, you need to spread the felt and pin a pattern to it with pins. We will need three colors of felt: gray (main), red (for the nose and decoration), brown (for the mustache). Using chalk, outline each detail of the pattern and cut along the contour. In total, you should get a couple of parts of the torso, head and tail, as well as one part of the nose and heart, and four parts of the ears. Randomly cut mustache strips from brown felt.

elegant cat
We start sewing a cat from the head. We take the front part and sew the eyes, mustache and nose of the cat to it. Eyes can be made from buttons or beads, you can also form them from felt or buy ready-made eyes - accessories in a specialized store. The tips of the mustache can first be stitched, and then carefully glued with special glue. We do not sew the nose to the end, leaving a small hole for the filler. After the nose has been filled with filler, it can be stitched completely.

Sew two parts of the ears. They do not require filler.

Sew buttons on the cat's tummy for decoration. Buttons can be of any texture, they can also be replaced with beads or small bows.

Sew both parts of the body, leaving a small opening for the filler. Fill the cat's body with padding polyester or other filler and sew up the hole.

We act with the head in the same way as with the body (first we sew, and then we fill it with filler). All seams are made on top. Sew the finished head to the body.

Sew the details of the paws and fill them tightly with filler, sew up the holes.

Using colored thread to match the felt and a large needle, make large stitches on the paws, forming his fingers.

Sew the finished cat's paws to the body.

Sew two parts of the tail and fill it with padding polyester.
Now there are a great many toys, for every taste, color, and wallet. But what could be better than handmade toys and gifts? What if it's a felt cat? Everyone loves cats, and felt is the most suitable material, it is soft and warm, you want to constantly touch and feel, which is important, it keeps its shape perfectly and does not crumble at all. Let's figure out what we need for the future cat.
Materials:
- 1. Felt;
- 2. White bar of soap;
- 3. Scissors;
- 4. Needle;
- 5. Threads;
- 6. Quite a bit of filler for toys (I use holofiber).
Step one
First of all, I drew a pattern, and transferred it to the felt with a piece of white soap, then with sharp scissors I cut out two parts of the body, and one part of the tail. Also, from the remnants of felt white color I cut out two circles, these will be the eyes of the cat.
step two
Now you need to take one of the details of the body, and sew a tail to it, I do this with a back seam needle, it looks like a machine stitch, and is very strong. To the second part of the body, I sew two white circles that will serve as the eyes of the cat.

Step Three
I'm starting to embroider the face of a cat. I decided to make the cat's eyes with typical green pupils, embroider a red nose, a white mouth and antennae, with contrasting threads. The muzzle of the future cat made of felt turned out to be funny.

Step Four
The two finished parts of the body must now be connected. I fasten them on the front side with pins so that the details do not “leave”, and sew them together from the front side using a buttonhole seam. I also leave a small hole at the bottom of the cat. Of course, do not forget to remove the pins before stuffing the product with filler. Through the hole at the bottom, I stuffed the felt cat with holofiber, and sewed up this stuffing hole using the same buttonhole seam.

Love the result? I got such a cute, chubby, black cat made of felt. They say that black cats bring bad luck, but this is a far delusion, because they are so cute. felt cat will bring happiness to its owner, and will be an excellent addition to the interior, which will bring comfort to the house, or become a wonderful toy for children, maybe even a gift to a friend!
Also, you can sew a rope on his head, and carry it with you as a keychain. The materials for creating such a cat will come out very cheap, and most of the accessories can be found in everyone's house. Most importantly, making a cat out of felt is very simple, and most importantly, it won’t take much time to create, it will only take a couple of free hours of your time to create such a cutie.
An example of creating a cat from felt on video
You might also be interested in:
 Felt fox mask - master class, examples of masks ...
Content
Felt makes excellent soft toys, because. this is a very pliable and pleasant to the touch material, when cutting, its edges are not sprinkled, and the choice of colors is quite wide. For example, you can make a cute cat out of felt for a gift, use it as a keychain for a women's handbag or a bunch of keys. And if you increase the size of the pattern, you can sew decorative pillow in the form of a cat for a nursery or living room.
Cute cat
For work you will need:
- Orange felt (medium density);
- Paper pattern;
- Threads to match the base material;
- Sintepon, cotton wool or sintepuh for stuffing the product;
- Scissors;
- Finished nose and eyes;
- Glue "Dragon".
Work process
We cut out a pattern of a cat from thick white paper, having previously applied a drawing with a pencil.

We lay out a sheet of felt on a flat surface of the table, apply a pattern, trace the contours of the part. We apply the same pattern next to it, only in a mirror image, circle it.

With scissors, carefully cut out both parts of the future toy.

We fold the two parts face inward, sew them together along the edge with a seam back to the needle, stepping back from the edge of the canvas at least 3 mm. And you can also lay a standard machine seam. Or sew the toy by hand on the front side with threads of a contrasting color using a buttonhole stitch. The last option will be an additional finishing element of the product.
When sewing the details from the inside, we leave a small segment unsewn so that through it you can turn the product inside out and stuff the toy soft filler. If you can’t turn out small parts with your hands (legs or tail), we help ourselves with the back ballpoint pen or a pencil.
If there are no ready-made toy eyes and nose, at this stage they can be sewn to the face, having previously been cut out from scraps of black and white material.
To give the product volume and softness, we fill it with any filler (synthetic winterizer, synthetic winterizer, scraps soft tissue, cotton). We evenly distribute the filler throughout the toy, helping with the back of a pen or pencil. We pay special attention to the tail and paws so that they do not remain empty inside. But it is also not necessary to stuff too tightly, because. the seams may not withstand and sometimes disperse, and such a product cannot be called soft.

After filling, the missing section of the contour is sewn up with a hidden seam or neat small stitches from the outside. We glue ready-made eyes with a nose to the stuffed toy, after adjusting their location on the cat's face.

You can decorate such a toy in different ways: stick a nameplate, attach a bow or a butterfly around your neck near the ear.
Cheerful cat
Such a toy will cause a lot positive emotions will quickly lift your spirits. It is not difficult to make it, it is enough to have some material on hand with a good mood to boot.

For work you will need:
- 1.5 m gray thin felt;
- A piece of knitted fabric in gray tones for the paws and abdomen;
- A piece of black and white leather;
- Red ribbon for a scarf;
- Holofiber for stuffing;
- 2 eyes;
- Threads with a needle;
- Scissors;
- Sewing machine;
- Paper pattern with a pattern.
Work process
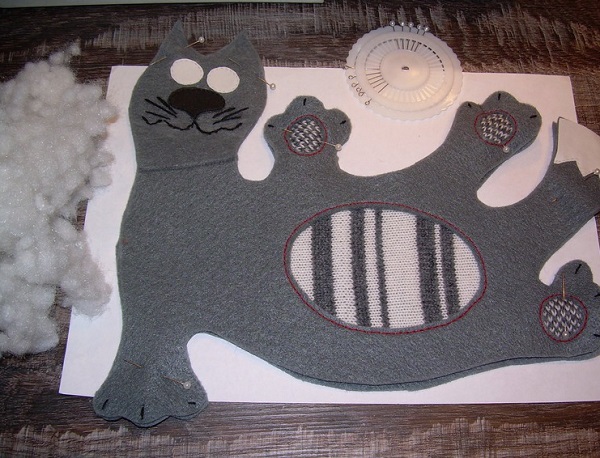
On a sheet of white paper, draw a cat figurine, marking areas with knitted inserts. Carefully cut out the cat along the contour with scissors, cutting out sections with knitwear (3 paws and a tummy).

We put a pattern on a sheet of gray felt, circle it along the contour, not forgetting to mark the holes for the inserts. Cut out the cat and holes for knitted inserts. If the head does not fit on a standard sheet of felt, then it can be cut separately, and then sewn to the body with a connecting seam.

We also cut out the back - the back of the toy, only without holes, in a mirror image.
As knitted inserts, you can use any old sweater or golf in a suitable color. If such a thing was not found, then small details can be individually knitted manually from gray and white yarn with knitting needles or crochet. The size of the knitted parts should be slightly larger than the holes allotted for them so that they can be sewn neatly. And it is better to cut off the excess after sewing.
From white leather (any other material can be used), we cut out two circles for the eyes. Cut out the nose from black material. We glue the resulting parts, and for reliability we additionally sew them with black thread. We randomly embroider a mouth with a mustache with a stalked seam, making a preliminary marking with chalk or a pencil. On the tip of the tail we also glue or sew a piece of white material.

Now we pin the knitted section of the fabric to the hole on the stomach with pins, attach it on a typewriter with threads of a contrasting color (in our case, the threads are red). We do the same operation with the pads of three paws. We cut off all excess knitwear with scissors, stepping back from the edge by 0.5 cm. We embroider three claws on each foot with black thread. This completes the work on the front part of the toy.
Now we put the top part of the toy on top of the bottom. For convenience, we chop off the details in several places with pins.
We start sewing along the contour on sewing machine with gray threads, making a seam allowance of 0.5 cm from the edge. Gradually, when grinding the parts, we fill the toy with holofiber or other filler, stuffing it not very tight.

Having completely stitched the details, we tie a thread with a knot, we hide the ends in the canvas. If there are irregularities along the contour, carefully align them by cutting them off with sharp scissors. The cat is almost ready, it remains to glue the toy eyes and tie a scarf around the neck.
Such toy cats can be made by the whole family, especially children will like the work. Kids can be instructed to cut, glue parts. Older children can already embroider or sew parts together under the strict guidance of their parents. Moreover, all the presented patterns are quite simple, and the toys are easy to manufacture. Working with your hands will bring you and your children a lot of pleasure, and felt cats will always please the eye. Everyone Have a good mood and creative success!
Post Views: 718