Origami paper castle diagram. How to make a castle out of paper that everyone will like? How to fold a triangular origami module
Winter. Like any season, it comes to us with its secrets, riddles, fairy tales... What fairy tales do you associate with winter? “Morozko”, “Two Frosts”, ... “The Snow Queen”. Did the Snow Queen really disappear, like at the end of Andersen's fairy tale? Or maybe she still lives somewhere at the North Pole? In an icy castle shimmering in the light of the northern lights?
Let's try to assemble a fairytale castle Snow Queen using the modular origami technique, a technique that is very exciting and calming.
For this we will need the following materials:
128 sheets of white office paper,
30 sheets different colors,
universal transparent glue (“Crystal Moment”).
Tools:
stationery knife or scissors.
Description of work.
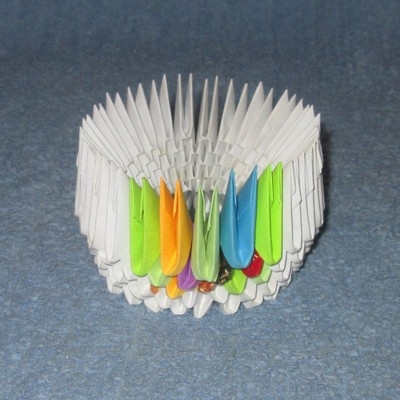
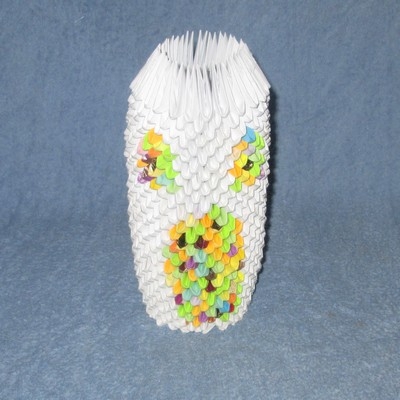
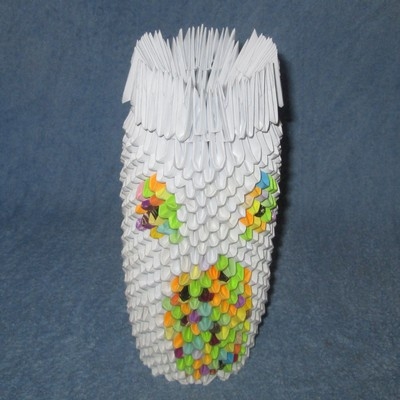
We need to assemble a lot of modules. White – 2046 pieces. Multi-colored - 476 pieces. If this is not your first work using this technique, then you may have accumulated leftover modules. So they can be used in this work. The castle can also be assembled entirely from white modules. But for us it will shimmer in the light of the polar sun or northern lights, which is why we use multi-colored modules.
The size of the modules is standard – 1/16 A4 sheet.
Central tower.
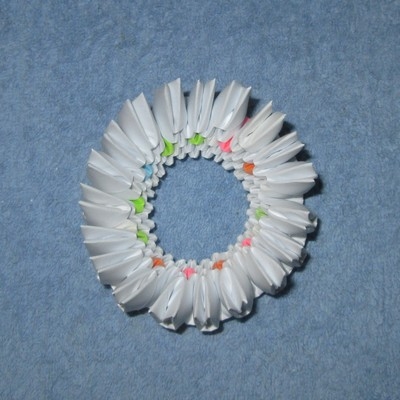
Circular rows. Each row has 25 modules. The first and second rows - 25 white modules each.
We start laying out the gates to the castle from the third row - 5 multi-colored modules.


Thus we assembled 16 rows of doors.

In the next row - 3 color modules, in the next - 2.

The next two rows are 25 white modules each.
From the next row we lay out two windows. Each has 3 color modules.

For each window you will need 16 color modules.
The next three rows are 25 white modules each.
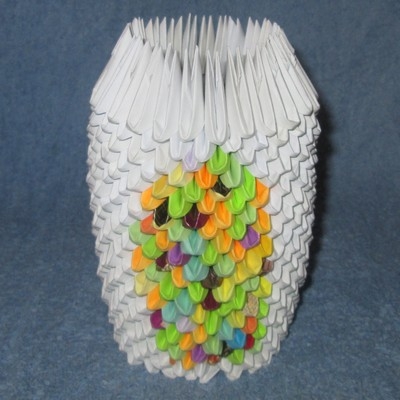
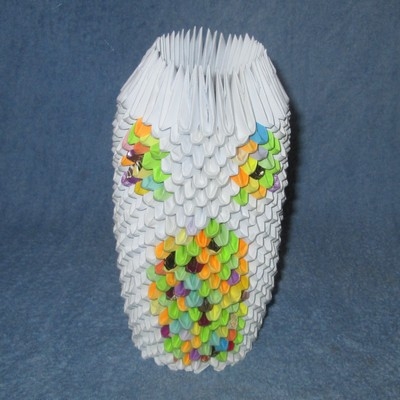
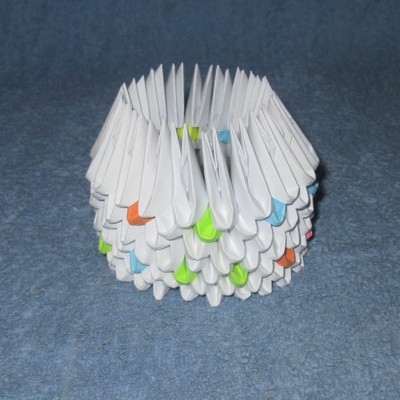
We lay out the next two rows with white modules, but place them back to front (see photo):
Lay out the cloves. For every three modules of the previous row we put on 6 modules, i.e. A whole module is put on each corner of the module. We pass 2 modules between each clove.
There are 52 white modules for each clove. Only 5 cloves.

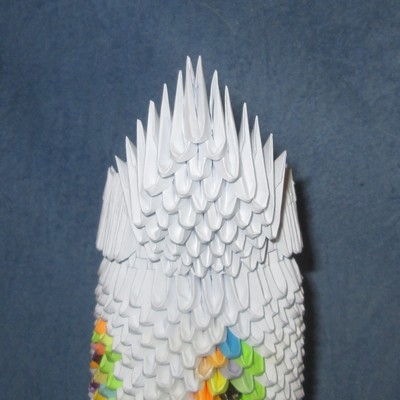
We put on multi-colored modules along the entire upper edge, placing them backwards. A total of 75 color modules.


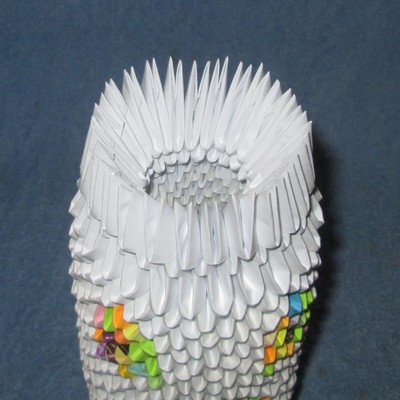
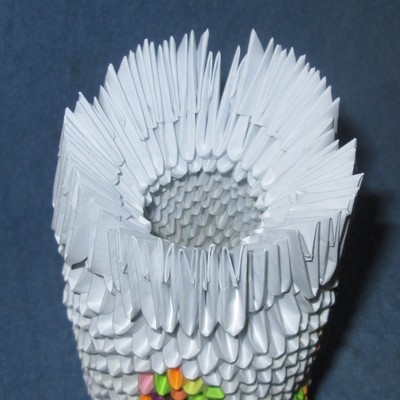
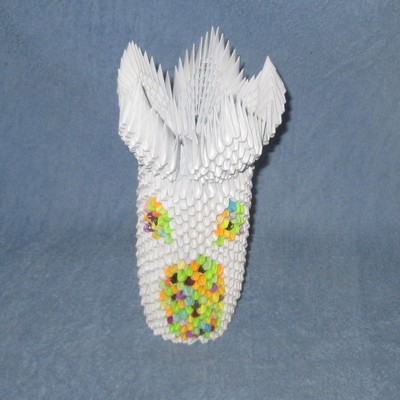
Roof of the central tower.
The first and second rows contain 25 white modules.

In the next row we alternate white modules with colored ones. Fourth row – 25 white modules.
Fifth row – 19 white modules. We reduce the number of modules; to do this, we put the fifth row module not on two corners of the fourth row modules, but on three.
Sixth, seventh rows - 19 modules each.
Eighth row - 13 white modules.

Ninth row - 7 white and 6 colored modules. Tenth row – 9 white modules.

We glue the roof to the tower.

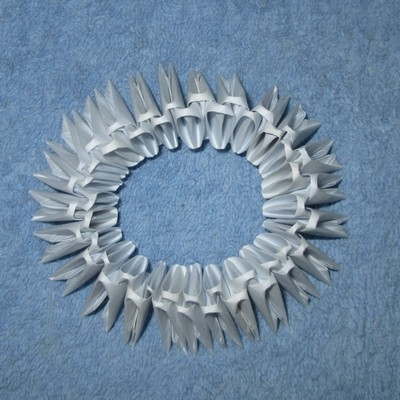
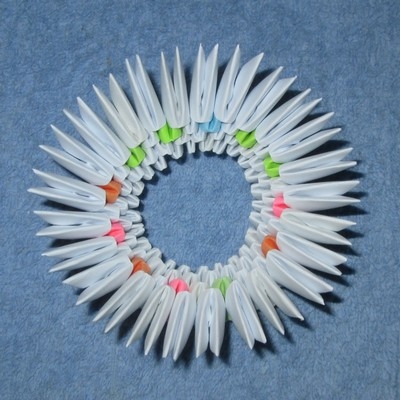
Fence. The fence will consist of two identical parts, which will subsequently be glued to the central tower from the sides.
The number of modules in the rows alternates: 25 – 24, i.e. one has 25 modules, the next 24, etc.
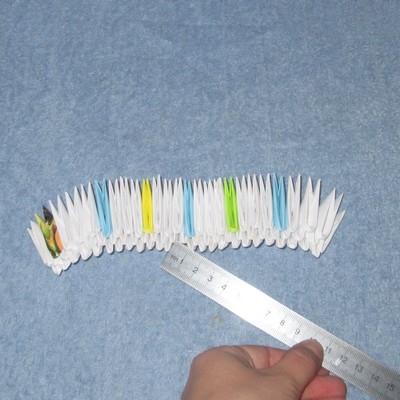
We lay out the pattern using colored modules. It will require 29 color modules.
Ten rows assembled.


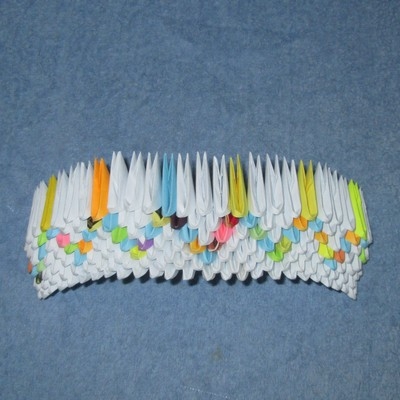
We put colored modules along the entire upper edge of the fence. There are 54 modules in total.
The fences are ready.

Glue them.

Side turrets. We assemble them symmetrically, and also lay out the pattern symmetrically.
The first and second rows are 8 white modules each.

In this way we assemble 22 rows of the tower.


Second tower.
We place the towers inside the courtyard.
The Snow Queen's castle is ready!
Perhaps she will like him, and she will have mercy on us: she will not be subject to severe frosts.
Today, stores offer a huge range of toys, but they cost
quite expensive. For a child, try making them yourself. You can also invite your child to participate in the process, this will develop his imagination and logic, and in addition, you will get great pleasure from joint creativity. Below we tell you how to make a castle out of paper that both boys and girls will love. You can take the schemes described in this article as a basis, but this does not mean that you need to end there - use your imagination and create your own unique palace. Additionally, this product can be used as a decoration - a stand for confectionery products.
Tools for work
For a craft like a paper castle, you will need:
- cardboard box;
- sand;
- paints;
- textile;
- sawdust;
- chip cans;
- glue;
- scissors;
- pen.
Step-by-step instruction
To learn how to make a castle out of paper, you need to study the following information:

Now you just have to figure it out interesting story and please your beloved child with a new fairy tale.
How to make a castle out of paper
When you have children, it doesn’t matter at all whether it’s a boy or a girl, the main thing is that they all love fairy tales and believe in miracles. Any child will be happy with such a gift. To make a castle with your own hands as accurately as possible, you need to spend a lot of time and effort, but your beloved offspring deserve it.
To work you need to take the following accessories:

Instructions
In order for the castle, made with your own hands from paper, to be the most accurate copy of the original, adhere to the following rules:

Helpful information
A paper castle, the diagrams of which are presented in this article, will help you realize your child’s dreams and give him a piece of happiness. If the craft will be used not only as decoration, do not forget about its sustainability. For example, you can fix each part with tape, which must be secured on the inside. The same palace can be made for a little princess, simply by decorating it in bright fairy-tale colors. Now you know detailed instructions how to make a castle out of paper. Go ahead, please yourself and your child.


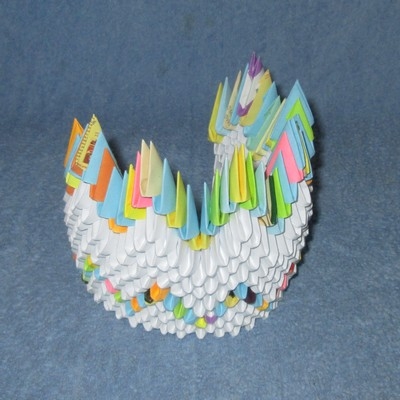
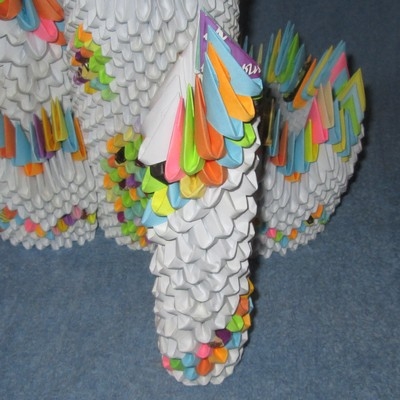
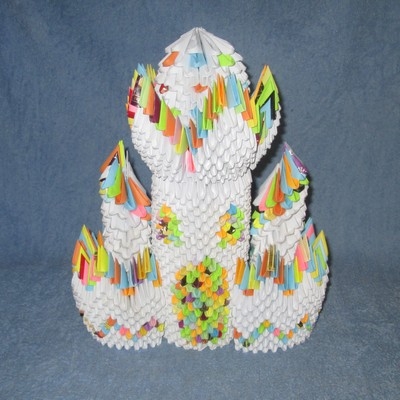
Hi all! I'm glad to show you mine new craft from modules - LOCK! It took me about a year to make such a miracle :) Mostly the castle was made last winter, autumn, and from the beginning of winter until today! Let's enter this castle and take a closer look!

let's begin! This is the castle tower, there are two of them. All the work on making the castle began with them.

This is a fortress wall with a tower, a fortress wall is the easiest to complete, just put the mods in rows and that’s it :)

And this is the Castle Gate, I made them yesterday, and the castle itself was put together today. If you look carefully, you can see that the middle teeth have red modules on them - only two orange modules were missing :)

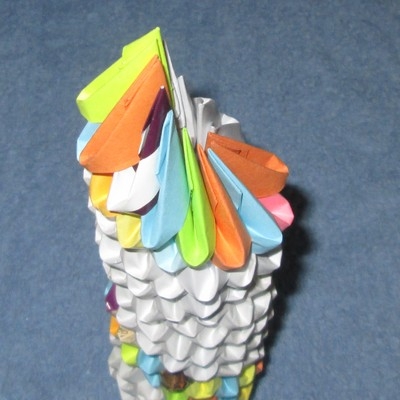
And here is the most beautiful, most difficult and longest to assemble - the main tower of the castle! For a long time I could not assemble the very bottom where the door is....

Now you can safely go up to the observation deck of the main tower!

And this is the top of a regular tower :)

Well, now, of course, you need to take a photo with the castle :)

Well, I’d like to end with words from Tatyana Nikolaevna’s book “Funny Figures” - Mountains of paper, hours of folding, creative efforts and now... A fairytale palace appears like a mirage in the desert. It seems that now the heroes of the Arabian Nights fairy tales will emerge from it. You can continue construction further, surround the palace with palm trees, depict the surrounding landscape, populate it with inhabitants. There are no limits to your imagination when you have such a magical material in your hands - paper!
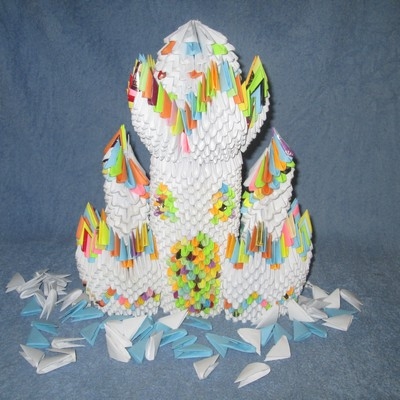
Round tower: 1. Prepare 108 modules for the first three rows. Start assembling two rows by connecting the modules as shown in the photo. 2.When there are 4 modules in the first and second row, start assembling the third row. Each row has 36 modules. Close the finished chain into a ring. 3.Make two rows, placing the modules with the short sides facing out (xn). 4. In the ninth row, reduce the number of modules by 3. To reduce the row by one module, place a pair of adjacent modules not on 4 corners, but on 6. Do the same operation in three places. In the tenth row, again reduce the number of modules by 3, securing 30 modules. 5.The next six rows (from 11 to 16 rows) consist of 30 modules each. The modules are fixed with their long sides facing out. During the assembly process, do not forget to form smooth cylindrical walls of the tower. 6. There are 4 windows in the tower. Here's how they're done. Place 2 modules (ksn) on the tower blank. (xn - short sides out). Secure 2 posts on the sides, each of 6 modules placed on top of each other. Make an arched connection. To do this, place 2 modules one after another on the left column, inserting only the right corners into the pockets. Place 2 modules on the right post, inserting only the left corners into the pockets. Connect the semi-arches from above with a module. 7. Now you need to create walls between the windows. Right pier: seventeenth row - 3 modules, eighteenth - 3 (the outermost modules are put on the corners of the last and penultimate rows), twentieth - 2, twenty-first - 3. 8. The left pier is performed similarly. It is a little wider: the seventeenth row - 4 modules, the eighteenth - 3, the nineteenth - 4, the twentieth - 3, the twenty-first - 4. 9. Make 3 more windows in the same way and make walls between them. Next, we will assemble the walls between the arches. Rows from 22 to 24 rows: right partition - 4,5,6 modules (outer pockets are put on the corners of the arches), left partition - 5,6,7 modules. 10.In the 25th row, put on 30 modules. 26 - 30 modules (short side out). In the 27th row there are 30 modules. 11.Now take a compass and measure the inner diameter of the tower. Draw a circle on the cardboard, cut the circle along the contour and insert it inside the workpiece. This is the top platform of the tower. 12.Make supports for the arches. Place 5 modules on top of each other. Insert such columns along the entire circumference, leaving 4 corners between them. 13.Make arched ceilings between the supports. Place 3 modules one after another onto the left support, inserting only the right corners into the pockets. Place 3 modules on the right support, inserting only the left corners into the pockets. Connect the semi-arches from above with a module. 15 . Between the arches, lay out colored diamonds in five rows: 1 - 2 - 3 - 2 - 1 module. 16. Finish the tower with a jagged edge. There are 7 modules on each tooth, a total of 70 modules in the last row. Fortress wall: Flat walls made of modules are very easy to make. You can choose any width of the wall section. In order for the wall to follow the contours of the tower - and the tower has a protrusion at the bottom - you need to start with fewer modules and then extend the wall. 1 . Prepare 32 modules (16x2) for the first two rows of six-prong walls. Connect the modules of the first and second rows in the same way as at the base of the tower. 2. Make seven rows of 16 modules. In the eighth row on the left and right, put on one additional module. Do the same in the ninth row (the eighth and ninth rows have 18 modules each). 3. In the tenth row there are 17 modules, in the eleventh - 18, in the twelfth -19 (we added one at the edges), in the thirteenth - 20, in the fourteenth - 19, in the fifteenth - 20 (short side out). 4. In the 16th row, fasten modules of a different color - 19-20 pieces. Row 17 - windows. Alternate: a support of 5 modules placed on top of each other, 2 modules (short side outwards)... 5. Make arched ceilings between the supports. Place 3 modules one after another onto the left support, inserting only the right corners into the pockets. Place 3 modules on the right support, inserting only the left corners into the pockets. Connect the semi-arches from above with a module. 6.Place 2 more additional modules onto the connecting modules. The wall is ready. You can attach it to the tower. Main tower. Bottom part: The colors used for our tower were: blue, light blue and lilac (in the assembly description they are all designated as Blue colour). Also for finishing you will need modules in white and light yellow colors. For front door - brown, for the roof - a mixture of red and orange. If you have paper-based foil, then make several golden modules. 1 . Gather the first three rows and close them into a ring. There are 42 blue modules in the first row. In the second - 5 brown, 2 white, then alternating (5 blue + 2 white) X 5. In the third row - 1 white, 4 brown, 2 white, then alternating (1 blue (ksn) + 4 blue +1 blue (ksn ) +1 white) x 5. Fix all brown modules strictly above each other, this is the future door. 2. In the fourth row there are 2 white modules, 5 brown ones, then alternating (2 white + 5 blue) X5. Perform the fifth row as the third, the sixth as the fourth, the seventh as the third. 3. Let's make the upper, tapering part of the door. Place 3 more brown ones on the brown modules of the seventh row, 2 brown on them and 1 brown on top. Now make a white frame for the door: 1 white module, 5 white diagonally from left to right. The same on the other side: 1 white module, 5 white diagonally from right to left. 4. Lay the eighth row to the left of the door: (2 white + 5 blue) x 5.2 white. Make an arch over the door: 5 golden modules diagonally from left to right, 5 from right to left, 1 from above. 5 - Lay rows nine through fifteen from the golden arch to the left. Ninth row: (1 white +1 blue (ksn), 5 blue + 1 blue (ksn)) X5, 1 white module. 6 “Tenth row: (2 white + 5 blue) X 5.2 white. 7. Eleventh row: 1 white (ksn), (1 white +1 blue (ksn) + 4 blue +1 blue (ksn)) X5, 1 white, 1 white (ksn). 8. Twelfth row: 1 white (xn), (2 white + 5 blue)x5, 2 white, 1 white (xn). 9. Thirteenth row: 1 white (ksn), 1 white, (1 blue +1 white +1 white (ksn) + 2 blue +1 white (ksn) +1 white)x5.1 blue, 1 white, 1 white ( ksn). 10. Fourteenth row: (1 white (ksn) +1 white + 2 blue +1 white +1 white (ksn) + 1 blue) X 5.1 white (ksn), 1 white, 2 blue, 1 white, 1 white (ksn). 11. Fifteenth row: (1 white (ksn) + 1 white + 3 blue +1 white +1 white (ksn) +1 blue) X 6. 12. Sixteenth row: (1 white (ksn) +1 white + 4 blue + 1 white + 1 white (dc) x 6. 13. Seventeenth row: (2 white + 5 blue) x 6. 14. Eighteenth row: (1 white + 6 blue) xb 15. Nineteenth row: (2 white (dc) + 5 blue) X6. 16. Complete the twentieth row as the eighteenth, twenty-first as the nineteenth, twenty-second as the eighteenth. 17. Twenty-third row: (2 white (xn) + 5 blue (xn)) x 6. 18. Twenty-fourth row :(1 white +1 blue + a column of 6 white + 2 yellow + a column of 6 white +1 blue) x 6. Make arches between the columns, each of 7 yellow modules. We got windows. 19 . Now fill in the space between the windows. Twenty-fifth row: 2 white (ksn) xb. 20. Twenty-sixth row: (1 blue +1 white +1 blue) cotton. 21. Complete the twenty-seventh and twenty-ninth rows as the twenty-fifth, twenty-eighth and thirty - as the twenty-sixth. 22. 31 row: (1 blue + 2 white (short side forward) + 1 blue)x6. 23. Row 32: (2 blue +1 white + 2 blue)x6. 24. Thirty-third: (2 blue + 2 white (ksn) + 2 blue)x6. 25. Thirty-fourth: (2 yellow (ksn) + 2 blue + 1 white + 2 blue)x6. 26. Thirty-fifth: (1 yellow + 2 blue + 2 white (ksn) + 2 blue)x6. 27. Thirty-sixth: (6 blue + 1 white) x6. 28. Thirty-seventh: (5 blue (ksn) + 2 white (ksn))x6. 29. Thirty-eighth: 42 whites. 30. Complete the thirty-ninth row as the thirty-seventh. Next, attach 3 white ones only above the white modules. Put 3 more modules on these triplets. 31. Make white arches, each of 13 modules, between the resulting posts. Main tower. Upper part We start with the upper, thickened part of the tower. The rows will be numbered from the beginning. You can experiment with color, with details, and come up with different tower designs. You can make a more fabulous or more realistic option. 1 . Fill in the space between the arches. In the first row there are 2 blue modules x b. In the second (1 blue +1 yellow +1 blue)x6. The third one has 4 BLUE X 6. The fourth one has 7 BLUE X 6. 2. Make windows. In the fifth row (2 blue + a column of 4 white + 2 yellow (ksn) + a column of 4 white + 2 blue) x6. Make arches between the posts, each of 7 white modules. 3. Start filling in the space between the windows. Sixth row: (1 blue + 2 white (ksn) + 1 blue) x6. To the left and right are the free corners of the blue modules. Seventh row: (2 blue + 1 white + 2 blue) X6. Complete the eighth and ninth rows as the sixth and seventh. 4 . In the tenth row (2 blue + 2 white (ksn) + 2 blue)x6. In the eleventh (3 blue + 1 white + 3 blue)x6. In the twelfth (3 blue + 2 white (ksn) + 3 blue)x6. In the thirteenth (4 blue + 1 white + 4 blue)x6. 5. In the fourteenth and fifteenth rows, fasten 54 white modules. 6. Measure the inside diameter of the tower. Draw a circle on the cardboard, cut the circle along the contour and insert it inside the workpiece. This is the top platform of the tower on which the roof will stand on supports. 7. Make the teeth: put 2 white modules (ksn) on the workpiece, 2 columns of 2 white ones on them. Skip 5 corners and repeat the same steps until the end of the row. 8 . Let's start building the roof. First, make 6 identical supports from blue modules. In the first row of the support there are 2 modules, in the second - 3, in the third - 2, in the fourth - 3. The outer modules cover the corners of the last and penultimate rows. 9 . In the next four rows of support, the alternation continues: 2 modules - 3 modules. There are 4 modules in the eighth row, 5 in the ninth, 6 in the tenth. 10. Connect 6 supports to each other, making a total row of 36 white modules. Above it, make a row of 36 blue modules (ksn). 11. Next, lay out a row of 30 red modules (ksn). In the spaces between the supports, put 2 modules on 3 corners. 12. Complete the next four rows of 30 pieces each. 13. Next, with each row, reduce the number of modules by 6 (24 red modules, 18.12). 14. In the last row, fasten 7 golden modules, skipping 1-2 corners each time. 15. The finished roof should taper evenly. The supports should be the same length and shape and stand well on a plane. Make a flag, glue it onto a wooden skewer and insert the skewer into the hole in the roof. 16. Place the roof on the top platform of the tower. You can glue it, or you can leave it removable. Castle Gate The method of assembling the gate is similar to the method of assembling the fortress wall. But to get a gate, you must first make the left and right parts of the wall, and then combine them. 1. Prepare for the first row of the left side of the wall 1 white, 7 orange, 1 white module. Put on the second row: 2 white, 4 red, 2 white modules (put the outermost white modules on 3 corners). Third row: 1 blue, 5 red, 1 blue module. 2. Fourth row: 2 white, 4 red, 2 white modules. The outer white modules are placed on the corners of the last and penultimate rows. Fifth row: 1 blue, 5 red, 1 blue module. 3.Repeat the same alternation until the fourteenth row. From the sixth row, mix red modules with orange ones. 4. Fifteenth row: put 1 white module in the left pocket on the right corner, fasten 1 blue, 5 red, 1 blue module in the usual way. 5. Sixteenth row: 1 blue module (leave the white corner free), 1 white, 4 red, 2 white. 6. Now make the right side of the wall. Perform rows from the first to the fourteenth exactly the same as on the left side. 7. Fifteenth row: 1 blue module, 5 red, 1 blue, 1 white in the right pocket on the left corner. 8. Sixteenth row: 2 white modules, 4 red, 1 white, 1 blue. 9. Make a ceiling over the gate. To do this, take 7 white modules, fasten 6 white ones on them and put this chain with the left pockets on the free white corners of the left and right parts. 10. Continue to the left the seventeenth row (it will be common): 1 blue, 1 white, 5 red, 1 blue module. Also continue the seventeenth row to the right. 11. Eighteenth row: 2 white modules, 5 red, 1 white, 1 blue, 1 white, 3 blue, 1 white, 1 blue, 1 white, 5 red, 2 white. 12 . Continue laying out the wall, alternating 22 and 23 modules in a row. Make a color pattern from the photo. Make twenty-six rows. 13 . In the twenty-seventh row, lay out 23 orange modules (ksn). In the twenty-eighth - 22 blue ones. 14. Make the battlements of the gate in the same way as the battlements of the fortress wall. The middle arch is 2 modules larger than the others and the distance between its supports is not 2, but 3 modules. 15. Finally, you can assemble all the elements of the castle together. An exciting moment. Mountains of paper, hours of folding, creative efforts and now... A fairytale palace appears like a mirage in the desert. It seems that now the heroes of the Arabian Nights fairy tales will emerge from it. You can continue construction further, surround the palace with palm trees, depict the surrounding landscape, populate it with inhabitants. There are no limits to your imagination when you have such a magical material in your hands - paper!
We make beautiful things with our own hands!
Practical work by origami :-)
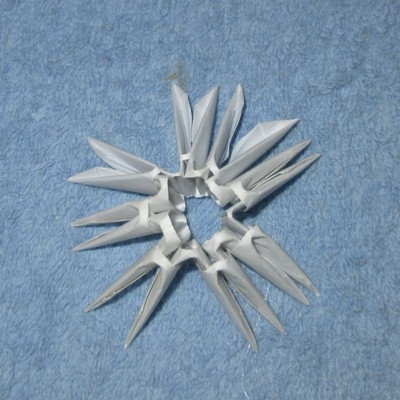
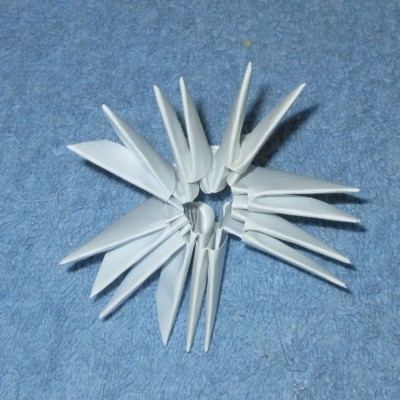
All figures are made from so-called triangular modules, and therefore, first, let's learn how to make these same triangles.
This module is made up of a rectangle of colored or white paper. The aspect ratio of the rectangle should be approximately 1:1.5. You can get the desired rectangles by dividing the A4 format into equal parts.
| If the long and short sides of A4 format are divided into 4 equal parts and cut along the marked lines, you will get rectangles approximately 53x74 mm. | |
| If the long side of A4 format is divided into 8 parts, and the short side into 4 parts, you will get rectangles 37 × 53 mm. |
You can also fold modules from half a square using note blocks available in office supplies.
How to fold a triangular origami module
The resulting module has two corners and two pockets.
How to connect modules to each other
Modules folded according to the above diagram can be inserted into each other different ways and receive voluminous products. Here is one possible connection example:
By making many modules from paper of different colors, you can get a modular construction set. A figurine made from such a constructor can be easily disassembled. From such details you can put together many interesting figures.
Lesson 1-2
| OrangeOrange is not a difficult figure to execute. However, it requires some skill in forming spherical shapes. This skill is necessary for making various animal figurines using the technique modular origami. If instead of orange you take several bright colors, then you can make Christmas ball.
|
Birthday cake
First prepare triangular origami modules folded from rectangles different sizes.
- Module-1: 1/4 sheet of white A4 paper, 175 white and 7 green.
- Module-2: 1/8 A4 sheet, 166 white and 14 green.
- Module-3: 1/16 A4 sheet, 14 white and 14 green.
- Module-4: 1/32 sheets of A4 (60x38 mm), 7 white and 7 green.
For the plate you will need approximately 130 pieces of Modules-4 (colors of your choice).
- Take 42 Modules-1 for the first row and the same for the second. Connect the modules this way. First row: modules are on the short side, second row: modules are on the long side.
- When you make 4 modules in the first row and 3 in the second, immediately start assembling the third row. The modules are on the long side, put on in a checkerboard pattern.
- Continue to collect three rows at a time. The third row also has 42 modules.
- Close all rows into a ring.
- Turn it over to the other side and, gently pressing the edges with your fingers, turn the shape inside out. The edges should go towards the center and the middle should go up.
- It turns out this is the figure.
- Turn over and put on the fourth row of Modules-1.
- Take 7 green Modules-1 and put them on every sixth pair of corners.
- Take 14 Module-2s and put them on the sides of the large green ones.
- Put 14 Modules-3 on the sides of Modules-2 and put 7 Modules-4 in the middle.
- Take the same number of white modules as green ones of exactly the same size. Put them not in a checkerboard pattern, but directly on the green modules. The bottom tier of the cake is ready.
- Make the top tier of the cake exactly the same as the bottom one, only using Modules-2. Make each row of 22 modules. Also collect three rows at once, close them in a ring, turn them inside out and put on 2 more rows. There are a total of 5 rows in the upper tier.
- This is what the top tier looks like if you turn it over:
- Now you need to make a stand for the cake - a plate. Close it into a ring, inserting approximately 130 Modules-4 (or Modules-3) into each other. Cut out a circle from thick paper, its size should fit the lower tier (about 20 cm), glue a ring to it.
- To prevent the bottom tier of the cake from spreading, make a support inside the cake. For example, you can cut off a small part plastic bottle.
- Place the lower tier on a support. If there are large distances between the modules at the base, they can be closed by inserting Modules-2 into the gaps with the pockets facing out.
- Place the top tier exactly in the center of the bottom. Try to find a groove in each corner of the upper tier in the lower tier. This can be done by helping with a toothpick. When all the grooves are selected, the upper tier will easily fit into the lower one. Press it in a little.
- This is what the finished cake looks like from above.
You can start decorating.
Roses recipe
For roses you will need Modules-4 (60x38mm): pink - 27 pieces, yellow - 27 pieces, red - 9 pieces, green - 16 pieces.
- For one flower, take 9 Modules-4. Unfold 3 modules and cut off the valves.
- Tightly screw these modules onto a thin stick (skewer, pen refill, toothpick). When winding, the long side should remain at the same level.
- The rolled pieces must have a straight enough end to stand on the table.
- Unfold the other 6 modules and twist the corners onto the stick a little
- Cut out a circle with a diameter of 25 mm from paper of the same color. Lubricate the valves with glue.
- Bring the halves of the module together a little and glue it onto the circle.
- Glue 2 more similar modules onto the circle.
- Glue the next circle of petals inside the first circle as well. To do this, the halves will have to be brought together more strongly.
- Insert two pieces rolled into a tube one into the other. Lubricate the ends with glue and glue them to the center.
- Unfold the last tube blank slightly, grease the end with glue, and glue it around the first two tubes.
- The rose is ready.
Rose petals
Decorating the cake
Roses and leaves can be placed on the cake at your discretion. For example, this way:
A candle can be made from a rolled paper straw, which is covered in a spiral with a thin strip of foil. And the light is made of two modules.
Blooming cactus
All work is made from modules made of 4x6 cm rectangles
Flowers
- The flower consists of three rows of 8 modules each. Prepare 24 modules of the same color. Take the module, open it and bend it along the indicated lines. Do not iron the folds; the fold should be slightly outlined.
- Open the pocket.
- The pocket should open up into a petal shape. Make 8 of these petals for the second row.
- Make 8 petals for the first row in the same way as for the second. Take the corners of the petal with two fingers and bring them together. Such folds form at the corners. Do this for all 8 petals.
- Insert the corners of the petal of the first row into the pockets (closest) of the petals of the second row.
- Immediately put the regular module of the third row on the corners of the second row. It will secure the remaining petals.
- Collect all three rows and close them into a ring.
- This is what the workpiece looks like from the side.
- For sepals, prepare 6 green modules. Glue them one after another in this way, turning them at a right angle to the center.
- The resulting sepals were cone-shaped.
- Lubricate the ends of the flower blank with glue.
- Lubricate the inner surface of the sepals well with glue. Bring all the corners of the flower together and glue them inside the cup, making sure they are evenly distributed around the center.
- Hold it until the glue sets.
- Make a core from a square of yellow paper measuring 6x6 cm according to the pattern of the Kusudama Superball Module (see how to make it below, after this lesson). Insert it inside the flower.
- Insert a toothpick into the hole. She will attach the flower to the cactus.
Cactus
Potty
Such a cactus will be able to delight you with its flowering for a long time!
Classic kusudama Superball (Flower) consists of 40 modules. These modules can also serve as the basis for creating Flower Dolls. Take it square sheet paper. For kusudama it is better to use double-sided colored paper, and for dolls - depending on the design.
- Turn the square back to face you. Bend and straighten diagonally. Turn it over.
- Bend and straighten in half vertically and horizontally. Turn it over.
- Fold along all the marked lines at the same time. To do this, bring the two halves of the horizontal diagonal together. There should be two squares at the top and bottom.
- The result is a basic Double Square shape.
- Fold towards the middle.
- Open your pocket and tear it apart.
- This is what a pop-up pocket looks like.
- Flip to the right.
- Do the same operation with the other pocket and also with the two back pockets.
- Open the figure in front of you with the empty side. Fold towards the middle.
- Fold the corner.
- Flip through the sectors and perform operations 10 - 11 three more times.
- The result is a figure like this. Now it needs to be fully expanded.
- The result was the original sheet of paper, but with the intended folds.
- Press in the middle to make the sheet concave. Now we assemble the final module. Let's start from the upper left corner. Place your hands on the edges of the square where the dotted lines are. Bring the folds back, around the corner of the square. The folds marked with a dotted line should meet at the back, at the diagonal of the square.
- This is what it looks like. Fold towards the middle along the previously marked folds.
- Fold the corner inward.
- Flip the right side of the resulting figure to the left.
- Fold the next corner of the square in the same way. Again, fold the sides and fold the corner.
- Flip all the resulting sectors to the left and perform the same folding on the remaining two corners of the square.
- This is what the resulting module looks like from the end.
- This is what the module looks like from the side.