Such a difficult simple pencil skirt: what to consider when designing in order to achieve a slimming effect. Straight skirt with several reliefs How to sew a pencil skirt with vertical reliefs
But, of course, there is a way out. We offer to master the basics of design in order to easily build an ideal model for yourself. Let's start our course by building a straight classic skirt.
You will need:
- graph paper (),
- pencil,
- eraser,
- ruler (),
- tailor's pattern,
- calculator
- to take measurements from the figure, we need a centimeter tape
Measurements for building
- St - half-circumference of the waist (we divide the measurements of girths in half and get half-girths)
- Sat - semi-circumference of the hips
- Di - product length
How to take measurements
Waist
When taking measurements of the circumference of the waist, you need to pay special attention to the fact that the centimeter tape should be located strictly horizontally in the narrowest place. Do not pull on the tape, as this may lead to a narrowing of the product at the waistline. Rice. one
Hip girth
When taking a measurement of the girth of the hips, you should also pay special attention to the fact that the centimeter tape should be placed strictly horizontally, passing along the most protruding points of the buttocks. The tape should also run with some freedom and no tension. The distance from the waist to the protruding points of the buttocks is the measurement of the height of the hips. 
Rice. 2
Flexibility gains
- waist increase (Fr) 0 - 1.0 cm,
- increase in the hips (Pb) 0 - 2.0 cm.
To build a classic skirt, we will take size 44 (this is a size of 88 cm across the chest) for height 170.
measurements
- St=33.5 cm,
- Sat=48.0 cm,
- the position of the hip line for constructing a skirt: 18.0 - 20.0 cm (this measurement depends on the type of figure, with a significantly non-standard figure, this measurement must be taken directly from the figure).
Calculation for construction
- St + Fri \u003d 33.5 + 0.5 \u003d 34.0 cm - the width of the skirt along the waist line.
- Sat + Pb \u003d 48.0 + 1.0 \u003d 49.0 cm - the width of the skirt along the hips and the width of the grid for construction.
- Wb \u003d 19.0 cm - position of the hip line
- Di=55.0 cm - the length of the product in finished form and the height of the grid for construction.
Step 1. Building the mesh
We take point T as the first point of construction - and from it we set aside the width of the grid to the right - 49.0 cm, draw a line and set point T1 at the end of the segment.Down from the point T, we set aside the height of the grid and put the point H at the end of the segment - the length of the product - corresponds to the bottom line of the product.
We complete the rectangle by building point H1 to the right of point H. The segment H-H1 is also equal to 49.0 cm and is the width of the base grid.
Also, to build, we need a line of hips: from the point T down on the segment TH we set aside a distance equal to the height of the hips = 19.0 cm, and to the right we lay off a horizontal line and on the segment T1-H1 we get point B1.
We outline the line of the side seam, it will be located in the middle of the grid, i.e. 49.0 cm / 2 = 24.5 cm.
The first and important stage of construction should look like the one shown in Fig. 3.

Rice. 3
Step 2. Building darts
To build darts along the front, back panel and side seam, you need to perform the calculation: (Sb + Pb) - (St + Fri) \u003d Gvyt (tuck depth).49.0 cm - 34.0 cm = 15.0 cm - this is the total difference between the size of the waist and hips, as well as the total amount of darts at the waist of the product.
In the side seam we put half the difference between the hips and the waist, which is 15.0 cm / 2 = 7.5 cm.
In turn, you need to divide the total tuck along the side seam into a tuck along the front panel, and a tuck along the back panel, which will be 7.5 cm / 2 = 3.7 cm.
Building a side seam tuck
We postpone point T3 to the left and point T4 to the right, a distance of 3.7 cm, connect points T3 and T4 with point B2, we have a temporary line of the side seam.The remaining tuck at the waist should be distributed in a percentage ratio of 30% / 70% at the waist of the front / back of the skirt, respectively.
The total amount of tuck at the waist of the front panel is 7.5 * 30% = 2.2 cm, the total amount of tuck at the waist of the back panel is 7.5 * 70% = 5.2 cm.
For ease of construction, you need to divide the total amount of the tuck by 2, in connection with this, half of the tuck of the front panel will be 2.2 cm / 2 = 1.1 cm, and half of the tuck of the back panel will be 5.2 cm / 2 = 2.6 cm.
The length of the tuck of the front panel should be 8.0 - 11.0 cm, and the length of the tuck of the back panel - 15.0 - 20.0 cm.
For example, let's take average length darts to build:
- front panel tuck length - 9.0 cm
- back panel tuck length - 17.0 cm.
The length of the tuck in the front and back panel depends on the type of figure and the height of the hips: for higher hips, the darts must be made shorter, for lower hips, the darts must be lengthened.
The location of the darts on the front and back panel should be at a distance of about 50% from the center of the front panel and back panel to the side seam.To build a tuck in the back panel, the distance T-T2 * 50% \u003d 24.5 * 50% \u003d 12.2 cm.
To build a tuck in the front panel, the distance T1-T2 * 50% \u003d 24.5 * 50% \u003d 12.2 cm.
Construction of the tuck of the back panel
We postpone point T5 from point T along the waist line to the right, and lower the perpendicular down to point T51, 17.0 cm long - the length of the tuck of the RFP. We set aside a 2.6 cm tuck solution for the rear panel in each direction from the perpendicular and set the points T5 * and T5 **, respectively. We connect these points with point T51. The tuck of the back panel is ready.Construction of the front panel tuck
We set aside point T6 from point T1 along the waist line to the left, and lower the perpendicular down to point T61, 9.0 cm long - the length of the PP tuck. Set aside a 1.1 cm tuck solution for the front panel in each direction from the perpendicular and set the points T6 * and T6 **, respectively. We connect these points with point T61. The tuck of the front panel is ready.The second stage of construction should look like the one shown in Fig. four.

Rice. four
Step 3. Building the side seam
To build a side seam, divide the T3B2 segment and the T4B2 segment in half - we get points T31 and T41. From these points we build the perpendicular T32 and T42 with a value of 0.5 cm.To align the waist line, it is necessary to lengthen the lines of the side seams of the front and back panel by 0.5 cm. In accordance with this, the line of the temporary side seam T3B2 and T4B2 must be extended upwards by 0.5 cm and we get the point T3 * and T4 *.
The third stage of construction should look as shown in Fig. 5.

Rice. 5
Step 4. Skirt silhouette
The silhouette of a classic straight skirt along the bottom line can vary, and the side seam can expand or narrow slightly along the bottom line. For a more strict silhouette, we will perform a slight narrowing along the side seam. To do this, along the bottom line from the point H2 in each direction, we set aside a narrowing of 1.5 cm and get the points H3 and H4, respectively.The fourth stage of construction should look as shown in Fig. 6.

Rice. 6
Step 5. Side seam line
Through the points T3 * -T32-B2-H3 and T4 * -T42-B2-H4 we draw the lines of the side seams of the front and rear panels. The line of the side seam should be smooth, made according to the pattern.The fifth stage of construction should look as shown in Fig. 7.

Rice. 7
Step 6. Waistline
Next, we connect the points T5 **-T3 * with a smooth line - we get the waist line of the RFP, and we connect the points T6 **-T4 * with a smooth line - we get the waist line of the PP.The sixth stage of construction should look as shown in Fig. eight.

Rice. eight
Step 7. Bottom Line
In order for the bottom line along the side seam not to be an angle, it must be extended down by 0.2 cm on each side. Next, we connect the points H-H3 and H1-H4 with a smooth line at the side seam.The seventh stage of construction should look as shown in Fig. 9.

Rice. 9
The main construction of the skirt is completed, as a result, we have a drawing of the front and back panels of the skirt, as shown in fig. ten.

Rice. ten
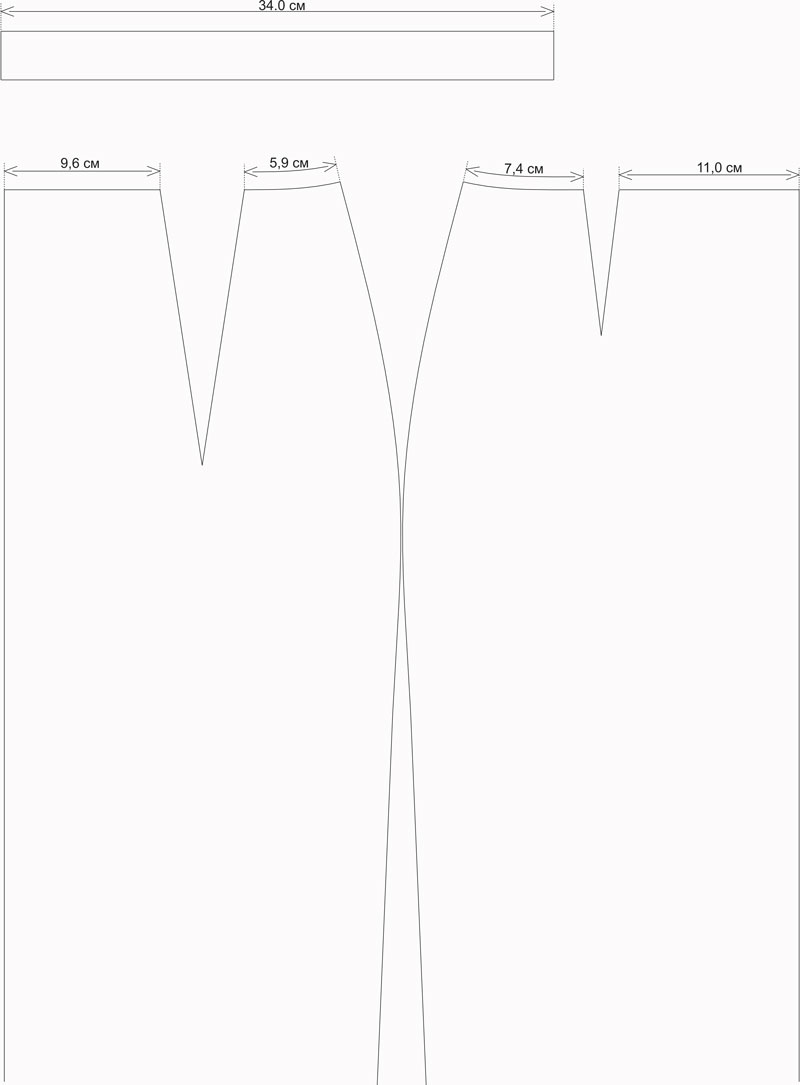
Step 8: Building the Belt
To build a belt, you need to measure the length of the waistline and check it with the initially calculated value along the waistline.The lengths of the sections along the back and front panels are equal: 9.6 cm + 5.9 cm + 7.4 cm + 11.0 cm = 34.0 cm. The initially calculated width of the skirt at the waist was 34.0 cm, which means the drawing is correct.
The length of the belt is 34.0 cm in half and the width of the belt for the classic skirt is 3.0 cm.
This build step should look like the one shown in Fig. eleven.
Rice. eleven
Now the details of the skirt need to be transferred to tracing paper, connect the tucks, if necessary, mirror the detail of the front panel so that the front detail is one-piece. Cut out for easy cutting, as shown in Figure 12. Allowances can be applied on tracing paper or directly on the fabric.

Rice. 12
Having understood the basic principle of building a classic skirt, you can add various details (slits, slots, pockets, fasteners, coquettes, various undercuts) and create your own unique models. Such elements will bring a bright personality even in such base model like a classic skirt. And also on its basis, you can create other products.
In the next construction tutorial, we will show you how to build a wedge skirt and a year skirt.
How to build a sun skirt
A sun skirt is one of the options for a flared skirt. It also has a flared silhouette and is based on a circle. You can make a sun skirt pattern yourself with the help of our master class. A step-by-step illustrated master class will tell you how to take measurements correctly, make calculations for building and complete the design of a sun skirt, half sun skirt and flared skirt based on 1/6 of the circumference.After all the constructions, we cut the front panel along the relief line (dashed line).
To build a pattern of a straight skirt with slots, one should not forget about the allowances for the slots. These are rectangles 6-7 cm wide and 20-25 cm high with a skirt length of 50-60 cm. We add them to the relief lines of both parts of the front panel (Fig. 4).
Layout on the fabric of a pattern of a classic skirt with reliefs
The layout of a skirt pattern with reliefs on the fabric, and hence the fabric consumption, depends mainly on the width of the fabric, and, of course, on the size of the pattern itself.
Consider two options that differ in the size of the pattern. The width of the fabric in both cases is 140 cm, the length of the skirt is 58 cm, the fabric consumption is 75 cm.
1 option- for hips of 100 cm or less. Fig.4.
Option 2- for the volume of the hips 100 - 110 cm - fig.5.
With an increase in the volume of the hips, the width of the fabric may not be enough, so we do the layout in an economical way, with a turn of the central front part.
In option 2, the parts are laid out in different directions, so you need to use fabrics without a directional pattern and pile.
With a fabric width of 150 cm, the same layout will work for a hip volume of up to 120 cm.
Tailoring of a straight skirt with reliefs
We begin work with relief seams.
In order to qualitatively sew a straight skirt with slots, it is important to properly process the slots. Here you will find a photo with explanations:.
When the front panel is assembled together, then - the usual sequence for sewing a straight skirt:
- we grind tucks, side and back middle (if any) seams;
- we sew a zipper;
- we process the top of the skirt with a belt;
- sewing the bottom of the skirt:
This skirt can be made without slits in front. You can replace them with one cut in the left embossed seam- then the allowances for the slots are not needed.
The back panel can also be made with reliefs. The construction of the relief line at the back is similar to the construction at the front.
One more moment. In the photo above, the reliefs are located far from each other. This is because the size 48 mannequin is wearing a larger skirt. Therefore, the distance between the reliefs seems disproportionately wide. According to the above calculation method, the reliefs will be in their place for each size.
http://shjem-krasivo.ru/
Hello, friends!
Today's publication is the answer to a question that I received not so long ago from a reader of the blog "You can't forbid beautiful sewing!".
You have no idea how nice it is to know that my leadership brings benefits and tangible results, in the form of new products!
I am always happy when I receive such letters in which you share your victories, thank you!
I could not leave Nellie's request without attention.
The request is, and I quote:
"Hello, Elena!
I don't know if I can address you with a personal request. The fact is that the cold is coming and I would like to sew a warm skirt. But I have certain wishes. I want a pencil skirt with reliefs in front (a simpler relief is possible - two seams vertically in the middle of each leg), without a belt, just with a facing and a zipper at the back, with a lining and a slot. The length is slightly above the knee.
I bought suit fabric on fleece, laid it out and was confused.
Elena, if you can help, I will be very grateful. My size is 48 (if anything). I took a course from you on building the base of a pencil skirt, but I couldn’t model it myself. I have never sewed skirts with lining and vents. You have a very accessible form of explanation, I really liked it.
Thanks in advance."
In short, I already answered Nelly's question by mail so as not to delay creative process, but promised to tell more about this model.
Andso, today we will consider the modeling of a skirt with reliefs and the technology of sewing this skirt.

To model a skirt with reliefs, you need to either build a straight skirt pattern or use a ready-made pattern for your figure.
Of course, it is better to build your foundation, taking into account the characteristics of your figure, especially if it differs from generally accepted standards, but if you have a proven finished pattern, it will fit as well.
Modeling of a skirt with reliefs.
Modeling a similar skirt is easy.
To do this, on the basis of a straight skirt, you need to draw a line parallel to the middle of the front panel from the end of the tuck (if you need reliefs on the back panel, draw a line parallel to the middle of the back panel, respectively).

Sign the details, mark the shared thread and cut the patterns along the marked lines.

The technology of sewing a skirt with reliefs.

Skirt lining. Stages of cutting and processing.
If the skirt is lined:
The lining should be cut according to the cut details of the skirt, keeping all the decorative and constructive lines of the cut.
Before basting on the sides, for a better fit of the skirt due to the side allowances, be sure to cut off 0.2 cm on both sides, leaving the width of the allowances for the seams, but reducing the lining along the circumference of the hips, and therefore in general for the manufactured product.
If the style of the skirt is without structural and decorative elements, sewing on the lining is easy:
Stitch darts and side cuts, leaving unstitched for the fastener in the left side seam(or optional) 16 - 18 cm, hem the bottom of the skirt flush with the cut of the allowance for hemming the bottom of the product.
Combine the processed lining with the waistline, baste.
IMPORTANT: if the upper cut of the skirt is processed with a facing, then the lining is cut out minus the details of the facing. The podkald is stitched to the lower cuts of the facing.
In the clasp, stitch the lining for allowances. To make the lining less mobile, fasten on one side at the level of the hips along the allowances for the seams with the product.
In pleated skirts, position the seam of the lining over the pleat of the top and process the slit for a free step.
The darts and seams in the lining should be located strictly above the darts and seams of the top of the skirt.
Processing the lining in a skirt with a vent.
If the skirt has a vent, the lining of the lower part of the vent must be folded inward and sewn with blind stitches for the allowance for processing the top.
On the upper part of the lining, make a notch to the width of the allowance for the slots, from the corner - by 0.7 cm, bend the allowance inward and hem manually according to the allowance for processing the slots.
Along the upper edge of the lining with the top of the skirt, we will process the belt or facing.
I do not yet have a video on the topic of processing with a slot (you need to fix the situation), but I found an interesting and understandable video for you.
The teacher very competently and clearly explains to beginners the stages of processing slots.
The first part of the spline processing
The second part of the processing splines
The third part of the spline processing
Skirt ironing.
Skirts need to be ironed only on an ironing board, electric, with an iron with a thermostat through an iron.
First you need to carefully iron, iron or iron all seams, darts, folds, pockets, and then the entire skirt completely through the ironing from the wrong side.
We fix the ironed product on a hanger, leave it to dry completely and fix the shape given to the product (skirts made of woolen fabrics - 20-25 minutes, skirts made of silk and cotton fabrics - 10-15 minutes).
Iron the side seams of the skirts on a special pillow oval shape(can be replaced with a towel folded several times) to avoid deformation of the side lines.
When ironing the bottom hemming, it is better to place a double folded fabric to the edge of it and slide the iron over the hemming and the underlying fabric through the moistened iron so that the edge of the seam is not printed on the front side.
Fix the ironed product on a hanger, leave it to dry completely and fix the shape given to the product (skirts made of woolen fabrics - 20-25 minutes, skirts made of silk and cotton fabrics - 10-15 minutes).
All finished goods iron only in the longitudinal direction of the thread, without stretching it.
So, we have considered the modeling and technology of sewing a skirt with reliefs, I hope now it will not be difficult for you to sew such a skirt.
Finished pattern." class="img_anons" title="(!LANG:Pencil skirt pattern with reliefs and small slits in the seams.
Finished pattern.">!} Pattern elegant slim pencil skirt with small slits in the seams on the sides, back and middle of the front. Skirt length just below the knees looks the most successful.
Style="float: right; margin: 0px 10px 10px;" title="(!LANG:Pencil skirt pattern with reliefs and small slits in the seams.
Finished pattern.">!}
There are two figured reliefs on the front and back panels of the skirt. Such a division of the skirt panels allows, if desired, to combine fabrics of different colors and (or) textures. The zipper can be positioned as standard: at the top of the left side seam, or at the back in the middle seam. It looks interesting skirt with a through fastener on a metal zipper in the side seam (even in both) or in the middle seam of the back panel of the skirt. Experiment!
Skirt pattern suitable for women with waist 80cm and hips 104cm. Skirt length 63 cm.
The skirt pattern is given without seam allowances.
Print the pattern sheets on the printer and connect them in accordance with the diagram. The scheme is the order in which the pattern sheets are connected. It is printed on the first page.
Be sure to check the scale. On a printed sheet with a depicted square of 10x10 cm, the sides of 10 cm should correspond to exactly 10 centimeters. To do this, in the printer settings, set the print scale of the document to 100% (without scaling).
Before cutting, check again for compliance with your measurements with the parameters of the pattern.
Ready-made patterns are given for a conditionally typical figure. If your figure differs from the conventionally typical one, you should adjust the pattern taking into account the characteristics of your physique and only after that proceed with cutting.
Don't forget to give seam allowances, as well as additional allowances in those places where clarifications are possible when trying on.
Having swept away the details, try on the product, make any necessary corrections and start sewing.
The skirt can be either lined or unlined. The lining is cut according to the main details.
For those who want to build a pattern for a specific figure according to measured standards, we have detailed . Having such basic pattern you can create the most various styles skirts.
READY PATTERN FOR FREE.
Pencil skirt is a kind of lifesaver for women of any age, any complexion. Today it is more diverse than ever before. Depending on the length, the presence of reliefs or other design elements, the material, finish, etc., a pencil skirt can be completely different and appropriate in a variety of situations.
Finished pattern double embossed pencil skirts on the front panel, on the back panel, the middle seam into which the zipper is sewn. In the same seam at the bottom of the skirt, there can be a slit, slot, pleat or frill. We deliberately do not mark any marks on the pattern of the back panel and do not give any allowances, leaving the choice to you. Allow for processing according to your decision.
How to build a skirt pattern for a specific figure according to the measurements taken (step-by-step instruction) can be viewed.
Modeling a pencil skirt described in several ways previously.
Today we offer you finished pattern.
Pattern sizes:
waist circumference 62cm,
hip circumference 86cm,
skirt length 68cm.
The pattern is given WITHOUT seam allowances!
Preparing a pattern for work is extremely simple.
Click on the diagram at the end of the article and skirt pattern will open in a new window.
Print the pattern sheets on the printer, connect them according to the diagram and cut them out.
- Be sure to check the scale. On a printed sheet with a depicted square of 10x10 cm, the sides of 10 cm should correspond to exactly 10 centimeters.
Compare the sizes of the patterns with your measurements. Make changes if necessary.
After that, start cutting. Do not forget give seam allowances and additional allowances in those places where clarifications are possible during fitting.
Having swept away the details, try on the skirt, make any necessary adjustments and start sewing.

You can change the finished pattern if you wish, in accordance with your preferences.
For example, change the configuration of reliefs, add pockets, flaps, belts, buckles or other decorative elements. You can also adjust the length and width of the skirt at the bottom.
The technology for sewing a skirt is extremely simple and depends on the chosen fabric and your decision.
The processing sequence is standard - processing of individual parts (darts, reliefs, slots), assembling the front and back panels of the skirt, sewing in the fastener, sewing on the belt or (depending on the style) processing the upper edge of the skirt with turning, hemming the bottom and final wet heat treatment.
The top section of the skirt can be processed different ways, for example, facing, inlay, belt of various heights, etc.
I draw your attention to the following: if you are sewing a skirt from elastic fabric, then it is desirable to process the upper cut with elastic material. For example, sew an elastic band or lace with a scalloped edge, if this does not contradict the style, or process it with a piping (belt) from the same fabric as the skirt itself.