Small loom for weaving belts. Loom for braid or belt
I decided to do detailed description of my experience in the form of a photo lesson, only because on the sites dedicated to this method everything is somehow very superficially written and independently, it is not easy to figure it out there. Moreover, on the example of an ochelya with a simple swastika ornament, and not with some incomprehensible pattern.
We will weave an ochelie
1. Not everyone can make 3 mm wooden plates. Sometimes they offer to make them from plastic bank cards or beer coasters. But I think it's not best theme for weaving amulets.
Therefore, I propose a simpler approach to this problem:

Take ordinary A4 cardboard - draw it into 9 rectangular parts (7 by 8 cm), laminate the sheet and then cut it into these 9 rectangles. For the convenience of weaving, I advise you to cut the cards as evenly as possible. And so to do just in case (if you ever have to weave a belt) 5-6 sheets, i.e. there will be 45-54 cards. Although it took me 60 cards for the bass guitar strap. I just repeat, first draw, and then laminate. And not like I did: first I laminated it, and then I tried to draw it on a slippery laminate. Then punch 4 holes with a hole punch, but not in the perimeter of the rectangle, but in the form of a square about 5 by 5 cm. so that the inside of the holes in the card is smooth, without lumps. And then slightly dull the sharp corners of the card. Then, as shown in the photo, number each card with a red and black marker. Of course, over time, the corners of the cards go astray, and the laminate moves away a little, but there are enough of them to weave overcoats for a large family and friends. And then you can just glue these corners.
2.
Threads with less pile are best suited for such weaving. I use Iris. It is convenient to put balls of thread in plates, and put them on the floor to your left.

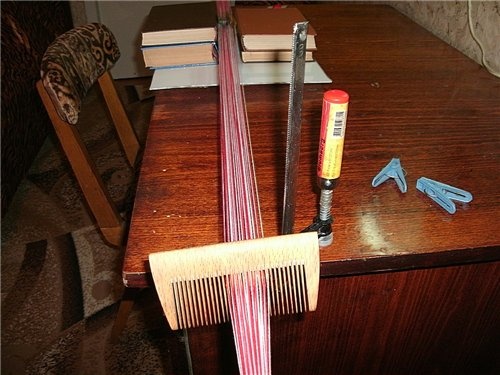
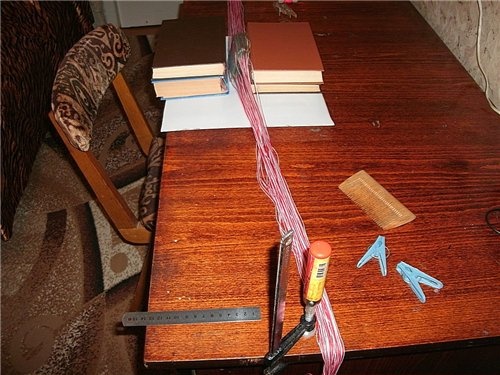
3. On the Internet you can see many different special designs for such weaving. But this is probably good for those who do it professionally. I have a different way, the essence of which is to get by with what is in almost every home. Vice, desk, clamp, clothespins and 2 combs. I fix the front tail in a vice with a comb, and wrap the back tail on a clamp. And weaving does not take place in the air (as in the original), but on the table.
4.
Fix the vise 13-15 cm from the edge of the table and clamp the comb well in them.

5. We lay down card number 1 face up. Now we cut 2 pieces of red thread and 2 of white. The length of my table is 1m, and therefore I take the length of the threads 1m 80cm. Now we thread the threads into the holes of the card: the threads of the color that you want to make the background of the ochelya (red) are threaded into the front 2 holes, and the threads of the color of the ornament (white) are threaded into the back.
In order for the canvas of the overcoat not to be "behaved" (curved plane), it is necessary to thread all the threads from above into odd cards, and thread the threads from the bottom of the card into all even cards. Or vice versa. In general, it is important to alternate the way of pulling
6.
Here are all the threads drawn from above. Red threads (background) in front, and white threads (ornament) behind. Now fold the front ends of the 4 threads together and tie in a knot.


8.
Here are all the threads drawn from the bottom.

9. Now we fix the second knot in the comb next to the first, and lay the second card on top of the first.
10.
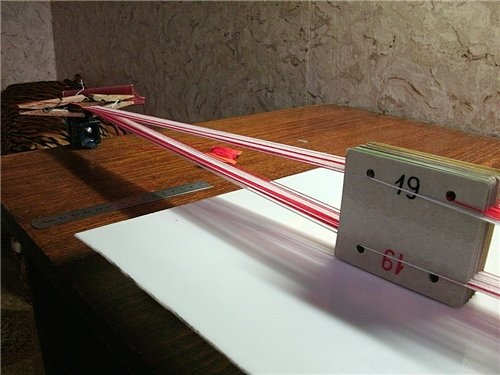
And so we do all 19 cards (not forgetting to alternate the method of pulling threads).

11. Since the centering of all the cards is now slightly higher than the table, it is necessary to put some kind of substrate (2-3 cm) under them. In general, after pulling the threads on the clamp, you yourself will determine the height of the substrate that is necessary so that the cards do not hang in the air.
12.
Now on the sides so that the cards are in a horizontal position, arrange them with books 1-2 cm from them, i.e. do not clamp the cards, but simply so that they do not fall.

13.
Now fasten the clamp on the other edge of the table so that its rod is in the center of a row of knots on the comb. You can simply measure with a centimeter.

14.
Since one of the important conditions for high-quality weaving is good tension and the absence of loosening of the threads, it is necessary to comb the entire back tail well. It is especially good to comb the section of threads from the cards and for 20-30 cm for the clamp. Take a comb not thick. Pull firmly, but of course so as not to break the comb.
15.
Make 4-5 turns and clamp with clothespins. Remove books from cards.

16.
Make such a "chip" from the remaining laminated cardboard and wind the threads on it that you use as the background of the ochelie, i.e. red. It will be DUCK. In other matters, ducks can be made at any time, and not right now. For example, before threading the cards.

17.
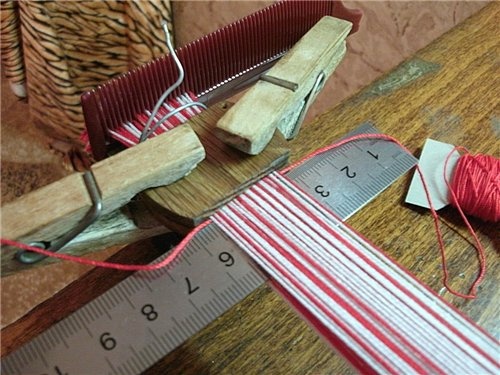
Wire, if necessary, the threads to a width of no more than 22-25 mm. Secure the beginning of the threads with some dies. For example, I have oak dies. In fact, there is no special need for these dies now, but, for example, I like it when the first woven row rests on something.

18.
Now lay the weft between the upper and lower threads, and "knock" it with a ruler to the dies.

19.
Now we proceed directly to weaving.
To do this, using the GTT program, I created my own program for 19 cards:

I intentionally didn't write 2, 4, etc. rows because they are done exactly with the previous one, i.e. 2nd as 1st, 4th as 3rd, 6th as 5th, etc.

At the beginning, we have all the cards arranged so that the red numbering is at the top.
20.
Turn cards 1 and 2 90 degrees clockwise.

21.
Then from the 3rd to the 11th we also turn 90 degrees already counterclockwise. Then from 12 to 14 clockwise. 15 to 17 counterclockwise. And 18 from the 19th clockwise.


Small digression:
It is customary to make square cards rather than rectangular ones. But I prefer rectangular ones. let's say, when you do some line and you are distracted, for example, by a phone or something else, then sitting down at the table again, you immediately see where you left off. due to the rectangular shape of the cards, you can see which are horizontal and which are vertical.
22.
First weave the weave with our fingers.

23. Then we press with a ruler. We remove the line.
24.
Then we lay the weft between the upper and lower threads, again we take the ruler, press the weft with it, and do not pull it too much, i.e. all the way and no more. It is necessary to pull the weaves of the ducks with the same force throughout the weaving so that the width of the overshoe is the same, and does not narrow or expand in different places. Well, that experience will come with time.

25.
Now we make the second line, i.e. we repeat exactly all the turning over of the cards of the first line. And after that, also, we line the palms with our fingers - a ruler - we lay the ducks, pressing it with a ruler.

26.
Now all the cards are again in a horizontal position, but with black numbering at the top.

27.
Next we make line 3:
from 1 to 8 we turn counterclockwise, from 9 to 11 clockwise, 12-14 counterclockwise, 15-17 clockwise, and 18-19 counterclockwise. Well, then, as before: we knock with our fingers - with a ruler - we lay the ducks - we stretch it and press it with a ruler. And then we do the 4th line, i.e. repeat 3rd. And do not forget to lay the ducks.
28. And so we do this until the 12th line (which is, I remind you, a repetition of the 11th).
29.
Here we went through the entire program for the first time and got the first rotater. When we started the first line, then we had all the cards numbered in red on top and ducks to the right of the head. Now, before executing the program a second time, we again should have the red numbering at the top and the ducks on the right. In general, sometimes check the color of the numbering of all cards. Before completing the 1st, 5th, 9th lines, all cards must be red numbered at the top. And before the 3rd, 7th and 11th - black. If any card has the wrong color on top, then you made a mistake. And therefore, we must urgently return, i.e. unravel and locate the error. And unraveling is not easy, i.e. you need to go from the stop and turn all the cards back to the direction indicated. In general, unraveling and finding a mistake without having experience is usually a thriller where Alien is resting. Often the student, while unraveling, gets entangled again, and as a result takes scissors and shreds everything. And in general throws this creativity. Therefore, I advise you to be very careful. At first, I don’t even recommend listening to music. she can distract.

30.
In general, in this way, we make 6-7 Kolovrats, i.e. in fact, we go through the entire program 6-7 times. Due to the increase in the length of the woven section, the tension force of the threads increases, and each new kolovrat turns out to be somewhat longer than the previous one. But this is not scary, because. after soaking the ochelya in water, it will “sit down” and all the kolovrats will level out.

31.
We furnish (as before 1-2 cm from the cards) cards with books.

32. We untie the tail from the clamp. Naturally, after weaving, the tail intertwined. Therefore, separating a group of threads from each card from the rest of the bundle, we unwind it.
33.
We move the cards along with the substrate and books closer to the vise. We release the comb. And we clamp a part of the woven section in a vice between wooden dies.

34. Then, pulling the back tail of the threads with your left hand, right hand we move the substrate with cards and books away from the vise, i.e. to its original place (middle of the table).
35. Now, as before, we begin to carefully comb the tail of the threads, and above all, the area from the cards and up to 20-30 cm for the clamp. And again we wind it on a clamp, and fix the tail with clothespins. We remove books. We press the ruler weakened in the process of rearranging the ducks. And then we make another 6-7 kolovrats.
36. And thus it is necessary to make the desired length of the ochelya. What is needed? Measure the circumference of your head, and add 9-10 cm. This is necessary because. weaving after washing "sits down" somewhere by 4-5 cm and plus 4-5 cm in the whip. On the "average" length of the head, you need somewhere around 27-28 kolovrats.
I decided to make a detailed description of my experience in the form of a photo lesson only because on the sites dedicated to this method everything is somehow very superficially written and on my own, it’s not easy to figure it out there. Moreover, besides, on the example of an ochelye with a simple solar ornament, and not with some incomprehensible pattern.
Let's weave a cape
1. Not everyone can make 3 mm wooden plates. Sometimes they offer to make them from plastic bank cards or beer coasters. But I think that this is not the best topic for creating amulets.
Therefore, I propose a simpler approach to this problem:
Take ordinary A-4 format cardboard - draw it into 9 rectangular parts (7 by 8 cm), laminate the sheet and then cut it into these 9 rectangles. For the convenience of weaving, I advise you to cut the cards as evenly as possible. And so to do just in case (if you ever have to weave a belt) 5-6 sheets, i.e. there will be 45-54 cards. Although it took me 60 cards for the bass guitar strap. I just repeat, first draw, and then laminate. And not like I did: first I laminated it, and then I tried to draw it on a slippery laminate. Then punch 4 holes with a hole punch, but not in the perimeter of the rectangle, but in the form of a square about 5 by 5 cm. so that the inside of the holes in the card is smooth, without lumps. And then slightly dull the sharp corners of the card. Then, as shown in the photo, number each card with a red and black marker. Of course, over time, the corners of the cards go astray, and the laminate moves away a little, but there are enough of them to weave overcoats for a large family and friends. And then you can just glue these corners.
2. Threads with less pile are best suited for such weaving. I use Iris. It is convenient to put balls of thread in plates and place them on the floor to your left.

3. On the Internet you can see many different special designs for such weaving. But this is probably good for those who do it professionally. I have a different way, the essence of which is to get by with what is in almost every home. Vice, desk, clamp, clothespins and 2 combs. I fix the front tail in a vise with a comb, and wrap the back tail on a clamp. And weaving does not take place in the air (as in the original), but on the table.
4. Fix the vise 13-15 cm from the edge of the table and clamp the comb well in them.

5. Place card #1 face up. Now we cut 2 pieces of red thread and 2 of white. The length of my table is 1m and therefore I take the length of the threads 1m 80cm. Now we thread the threads into the holes of the card: the threads of the color that you want to make the background of the ochelya (red) are threaded into the front 2 holes, and the threads of the color of the ornament (white) are threaded into the back.
In order for the canvas of the overcoat not to be "behaved" (curved plane), it is necessary to thread all the threads from above into odd cards, and thread the threads from the bottom of the card into all even cards. Or vice versa. In general, it is important to alternate the way of pulling.
6. Here are all the threads drawn from above. Red threads (background) in front, and white threads (ornament) behind. Now fold the front ends of the 4 threads together and tie into a knot.

8. Here are all the threads drawn from the bottom.
9. Now we fix the second knot in the comb next to the first and put the second card on top of the first.
10. And so we do all 19 cards (not forgetting to alternate the method of pulling threads).
11. Since the centering of all the cards is now slightly higher than the table, it is necessary to put some kind of substrate (2-3 cm) under them. In general, after pulling the threads on the clamp, you yourself will determine the height of the substrate that is necessary so that the cards do not hang in the air.
12. Now on the sides, so that the cards are in a horizontal position, arrange them with books 1-2 cm from them, i.e. do not pinch the cards so that they do not fall.
13. Now fasten the clamp on the other edge of the table so that its rod was in the center of a row of knots on the comb. You can simply measure with a centimeter.
14. Since one of the important conditions for high-quality weaving is good tension and the absence of loosening of the threads, it is necessary to comb the entire back tail well. It is especially good to comb the section of threads from the cards and for 20-30 cm for the clamp. Take a comb not thick. Pull firmly, but of course so as not to break the comb.

15. Make 4-5 turns and clamp with clothespins. Remove books from cards.
16. Make such a "chip" from the remaining laminated cardboard and wind the threads on it that you use as the background of the ochelie, i.e. red. It will be DUCK. In other matters, ducks can be made at any time, and not right now. For example, before threading the cards.
17. Wire, if necessary, the threads to a width of no more than 22-25 mm. Secure the beginning of the threads with some dies. For example, I have oak dies. In fact, there is no special need for these dies now, but, for example, I like it when the first woven row rests on something.

18. Now lay the weft between the upper and lower threads and "knock" it with a ruler to the dies.
19.
Now we proceed directly to weaving.
To do this, using the GTT program, I created my own program for 19 cards:
I intentionally didn't write 2, 4, etc. rows because they are done exactly with the previous one, i.e. 2nd as 1st, 4th as 3rd, 6th as 5th, etc.
At the beginning, we have all the cards arranged so that the red numbering is at the top.
20. Turn cards 1 and 2 90 degrees clockwise.

21. Then from the 3rd to the 11th we also turn 90 degrees already counterclockwise. Then from 12 to 14 clockwise. 15 to 17 counterclockwise. And 18 from the 19th clockwise.


Small digression:
It is customary to make square cards rather than rectangular ones. But I prefer rectangular ones. let's say, when you do some line and you are distracted, for example, by a phone or something else, then sitting down at the table again, you immediately see where you left off. due to the rectangular shape of the cards, you can see which are horizontal and which are vertical.
22. First weave the weave with our fingers.
23. Then we press with a ruler. We remove the line.
24. Then we lay the weft between the upper and lower threads, again we take the ruler, press the weft with it and do not pull it strongly, i.e. all the way and no more. It is necessary to pull the weaves of the ducks with the same force throughout the weaving so that the width of the overshoe is the same, and does not narrow or expand in different places. Well, that experience will come with time.

25. Now we make the second line, i.e. we repeat exactly all the turning over of the cards of the first line. And after that, also, we line the palms with our fingers - a ruler - we lay the ducks, pressing it with a ruler.

26. Now all the cards are again in a horizontal position, but with black numbering at the top.
27.
Next we make line 3:
from 1 to 8 we turn counterclockwise, from 9 to 11 clockwise, 12-14 counterclockwise, 15-17 clockwise and 18-19 counterclockwise. Well, then, as before: we knock with our fingers - with a ruler - we lay the ducks - we stretch it and press it with a ruler. And then we do the 4th line, i.e. repeat 3rd. And do not forget to lay the ducks.
28. And so we do this until the 12th line (which is, I remind you, a repetition of the 11th).
29. Here we went through the entire program for the first time and got the first rotater. When we started the first line, then we had all the cards numbered in red on top and ducks to the right of the head. Now, before executing the program for the second time, we again should have the red numbering at the top and the ducks on the right. In general, sometimes check the color of the numbering of all cards. Before completing the 1st, 5th, 9th lines, all cards must be red numbered at the top. And before the 3rd, 7th and 11th - black. If any card has the wrong color on top, then you made a mistake. And therefore, we must urgently return, i.e. unravel and locate the error. And unraveling is not easy, i.e. you need to go from the stop and turn all the cards back to the direction indicated. In general, unraveling and finding a mistake without having experience is usually a thriller where Alien is resting. Often the student, while unraveling, gets entangled again, and as a result takes scissors and shreds everything. And in general throws this creativity. Therefore, I advise you to be very careful. At first, I don’t even recommend listening to music while weaving, because. she can distract.
30. In general, we do 6-7 cycles in this way, i.e. in fact, we go through the entire program 6-7 times. Due to the increase in the length of the woven section, the tension force of the threads increases, and each new kolovrat turns out to be somewhat longer than the previous one. But this is not scary, because. after soaking the ochelya in water, it will “sit down” and all the kolovrats will level out.
31. We furnish (as before 1-2 cm from the cards) cards with books.
32. We untie the tail from the clamp. Naturally, after weaving, the tail intertwined. Therefore, separating a group of threads from each card from the rest of the bundle, we unwind it.
33. We move the cards along with the substrate and books closer to the vise. We release the comb. And we clamp a part of the woven section in a vice between wooden dies.
34. Then, pulling the back tail of the threads with the left hand, with the right hand we move the substrate with cards and books away from the vise, i.e. to its original place (middle of the table).
35. Now, as before, we begin to carefully comb the tail of the threads, and above all, the area from the cards and up to 20-30 cm for the clamp. And again we wind it on a clamp, and fix the tail with clothespins. We remove books. We press the ruler weakened in the process of rearranging the ducks. And then we make another 6-7 kolovrats.
36. And thus it is necessary to make the desired length of the ochelya. What is needed? Measure the circumference of your head, and add 9-10 cm. This is necessary because. weaving after washing "sits down" somewhere by 4-5 cm and plus 4-5 cm in the whip. On the "average" length of the head, you need somewhere around 27-28 kolovrats.
37. Now we cut off the neckline from the rest of the threads. With the remaining segments of the weft at the ends of the ochelya, we slightly tighten these tips and you can simply tie them into a knot with the nearest thread so that they do not unravel.
38. Then for some time we immerse the ochelye in water. Then we take it out of the water and in no case stretch it (but simply level the plane with our palms), hang it up and wait for it to dry completely
39. Now, after complete drying, we can no longer be afraid that the weaving will “sit down” and, stepping back a little from the ends of the overcoat, we sew lines on a typewriter. The weave that protrudes beyond these lines is cut off.
40. Then we sew the fasteners in those places so that the headband does not particularly press, but also does not hang on the head. We select the threads for sewing in such a way that on the front side (i.e. a white ornament on a red background), they match the color of the place where they are sewn. The photo shows that the right end of the headband (with a hook) goes to the whip on the left (with a loop).
41. And then you can whisper some kind of conspiracy or Anthem-Pravoslavlenie at him. For example, your Patron God or the Patron God of your Family.
That's all!!! As you already understood - everything is not very difficult. The main thing is attentiveness.
42. Please note: on the inside, everything turned out the other way around, i.e. red salting ligature on a white background. And the background looks very dirty. ducks are red and visible. And therefore, remember the rule - what background color is this and the color of the duck. Of course, it may come to someone's mind to make green or gray-brown-raspberry duck here. After all, "there is no comrade for taste and color." But only I, in any case, - for the purity of the color of the background of the ochelya. So I think it's more beautiful. boards, and
In the life of a Belarusian from ancient times to the beginning of the 20th century, the belt was a necessary detailcostume, both everyday and festive. It was considered indecent to appearon people without a belt. Because, according to popular belief, a man without a belt was easily accessible tounclean power. From here came the expression - unbelt. Also, the belt carried a deepsymbolism, which was reflected in the participation of the belt in many rituals. He was endowed with magicalproperties, attributed to it the functions of a talisman and decorated with special symbols. Beltclosed the symbolic circle, so everything that should have been one whole was tiedbelt, for example, newlyweds. In the pre-wedding season, the girls wove belts in order to bestowall the groom's relatives at the wedding.
The width and length of the woven belt was determined by many factors, depending on whoit was intended - for a man or for a woman, for a girl or for a boy, forfestive clothes or everyday or ritual. Men wore belts high underchest, on the belt or below the belt, and women - on the waist.
In modern life, the belt plays the role of decoration for the most part. However, the oldbelt making techniques provide great opportunities for creativity and self-expression.Woven belt can be a great accessory for modern clothes.
According to the manufacturing technology, weaving belts is divided into 3 types:
on boards, thread and on the loom.
Weaving belts on boards.
Our ancestors used mainly woolen and linen threads when weaving belts. ATmodern conditions, you can also use these materials, as well as cottonthreads and threads made of synthetic fibers, which allows you to make belts bright, unusual.
Also for work you will need planks - fig. 1, a wooden knife for nailing a duck (Fig.2), shuttle for weft thread (Fig. 3), 2 safety pins for fastening planks.

Planks are 60x60 mm plates made of wood, metal orplastics. In each corner of the board there is a hole with a diameter of up to 5 mm.
The edges of the boards and the edges of the holes must be sanded, otherwise during the processweaving threads will quickly fray and tear. The corners of the boards are also necessaryround and grind for the same reason.
Planks can be from 4 to 30 or more, depending on the required width of the belt anddrawing complexity.
Weaving belts on planks was typical not only for Belarusians, but also for manyother nations Western Europe, ancient egypt, where boards withthree and six holes (Fig. 4).

At home, planks can be cut out of thin plastic or thick cardboard, andmake holes with a hole punch.
Shuttles for weft thread can also be made independently from plastic, densecardboard, plastic ruler or tin, as well as to adapt a special fishing"reeler" (Fig. 5). The most convenient length of the shuttle is 15-20 cm.wind the weft thread - this can be either the thread used for the warp, selected inedge color, or thinner (linen or synthetic).
The manufacture of belts on boards combines elements of vitya (boards in the processworks turn, forming flagella from threads) and weaving (flagellums are fixedweft thread). Each turn forms a pattern on the surface of the belt (Fig. 6).
The process of manufacturing woven belts consists of several stages:
1. Drawing up a filling scheme.
2. Calculation of the length of threads for warping.
3. Warping.
5. Weaving.
6. Making the ends of the belt.
It is best to master the technique of weaving on boards in the manufacture of a narrow, withsimple belt pattern. At the same time, the variety of patterns depends on the color combination.warp threads, from the threading direction (top or bottom) and from the direction of rotation boards.

1. Drawing up a filling scheme for the belt.
The belt diagram is as follows (Fig. 7), where A, B, C, D representholes in the tablet itself (signed clockwise), and the numbers representboard serial number.
2. Calculation of the length of the warp threads.
The length of the warp threads is calculated using the following formula:
length of the finished product + 15-20% for working out + 30-40 cm at the ends of the belt.
For example, it is necessary to weave a belt 2 meters long. Accordingly, threads are needed2.8 meters long each: 2 meters (product length) + 40 cm (20% of the finished belt length) +40 cm (the ends of the belt).
3. Warping
Warping or warping is the process of preparing the warp threads: their orderly arrangementin the quantity necessary for the manufacture of a certain width of the product. Number of threadseach color is counted according to the scheme. In this case (as shown in Fig. 7) it will be 6 threadsred and 18 white.
The photo shows the process of warping with the help of a special device, which is quitecan replace household improvised means.

After the threads are measured or laid, they are removed from the fixture and cut.Since the threads are long, for convenience in further work, they must be braided in a chain, aswhen crocheting (Fig. 8). At the same time, they can get mixed up, but after the processrefills in the boards of the thread will each fall into its place.
Having prepared the required number of boards, lay them out on the table in a row. Putbraid in front of you on the table and thread the ends of the threads into the holes of the planks according to the scheme.The arrows on the threading diagram show the direction of threading the boards: slopeto the right means that the threads are threaded into the hole from above, with front side boards (Fig.9.1), tilt to the left means that the threads are threaded from below, from the wrong side of the board (Fig.9.2). Accordingly, in finished product thread flagella will be stacked according togiven direction to form a pattern.

So, according to our scheme, all the boards will be threaded as follows (Fig. 10). When all the threads are threaded, carefully fold the boards one on one without turning over, andfasten with two pins (Fig. 11).
Then it is necessary to unravel the braid: the end of the warp, from which refueling was carried out,must be tied and secured to an immovable object. And, gradually unraveling the threads,move the planks forward. You can help yourself with a comb with rare teeth. SoThus, all the threads are each in its place. After that, stretch the planks into thatthe end from which refueling began.

5. Weaving
Attach one end of the warp to a fixed object, pull the threads and fasten
2nd the end on a high-backed chair on which weaving is done while sitting.
When the threads are fixed and taut, the planks become vertical and the threadsare divided into two layers, forming a pharynx.
Remove the pins, use the shuttle between the warp threads to lay the weft thread (Fig. 12) androtate all planks simultaneously by 90°, so that holes A take the positionholes B. In this case, part of the threads from the lower throat will go to the upper one, and from the upper one - tolower. A new pharynx will be obtained (Fig. 13). Lay the ducks again, turn the planks 90 ° inthe same side and nail the weft thread.

Perform a full turn of the boards around its axis (Fig. 14) - this forms a rapportdrawing. To repeat the pattern, perform the following 4 turns with laying the weftthreads between warp threads.

In the process of weaving, the warp threads of one plank, located behind it, are twistedeach other in flagella. This happens when the boards are rotated only inone direction. To eliminate twisting of the plank, fasten with pins, faruntie the end of the warp and untangle the flagella. Then continue weaving in the same order.You can unwind the flagella in another way: by turning the plates in the opposite directiondirection the same number of times. But at the same time, the direction of the rapport of the pattern will change.
At the time when work with the belt stops, fasten the planks with pins so that the threadsthe basics are not mixed up with each other. When the belt is ready, you need to fasten the weft threadand finish the ends.

Below are the filling schemes for weaving Belarusian belts. But there are alsovarious European weaving techniques. In them, the turns of the planks in one throatare carried out in different directions, due to which more complexornamental drawings.


Back to section:
It turns out that for weaving belts and braid, you can use not only reeds or bastards, but also such a design, which is called: a braid machine.
This loom has been specially designed for weaving very strong and long strips or strips of fabric, from two to 28 centimeters wide.
It is very popular for weaving belts, braids, and decorative trims. Although it is not a full-fledged machine, since the products are limited in size and type of material (woven strips are obtained in length from 90 to 180 centimeters), it has advantages for some situations.

loom ok for braid, quite compact in size; some versions are small enough to be held on one knee or work on a table. This can be a huge advantage, especially if your workspace is limited. An ingenious system for changing even and odd threads is built into the design of the loom and weaving on such a loom is a very fast process.

Many beautiful and complex schemes can be designed or transferred from embroidery or warp weaving patterns to this loom. The fabric turns out to be warp, which means that you will not see the weft thread in the finished fabric. This can be an advantage if the amount of yarn for weaving is limited. Excellent braid can be obtained even if good yarn is used only for the warp, and more modest threads or even thread remnants will go to the wefts. Even if you already have a large loom, bastard or reed at home, a braid loom will be a good addition, on which you can weave braid for decorating clothes or an unusual handbag strap.
You need
1) boards. For the first lesson, 6 pieces are allowed. (pic 1)
The most convenient are wooden or bone ones, with a thickening in the middle with a side of 5-5.5 cm. You can do it, as they say, from plastic cards, cardboard coasters for beer, etc. If you have mugs, turn them into squares with rounded edges. I recently read that you can glue paper sheets with drying oil, then they stick together and you get a strong board. It is very convenient if the boards are thinner towards the edges, then the boards will rotate more easily, the threads will not cling to each other. The main thing! The boards should be the same size and with a constant distance between the holes. To be honest, I don't know how to make holes in plastic. I got jagged edges and clung to the threads.
2) Yarn. For the first lesson, it is better to take a slippery one, it will be less confused. The diameter should be smaller size holes.
3) Shuttle. It can be cut out of soft metal or wood, or simply cut out of cardboard according to a sketch. (Figure 2) The width of the shuttle is about 2.5 cm.
4) belt
Work preparation.
First, you can wind the weft thread on the hook. To prevent the thread from unwinding, you can either make a loop on the ledge or thread it into the slot. Don't forget to leave a long end.
To start, make the shuttle and warp threads the same.
Then you need to prepare 6 * 4 \u003d 24 warp threads about 1.5 m long. You can wrap (wind) the threads around two chairs placed at a distance from each other, around the secretary board ... whatever you think of. Threads may vary slightly in length. (Figure 3)
Then the threads need to be threaded into the holes of the planks. To prevent the threads from slipping, tie them with a loose knot (Figure 4) on both sides of the plank.
After all the boards are filled, they are installed side by side in a kind of deck. Soft knots are untied.
One of the ends is attached to a fixed object, for example door handle. The other end must be tied to your belt. (See Fig. 5).
If the threads are tangled, move the planks back and forth several times. Look down at how the threads pass through the planks. We will assume that the threads enter the planks farther from you, and come out closer. Some threads can enter from the left, exit from the right, (S) others go from right to left (Z). For the convenience of writing, Latin letters were introduced - the direction of the central stick of the letter and the threads in the board are similar. (pic 6)
The direction of the threads in the planks is very important. If all threads are threaded the same way (S or Z), the braid will twist. If the course of the threads in the boards is disordered, the pattern will be ugly. AT simple pattern gas station (SZ), (SZ), (SZ), (SZ),...
In order for the threads to go correctly, you can simply rotate the planks around their axis. Again, “comb” the warp threads with the help of planks.
Tie the end of the weft thread to the belt.
Now start weaving.
Lean back to pull the threads. A pharynx is formed through which you pass a shuttle (duck) with a thread from left to right. Pull harder. (fig 7)
Release the shuttle. The thread should not unwind. Lean forward a little to loosen the tension on the threads. Grasp the planks with both hands and turn them 90 degrees towards you until a new pharynx is formed. Lean back, pass the shuttle with the thread from right to left. When the woven braid becomes long and the planks are far from you, untie the braid from the belt and tie it comfortably. You can use a safety pin to shorten it. Here is the whole process so far. For the formation of many patterns, it will become more complicated, but now you need to fill your hand. The threads that are located behind the planks will twist into ropes and after a while the planks will not turn. Then start rotating the planks away from you. If necessary, back to yourself ... when the warp thread runs out, untie the braid and remove the planks. Don't worry, nothing will unravel.
At this stage, it is important for you to learn how to make braid with relatively even edges, for this the weft thread tension must be constant. Make sure that the weft thread does not wrap around the braid.
The next dressing can be done with colored threads. Or do you thread a thread through each hole different colors and you get just a colorful braid. Or, thread threads of one color into 2 adjacent holes, and another into 2 others and experiment. And I will describe these techniques in more detail in the next article.
In order for the braid to become a belt, you need to shape the ends by making brushes, pompoms on them, hanging bells. About this can be found here in the topic cords