Do-it-yourself boards for weaving belts. Loom for braid or belt
for the manufacture of boards, I purchased just such a plastic board for modeling from plasticine. You can buy it in any fairly large store that sells school supplies. my board is A4, but there are smaller ones. here in my city it is more profitable to buy a large board. from such a board I will get only 12 cards. but for the first experience in weaving a belt, they were just enough for me)))
now we take a ruler and a pencil and line it into squares 6 * 6 cm.

in addition, we line in each resulting square and diagonal. we need diagonals to try on and make holes symmetrically. Well, here is such a system of lines turned out. armed with scissors!!! and start cutting squares. p.s. ask your husband, if there is, a rather dense plastic and you can injure your thumb, or rather crush it, which happened to me the first time.

here are our cut boards. the edges in the photo are already rounded. I carefully, but by eye, rounded them with the same scissors.

oh, the mug got into the frame))) I drank tea in the process;) but we generally take a hole punch and remove the bottom cover from it, where the paper circles are poured. we insert our cut out card exactly into the hole punch, turned upside down. press the card to the hole punch until it stops. we see a traced diagonal in the hole of the hole punch. choose so that the diagonal is approximately in the center of the hole. all! press and make the most accurate hole! and so all the cards have 4 holes.

close-up card. here's the thing. the modeling board on one side has a "side" along the edges. it will interfere, thicken one edge of the card. Here I carefully cut it with a blade or a clerical knife. then we take sandpaper and grind the places where the corners are rounded and where the "side" is cut. all! put the numbers of the boards and letters. ready.
I decided to do detailed description of my experience in the form of a photo lesson, only because on the sites dedicated to this method everything is somehow very superficially written and independently, it is not easy to figure it out there. Moreover, on the example of an ochelya with a simple swastika ornament, and not with some incomprehensible pattern.
We will weave an ochelie
1. Not everyone can make 3 mm wooden plates. Sometimes they offer to make them from plastic bank cards or beer coasters. But I think it's not best theme for weaving amulets.
Therefore, I propose a simpler approach to this problem:

Take ordinary A4 cardboard - draw it into 9 rectangular parts (7 by 8 cm), laminate the sheet and then cut it into these 9 rectangles. For the convenience of weaving, I advise you to cut the cards as evenly as possible. And so to do just in case (if you ever have to weave a belt) 5-6 sheets, i.e. there will be 45-54 cards. Although it took me 60 cards for the bass guitar strap. I just repeat, first draw, and then laminate. And not like I did: first I laminated it, and then I tried to draw it on a slippery laminate. Then punch 4 holes with a hole punch, but not in the perimeter of the rectangle, but in the form of a square about 5 by 5 cm. so that the inside of the holes in the card is smooth, without lumps. And then slightly dull the sharp corners of the card. Then, as shown in the photo, number each card with a red and black marker. Of course, over time, the corners of the cards go astray, and the laminate moves away a little, but there are enough of them to weave overcoats for a large family and friends. And then you can just glue these corners.
2.
Threads with less pile are best suited for such weaving. I use Iris. It is convenient to put balls of thread in plates, and put them on the floor to your left.

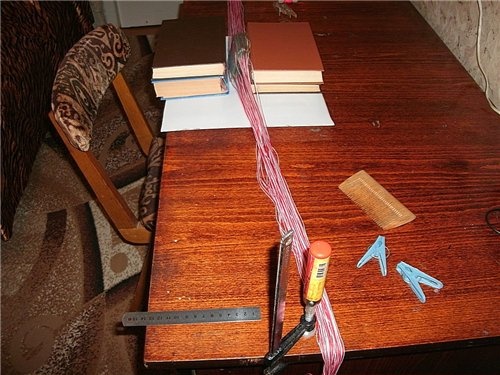
3. On the Internet you can see many different special designs for such weaving. But this is probably good for those who do it professionally. I have a different way, the essence of which is to get by with what is in almost every home. Vice, desk, clamp, clothespins and 2 combs. I fix the front tail in a vice with a comb, and wrap the back tail on a clamp. And weaving does not take place in the air (as in the original), but on the table.
4.
Fix the vise 13-15 cm from the edge of the table and clamp the comb well in them.

5. We lay down card number 1 face up. Now we cut 2 pieces of red thread and 2 of white. The length of my table is 1m, and therefore I take the length of the threads 1m 80cm. Now we thread the threads into the holes of the card: the threads of the color that you want to make the background of the ochelya (red) are threaded into the front 2 holes, and the threads of the color of the ornament (white) are threaded into the back.
In order for the canvas of the overcoat not to be "behaved" (curved plane), it is necessary to thread all the threads from above into odd cards, and thread the threads from the bottom of the card into all even cards. Or vice versa. In general, it is important to alternate the way of pulling
6.
Here are all the threads drawn from above. Red threads (background) in front, and white threads (ornament) behind. Now fold the front ends of the 4 threads together and tie in a knot.


8.
Here are all the threads drawn from the bottom.

9. Now we fix the second knot in the comb next to the first, and lay the second card on top of the first.
10.
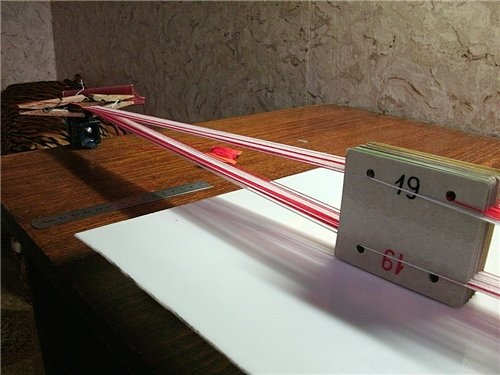
And so we do all 19 cards (not forgetting to alternate the method of pulling threads).

11. Since the centering of all the cards is now slightly higher than the table, it is necessary to put some kind of substrate (2-3 cm) under them. In general, after pulling the threads on the clamp, you yourself will determine the height of the substrate that is necessary so that the cards do not hang in the air.
12.
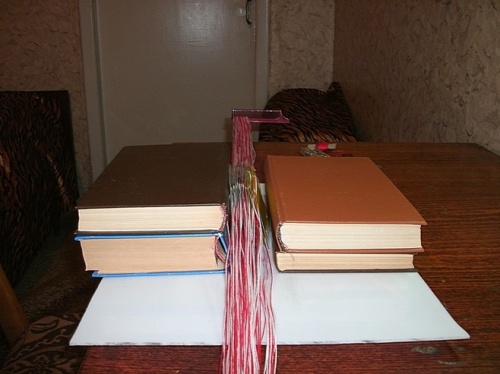
Now on the sides so that the cards are in a horizontal position, arrange them with books 1-2 cm from them, i.e. do not clamp the cards, but simply so that they do not fall.
13.
Now fasten the clamp on the other edge of the table so that its rod is in the center of a row of knots on the comb. You can simply measure with a centimeter.

14.
Since one of the important conditions for high-quality weaving is good tension and the absence of loosening of the threads, it is necessary to comb the entire back tail well. It is especially good to comb the section of threads from the cards and for 20-30 cm for the clamp. Take a comb not thick. Pull firmly, but of course so as not to break the comb.

15.
Make 4-5 turns and clamp with clothespins. Remove books from cards.

16.
Make such a "chip" from the remaining laminated cardboard and wind the threads on it that you use as the background of the ochelie, i.e. red. It will be DUCK. In other matters, ducks can be made at any time, and not right now. For example, before threading the cards.

17.
Wire, if necessary, the threads to a width of no more than 22-25 mm. Secure the beginning of the threads with some dies. For example, I have oak dies. In fact, there is no special need for these dies now, but, for example, I like it when the first woven row rests on something.

18.
Now lay the weft between the upper and lower threads, and "knock" it with a ruler to the dies.

19.
Now we proceed directly to weaving.
To do this, using the GTT program, I created my own program for 19 cards:

I intentionally didn't write 2, 4, etc. rows because they are done exactly with the previous one, i.e. 2nd as 1st, 4th as 3rd, 6th as 5th, etc.

At the beginning, we have all the cards arranged so that the red numbering is at the top.
20.
Turn cards 1 and 2 90 degrees clockwise.

21.
Then from the 3rd to the 11th we also turn 90 degrees already counterclockwise. Then from 12 to 14 clockwise. 15 to 17 counterclockwise. And 18 from the 19th clockwise.


Small digression:
It is customary to make square cards rather than rectangular ones. But I prefer rectangular ones. let's say, when you do some line and you are distracted, for example, by a phone or something else, then sitting down at the table again, you immediately see where you left off. due to the rectangular shape of the cards, you can see which are horizontal and which are vertical.
22.
First weave the weave with our fingers.

23. Then we press with a ruler. We remove the line.
24.
Then we lay the weft between the upper and lower threads, again we take the ruler, press the weft with it, and do not pull it too much, i.e. all the way and no more. It is necessary to pull the weaves of the ducks with the same force throughout the weaving so that the width of the overshoe is the same, and does not narrow or expand in different places. Well, that experience will come with time.

25.
Now we make the second line, i.e. we repeat exactly all the turning over of the cards of the first line. And after that, also, we line the palms with our fingers - a ruler - we lay the ducks, pressing it with a ruler.

26.
Now all the cards are again in a horizontal position, but with black numbering at the top.
27.
Next we make line 3:
from 1 to 8 we turn counterclockwise, from 9 to 11 clockwise, 12-14 counterclockwise, 15-17 clockwise, and 18-19 counterclockwise. Well, then, as before: we knock with our fingers - with a ruler - we lay the ducks - we stretch it and press it with a ruler. And then we do the 4th line, i.e. repeat 3rd. And do not forget to lay the ducks.
28. And so we do this until the 12th line (which is, I remind you, a repetition of the 11th).
29.
Here we went through the entire program for the first time and got the first rotater. When we started the first line, then we had all the cards numbered in red on top and ducks to the right of the head. Now, before executing the program a second time, we again should have the red numbering at the top and the ducks on the right. In general, sometimes check the color of the numbering of all cards. Before completing the 1st, 5th, 9th lines, all cards must be red numbered at the top. And before the 3rd, 7th and 11th - black. If any card has the wrong color on top, then you made a mistake. And therefore, we must urgently return, i.e. unravel and locate the error. And unraveling is not easy, i.e. you need to go from the stop and turn all the cards back to the direction indicated. In general, unraveling and finding a mistake without having experience is usually a thriller where Alien is resting. Often the student, while unraveling, gets entangled again, and as a result takes scissors and shreds everything. And in general throws this creativity. Therefore, I advise you to be very careful. At first, I don’t even recommend listening to music. she can distract.

30.
In general, in this way, we make 6-7 Kolovrats, i.e. in fact, we go through the entire program 6-7 times. Due to the increase in the length of the woven section, the tension force of the threads increases, and each new kolovrat turns out to be somewhat longer than the previous one. But this is not scary, because. after soaking the ochelya in water, it will “sit down” and all the kolovrats will level out.

31.
We furnish (as before 1-2 cm from the cards) cards with books.

32. We untie the tail from the clamp. Naturally, after weaving, the tail intertwined. Therefore, separating a group of threads from each card from the rest of the bundle, we unwind it.
33.
We move the cards along with the substrate and books closer to the vise. We release the comb. And we clamp a part of the woven section in a vice between wooden dies.

34. Then, pulling the back tail of the threads with your left hand, right hand we move the substrate with cards and books away from the vise, i.e. to its original place (middle of the table).
35. Now, as before, we begin to carefully comb the tail of the threads, and above all, the area from the cards and up to 20-30 cm for the clamp. And again we wind it on a clamp, and fix the tail with clothespins. We remove books. We press the ruler weakened in the process of rearranging the ducks. And then we make another 6-7 kolovrats.
36. And thus it is necessary to make the desired length of the ochelya. What is needed? Measure the circumference of your head, and add 9-10 cm. This is necessary because. weaving after washing "sits down" somewhere by 4-5 cm and plus 4-5 cm in the whip. On the "average" length of the head, you need somewhere around 27-28 kolovrats.
I decided to make a detailed description of my experience in the form of a photo lesson only because on the sites dedicated to this method everything is somehow very superficially written and on my own, it’s not easy to figure it out there. Moreover, besides, on the example of an ochelye with a simple solar ornament, and not with some incomprehensible pattern.
Let's weave a cape
1. Not everyone can make 3 mm wooden plates. Sometimes they offer to make them from plastic bank cards or beer coasters. But I think that this is not the best topic for creating amulets.
Therefore, I propose a simpler approach to this problem:
Take an ordinary A-4 format cardboard - draw it into 9 rectangular parts (7 by 8 cm), laminate the sheet and then cut it into these 9 rectangles. For the convenience of weaving, I advise you to cut the cards as evenly as possible. And so to do just in case (if you ever have to weave a belt) 5-6 sheets, i.e. there will be 45-54 cards. Although it took me 60 cards for the bass guitar strap. I just repeat, first draw, and then laminate. And not like I did: first I laminated it, and then I tried to draw it on a slippery laminate. Then punch 4 holes with a hole punch, but not in the perimeter of the rectangle, but in the form of a square about 5 by 5 cm. so that the inside of the holes in the card is smooth, without lumps. And then slightly dull the sharp corners of the card. Then, as shown in the photo, number each card with a red and black marker. Of course, over time, the corners of the cards go astray, and the laminate moves away a little, but there are enough of them to weave overcoats for a large family and friends. And then you can just glue these corners.
2. Threads with less pile are best suited for such weaving. I use Iris. It is convenient to put balls of thread in plates and place them on the floor to your left.

3. On the Internet you can see many different special designs for such weaving. But this is probably good for those who do it professionally. I have a different way, the essence of which is to get by with what is in almost every home. Vice, desk, clamp, clothespins and 2 combs. I fix the front tail in a vise with a comb, and wrap the back tail on a clamp. And weaving does not take place in the air (as in the original), but on the table.
4. Fix the vise 13-15 cm from the edge of the table and clamp the comb well in them.

5. Place card #1 face up. Now we cut 2 pieces of red thread and 2 of white. The length of my table is 1m and therefore I take the length of the threads 1m 80cm. Now we thread the threads into the holes of the card: the threads of the color that you want to make the background of the ochelya (red) are threaded into the front 2 holes, and the threads of the color of the ornament (white) are threaded into the back.
In order for the canvas of the overcoat not to be "behaved" (curved plane), it is necessary to thread all the threads from above into odd cards, and thread the threads from the bottom of the card into all even cards. Or vice versa. In general, it is important to alternate the way of pulling.
6. Here are all the threads drawn from above. Red threads (background) in front, and white threads (ornament) behind. Now fold the front ends of the 4 threads together and tie into a knot.

8. Here are all the threads drawn from the bottom.
9. Now we fix the second knot in the comb next to the first and put the second card on top of the first.
10. And so we do all 19 cards (not forgetting to alternate the method of pulling threads).

11. Since the centering of all the cards is now slightly higher than the table, it is necessary to put some kind of substrate (2-3 cm) under them. In general, after pulling the threads on the clamp, you yourself will determine the height of the substrate that is necessary so that the cards do not hang in the air.
12. Now on the sides, so that the cards are in a horizontal position, arrange them with books 1-2 cm from them, i.e. do not pinch the cards so that they do not fall.

13. Now fasten the clamp on the other edge of the table so that its rod was in the center of a row of knots on the comb. You can simply measure with a centimeter.
14. Since one of the important conditions for high-quality weaving is good tension and the absence of loosening of the threads, it is necessary to comb the entire back tail well. It is especially good to comb the section of threads from the cards and for 20-30 cm for the clamp. Take a comb not thick. Pull firmly, but of course so as not to break the comb.
15. Make 4-5 turns and clamp with clothespins. Remove books from cards.

16. Make such a "chip" from the remaining laminated cardboard and wind the threads on it that you use as the background of the ochelie, i.e. red. It will be DUCK. In other matters, ducks can be made at any time, and not right now. For example, before threading the cards.

17. Wire, if necessary, the threads to a width of no more than 22-25 mm. Secure the beginning of the threads with some dies. For example, I have oak dies. In fact, there is no special need for these dies now, but, for example, I like it when the first woven row rests on something.

18. Now lay the weft between the upper and lower threads and "knock" it with a ruler to the dies.

19.
Now we proceed directly to weaving.
To do this, using the GTT program, I created my own program for 19 cards:

I intentionally didn't write 2, 4, etc. rows because they are done exactly with the previous one, i.e. 2nd as 1st, 4th as 3rd, 6th as 5th, etc.

At the beginning, we have all the cards arranged so that the red numbering is at the top.
20. Turn cards 1 and 2 90 degrees clockwise.

21. Then from the 3rd to the 11th we also turn 90 degrees already counterclockwise. Then from 12 to 14 clockwise. 15 to 17 counterclockwise. And 18 from the 19th clockwise.

Small digression:
It is customary to make square cards rather than rectangular ones. But I prefer rectangular ones. let's say, when you do some line and you are distracted, for example, by a phone or something else, then sitting down at the table again, you immediately see where you left off. due to the rectangular shape of the cards, you can see which are horizontal and which are vertical.
22. First weave the weave with our fingers.
23. Then we press with a ruler. We remove the line.
24. Then we lay the weft between the upper and lower threads, again we take the ruler, press the weft with it and do not pull it strongly, i.e. all the way and no more. It is necessary to pull the weaves of the ducks with the same force throughout the weaving so that the width of the overshoe is the same, and does not narrow or expand in different places. Well, that experience will come with time.

25. Now we make the second line, i.e. we repeat exactly all the turning over of the cards of the first line. And after that, also, we line the palms with our fingers - a ruler - we lay the ducks, pressing it with a ruler.

26. Now all the cards are again in a horizontal position, but with black numbering at the top.

27.
Next we make line 3:
from 1 to 8 we turn counterclockwise, from 9 to 11 clockwise, 12-14 counterclockwise, 15-17 clockwise and 18-19 counterclockwise. Well, then, as before: we knock with our fingers - with a ruler - we lay the ducks - we stretch it and press it with a ruler. And then we do the 4th line, i.e. repeat 3rd. And do not forget to lay the ducks.
28. And so we do this until the 12th line (which is, I remind you, a repetition of the 11th).
29. Here we went through the entire program for the first time and got the first rotater. When we started the first line, then we had all the cards numbered in red on top and ducks to the right of the head. Now, before executing the program for the second time, we again should have the red numbering at the top and the ducks on the right. In general, sometimes check the color of the numbering of all cards. Before completing the 1st, 5th, 9th lines, all cards must be red numbered at the top. And before the 3rd, 7th and 11th - black. If any card has the wrong color on top, then you made a mistake. And therefore, we must urgently return, i.e. unravel and locate the error. And unraveling is not easy, i.e. you need to go from the stop and turn all the cards back to the direction indicated. In general, unraveling and finding a mistake without having experience is usually a thriller where Alien is resting. Often the student, while unraveling, gets entangled again, and as a result takes scissors and shreds everything. And in general throws this creativity. Therefore, I advise you to be very careful. At first, I don’t even recommend listening to music while weaving, because. she can distract.
30. In general, we do 6-7 cycles in this way, i.e. in fact, we go through the entire program 6-7 times. Due to the increase in the length of the woven section, the tension force of the threads increases, and each new kolovrat turns out to be somewhat longer than the previous one. But this is not scary, because. after soaking the ochelya in water, it will “sit down” and all the kolovrats will level out.
31. We furnish (as before 1-2 cm from the cards) cards with books.

32. We untie the tail from the clamp. Naturally, after weaving, the tail intertwined. Therefore, separating a group of threads from each card from the rest of the bundle, we unwind it.
33. We move the cards along with the substrate and books closer to the vise. We release the comb. And we clamp a part of the woven section in a vice between wooden dies.
34. Then, pulling the back tail of the threads with the left hand, with the right hand we move the substrate with cards and books away from the vise, i.e. to its original place (middle of the table).
35. Now, as before, we begin to carefully comb the tail of the threads, and above all, the area from the cards and up to 20-30 cm for the clamp. And again we wind it on a clamp, and fix the tail with clothespins. We remove books. We press the ruler weakened in the process of rearranging the ducks. And then we make another 6-7 kolovrats.
36. And thus it is necessary to make the desired length of the ochelya. What is needed? Measure the circumference of your head, and add 9-10 cm. This is necessary because. weaving after washing "sits down" somewhere by 4-5 cm and plus 4-5 cm in the whip. On the "average" length of the head, you need somewhere around 27-28 kolovrats.
37. Now we cut off the neckline from the rest of the threads. With the remaining segments of the weft at the ends of the ochelya, we slightly tighten these tips and you can simply tie them into a knot with the nearest thread so that they do not unravel.
38. Then for some time we immerse the ochelye in water. Then we take it out of the water and in no case stretch it (but simply level the plane with our palms), hang it up and wait for it to dry completely
39. Now, after complete drying, we can no longer be afraid that the weaving will “sit down” and, stepping back a little from the ends of the overcoat, we sew lines on a typewriter. The weave that protrudes beyond these lines is cut off.
40. Then we sew the fasteners in those places so that the headband does not particularly press, but also does not hang on the head. We select threads for sewing in such a way that on front side(i.e. a white ornament on a red background), they matched the color of the place where they were sewn on. The photo shows that the right end of the headband (with a hook) goes to the whip on the left (with a loop).
41. And then you can whisper some kind of conspiracy or Anthem-Pravoslavlenie at him. For example, your Patron God or the Patron God of your Family.
That's all!!! As you already understood - everything is not very difficult. The main thing is attentiveness.
42. Please note: on the inside, everything turned out the other way around, i.e. red saline ligature on a white background. And the background looks very dirty. ducks are red and visible. And therefore, remember the rule - what background color is this and the color of the duck. Of course, it may come to someone's mind to make green or gray-brown-raspberry duck here. After all, "there is no comrade for taste and color." But only I, in any case, - for the purity of the color of the background of the ochelya. So I think it's more beautiful. boards, and
It turns out that for weaving belts and braid, you can use not only reeds or bastards, but also such a design, which is called: a braid machine.
This loom was specially designed for weaving very strong and long strips or strips of fabric, from two to 28 centimeters wide.
It is very popular for weaving belts, braids, and decorative trims. Although it is not a full-fledged machine, since the products are limited in size and type of material (woven strips are obtained in length from 90 to 180 centimeters), it has advantages for some situations.

Weaving loom for braid, quite compact in size; some versions are small enough to be held on one knee, or to work on a table. This can be a huge advantage, especially if your workspace is limited. An ingenious system for changing even and odd threads is built into the design of the loom and weaving on such a loom is a very fast process.

Many beautiful and complex schemes can be designed or transferred from embroidery or warp weaving patterns to this loom. The fabric turns out to be warp, which means that you will not see the weft thread in the finished fabric. This can be an advantage if the amount of yarn for weaving is limited. An excellent braid can be obtained even if good yarn is used only for the warp, and more modest threads or even thread remnants will go to the wefts. Even if you already have a large loom, bastard or reed at home, a braid loom will be a good addition on which you can weave braid to decorate clothes or an unusual handbag strap.