Hemstitch embroidery. Merezhka embroidery lace for beginners Merezhka execution technique
Merezhka is a very old method for decorating things such as tablecloths, napkins, shirts, the history of which takes us far back in time. It used to be very popular for embellishments on clothes. And to this day, this cross-stitch technique has not lost its popularity. Such work is available to almost all girls, as it does not require a sewing machine or any other high costs. There are many varieties of embroidery - this is a column and a brush, a goat bug, a spider and other types. You can find and download schemes on the Internet for free.
What is the meaning of the technique of this mastery? Some threads need to be pulled out of the fabric, and those that remain are collected in a bundle and as a result, a beautiful pattern will be obtained.
What kind materials we need to work:
- Canvas, plain or silk fabric.
- Sharp knife or blade.
- Needle and thread of a certain color.
If you want to work on a uniform, remember - for beginners, the most the best option fabric is a canvas, because it is very simple and easy to work with. Silk can be taken if the skills are already developed and there is a lot of work experience. Fabric preparation is a delicate job. Each type of fabric needs a special an approach.
- You need to start by slowly cutting several horizontal threads on the canvas with a knife. We create a width of no more than 1.5 centimeters so that the finished thing looks neat and cute.
- The new stage of our lesson will be pulling out the threads, it is easier to do this with a needle. The threads must be removed from left to right gradually. Having reached a certain length, you need to cut six elongated threads on the right. You need to be very careful to ensure that the ends of the cut edge do not fall. If you only need a horizontal hemstitch, there is no need to cut the vertical threads.
- In order to process the embroidery, fasten the edges, step back one cell from the beginning of the thread removal. We will thread a thread with a knot into the needle and insert the thread into one cell twice. Then we'll move on to the next one. This stage must be done, regardless of what pattern we will work with.
Gallery: hemstitch embroidery (25 photos)


Merezhka tassel master class
The brush method is the most easy way. This type of seam can be used as an independent type, and as the main basis for other types of seams.
 Let's start embroidering a brush from the right or from the left corner of our thing, in dependencies whichever is more convenient for you. Insert a needle and thread into the created strip on the canvas and fasten it with two stitches and bring it to the front of the thing. Then we grab a couple of threads (three or five), wrap them around and make a loop, and so we sew without creating gaps. Let's grab the same number of threads.
Merezhka on canvas master class
And then, we will analyze how to create a hemstitch on a canvas with a “split” pattern. The canvas is very loose, so you need to work with it carefully, otherwise everything can be easily ruined. But, besides this, such a unique weaving will help to make the drawing correctly, especially for a new craftswoman.
First, you need to learn how to pull the threads. This must be done with a blade, with which we will cut about six threads. You can not do a wide hemstitch, as the image in this case may be lost.
First of all, we pass one edge. Worth starting right away handle so that it doesn't spread further. Then we decorate the second edge in the same way.
After preparing the canvas, let's move on to creating a drawing. Let's figure out how you can gradually make stitch embroidery. For beginners, the "split" pattern will be easy to perform. On one side of the fabric we make a brush of two threads. We slowly pass the seam so that the loops are distinct, visible. On the other side, in one brush, we will attach the strings of different columns.
Merezhka bug.
Pull out another row of threads to create such a seam. It is made of embroidery "column" and the thread is threaded in the middle of the finished edge. Next, we cover three columns with a needle, again draw a needle behind them and under a special thread. Tighten the created loop. Let's count the number of columns so that there are no single columns at the end.
 To create this look, you need to pull out two rows of threads with an interval of three cells. Around we will process with our “brush”. Further, the principle of processing the central part is similar, but the actions from different sides are exactly the same.
The rows should be decorated with seams already known to us. Making the middle in lace embroidery or "bug", you can start stringing beads. These are such easy and beautiful types of hemstitching, for beginners. With such embroideries, you can decorate different things, making complex lace patterns.
To begin with, it is worth practicing with a hemstitch on canvas, where pulling out the threads will not be difficult. It is necessary to cut about six vertical threads with a blade or a clerical knife. The width of the hemstitch should be no more than 1.5 cm in order to preserve all the beauty of the seam.
The needle is very convenient to pull out the threads gradually. Reaching up to required length, you need to cut off the same 6 threads with a blade. Make sure that the remaining ends do not begin to fall apart. 
At the beginning and at the end of any type of seam, it is necessary to process the edges. To do this, you need to step back one cell from the edge, thread a thread with a knot tied at the end, thread the thread into one hole twice and go to the next. 

We draw the thread in the upper free cell and start embroidery with a hemstitch. 
Merezhka "tassel"
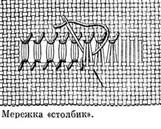
This type of hemstitch is used as an independent seam, and as a basis for other types. The previous photo shows the initial scheme for making such a seam. First, we grab two columns of thread from the back and stick the needle in front into the lower corner. 
We continue the embroidery in the same way. 
At the end, we process the edge in the same way as at the beginning. 
So the "brush" looks finished. 
This is what the reverse side looks like. 
Merezhka "column"
At the beginning, we embroider a “tassel” hemstitch from below, and then we do the same from above. Starting embroidery from the edge, go to the bottom, then again to the edge and up (for convenience, you can turn the embroidery over). We carry out such a continuous circle. This also applies to the further execution of various seams. 
We hide the thread on the wrong side in the finished edge. 
This is how the “column” turns out, from which more complex seams are also made. 
Merezhka "split"
Again we perform the "brush". Then, on the reverse side, we simply connect the halves of different neighboring columns in the same way. 


Openwork hemstitch
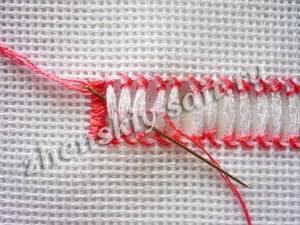
We carry out a “column” hemstitch and pierce with a needle from the bottom in the center of the edge. We bring out the thread. We begin to twist the columns among themselves, first capturing the second distant one. 


The thread should run in the middle of the crossed columns. 
At the end, we fix the central thread in the finished edge. 
Merezhka "bug"
We pull out another row of threads to make such a seam. It is woven from a “column” hemstitch and the thread is threaded through the center of the finished edge. Then we cover three columns with a needle, again draw the needle behind them and under the working thread. We tighten the formed loop. Keep count of the columns so that there are no single ones at the end. 


Merezhka "Punk"
This type combines all other types of hemstitch. To perform it, it is necessary to pull out two rows of threads with an interval of 2-3 cells. Around we process the “brush” already known to us. Further, the principle of processing the middle is similar, but the actions on both sides are absolutely similar. 


The rows can be embellished with seams already known to us. Performing the middle in a lace hemstitch or "bug", you can string beads. 

These are so simple and beautiful views hems, for beginners. With such hemstitches, you can decorate a wide variety of things, performing complex lace patterns.
There are quite a few embroidery techniques, but one of the most fascinating and in demand is hemstitching. Looking at products made using this technique, it is sometimes breathtaking, it is so gentle, elegant and mysterious. And it even seems that in order to learn this skill, years of hard training are needed, but not everything is as difficult as it seems at first glance. In this article, we propose to consider the art of hemstitch embroidery for beginners.
What is hemstitch and what is this technique? Merezhka is an openwork embroidery, which is performed along the threads threaded into the fabric in the form of a strip. It is customary to decorate napkins, tablecloths, collars, clothes and much more with this embroidery. The principle of embroidery itself lies in the fact that certain bundles are formed from the threads remaining in the intended strip, with the help of a needle and thread, forming bewitching patterns.

Hemstitching does not require special material and equipment, the most important thing is your attention, patience and perseverance, since this type of embroidery is very painstaking.
Proper preparation
As in any other art, you need to start with the basics and with the right material. So, for example, the fabric is recommended to use plain weave, and for beginners it is better to practice on the canvas, since it is very convenient to pull the threads there. Any threads can be used, the main thing is that they should match the density of the main fabric, it can be ordinary bobbin threads, or you can use floss in several additions.
In order to carefully cut through the strip for embroidery, you should use well-sharpened scissors or use a blade.

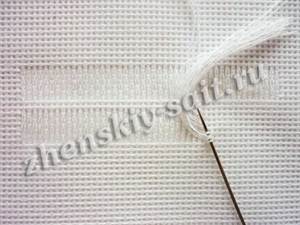
Also, in order to prevent the strip from blooming, you should process the edges, for this you need to lightly overcast them, as shown in the photo.


Everything, now you can start embroidering patterns.
3 main types
Before starting embroidery, let's look at the types of simple patterns.
- Pattern "Tassel". Having captured with a needle and thread several longitudinal threads, at least 3, enclose in a loop. So repeat until the end of the row.


The "Tassel" pattern is one of the main patterns, from which other schemes are subsequently reproduced.
- Pattern "Columns". The execution scheme is the same as in the brush, only the threads must be captured from both sides.
- Pattern "Split".
For this pattern, it is necessary to make a brush, and then, having shifted the rows, we make a cross.


These are the 3 main patterns that are present in every complex pattern. Let's consider more complex patterns using 3 main ones in a detailed master class.
Little "bug"
Very gentle and beautiful pattern:

To do this, it is necessary to take the "Column" pattern as a basis. Further, capturing 3 columns with a needle, we tie it with a thread, thereby making a loop, we tighten it.


openwork pattern
Having prepared the basis for the hemstitch correctly, we proceed to embroider the pattern.

Every 10 threads we pull together into a "Column" pattern.


Pay special attention to the fact that in this pattern you must have a central thread.
Using a needle, we cross two columns together, as shown in the photo.
Any outfit can be decorated in such a way that it acquires individuality and reflects the taste of the owner of the thing. A modest blouse, dress, scarf will become more elegant and elegant, a tablecloth, towel, curtains, on which there will be a hemstitch, will give a unique look. How to make this embroidery, show the photos given in the article.
Hemstitch
This is a very old and recently fashionable one. It is performed on fabric carefully prepared in a special way. In the place where the embroidery will be located, the transverse threads are removed, the number of which depends on the planned width. After that, work is performed with one of the types of patterns. And so it turns out the hemstitch. How to do it - we will consider further.
It is not difficult to perform hemstitching, it does not require any special devices and materials. But at the same time, this type of needlework requires utmost care and accuracy, otherwise the product with embroidery will look ugly.
This method is most often used when decorating cotton products. These are all kinds of tablecloths, blouses, bed linen, kitchen towels and curtains. On any of these products, a hemstitch will look very impressive. How to do it? Will learn.
Types of patterns
The beauty of hemstitching lies in the accuracy and method of making the pattern. There are several types of it. Here are the simplest ones. All of them are performed with a needle and thread on a prepared area of \u200b\u200bthe fabric where the transverse threads have been removed.
- Tassels. We stretch the needle with the working thread through 3-5 main threads and tighten them with a loop. Similarly, we sew stitches to the end of the row.

- Columns. These are the same brushes, only they are made on both sides of the fabric. Between them you can stretch an elegant lace.
- Merezhka split. Consists of their brushes, made in a checkerboard pattern.
- Goat. It connects the columns, each time the junction is shifted, and a kind of cross is obtained.
- Flooring. The working thread is pulled together into a fairly dense surface, which is similar to satin stitch embroidery.
This is only part of the patterns that make up the hemstitch. How to make them? First you need to practice on a small piece of fabric, and only then you can start embroidering. If you do the work slowly and carefully, you will get a beautiful pattern, because the hemstitching is done as evenly as possible, and the work is even and smooth.
Skillful embroiderers add beads to the patterns, and a few more variations are obtained. It is also possible to perform hemstitching with ribbons. Such a pattern turns out to be voluminous, and if you choose the right color, it will look very impressive.
Simple hemstitch
Let's take a step-by-step look at how to make a hemstitch. For beginners, acquaintance with this type of needlework is best obtained from embroidery on cotton or linen fabric. It holds its shape well, does not slip, the threads are clearly visible on it.
We make an incision along the edge of the cotton fabric and pull out several transverse threads with tweezers. First, we will process the edges so that they do not crumble. Then, with a prepared needle with a white thread, we pull 5-10 threads together with a loop. We fix each loop on the canvas. Thus we pass both edges. Now we cross adjacent bundles in pairs, fixing them in the center with an additional thread. This is a very easy way to do hemstitching on fabric. Such a simple embroidery will be an elegant element of any thing, moreover, the funds used to complete the work are minimal, which saves the budget.
If pick up good combination colors of fabric and thread, you can get very beautiful drawing, which will be a prime example of how to make a hemstitch. For beginners in this type of needlework, such embroidery will allow you to master the methods and techniques of work. With this pattern, you can decorate a kitchen towel, a pocket on a blouse, a pillowcase.

Merezhka on canvas
And now let's look at how to make a hemstitch on a canvas with a "split" pattern.
The canvas is quite loose, so you need to work with it carefully, otherwise the embroidery can be ruined. But at the same time, such a rare weaving will help to complete the drawing correctly, especially for a beginner needlewoman.
First you need to learn how to pull the strings. This is done with a blade, with which we cut about six threads. You should not do a wide hemstitch, as the pattern will be lost in this case.
Let's go through one end first. It is better to process it immediately so that it does not bloom further. Then we make the second edge in the same way.
When the canvas is prepared, we proceed to the execution of the drawing. Consider how you can gradually make a hemstitch. For beginners, the "split" pattern will be easy to perform. On one side of the embroidery, we make a brush of two threads. We carefully pass the seam so that the loops are clearly visible. On the other side, we connect the threads of different columns into one brush.

You can combine several strips of embroidery made with different patterns, and if you add colored threads, the pattern will turn out bright.
On a napkin
At the next stage of acquaintance with this type of embroidery, we will consider how to make a hemstitch on a napkin.
Along the edge of the napkin, leaving room for a fold, pull out eight to ten threads from the fabric. Let's go through all the edges in this way. Now let's make the folds. Then you can start embroidering. Always sew from left to right.
We fix the thread by making a few stitches. We collect on the needle from 4 to 8 threads (optional). The needle goes from right to left horizontally. Then we stick the needle from the wrong side and tighten the working thread to form a brush. Thus, go along the entire length of the napkin. We must remember that the brushes must be of the same thickness, so you need to carefully count the number of threads. Also pay attention to the passage of corners so that they are neat.

This work clearly shows how to make a simple hemstitch on a napkin.
This type of needlework can become an exciting hobby. Decorate clothes and interior items - what could be more fun!
Depending on the state of familiarity with this technique, needlewomen can embroider works in a different range: from a small thin embroidery that plays the role decorative element, to complex flat patterns. The same goes for colors: white sewing can be replaced by colorful hemstitches.
Merezhka can decorate a tablecloth or bed linen, a festive blouse or a ribbon on a hat. In any case, using the basic techniques, you can experiment and apply different combinations flowers and drawings.
Slow painstaking work will allow you to relax, and the end result will leave a feeling of satisfaction in your soul.
Women's needlework in Russia has never disappeared: at all times, Russian beauties wove lace, embroidered with beads and pearls decorative pillows and icons. Gold and silver threads were used in embroidery.
Today, many materials of that time are inaccessible to us, some needlework techniques are forgotten, but still a lot remains and can become an exciting hobby for us that will truly give original products. For example, hemstitch embroidery, with which you can decorate yourself and stand out from the crowd in the best possible way.
.jpg)
Merezhka is an ancient embroidery method that was available to every woman. It is not necessary for her to have sewing machine, so this type of embroidery has always been popular in many European countries and in Russia. Merezhka embroidered napkins, tablecloths, collars, scarves, shirts for both men and women, and, of course, dresses, skirts, blouses.
.jpg)
It will take a lot of time and patience to complete the hemstitch. First, you need to pull out a certain number of threads from the fabric, going in one direction, and you need to do this carefully and in a row. The fabric in this case is better to use one from which the threads are easily pulled out. If the structure of the fabric contains intricate weaves of threads, then such a fabric is not suitable for hemstitching.
The best fabrics can be linen, cambric, linen with lavsan, silk and others like them and, of course, smooth, not containing a print. Threads must also be selected in accordance with the density of the fabric. They can be not only bobbin threads (cotton), but also floss in several threads, linen and threads that you pulled out of the fabric. The color of the threads with which you will embroider, you can choose one that will effectively convey the hemstitch pattern, but it is better to do this to match the color of the fabric.
.jpg)
It is better to wash products with a hemstitch in a special bag (if in a car), but it is better to carefully wash by hand. It is better to iron such areas with a hemstitch through the fabric, as if pressing down with an iron, do not try to drive back and forth - you can deform the embroidery.
With a hemstitch, you can trim the edges of the sleeves, the bottom of the dress, the bodice, in fact, everything you want, depending on what cut your clothes are. Merezhka you turn clothes into a lace fantasy.