Embroider a spiral with a stalk stitch. Step-by-step execution of a stalk seam. What is a stalk seam
This seam got its name because most often they embroider flower stalks. This is the most popular and easy seam. If you are just learning the basics of embroidery or teaching your children, start by mastering this particular stitch.
When embroidering with a stalk stitch, take the thread not too long, otherwise it will become shaggy during work and the embroidered pattern will take on an untidy look.
Copy the pattern for stalk stitch embroidery onto front side material. According to the method of execution, there are two types stalk suture.
It is sewn from left to right as follows. After securing the thread with two consecutive stitches, insert the needle 2-2.5 mm to the right along the contour, pull it out from the front side at the point where the thread previously entered the fabric, and pull the thread. After 2-2.5 mm, insert the needle again, pull it out together with the thread at the thread entry point and continue in the same way. When the needle enters the right side of the fabric, the thread is only pulled out, but not tightened.

Thus, with each stitch with the needle, you grab the fabric from the right side, that is, the needle enters the material, exits it, and the thread is pulled out. The thread remaining on the front side is twice the thread from the inside. In an ordinary stalk stitch, do not try to make several stitches at the same time, as when embroidering with a lining stitch or a needle-forward stitch. Here, each stitch is sewn separately. The stitches come one after the other; at the same time, make sure that when pulling the needle, the thread is always on top.
A stalk stitch is beautiful only if its stitches are the same size. This value depends on the thickness of the threads used to embroider. The thicker the thread, the larger the stitch, but it should not exceed 5 mm, otherwise the seam will look ugly. The size of the stitches also depends on which lines are embroidered - straight or winding. In a straight line, the stitch can be 5 mm in size, but in a curve it is necessarily smaller, and the smaller the steeper the bend. Large stitches when embroidering a sinuous line make its outline inaccurate.
After finishing the embroidery of the figure, or if the thread is over, stick the needle where you would have stuck it if the work continued, pull it out from the wrong side in the same place, skip under 3-4 stitches, pull it out and cut the thread. New thread start by pulling it through 3-4 purl stitches, pull it out from the right side where you would pull it out if you continued to embroider with the same thread, then repeat the process.
From the inside, the stalk seam looks like hand stitch. How well you get his stitches can best be judged by the wrong side.
The second type of stalk seam
It is performed in almost the same way as the first type, with the only difference being that with successive stitches, pulling the thread, it is left first on top of the needle, and then under it. In this case, the seam looks like shown in Fig.

This type of stalk stitch is most often used when making a hemming, instead of hemstitch embroidery. It is usually sewn with thick threads - iris or floss in 4-6 layers.
Types of seams
Simple seams (part 3)
Hello, beginner craftswomen, in the previous article we told you about a simple seam. Today in the third part of the article you will learn how to perform a "stalk seam".
Stem seam. This is another of the simple stitches often used in various types embroidery . They, as a rule, are embroidered with twigs and stems in floral ornaments, which is why it was called "stalked". You can also completely fill in individual elements of embroidery with this seam or sheathe the contour of the pattern. In facial sewing, it is used as the main one.
The stalk seam is performed both in the hoop and without them, from left to right or from bottom to top. First, a stitch is made about 3-4 mm, then the stitch is brought out from the inside to the front side in the middle of the first stitch, without piercing it. To perform the next stitch, the needle is injected into the fabric, stepping back along the pattern line by 1.5-2 mm from the end of the first stitch (i.e., at a distance equal to half of it), and the needle is brought out to the front side at the point of its end (Fig. .one). In the same way, perform all the remaining stitches until the end of the row. In this case, you need to ensure that the working thread is always on the same side of the seam. This rule must be followed for any bend in the line of the pattern - only then is a smooth line obtained. With proper sewing, a “back of the needle” seam is formed on the wrong side. Heavily curved lines, such as circles and spirals, should be embroidered with a traditional stitch in as small stitches as possible.

In embroidery, the traditional stem stitch is often modified.
To get a thicker line, the stitches are gradually shifted to the left, more and more overlapping the previous stitches with subsequent ones.

And if necessary
Get a thinner line
then move the needle exit point
Front side right

Using these techniques, you can embroider twig with thickening grounds and very thin peaks

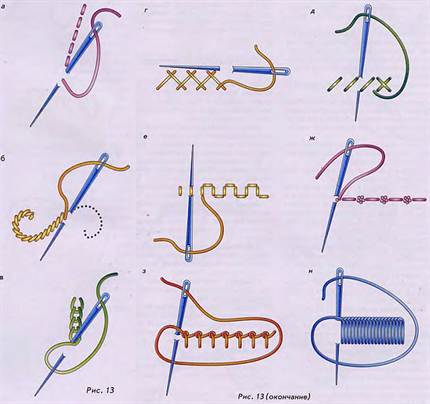
If, when performing a stalk seam, bring the needle to the face either from above or from below the previous stitch, you will get a two-row seam "bricks" (Fig.5).
The seam "pigtail" it turns out if you perform two rows of a seam, laying the stitches symmetrically to each other, one under the other (Fig. 6).

With tightly packed rows of a stalk seam, you can fill in entire fragments of the pattern. In this case, the seam gives a more convex filling. If, when filling the pattern with a thin stalk seam, the stitches of adjacent rows are staggered, the satin filling is flatter (Fig. 7).
![]() The seam "split"
perform in the same way as a traditional stalk seam, but bringing the needle to the front side, pierce the thread of the stitch being performed. The puncture point is slightly shifted to the right (approx. 1/3 or 1/4 stitch size). The thinner the thread, the smoother the seam (Fig. 8). This seam performs a particularly thin satin stitchembroidery,
"Facial sewing", with which the faces of saints are embroidered on icons.
The seam "split"
perform in the same way as a traditional stalk seam, but bringing the needle to the front side, pierce the thread of the stitch being performed. The puncture point is slightly shifted to the right (approx. 1/3 or 1/4 stitch size). The thinner the thread, the smoother the seam (Fig. 8). This seam performs a particularly thin satin stitchembroidery,
"Facial sewing", with which the faces of saints are embroidered on icons.

The stalk seam is also used as a finishing one, wrapped around with a thread of a different color or making scallops.
One of the main stitches in satin stitch embroidery. It is performed in the form of an elegant contour line, which can be straight, curved, creating a circle, etc. It looks spectacular in embroidery of plant motifs. With the help of only one stalked seam, you can embroider stems, veins of leaves, leaves and petals, and it will look in the technique of artistic smoothness.
One of the most vintage seams. It was most often used when embroidering flower stems and twigs, which is why it got its name. Consists of oblique stitches, tightly pressed to each other. All stitches should be the same size and laid flat. It is sewn in various directions - both from left to right or right to left, and from top to bottom and vice versa, as well as at any angle, depending on the motive or detail. This seam can also be a straight line or curved. Despite the fact that it is a contour stitch, it is very widely used in artistic smoothness due to its plasticity. With the help of a stem stitch, irregularly shaped details and complex motifs are filled.
To begin with, we will mark the fabric on the fabric, as we did in the previous lesson.
![]()
From point 1 to point 2, while skipping point 3, we make the first stitch (Fig. 16).
Then we bring the needle out of point 3 right above the first stitch. The working thread must always be on one side, left or right, otherwise the structure of the seam will be disturbed. It turns out that the stitch starts from the middle of the previous one, tightly adjoining it. The second stitch is located between points 3 and 4. From point 4 we bring the needle to point 2 - the middle of the second stitch (Fig. 17).
![]()
The stitches should fit snugly together. In the same way, we continue the seam further. This is what our stem stitch should look like:
![]()
On the wrong side, you should get a series of lowercase stitches (Fig. 19).
Ideally, the stalk seam should have an even cord. The beginning and end of each stitch should be barely visible.
Art is such a need for a person as to eat and drink.
Exercise:
- Sew 2 straight lines with a stem stitch. In one, the working thread will be located on the right side of the main stitch, and in the second - on the left side.
- Sew the circle along the contour with a stem stitch.
- Let's complicate the task a little. Embroider the pattern shown in Fig. 20 along the contour lines, trying to make the seam look like a continuous cord.
- Embroidery scheme:

In this photo, the horse is embroidered along the contour with a stalk stitch, the hooves are embroidered
Even novice craftswomen can make their outfits unique. You can look irresistible by decorating a blouse with hand embroidery, decorating a dress with ribbons. A simple technique will help to accomplish this - a line of stalk stitches. It is easy to learn how to decorate products on your own using this artistic technique.
What is a stalk seam
Decorative contour embroidery has long roots due to its simplicity of execution. The lace seam, made in a straight, curvilinear line, helps to draw simple patterns on the fabric with threads - flowers, leaves and stems. This is where its name came from. Craftsmen with the help of such stitches perform unique:
- ribbon embroidery;
- satin stitch floral patterns;
- complex contour ornaments;
- paintings.
To embroider, you will first need to prepare the fabric. The material after the work is done will not be deformed, contracted, if it is pre-washed, stroked. To perform stem stitch, you will need:
- hoop;
- threads or ribbons;
- scissors;
- thin sharp needle;
- hard pencil;
- carbon paper - transfer the pattern to the fabric.
How to make a stem stitch
You can learn how to perform a decorative stitch by watching a video, a master class, or by reading the appropriate instructions. The technology is so simple that it is not difficult to implement it the first time. It is very important to use stitches of the same size to get a good result. You should follow these steps step by step:
- insert the printed fabric into the hoop;
- thread the needle;
- fasten it from the wrong side of the matter.
Stitch stitch embroidery is a counting technique, performed from left to right. The working thread should always be on one side. The stitches lie close to each other. Step by step, the line is manually performed with the following sequence:
- bring the needle and thread to the face of the fabric at the starting point of the pattern;
- along the line make a forward stitch 4 mm long;
- pierce the fabric with the needle down;
- pull it in the middle of the previous stitch to the front surface;
- repeat the steps from the beginning.
Stitched seam - scheme
To make the scheme of the stalk seam clear, it is possible for the correct perception of embroidery technology:
- draw a straight line on the fabric;
- mark 4 points on it at an equal distance;
- fill the material in the hoop;
- fasten the thread on the wrong side of the fabric;
- bring the needle up at the first point;
- prick into the fabric in the third;
- pull out from below through the second point;
- inject from above into the fourth;
- pull up through the third point.

Stitch stitch embroidery for beginners
In order not to be disappointed in decorative embroidery, novice craftswomen should not immediately take on complex patterns. The gradual development of technology will help you quickly learn needlework. It is recommended to first embroider by hand straight twigs, simple flowers, contour drawings. There are two types of cord stitch creation:
- piercing - each is performed by piercing the material with a needle, bringing it to the opposite side;
- sewing - the fabric is pierced horizontally, 2 punctures are immediately made parallel to the material, then the thread is pulled.
Embroidery with a stalk stitch for beginners is recommended to be performed in compliance with the rules:
- make stitches equal in length;
- prefer stitching type of embroidery - the fabric will shrink less;
- for sharp bends of the pattern, use small stitches;
- avoid twisting the threads;
- when working, they should always be on the same side - above or below;
- the same thread tension is required.
Stitch seam patterns
Beginning craftswomen should start with simple contour motifs. Having mastered the technique of execution, you can find in the photo in magazines, on websites, suitable patterns for embroidery with a stalk stitch. To get a quality result, you need:
- choose a pattern that you can do so as not to quit work halfway;
- transfer the drawing to tracing paper;
- transfer it to a fabric or finished product using carbon paper.
Those who know how to sew and draw will be able to independently create and execute unique patterns for their clothes. Stores dedicated to this sell hand-embroidered magazines with designs of varying complexity. It can be:
- contour letters;
- animal silhouettes;
- intricate ornaments;
- flowers for embroidery;
- motifs for beads;
- patterns for making ribbons;
- complex in terms of color and content of the picture.

How to sew with a stalk stitch
When hand embroidering, several types of stitches are used. Recommend decorative stitches in embroidery, except for the direct version:
- perform work with an inclination to the left;
- get a two-row stitch by making a stitch from one point, first from above, then from below;
- to thicken the line, shift each subsequent one back to the left;
- for a thin free stitch, any upcoming step should be shifted to the right.
Techniques for embroidering with a rope are applicable to the satin stitch technique, when dense filling inside the pattern is required. Work can be carried out in two ways:
- sequentially stack straight rows embroidered with one direction, closely to each other;
- for fine work, use the “split” technique - when returning back, pierce the needle through the thread of the previous step.
Stitch stitch with beads
By performing the decoration of clothes with beads, you can get exclusive products. The craftswoman will look unique if she is able to sew the outfit herself. The stalk seam back to the needle with beads is done step by step as follows:
- the thread is fixed from the inside, brought up;
- 2 beads are strung on a thin needle;
- the fabric is pierced down near the last.
Subsequent embroidery steps are performed according to the pattern in the following order:
- a thread with a needle is brought out from the bottom up between the beads;
- stretches through the last bead;
- the next bead is tightly applied;
- the thread is passed through it;
- the needle sticks into the fabric down to the right close to the bead;
- extends to the top left of it;
- work continues until the end of the drawing.

Ribbon embroidery - stem stitch
You can originally decorate clothes with artistic embroidery using ribbons. The work is done on fabrics of various textures, and for its implementation you will need a needle with a long, wide eye. Ribbons for needlework are used silk or synthetic, with a width of 3 to 12 mm. Step by step embroidery is performed from left to right as follows:
- the tape tucked into the needle is fixed on the fabric from below;
- displayed on the front.
- poke the needle from above into the fabric;
- maintain a distance slightly more than the width of the tape;
- bring it out from the bottom in the middle of the stitch;
- pull the tape up;
- gently straighten;
- make a stitch of the same length, stitching from above into the fabric;
- extrude at the end of the previous step;
- straighten the tape;
- continue work.
Video: how to embroider with a stem stitch
The stem stitch is one of the most used stitches due to its ease of embroidering. It got its name because it is in this way that stems of various colors are often embroidered. As a rule, it is with this seam that the lessons of experienced craftswomen begin, who teach those who wish to embroider.
With this seam, you can create both the borders of a pattern, and fill it completely, like a satin stitch. In addition, it goes well with many other stitches: goat, chain stitch, counted or printed cross. This is a universal technique, thanks to which embroidery can be created only with the help of this seam, or it can serve as an accent, embellishment of some nuances.
According to the technology, the stalk seam can be divided into two types:
- ordinary;
- compacted.
 Regular stitch stitch
 Both types, like the vast majority of seams, are embroidered from left to right. In order to secure the thread without knots on the wrong side, two consecutive stitches must be made on the edge of the outline of the pattern. Then, according to the sketch, step back 2-2.5 mm to the right, complete the first stitch, return the needle to the left under the wrong side, pull it out together with the previous puncture. Next - pull the thread, retreat the same distance again, and repeat the manipulation described above. It is important to take care not to pull the thread tight after bringing it to the front of the embroidery.
The result should be a thin, slightly convex line, as in the photo.
 Sealed stalk seam
To embroider a sealed stem seam, you need to bring the needle not to the place of the first puncture, but in the middle of the previous stitch. The resulting pattern, in the end, resembles a neat lace. Its thickness depends on the thickness of the thread and the length of the stitch.
Photo of such a seam:
As a rule, such a seam is used in order to make a beautiful filing. To sew it, you should take a thick thread - so the seam will be more effective.
In other words, the stalk stitch grabs the material from the right side. A characteristic feature of this seam is that the thread from the inside is two times shorter than the one that actually forms the pattern on the front side. That is, each next stitch will protrude half the length of the previous one.
 Thus, the seam is sewn by moving the needle towards itself, and it fits the other way around - away from itself.
In no case should you try to make several stitches at a time, which is allowed, for example, when sewing a “forward needle” seam. This will pull the fabric and tangle the thread.
In such embroidery, one stitch comes after another, so you need to carefully ensure that the thread is always above the needle when performing the next stitch.
A stalk seam will form a beautiful pattern only if each stitch does not differ in size from each other. How long it will be, you need to decide depending on the thickness of the embroidery thread. The thinner it is, the shorter the stitch should be, and vice versa. The maximum stitch length should not exceed 5 mm.
Also, the stitch length may vary depending on the pattern. So, on the bends, the stitches should not be large. Therefore, if there are a lot of them on the selected sketch, you should take this into account in advance and perform stitches of the same size along the entire length of the line. If the embroidery on the bends is done with too long stitches, then it can spoil the overall state of the picture due to blurry contours. You also need to bring the needle to the front side along the bend from the side in which it is wrapped.
 To make a thickening of a branch in a floral pattern, gradually increase the length of the stitch, while bringing the needle to the front side a little lower than the middle of the previous stitch.
In case the thread runs out, or you need to start work in another place in the pattern, you need to insert the needle at the point where the embroidery could be continued, bring the thread inside out, circle around a few stitches, cut the thread. Starting the next fragment, you can also secure the thread by passing it through several already existing stitches on the wrong side.
To make sure that the seam turns out correctly, you just have to look at the wrong side: there should be an even stitch, similar to a machine.
It must be remembered that when performing a stalk seam, it is important to monitor the location of the working thread - it should be either all the time on the right or all the time on the left. If this rule is violated, then the desired pattern will not be achieved.
The nuances of preparing for work
 Before starting work, it is better to stretch the fabric on which the pattern will be embroidered. If this is not done, the material may shrink after the first wash and thus the design may be deformed. It is better to embroider with a stalk stitch on pure linen or on cotton material. On the canvas, it will not look so organic.
To make the drawing more accurate, it is better with a simple pencil or copy it onto the right side of the fabric with a special washable marker. For beginners, it is better to select patterns that have clearly defined limits.
The thread should not be taken very long, otherwise it will twist and tangle, which will break the structure, and the embroidery will look sloppy.
To summarize, the following conditions for a beautiful stalk seam can be distinguished:
- Same stitch length;
- Direction of stitches in one direction;
- Conclusion of the needle inside the bends;
- When imitating satin stitch embroidery, start each line that fills the pattern from the same side.
Also, the stalk stitch is often used when embroidering with beads. It helps to make the drawing more even and dense.
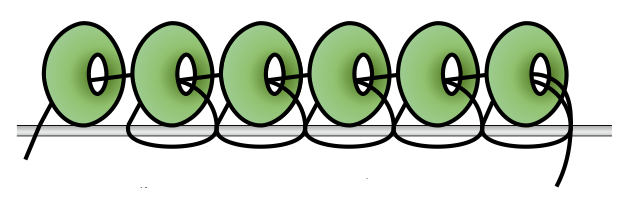
 To do this, you need to fasten the thread or fabric, take two pieces of beads, string them, insert the needle through two ovals, as in the picture taken, bring it out between the strung beads. Next, you need to stretch the thread through the last bead, add the next one, insert the needle into the fabric through another oval, bring the needle out between the last two beads. And so on, repeat these steps for as long as necessary for the drawing.
If, after starting work, it seems that the embroidery is wrong, you can watch a video that will help you figure it out.
Video: stem seam and other types of hand seams
Related publications

The stalk ("back to the needle") seam is one of the basic ones in satin stitch embroidery. It consists of several horizontal stitches adjacent to each other. The stalk seam is considered the oldest and at the same time the easiest to perform. It is no coincidence that it is with him that they advise to start acquaintance with this type of needlework.
Application of a stalk seam
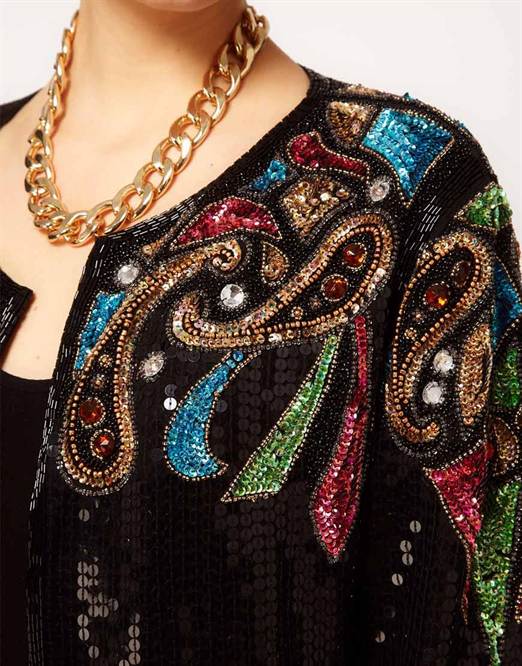
In the old days, flower stalks were embroidered with the help of this seam, for which it got its name. But its scope is not limited to this. The “back needle” can be used as an additional one, combining it with other types (for example, with a counted cross), but simple outline patterns will also look very impressive. The stalk seam is plastic: it can fill the contours of the picture, make floral patterns and even complex motifs - examples of work can be seen in the photo.
Tools
Embroidery requires special tools and materials.
It is better to use cotton fabric, it is better to wash it before starting work to prevent contraction and deformation finished product. You should not use a border for cross-stitching - it will not work for this purpose.
It is better to use a hoop - so the thread will not tighten the work, and the embroidery will look good.
Threads - you can pick up any that seem most suitable. Most often, floss threads are used in embroidery.
Pencil - you will need it to draw the outline of the pattern on the fabric.
Stages of embroidery with a stalk stitch
When you first start embroidering with a stalk stitch, you can apply marking points. They must be on the same line, at the same distance from each other. In order for the seam to turn out beautiful and even, it is very important to correctly calculate the length of the stitch. It depends primarily on the width of the selected thread. It is best to make a stitch whose length is 4 times the width of the thread.
In order not to get confused in the work, you can label all the points with letters. For a stalked seam, the letters will not go in order, but as follows: A-C-B-D and so on. This markup will allow you to better navigate the first time.
Fastening the thread on the wrong side
Next, we proceed directly to embroidery. First, we thread the needle. If the eye of the needle is too small, you can thread the needle using a needle threader. Then you need to fasten the thread on the wrong side - you can see how to do this in the photo or video of the master classes.
“Back needle” is easiest to sew from right to left. First you need to insert the needle into the point A from the wrong side. Bypassing the point FROM, we bring the needle to the wrong side through the point B. Then we return to the front side again at the point C, it should be in the middle of the stitch. Bringing the needle to the front side, you need to try not to separate the strand.
Tighten the thread to remove excess. But this must be done carefully so as not to pull the pattern. We make the next stitch. To do this, we bring the needle to the wrong side through the point D and return to the front through the previous hole - in our case, the point B. Again, tighten the thread a little, avoiding sagging.
Thus, it turned out 2 stalk stitches, the same in size. By the same principle, you can continue to embroider a straight line with a stalk seam. That is, we make a stitch, we bring the needle to the front side approximately in the middle of the previous one, we make the second stalk stitch, we again bring the needle to the front side through the previous hole. If you can’t figure out the scheme, you can watch our training video or photo.

A straight line is the easiest option for stalk stitch embroidery, and far from the only one. In this way, you can make a curved line, fill the drawing area. The directions of embroidery are also different: you can do it from left to right, or vice versa, from top to bottom or from bottom to top, you can - at an angle. That is, with stalk stitches, you can sew the outline of any pattern that only requires the implementation of the scheme.
If the line is to be curved, the stitches are made in exactly the same way as for a straight line. But there are several nuances. To make the seam look neat, the stitches can be made a little smaller. And to get a smooth line, it is better to bend in such a way that the stitches “look” at the outside.
Some schemes require the entire area of the pattern to be filled with a stalk seam. In this case, the contour of the area should not be embroidered with a seam. The embroidery is filled with several rows of stalk stitch. At the same time, each of them should begin on the same side so that all the stitches are made in the same direction, and each row fits snugly against the previous one.
Seam Rules
Ideally, the stitches should fit snugly together, the stalk seam should resemble a continuous cord, in which neither the beginning nor the end of the stitches should be visible. To achieve the ideal result, it will take some time to train, and, of course, following some rules.
The working thread must always be kept on one side, which is more convenient - to the right or left of the main line. It is impossible to change its location, otherwise the entire structure of the seam will collapse, and it will not work to achieve a good result.
The needle needs to be brought out only into the previous hole - so the seam will look neater and tighter.
The stitches should be the same length. If it is not possible to determine the distance "by eye", you can first mark the pattern, marking the points of entry and exit of the needle with dots.
Video: learning to embroider with a stem stitch
The stalk stitch or otherwise “back needle” is one of the elementary stitches that is involved in satin stitch embroidery. The components of this seam are several horizontal stitches adjacent to one another. It is considered ancient and very easy to embroider. That is why beginner needlewomen are advised to start getting acquainted with the embroidery technique from this very seam. Often used for embroidery contour drawings and for processing the smallest details.
Necessary for work
Of course, you need to prepare the canvas. It is advisable to choose a material that is not prone to deformation. It is necessary to wash and iron the fabric in advance. Prepare the hoop, thread, scissors, needle, pencil, carbon paper. Shortly before embroidering, wash the material on which you plan to work. This is done to avoid deformation of the fabric, and further distortion of the pattern. It is recommended to embroider on linen or cotton. On the canvas, the work will look less advantageous. For the accuracy of the embroidered pattern, the pattern is applied to the fabric with a simple pencil. The working thread is used of medium length, if it is too long, then there will be difficulties with constant tangling and twisting.


Execution technique
It is divided into 2 types: ordinary and compacted.


Both that and that, like other types of embroidery, are made from left to right. To attach the thread without a knot on the wrong side, 2 consecutive stitches must be done along the edge of the pattern. And then retreat about 2 mm. to the right, sew the first stitch, and under  wrong side, return the needle to the left, stretch it in the place of the previous puncture. Then, pull the thread, again retreat an equal distance, and repeat the above technology. Carefully watch the tension of the thread so as not to pull it tight after pulling it over the face of the fabric. To get a compacted embroidery, it is necessary to pull the needle not to the starting point of the puncture, but to the center of the previous stitch. The pattern that comes out will look like a miniature lace. The thickness will depend on the thickness of the thread and the duration of the stitch. Often it is used to make a neat filing. A spectacular seam will turn out due to a thick thread. The stalk seam tightens the fabric from the front of the fabric. A special feature of such stitches is that the thread on the wrong side is somewhat smaller than the one that directly forms the pattern itself on the front of the work. It follows from this that each subsequent seam will protrude half the length of the previous one.
Under no circumstances should you try to make a couple of stitches in one hole. This causes the material to be pulled in and the thread to twist. In the proposed technique, one stitch follows another, so care must be taken to ensure that the thread is always above the needle when making the next stitch. An ideal pattern can only be achieved when all the stitches are the same size. The stitch size is determined depending on the thickness of the working thread. If thin, then the stitch is short; if thick, the stitch is longer. The stitch length is also adjusted based on the pattern. On the bends of the pattern, the stitches should be small. Therefore, you need to look at the drawing in advance and determine where and in what quantity they will be laid. When embroidering with stitches that are too long, the quality of the finished product may be adversely affected due to a blurred outline. The needle is brought to the face of the canvas along the bend from the side in which it curls.

In order for you to enjoy embroidery and not bring disappointment, you should not immediately set a goal and fulfill complex schemes and patterns. Only a gradual development of technology will help you to master needlework. To get started, try to embroider straight branches, elementary flowers, contour patterns with your own hands.

First, choose a pattern that you can easily repeat. Transfer the drawing using carbon paper to the canvas. Craftsmen who draw well can independently create original and beautiful patterns for the product. What it will be: letters, outlines of animals, floral ornaments, motifs for embroidery with ribbons - it's up to you. Stitches can be created in two ways: stabbing - each subsequent stitch pierces the fabric with a needle and pulls it to the opposite side; sewing - by threading the fabric horizontally, performing 2 punctures at the same time, then the thread is removed.

Be sure to follow the following rules:
- stitch to produce equal in length
- in order to avoid contraction of the fabric, it is better to choose a stitching embroidery technique
- for sharp curves of patterns, embroider only short stitches
- do not twist the working threads
- while embroidering, the threads must always be located on one side
- watch the thread tension

Let's summarize everything we learned today. Learning how to sew using the stem stitch technique is quite simple. The technique is incredibly easy that even beginners will succeed immediately. Be very careful to ensure that the stitches are the same size.


We perform actions in the following order:
We fix the canvas with the pattern made in advance in the hoop.

Thread the thread through the needle.

Carefully attach it from the inside of the product.
Technology belongs to counted embroidery, is done from left to right. The working thread is always located on one side. The stitches run heaped to one another. The line is done in the following sequence:
- stretch the needle with the thread to the front side of the canvas to the starting point of the pattern;
- clearly along the line, a stitch is laid forward with a size of 4 mm .;
- pierce the material with the needle down;
- pull it out in the center of the previous stitch to the front;
- repeat all actions.

Video master class “Stem seam”
The stalk seam is used both to create the outlines of individual elements, and to fill them. This type of stitch goes well with wool embroidery, printed and counted cross stitch.
|
Step 1 We bring out the needle with the thread at the point where the seam should begin. We make a stitch about 3 mm long. |
Step 2
Again we bring the needle to the front side approximately in the middle of the previous stitch, while trying not to split the strand of the previous stitch. Pull up the thread to straighten the stitch. |
|
Step 3
Make the next stitch, also 3 mm long, leaving a distance of about 1.5 mm from the edge of the previous stitch. |
Step 4
We bring the thread to the front side in the hole of the previous stitch. Similarly, we make all subsequent stitches to the end of the pattern. |
|
Step 5
In cases where it is necessary to obtain a curved line, it should be embroidered so that the stitches are directed to the outside. Only in this case you can get a smooth beautiful line. You can also make the stitches a little shorter. |
Step 6
If you need to fill some area with a stalk seam, you need to start each filling line from the same side. |
|
Step 7
The stalk stitch can be used to embroider capital letters in inscriptions and initials. |


In Russia, in the evenings, entertaining themselves with songs and stories, the girls sat for hours at embroidery. They embroidered caftans, kokoshniks and sundresses. And that craftswoman was valued more, in which the seam was even. Grooms and their mothers, when choosing a bride, paid attention not least to the sewing that she was wearing. If everything is beautiful, neat, and with imagination, then such a girl will be a good housewife and you must definitely take her into the house. So they learned to embroider from their mothers so that their husband and his family would like it and marry a worthy groom as soon as possible. It is easier for modern craftswomen. First, they embroider mostly for themselves. Secondly, thanks to the Internet, they can master any technique, for example, a stem stitch. There are a lot of videos on this issue, and modern craftswomen quickly learn to create whole pictures with threads.
In embroidery, there are many types of seams, but there is also some base, basic seams, namely:
- seam "forward with a needle";
- seam "line";
- buttonhole seam;
- chain stitch;
- cruciform seam;
- Bulgarian cross;
- stem seam.
This article is about the stem seam.
The stalk seam is considered one of the most ancient types of seams. It is very textured and colorful. As a rule, the contours of the pattern are performed with a stalk seam. It can be leaves, petals and stems (by the way, this is where the seam got its name from).

It is best to use cotton canvas for the basis of embroidery. Before starting work, it must be washed and steamed, so you will avoid further deformation of the product after sewing is completed.
In the absence of much experience in embroidery, you can use the hoop. They will greatly simplify the workflow for a novice craftswoman.
Seam with threads
The video shows how to perform a stalk seam with a needle and thread.
The stem seam is made from left to right. The sharp end of the needle constantly looks to the left, and for each subsequent stitch they are taken, stepping back, that is, to the right. On the front surface of the product, the stitches overlap each other, and on the wrong side they form a line.

Art does not stand still, each craftswoman adds her own zest to the work. So today, new varieties of stalk seam have appeared. Examples of such seams are shown below, and detailed instructions their embroidery is contained in the video tutorials.
- portuguese stalk stitch.
- narrow stalk seam.
- wide stalk seam.
Embroider with glass beads
The tradition of embroidering things with beads appeared a very long time ago. In Ancient Russia, there were kokoshniks and sundresses embroidered with glass beads. A little later, collars and hats began to be embroidered with this material.

This article offers a video tutorial on this ancient technique.
Embroidery with glass beads using the stem stitch technique is the most popular technique, as this stitch is very strong and reliable. It is great for products that are subject to frequent external influences, such as collars, sleeves on clothes, handbags and so on.
Pillows embroidered with glass beads look very nice. Such a thing will be ideal for interior design, and will also be a very original gift.

And the seam technique itself is very simple and does not differ much from a seam made with threads.
- We fix the thread.
- You need to string a bead on the thread.
- The needle is inserted into the canvas and withdrawn through a gap equal to the width of one bead.
- The thread is again passed through the same bead and the next one is threaded.
- The needle should enter the work after the last sewn bead and exit between the 1st and 2nd.
- The needle passes through the 2nd bead, followed by the 3rd bead.
- The needle should go into the fabric and come out again between the 3rd and 2nd beads.
Working with ribbons
The last variety in the stalk seam toolkit will be a seam made with ribbons.

The principle of operation is the same as that of performing a stalk seam with a thread and a needle. Only, as the name implies, a tape is used instead of a thread.