Decorate the playground. How to decorate a playground - with your own hands from landscape to decoration. Natural playground
Natalya Chernikova
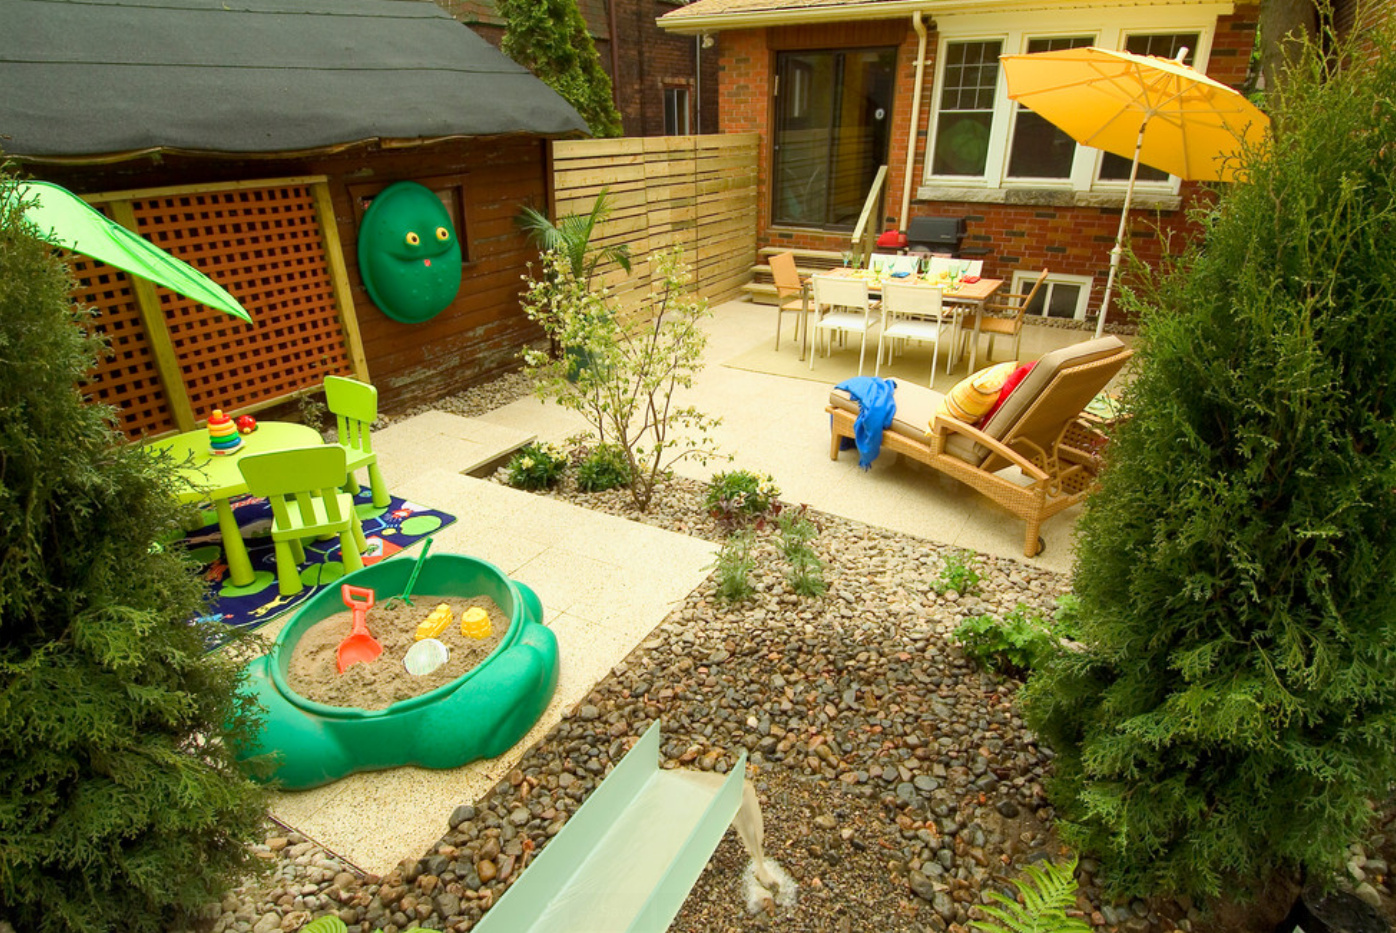
I always enjoy looking through the photo reports of colleagues about land improvement. And one can only rejoice at how well equipped playgrounds are. We have problems with this. Of the new stationary equipment, we have only a slide. Everything else is done hands teachers and parents of students.
Every year we puzzle over how to get out of the situation and equip plot.
We mainly use plywood, boards, logs, improvised material for equipment.
So for several years now, as a developing center for the development of fine motor skills of the hands, the train has been doing good service. At first he was with us.
Over time, the mechanisms of the locomotive fell into disrepair. We have updated it this year. And so the train became.
Its details are bright and interesting.

Nearby is home-made equipment also aimed at developing fine motor skills of the hands. A few years ago, for such equipment, the back of a crib came in handy for us. But it broke down before serving us even 3 years.

Now we have new equipment, made of durable wooden cuttings, metal crossbars. I want to believe that it will serve us for a longer period of time.

The water play center is a boat from a baby bath. I already talked about it in a previous post.

Nearby is Moidodyr, where children can wash their hands using a washstand.

Sand play center is a sandbox and mini sandbox "Cow" which has served us for several years.

For role-playing games, we have an airplane.


As well as a gas station for cars, a car, a motorcycle, which I also talked about.

We have a creative center: table, bench, stand for fine art works.

And also for many years now, a table in the form of a ram for drawing semolina and sand has been pleasing with its functionality.


When the children are engaged in creativity at the table, the rest of the children run around and play outdoor games at this time. In order to be able to organize building games at the same time, an idea came up - to make another table. And do you know what we made it from? From a wooden coil on which the wires. They dug one part of the coil into the ground, painted the upper part, and made flowers on the surface of the table using colored self-adhesive paper. Our table is large.


There is an opportunity to gather behind it for everyone who wants to play board games. The plans include an idea to make a bench so that you don’t have to take chairs out of the group every day.
The flowers in our flowerbeds in the form of swans have already grown up, delighting with their beauty.


A health track was made, which I also talked about. Survived until the end of summer.


We have fitness equipment "Apple and Pear" made from plywood. They serve to roll balls. We have been using this equipment for several years now.

For crawling, they made multi-colored gates. An arc from a hoop, plastic colored balls are put on it. They placed the gate where there is at least a little green soft grass.

This year to organize an outdoor game "Carousels" on the veranda they hung a carousel made of several hoops of different sizes and multi-colored satin ribbons.

To organize games for the development of breathing, they made a manual in the form of an inverted umbrella and butterflies.

We are building pans for next summer. I'm looking for ideas from you guys. Thank you.
I wish you all creative success!
Related publications:
Quite recently, a couple of good gnomes "settled" in my house. I made these fabulous little men to decorate the beds in our children's area.
"Summer fantasies" - updating the site with your own hands in kindergarten.
Dear colleagues! I bring to your attention a master class on making flowers from improvised material with your own hands for.
With the onset of warm days, the stay of children in the fresh air increases, and teachers face the problem of organizing interesting activities.
The long-awaited summer is coming soon. I really want the kindergarten site to look bright, lively and interesting in the summer! Kindergarten site.
Kindergarten is a special institution, it is practically a second home for its employees and children. And you always want to make your home cozy and warm.
Every child in the period of active knowledge of the world needs movement. He needs to play, run, have fun. Usually, kids spend their time walking on the street on playgrounds. This place should be as safe and functional as possible. Such requirements apply to all sites, wherever they are built.
If the resting place is equipped on a suburban area, you should get acquainted with the technology of work, prepare the necessary materials and tools. It is better if you build a playground in the yard with your own hands will be someone who has basic carpentry and locksmith skills.
Primary requirements
Each playground is created to develop the child's skills and increase his level of physical fitness. The main feature of such complexes is that the child can play and move independently. Adults here act only as observers. For this reason, all playgrounds are decorated very brightly. In addition, each building in the complex can be used in different ways. As can be seen from the numerous photos of playgrounds, various designs can be located in different ways depending on the design idea.
The requirements according to which playgrounds should be built can be found in the relevant SNIP. The current established standards are as follows:
- The site should be fenced off from driveways. At the same time, a distance of at least 10 m should be made from it to parking lots.
- The territory of the playground should be made impassable. It should be separate from the footpaths.
- The site is landscaped around the perimeter. In addition, it is necessary that the territory has both darkened and sunny areas.
- The site should be located at a distance of 20 m from other large open areas and waste bins.
- Every three months, all equipment that is installed on the playground must be inspected. It must be functional and not damaged.
- Change the sand in the sandbox every year. At the same time, the safety of sand on the playground is confirmed by certain sanitary and hygienic standards.
For children of different ages, it is necessary to divide the playground into certain zones. They are performed for children under three years old, toddlers of preschool age, and younger schoolchildren. However, often a playground for children includes attractions for several age groups at once.
The sandbox must be equipped with a lid. Therefore, it is better to make it a simple form. Such an element of the playground should be not only beautiful, but also functional. With a complex configuration of the sandbox, it will be difficult to make a cover. It is better to make it in the form of a hexagon or a square. Photos of sandboxes will help you choose the right option.

Advice! With two roof flaps for the sandbox, children will be able to open it on their own. Adults will only need to control the process.
Ideas for creating playgrounds
The design of playgrounds for children is associated with the use of various equipment. In the absence of the necessary devices, you can use the advice of experienced craftsmen. You can also experiment with structures installed on the territory of the playground. For example, at the entrance to the hill-house, you can install a basketball backboard. With large tires, it is easy to equip an obstacle course on the playground (as in the photo).
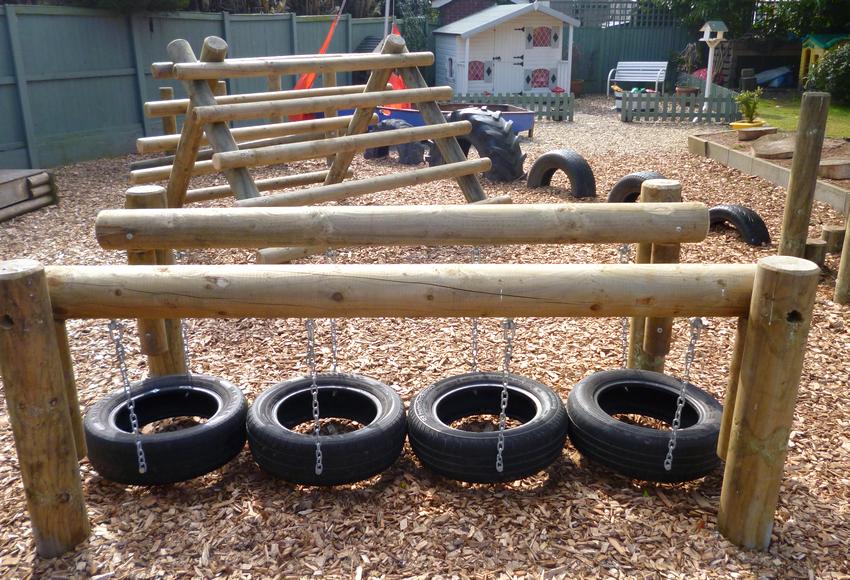
The sandbox in the playground is not only made of boards. She is often surrounded by stumps. If tires from a passenger car are used, five pieces will need to be prepared. The sandbox is fenced with tires, stacking them two on top of each other. The main thing is to securely fix the tires in place. This is usually done using metal pins. Then the tires are covered with sand. Then such a fence is painted.
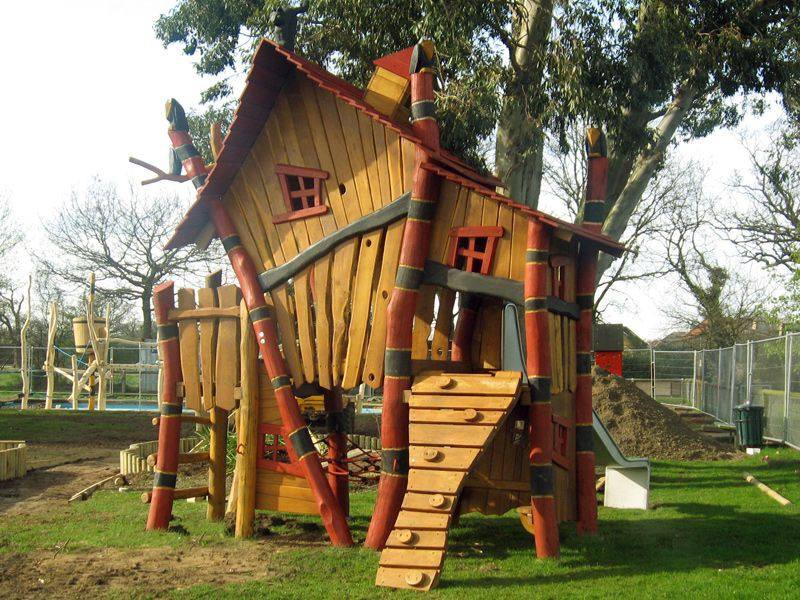
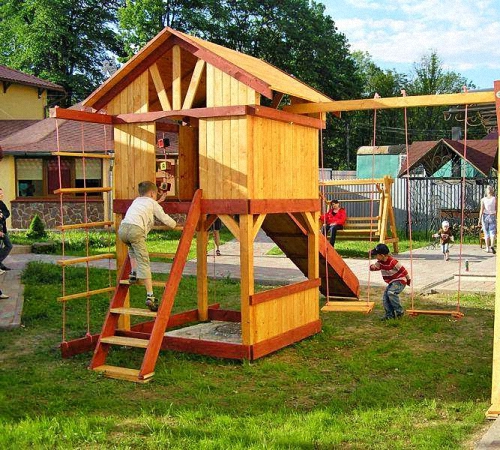
In addition to the slide-house, on the site you can equip a small house in the standard version. With the ability to work with wood, you can install various models of aircraft and ships on the territory. Children will be happy to climb on them. Do not chase the exact forms - children often draw various devices and designs in their imagination.
Playground with ready-made kits
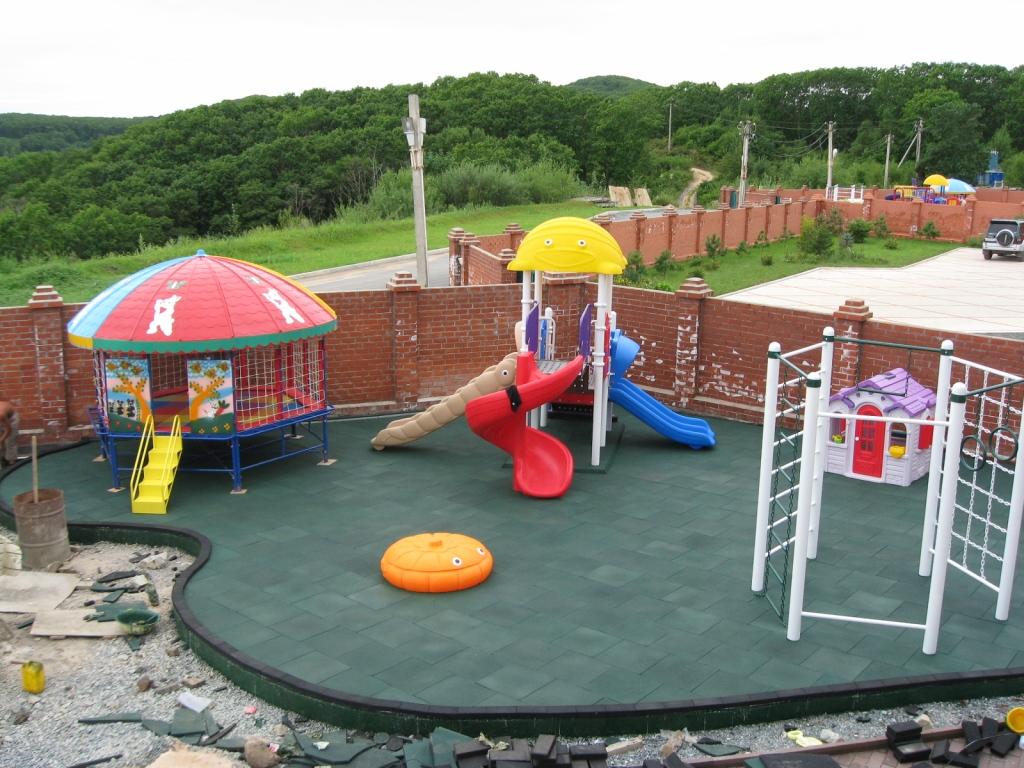
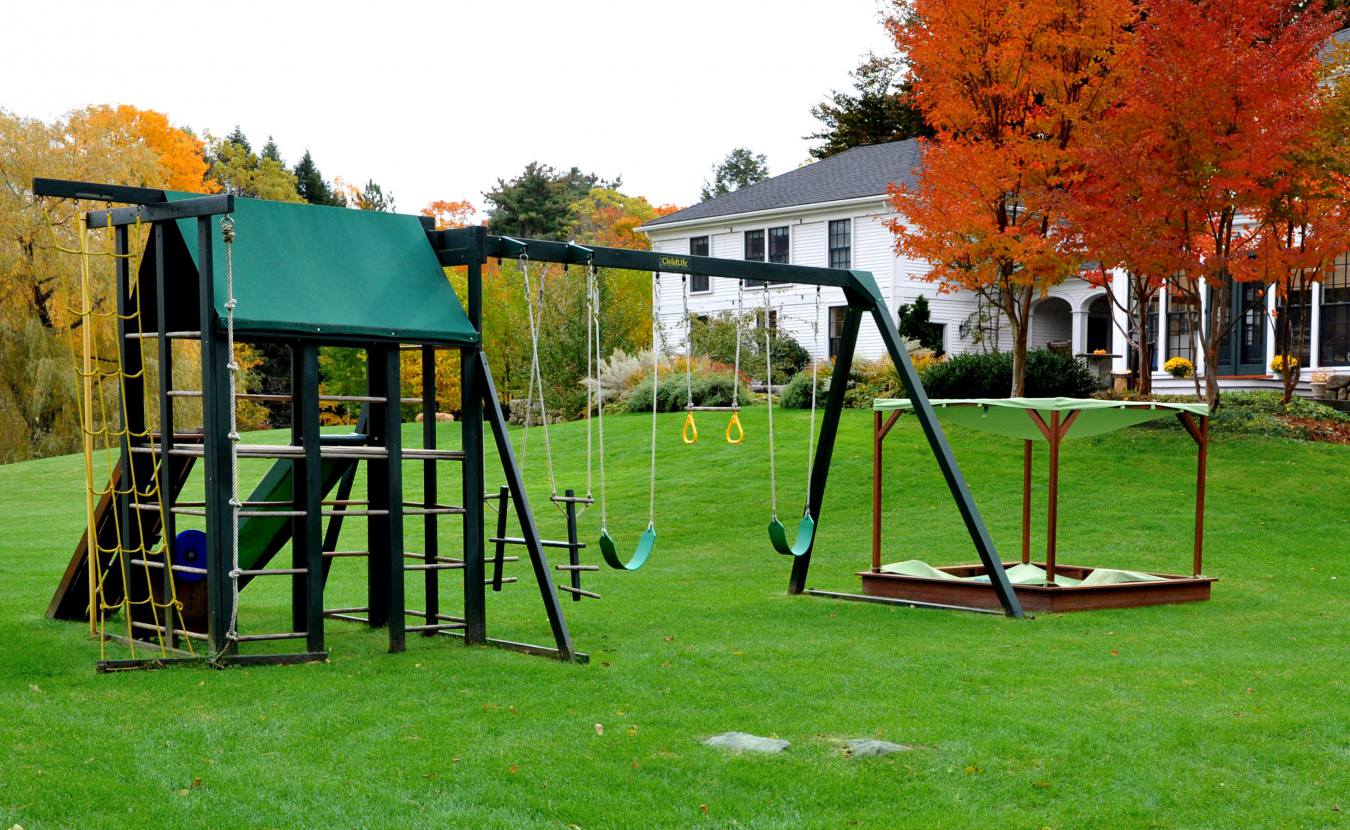
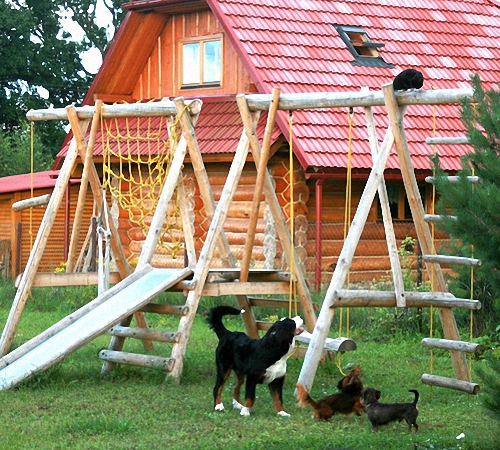
A playground can also be made from purchased simulators. In various stores you can find many designs that are made for installation on playgrounds. Here you can find houses and slides, swings and rope ladders. Installing a playground in the courtyard of a private house with ready-made kits is not difficult.
The main thing is to read the instructions that are issued along with the design. Playground simulators must be installed on a rigid base. Such a requirement is spelled out in SNIP. Most often, purchased designs have a more attractive appearance than home-made ones. This is confirmed by numerous photos of such products.

Making a site with your own hands
No playground is complete without a slide. This simulator should be comfortable and functional. The design can be made of different materials:
- steel corners - they must be at least 3 m thick;
- Sheet steel;
- pipes - will be needed to create a frame;
- plywood;
- boards.
When choosing such materials, you can equip a durable and functional slide.
Creating a slide-house
The slide-house is mounted on racks, which are usually made of timber. There should be 4 supports. Such a frame allows you to creatively approach the creation of the main children's simulator. In this case, several climbs can be made - ordinary steps, a ladder and a rope ladder. In this case, one slope is enough.
The angle that is performed when creating the ramp should not exceed 30 degrees. This avoids too much acceleration and injury to children. With such a design, children's leisure can be very well diversified.

Advice! If there are plastic panels, it is better to make a slope from them. In addition, plastic slides for playgrounds are often sold in stores. You can buy curved slides. From the descent from such a structure, children get more joy than from the descent from a straight wooden slide. The playground should be comfortable for the child, so all elements must be created in accordance with certain requirements.
materials
For the construction of a slide-house on the site, certain materials should be selected. To create such a design, you will need to prepare:
- 5 bars.
- boards from 50 to 100 mm;
- boards with a thickness of 25 and a width of 100 mm;
- plywood sheets 15 mm;
- mounting corners;
- nuts with bolts;
- self-tapping screws;
- a pipe equal in diameter to the cross section of the beam.
After preparing the materials, you can begin to create the base of the slide house for the site.
Foundation preparation
It is necessary to find a place to install the slide, as well as prepare a hole that will be needed for the foundation. It is worth making a square frame. There should be a distance of 1 m between the posts. Each side of the pit should be made 1.5 m long. In addition, the pits should have a minimum depth of 20 cm.
The bottom of the pits must be compacted, and then crushed stone should be poured. This layer should be 10 cm thick. It also needs to be compacted. Under each bar, you can dig a small hole. The depth of each of them must be at least half a meter. The lower edges of the bars are impregnated with bitumen.

At the bottom of the pit, it is necessary to pour a crushed stone pillow. Crushed stone must be selected fractions of 15-25 mm. After filling the rubble at the bottom of the pits, posts are inserted into them. They are leveled and correctly oriented. Then the concrete solution is poured.
Advice! Concrete is strong if it contains the optimal amount of water. The mixture should be thick when kneading. For the mobility of concrete, it is necessary to add plasticizers to it. They are easy to purchase at a hardware store.

Ramp and bottom harness
The strapping of the bars must also be performed using 50 mm boards. They are fixed at the floor level of the structure. In addition, to increase the reliability of the house, it is worth making a jumper. Boards should be screwed to the beams on self-tapping screws. Fasteners must have a minimum length of 100 mm. In addition, it is necessary to carry out a tray for a ramp.
For this purpose, follow simple steps. First, 2 boards are cut, which are slightly longer than the slope. Then the angles of contact of the ramp with the ground and the harness are marked. The board is cut to the desired size with a jigsaw. Then jumpers are cut. Long boards must be laid on the ground, and then fasten jumpers to them with self-tapping screws.

There should be a distance of about 30 cm between the jumpers. However, the first and last of them are mounted 5 cm from the edge. A cut is made on top of the board. This is necessary to create a full-fledged slope support for the harness.
Then the ramp is attached to the harness with corners. They are fixed with screws and nuts. The corners must be installed in such a way that children do not get scratched during the game. In addition, it is necessary to ensure that no fasteners or sharp parts stick out from the side of the slope. The slope is sewn up with plywood, which is installed on self-tapping screws. Fasteners are recessed into the material by 1 mm. Then the attachment points are puttied and sanded.

Stairs
It is necessary to cut 2 pieces of board 50 mm thick. Their length should be slightly longer than the length of the stairs. The corners of the connection with the ground and the strapping are cut off. Then it is necessary to cut grooves for the steps in the boards. After the steps are cut to the desired width. It remains only to assemble the ladder. The steps are fixed on the side boards with self-tapping screws.
The ladder must be securely fixed. It is attached to the strapping beam. Railings and supports are installed on each side of the stairs. They are treated with a planer to remove bumps and sharp edges. Then the details of the structure must be carefully sanded. The upper edge of the railing is attached to the uprights.
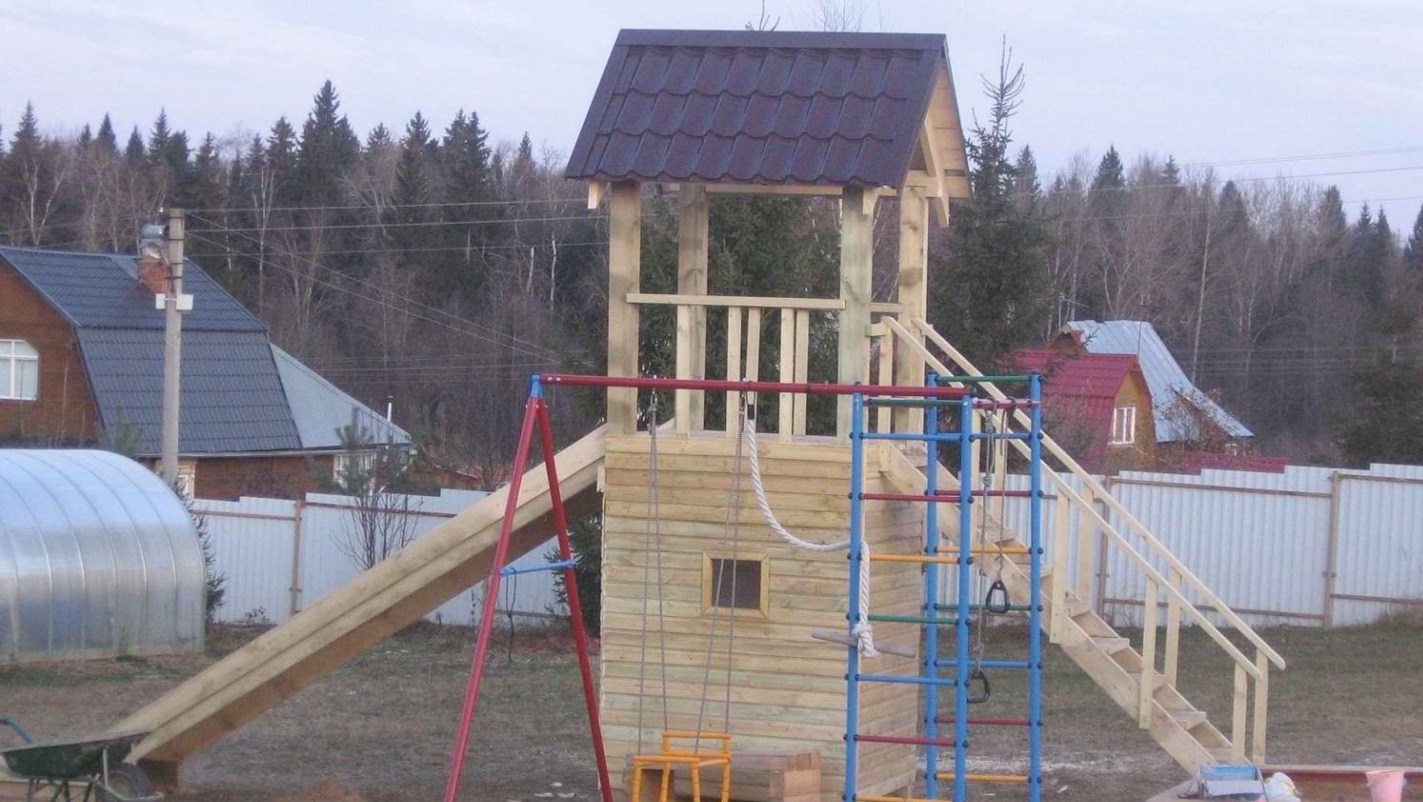
Entrances and roof
On each slide in the playground, an extreme climb is performed. To do this, make a tray of the same size as for the ramp. The part of the harness, which is located on the side of the extreme entrance, must be reinforced with steel corners.

Then cut pieces of plywood are laid on the floor of the house on the site. The ceiling is also lined with the same material. The house must be sheathed on the outside with plywood sheets. Entrances to it are made in the form of circles or ovals. Their size should be such as to provide maximum comfort for children playing on the playground. To create a roof, you need to cut 4 rafters. They are made from 25 mm boards. The angles of the rafters can be determined based on the height of the roof. They are attached to the corners of the frame, and then connected to each other with metal corners from above. The roof is covered with plywood of the right size.
Final work
When the work is completed, it is necessary to sand all the places where children can get a splinter. A rope is attached to the upper harness on the side of the extreme lift. It should have nodes located every 20 cm. The house is painted in such a way that it looks attractive. It can be applied to various images, as in the photo.

conclusions
It is not always possible to buy a ready-made play structure for a playground. In this regard, the playground in the yard is often done by hand. The main condition is that the materials used must be durable and of high quality. Often, a tree is chosen for the construction of various structures for playgrounds in the yard.
It is important to control the quality of processing elements. Some areas should not be allowed to remain uncleaned, and structural details should not have sharp edges. This may cause injury to children playing on the playground.

Each playground has a small house. It is usually made from improvised materials. You can build a house with your own hands with the participation of the children themselves. This will not only please the kids, but also make the designs more convenient.
Dacha is a popular place for recreation and family leisure. Most often, such houses are located outside the city and here you can perfectly relax from the bustle of the city, problems, breathe fresh air and enjoy the neighborhood of nature. It's a good place to spend time with friends and acquaintances. But a dacha is a place where children also spend their summer holidays. And it is necessary to create special conditions for them to play and have fun. How can this be done efficiently and economically enough?
It is quite difficult to tear modern children away from watching TV, computer games, tablets or mobile phones. Playing on the street is no longer prestigious. That is why it is worth trying hard to entice the child to play in the garden in the fresh air. It must be something really exciting! And therefore, try to create a playground in your summer cottage.
Children's playgrounds for summer cottages are a whole world for a child. Here you can run, jump, swing on a rope, climb the Swedish wall, go down the hill and swing on a swing. These classes will become doubly interesting if you invite friends with you. Do something pleasant for your child - create a gift for him with your own hands! And the first step in achieving this goal will be the choice of a place for the location of the children's playground and the selection of materials.
Safety and site selection
Playgrounds for giving should be first of all reliable. This factor is more dependent on the parents, and therefore the playground should be located in the direct visibility of adults. So you can control everything that happens on the site and with your child.

Make sure that children do not have access to electricity and electrical appliances, as well as various communications in the location of the children's playground. Do not place a playground on the shore of a reservoir - this may pose a threat to your children. Children's playgrounds for summer cottages should be well lit in the evening, but during the day it is desirable to create some shade so that children are protected from direct sunlight.
Material selection
The most popular material for baby supplies is wood. This product is environmentally friendly, non-toxic, practical to use and many interesting things can be made from it.

Wooden playgrounds for summer cottages are an opportunity to give free rein to your imagination and your creativity, as well as to please your children with a pleasant hand-made gift. In order to organize everything well, first create a project on paper, then you can see the end result of your enterprise.
Components of a playground
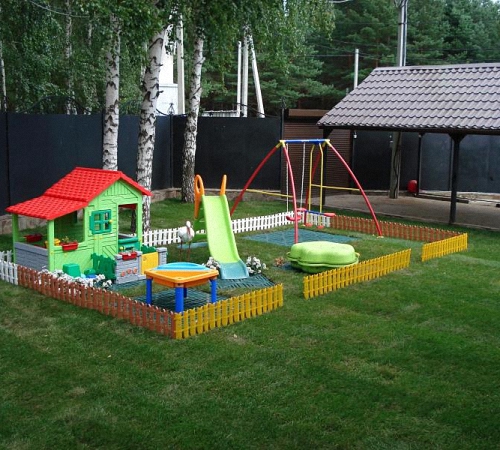
The design of the playground in the country depends on the age of the children who will play on it. It can be a sandbox, swings, climbing ladders, slides, all kinds of carousels - everything that will enable children to play actively and enjoy the game. Here are the most important components of the playground that you can do with your own hands.

This is one of the main elements of the children's playground. Its creation should be approached responsibly. Subject to all the rules and measurements, achieving this goal is not difficult.

Slide

Keep the kids entertained with a fun activity, but keep safety in mind when creating a slide. The wooden surface should be well processed, it should not have roughness and splinters, and the slide itself should be sufficiently stable and durable.

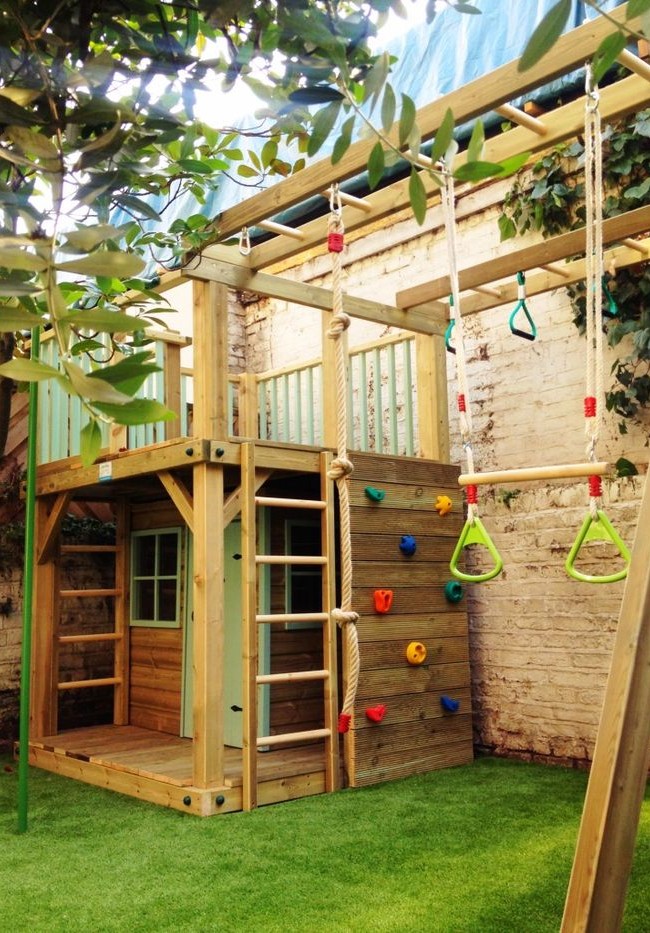
For older children, from the age of 6, you can install a children's sports complex. It may include stairs, bars, rings, swings. Everything is up to you.
When creating a children's playground for a summer cottage with your own hands, remember that all work must be done with high quality, because the safety and health of your children depends on it. Who will spend their time here.

The wood must be sanded, painted, nails hammered with high quality. Do not create structures with sharp corners and protruding parts. Well, the last moment is the coating for the sites in the country. It can be different depending on the situation and your preferences: sand, lawn grass, artificial surfaces made from synthetic materials. They are safe, environmentally friendly, comfortable and soft. The child is not injured, even falling on such a coating.
A well-created playground is an opportunity for your child to develop properly, maintain the necessary fitness and lead a healthy lifestyle. All this will stimulate the full development of the growing organism, and the child will be able to enjoy fun games with friends in the summer in the country.
Photos of various playgrounds


A playground is an essential attribute of any cottage or private house, in the event that children live in it. Buying a swing, sandbox and other attributes is a rather costly process. It is much cheaper to build a playground with your own hands. We will consider how to quickly and inexpensively build a playground with our own hands from improvised means.
Do-it-yourself design and scheme of a playground
The first and most important rule for the construction of a playground is its design in such a way that the playground is a reliable and most importantly safe place for children to relax. In addition, when choosing a place for arranging a playground, focus on an area with good visibility for adults.
Also, the presence of electrical appliances, wires, and various sharp objects on the playground is unacceptable. The playground should not be located near water bodies or pools.

Try to have a shade from the trees on the playground during the day, and in the evening, it is well lit. The place for arranging the site should be flat, it is advisable to equip it with a sand cushion, which will reduce the risk of injury to children in the event of a fall.
When choosing materials for the construction of the site, we recommend stopping at a tree. This product is environmentally friendly, harmless, light and practical. In addition, the tree is easy to process, so it can be used to build almost any design details. By painting wooden crafts in different colors, you will be able to get an aesthetically attractive playground.
We recommend that you initially create drawings of playgrounds with your own hands on paper. The project must indicate all the dimensions of each element located on the site. In addition, it is necessary to determine the safe angle of inclination of the slide and its height.
DIY playground: photos and ideas
The choice of design for the playground should be compared with the age of the children and the individual characteristics of the area on which it will be equipped. Most often, the main components of any playground are a sandbox, a slide and a swing. In addition, you can also add slides for descent, a children's house, carousels. In general, all components of the playground should be interesting for children to play.
The most important element of any playground is the sandbox. Its creation must be approached with special responsibility. When choosing the size of the sandbox, you should consider the number of children who will play in it. If the site is not in the shade, then it is preferable to make a sandbox with protection from sunlight. And if you have pets, such as dogs, then it is better to build a lid on the sandbox that will close it at night and in the winter.
Any kid will be delighted with the presence of a slide on the playground. However, this element must be especially safe. Handrails should be installed on the slide to prevent the baby from falling. Steps should be designed in such a way that the baby can easily climb them. The angle of inclination of the slide itself should not be too sharp, as the baby may fall off it. At the bottom of the slide, you should come up with protection that slows down the child a little during the descent.

If the slide is made of wood, then carefully sand the surface, treat it with special compounds that will save this material from roughness. The main qualities of a good slide are stability, strength and safety.
Try to ensure that there are no sharp corners or loose nails on the structures. It is necessary to cover wooden structures only with environmentally friendly materials. To cover the site, it is preferable to use sand or lawn grass. An excellent option is to cover the site with synthetic artificial turf. In no case is a playground built on a concrete base.
The technology of building a playground in the garden with your own hands: we make a sandbox
When choosing a place to install a sandbox, consider the following requirements:
- the place of its installation must be open to the access of parents;
- it is not recommended to install a sandbox under a tree, as leaves and various debris will fall into it;
- take care of the presence of protection from direct sunlight;
- Calculate the dimensions of the sandbox so that the children fit freely in it.
When choosing the shape of a sandbox, it is best to give preference to a square. This design is easily constructed from wood. When choosing wood, stop at pine, as this material tolerates moisture, temperature changes and solar radiation well. In addition, the resin that is in the tree has an antimicrobial effect.
The standard sandbox size, convenient for several children to play, is 200 by 200 cm. Initially, you should take care of preparing the site for the sandbox. For marking, you will need a cord and a peg. After marking, it is necessary to remove the top layer of soil, approximately 20 cm.
Next, you should prepare the base for backfilling sand. It is best to line the bottom of the sandbox with a dense material, as mixing sand with soil will cause it to lose its attractiveness. At the bottom of the sandbox, a sand cushion is arranged, about 5 cm thick. Next, geotextile material or plastic tiles should be laid at the bottom of the sandbox.
Please note that the use of polyethylene is unacceptable, since after rain moisture will accumulate inside the sandbox, which will prevent the sand from drying out. Geotextile materials, in turn, easily pass moisture, but do not let insects and spiders from the soil into the sand.

When using film or plywood, it is recommended to equip drainage holes in them. At the corners of the structure, a frame made of beams, 5x5 cm thick, should be equipped. Use an antiseptic to process parts, and it is recommended to treat those fragments of the sandbox that will come into contact with the soil with resin or bitumen.
To cover each side of the sandbox, make pine shields. At the same time, it is recommended to choose boards with a thickness of 25 mm, and a width of about thirty centimeters.
Please note that knots or various kinds of burrs should not be present on the surface of the wood, it should be well sanded. For greater convenience of children during the game, we recommend building bumpers on the sandbox. They will serve not only as an additional seat, but also as a showcase for various kinds of sand structures.
As an additional convenience, you can build a cover on the sandbox that will protect it not only from rain, but also from debris and pets. For the manufacture of the cover, a shield should be built from the same boards, which is fixed on additional bars and hinges. Keep in mind that even a child should be able to open the doors, so do not make the lid massive.
Do-it-yourself playground photo:

It is possible to equip the sandbox with an awning or shelter in the form of a fungus, for example. These designs will also protect the sandbox from moisture. In order to build the leg of the fungus, you will need a beam with a section of 10x10 cm. In order for the leg to be stable, it is buried at least 80 cm into the ground. Use hot bitumen or resin to process parts that come into contact with the soil.
Next, you should purchase sand for playing in the sandbox. We recommend stopping at its river version. This sand practically does not contain foreign inclusions. However, any sand must be screened before being placed in the sandbox.
There are special varieties of sand with a high content of clay. It is easier to sculpt castles and other structures from them. However, the cost of such sand is more expensive.
Do-it-yourself playground: building a slide
In order to independently make a slide out of wood, you will need:
- four wooden bars, dimensions 10x10x60 cm;
- one bar 50x50x80 cm;
- three standard floor boards, 6 m long;
- five boards measuring 4x13x60 cm;
- two rails with a circular cross section;
- two sheets of fiberboard and wood lining used in the finishing process;
- fasteners and screws.

In addition, it is necessary to prepare such tools as a hammer, screwdriver, grinder, electric drill, planer, saw, level, tape measure, wood cutting machines, etc.
Instructions for making a playground from wood with your own hands:
1. Initially, you need to create a slide plan. The project should indicate the specific dimensions of each part. You can use ready-made drawings of slides.
2. In accordance with the drawing, the tree is sawn into separate parts. Logs must be sanded and planed. Bevel wooden parts to avoid injury to children.
4. Make a recess in the ground by 65 cm. Coat the wooden parts of the tree that are installed in the ground with waterproofing mastic or resin.
5. Use a router to make grooves in the uprights. The depth of the grooves must be at least 2 cm. Use the grooves to connect the supports and boards. To tighten the boards, use bolts with self-tapping screws. The result is a frame structure.

6. Connect two wooden posts to the frame, in which the grooves are made. In order to install the floor, you need to use a floorboard.
7. Please note that a small gap must be left between the boards to compensate for the expansion of the tree in the process of getting wet. To connect the boards to the floor, use steel corners.
9. In order to build a frame, process the upper and lower parts of the slide with boards.
10. Sidewalls are installed on the side, the height of which is about 30 cm. For finishing the slope, a plastic sheet, galvanized steel sheet or linoleum coating is used.
12. In order to build a ladder for a slide, use a tree 5 cm thick. Initially, build a stringer on which the steps will be fixed. Use self-tapping screws to fix the boards.
13. Install the ladder, use self-tapping screws and racks to fix it on the slide. Don't forget to reinforce the beams. Next, the baluster is installed on the stairs, its height is about half a meter. Put a railing on it. Their installation is mandatory.

14. Install plywood or fiberboard walls at the bottom of the slide. They are fixed in groove joints. The presence of a parapet will protect the child from accidental falls. You should also equip the roof on the slide, it will protect the kids from the sun in hot weather.
How to decorate a playground with your own hands
In the process of designing a playground, it is not necessary to use expensive purchased materials. A few cans of bright paint and improvised means are quite enough. If you have old tires, plastic bottles, toys made of rubber and plastic, wheels lying around at home, then you can use all these elements when decorating a playground with your own hands.
Let's start with the sandbox. In order to give it an unusual and non-standard appearance, equip it with sides that have different heights. It is possible to use an old tire as a bead for a sandbox. At the same time, it needs to be decorated with different colors.
If the sandbox has a lid, then decorate it with paints. At the same time, you can design a playground in a specific theme, for example, in the form of a ship, forest, flower bed or garden.
If there is a house on the playground, its walls are painted in different colors. The discs can be used as mirrors or paintings. Install a table and chairs in the house so that the children can relax and have a tea party there. If you have old curtains lying around in your closet, feel free to hang them in the house. Place artificial flowers on window sills. Girls will especially like this design.
A variant of construction on the site of the machine is possible. For the manufacture of its frame, use old boards, and old tires will serve as wheels. Inside, you should install a seat, a toy steering wheel or a real one. In order for the car to please the kids, decorate it in their favorite color.
In order for palm trees to appear on your playground, build them from plastic bottles. If you have old stumps, build paths out of them. Using old tires, you can make garden figures for the playground in the form of swans, frogs, a wolf and a hare.
Try to ensure that each element of the playground performs a specific developmental and educational function. It is enough to show a little imagination and a do-it-yourself playground will become bright, beautiful and sunny.
People who have their own dacha know firsthand what a good vacation is. After all, a dacha far outside the city, where there is clean air, peace, and most importantly, there is no city bustle, which is so annoying on weekdays, is a great place to relax and enjoy it to the fullest. For a child, rest is primarily a game, and a do-it-yourself playground would be a good idea. The dacha is really a great place to build an impromptu playground, the place is remote and safe for these purposes, and most importantly - spacious.
Site marking

It is worth starting the creation of a playground from the most important thing, from choosing a more suitable site for it. Of course, you should choose wisely, and first of all, consider the safety of children. For these purposes, it is worth excluding from the possible those areas where a pond is already located, or simply there is a fence with barbed wire or sharp spikes. In addition, playgrounds for children should have enough light.
It is advisable to choose a place where there will be more light in the morning, when the guys are full of energy and want to play, and closer to noon the sun will stop covering the playground, and the children will not suffer from annoying heat.
But the site should not be completely immersed in the shade either, because in an open area under the sun you can place a small pool, and somehow protect it from the rest of the site. Under the sun, the water in the pool will warm up faster, which is quite convenient and efficient.
 On the impromptu scheme, the place where the adults are located is correctly allocated, and at the same time, they have a completely open view of the site itself. This is also an important markup point, because do not forget that children must be supervised so that in which case adults can protect them from a potential threat or some kind of “unsuccessful” game.
It is important to take into account the view factor, and arrange the playground structures so that they fit into this view and, as a result, the children remain in sight.
Size selection and layout
 The nuances of preparing the territory include such a moment as the size of the territory itself. They should be selected and adjusted carefully and wisely, because this is important not only for the children themselves, but also for you. It is obvious that the construction of such a platform is far from being an easy task. You will greatly facilitate your task if you can plan and place all the necessary objects in a relatively small area, while saving time and space, and creating a cozy, compact corner for children. This option is much better than building a large playground that children still cannot occupy all of.
As a rule, for children under 7 years old, a playground of 8-9 square meters will be optimal, for older children, up to 12 years old, respectively, more space is needed, because their desires and preferences change, the playground should expand by about 15 square meters.
It would be easier and wiser to build a platform, so to speak, for growth, leave a few meters in reserve when marking, which, by the way, will come when the child gets older.
 After the place is finally chosen, it should be, let's say, process it, do everything so that the presence on the site, and on the “attractions” themselves, is not only safe for children, but pleasant and fun. You should start with the foundation, as in any work, it is important in the structures on the site. All supports of swings, houses, slides that will fill the site must be tightly fixed. To do this, the details of the playground should be deepened into the ground by about 50 centimeters. Of course, you should start from situations, because they are different, but there are universal measurements and various rules that will help you do the job more professionally. In addition, after the parts have settled firmly in the ground, they should be fixed by concreting, that is, pour concrete supports so that the swings of the slides and houses in no case tip over and harm the children.
 As for the individual elements of the playground, for each entertainment there is a certain standard and a certain device that should be followed.
When installing a swing, leave a space of 2 or more meters behind and in front of them. This is the so-called security zone, and it must be free.
Choosing a place and installing a ready-made playground complex - video
Playground cover
There is one more, no less important than all the previous points of safety and comfort, this is the coverage of the site. The materials that cover the play space deserve special attention in the discussion and planning of the children's recreation area. The fact is that coverage affects many factors, and it is worth thinking about it.
 It should be taken into account that, most likely, children will often fall, forgetting about control during a fun game or through negligence, or maybe specially jump off a swing, slide down slides at high speed, run without thinking that they can stumble, and eventually fall. Based on this, we can conclude that the coating must be chosen more practical. Falling on this will not cause pain, but it should not be something soft like a trampoline. Such material can easily interfere with the game and entertainment, since it is inconvenient to run and jump on it. For these purposes, there is a special trampoline, which, by the way, can also be installed separately on the site.
Also, it must either be moisture resistant, or contain elements, or consist entirely of a material that dries relatively quickly. This is necessary so that the surface does not accumulate dampness and moisture, from which children can catch a cold the next time they play, from lying on such a surface longer than necessary. It's no secret that children, especially small ones, love to lie down just like that, or crawl on the ground. Therefore, the playground, namely its coating, should do a good job of protecting the child, preventing him from freezing or damaging his knees during a hard fall.
 In general, the rubber coating perfectly meets all these requirements, however, its first minus is in the price, the second in the purpose. Such a coating is quite expensive, but in addition, it is not particularly suitable for a site that will be located for a summer residence. After all, at the dacha, you don’t really want to watch the synthetics of the city, you want something that will be pleasantly combined with the dacha motif - like, for example, a lawn. Using reliable varieties of grass, such coverage is not difficult to provide, however, in the area where the slides and swings are located, it is advisable to add or completely fill up sand alone, which, as mentioned earlier, will easily soften the blows and falls that often occur in such places.
As a result, you need to remember and take into account:
- Territory size. (do not measure too large area).
- Nearby structures (something interferes with the construction or not).
- Children's safety.
- Site coverage (soil).
Paradise for children in the country - video
Territory cleaning
The final stage of the marking will be cleaning or searching for the most accurate area on which there will be no, or there will be as few as possible dangerous and inconvenient stones, bumps, snags, and similar items that can interfere with the construction of the site or the game of your children.
After the place is selected, it is necessary to proceed to the clearing itself. To begin with, completely level the territory, remove all kinds of mounds and bumps. Then rid the site of large stones, cobblestones, sharp roots sticking out of the ground, and other small debris, which can also interfere or do harm in every possible way.
Clean up and pay attention to:
- large and medium stones and cobblestones;
- roots and snags;
- mounds and bumps;
- other small debris.
Arrangement
It is likely that your site will also have a lot of wood elements, this is a very serious point, since all this wood and parts from it must be carefully polished, and ideally they should be coated with a non-toxic varnish. So they will look fresh and pleasant, and most importantly, this procedure helps eliminate the risk of splintering or any other undesirable consequences.
 Next, you need to take into account the fact that when creating a platform and installing a swing, metal fasteners are used, because you cannot do without metal in such a structure. This metal must be of particularly high quality and very durable. He must be sure to fasten all the details. When erecting such a platform, you should in no case save on such trifles, since during the game, the health of children will be kept precisely on such metal suspensions, and the more reliable they are, the more reliable the protection for their own health.
After installing metal or any other parts, you must not forget to check them all at least once every six months. Any tool, any mechanism tends to wear out, no matter how strong and reliable it is. You have to change, if necessary, and, if possible, lubricate and “care” for all these capricious materials.
After the final marking and cleaning of the territory, when everything is already firmly marked and decided, you can finally think about how to equip the future corner of fun. And here there are really a lot of options, you can choose any kind of entertainment, and the child will like it, this is something new, and most importantly, its own, which will definitely bring pleasure. You can build a whole children's town with your own hands.
Choosing accessories for the platform
 So that it doesn’t occur to you to choose for the site, you should also think about the fact that for a start you can create the entire entourage of the entertainment site from ready-made objects. Here we will move on to the specifics, and immediately remember the trampoline, the trampoline is really something that will make any kid rejoice and be distracted for a long time. And it, at a very affordable price, can be purchased on the market or in a specialized store, of any shape, size, and most importantly, quality.
 In addition, you can install a children's basketball hoop on the site, it can also easily arouse the interest of the children, and they will gladly try to throw the ball provided to them there, while there is still no threat.
A trampoline and rings are great, of course, but the entertainment and options for arranging and choosing are not over yet, because we have not taken into account the most obvious and acceptable option. We are talking about a pool for children, inflatable, of course. It can also be purchased ready-made, and it will also delight your children when they splash around in it on a hot day and arrive in a good mood.
An excellent option that does not require much time to install and purchase is a tent, or a house-tent, whatever, but the degree of comfort will not change from this. It will be a great addition to everything that is already on the playground.
children's house
 We all loved in childhood, as children love, and now, to start our own house, building it from pillows and blankets, save your children from such torment and set up a tent on a site full of fresh air, in which they will be happy to spend time and rest.
Just at the tent, or anywhere else on the site, there is an option to install some kind of small table and bench. Children could also relax behind him, as well as adults who are watching the game at this time. A table will never be superfluous in such a place, a bench - all the more, after a long game, you just want everyone to sit nearby and discuss something, or take a breath. 
Well, the last object that can be installed without outside help is a slide, ordinary, plastic, as it usually happens - a slide, a safe descent from which will give children a lot of fun and laughter, and this is the main thing on the playground.
The advantage of all these things is mobility, since you do not have to spend time on installation, repair and other trifles, the object is simply installed, and the children enjoy the game. All these elements are compact, fit perfectly into the size of the site, and children will like it. The only thing to consider is how to properly arrange all these rides and tents. After all, it would be illogical if the slide is located at the table and the children will, sliding down, hurt each other. And an even more logical solution would be to think in advance which objects are worth installing, and which are not needed at all, of course, all this must be discussed with the owners of the site themselves - the children.
Homemade buildings and installations
There are times when you want to modify or build something from the very beginning with your own hands. For example, a sandbox, or any other of those objects that were given as an example above, to make to your taste. For such cases, explanations, advice, and, of course, drawings will already be needed.
Sandbox
 And again, the most popular thing that can be placed on the playground is the sandbox, which is undoubtedly loved by all children. There will be a lot of joy and benefit, and at the same time, a very small amount of effort and material will be spent on its construction.
It is best to make a sandbox from boards or logs, there is also an option to use stumps, which may take root on the site and serve as an excellent original decor.
The following is an example sandbox setup: 
The installation begins with the fact that the earth at the place where it will be located is dug out by 30 centimeters and the bottom is covered with pebbles or rubble - drainage material. The sandbox also should not be planned in large sizes, 150-200 centimeters are enough.
It is very important to make a kind of canopy for the sandbox or just simply a cover so that animals do not enter it at night and do not use it as a toilet, besides, in case of rain, the sand will remain dry.
 The same purchased tent can be replaced with a makeshift children's house. This is a great choice for homemade construction, because every child wants to have their own territory, and such a cozy modest house will fulfill the desire of any kid. Of course, you need to build it from wood. The frame will be exactly wooden, and it should be hung with a thick cloth.
Slide
The most suitable extension to the house would be a homemade slide. Great entertainment that will bring joy to any child. But this design is one of the most complex. When installing a slide, you also need to remember many factors. The main thing, of course, will be the height, which should not exceed 3 meters in height, and if the children are very small, then the best option for them is 1.5 meters. The steps on the stairs should be as wide as possible, and preferably covered with something that will prevent children from slipping off them if the steps get wet, for example, during rain.
 We must not forget about the railing, or the handrails, which should be located throughout the entire staircase so that the child can hold on and not fall, and at the top of the hill it does not hurt to additionally enclose the railing and make the area in front of the slope more spacious.
The most difficult thing in this design is to install a ramp, which, of course, can be made of plywood fastened in layers and varnished, but it still will not be as effective as buying a plastic descent and installing it to the prepared ladder.
 Or you can make it even more interesting and buy a spiral slope, which will bring even more pleasure than a direct descent. But the main thing is to correctly complete the ladder and the platform on which the child will stand confidently.
Video instruction for making a wooden slide
Swing
 In addition to the slide, the most ordinary swings that bring us joy at any age can become an excellent and fun entertainment. But now we need them on the site, which we are building completely ourselves.
The first thing to do to install the swing is to choose a spacious place, because you need to take into account the deviation of the swing, and in both directions, as mentioned at the very beginning, at a distance of 2 meters behind and in front of the swing should be spacious and empty.
 It is clear that a strong branch on some tree on, or at least close to, the site is best suited for this purpose. It will be easy to attach ropes to it, which will easily withstand the kids.
We will design the swing ourselves. For this we need the following materials:
- board or boards for sitting;
- two hooks or any carabiners;
- strong cable (rope).
If there is no tree, then you can use homemade mounts. In order to build such a frame, we need:
- Two racks made of wood, thicker, 3 meters long.
- The crossbar of the same diameter is 1.5 meters long.
The final structure will look like this:
Probably, we have described almost all models of objects and entertainment that you can fit on the playground with your own hands. Purchased houses, homemade from wood, slides and sandboxes, swings and basketball hoops. All this can be made by yourself or purchased in a special store, and it would seem that what else can be placed and added to this list.
sports wall
 And an excellent solution would be a climbing wall for children, along which they will be happy to climb, try, and enjoy the process. Most importantly, in addition to joy, such a wall brings children great benefits, it develops them physically, improves coordination and dexterity, but for this you need to properly install such a wall.
 First you need to prepare the hooks that will be attached to the wall with screws or nails. They can be made from anything that comes to hand, but they must be comfortable, you can also buy them in a specialized store, but if we design everything ourselves, then we can use gypsum, which can be mixed with quartz sand for strength. This mix is easy to shape and we can make any hold we want.
 Then it is worth fixing them in a random or more or less planned order on our wall, it can be made of wood, but it will take a lot of time, and this way will be impractical, it is easier to fix ready-made hooks on a real tree in the garden, which children can climb. Or attach them to the wall of the house, but not too much and high, so that reaching a certain level, the children could not climb further and went down.
It is important to choose the right surface on which they will land, it should be something soft, so that in the event of any fall or unforeseen breakdown, the children do not hurt themselves, even if the height is small, the child should not be scared, but should be confident in your actions.
Here we have such a children's play complex for the dacha. This article comes to an end, but now you know how you can conceive and make a playground in the country with your own hands. You have an idea of what kind of entertainment can be prepared for children, and most importantly, how to make it easier and more profitable. We hope the kids will be satisfied and will definitely thank you for the wonderful playground.