Drawings on stones with acrylic paints for children. About painted stones. Stone painting process
A unique kind of creativity, painting ordinary stones, is now very popular. He fell in love with many needlewomen, because it does not require any special costs or skills, and the main material, pebbles, can be found literally under your feet. Artistic painting of stones will help decorate your interior with an original composition: it can be bright stones in a glass vase or a whole picture of skillfully painted pebbles. And large specimens are often used as an unusual decor for a garden plot.
Materials and technology
In order to try your hand at painting stones, you will need:
- pebbles as a starting material;
- brushes of different thickness;
- primer (if necessary);
- sketch pencils (dark and light);
- paints (acrylic, gouache, watercolor or oil);
- varnish (furniture or acrylic);
- solvent.
Almost any stone is suitable for artistic processing, from small pebbles to heavy cobblestones. It all depends on your goal and desired result.
As for the primer, it is not a mandatory step. The stone should be primed so that its porosity does not affect the quality of the drawing. Also, the primer is needed so that the paint remains on the surface of the stone without being absorbed. At the same time, smooth sea pebbles most often do not need to be primed.
So, after preparing the stone (priming and applying the background), you can get to work. Using a special pencil, make a sketch of the future drawing, while not forgetting about the rules of composition. Then paint the stone, gradually moving from large details to smaller ones. Separate plot fragments can be first filled with color and then outlined with a thin brush, or, conversely, first draw a contour and paint over it. Keep in mind that some types of paint tend to lighten when dry. If necessary, you can cover the stone with a second layer of paint, if the first turned out to be too dull.
Painted stones are varnished to give them a glossy sheen. But sometimes varnishing can be dispensed with if, for example, you want to preserve the natural look of the stone around a small drawing made on it.
The solvent is useful for correcting small errors that are inevitable in such delicate work.

- As a raw material, choose smooth, even pebbles. Before starting work, they must be washed and dried.
- Remember to protect your clothes from paint or solvents: it is best to paint in old clothes that you do not mind getting dirty, or in an apron.
- The shape of the stone itself will tell you which pattern will look best on it. It is not necessary to look for perfectly even figures: on the contrary, irregularly shaped stones are more conducive to creativity. Give freedom to your imagination!
- Use thick brushes to create the background of the picture, and thinner ones to draw small details.
- It is best to use acrylic paints in work: they have a bright palette and dry very quickly. But if you wish, you can paint the stones with ordinary school watercolors or gouache. It should only be remembered that a drawing made with water-based paints can “leak” when varnished.
- Having mastered the basic technology, experiment with paints. For example, painting on stone with metallic acrylic paints gives the products an interesting optical effect and a pleasant sheen. The spot painting of stones with volumetric acrylic contours or paints for ceramics looks very interesting.
- If the craft is intended to decorate the yard or garden, be sure to varnish it with a weather-resistant varnish. This will help protect your work from the effects of rain and snow.
Try to master this art, and you will understand how exciting this activity is. But at the same time, painting stones is so simple that you don’t need to study complex master classes for it - just pick up a brush and create!
Master class for beginners "Painting stones"

- I wish you creative success!


Painting stones master class
Materials:
Paints:
Black, White, Red, Yellow, Dark Brown, Burnt Sienna, Yellow Ocher.
Brushes: medium and small flat, small round, eyeliner.
Others: Pencil, fixing varnish.
1. Ladybugs are a simple and popular object for stone painting. They are great for beginners. Look for small round or oval stones like in the photo. For this project, I chose the stone you see in the center.
 2. The pictures below show how to sketch your ladybug.
Using a pencil, divide the stone into three parts. Make the center section larger than all the others.

Draw two crescents touching the dividing lines.
Wings should be located in the resulting strip. 
Cut out a triangle in the center of the strip.
It looks like open wings. 
Now draw the body of the ladybug on the third section of the stone. 
3. When you are satisfied with your sketch, stroke the outlines with black paint using the tip of the brush.

4. Apply white paint to the wings with a small flat brush. The next layers, already colored, will be much brighter from this. 
5. Paint the body with some dark brown color (I used burnt umber) 
6. In a lighter color (for example, burnt sienna), add a series of stripes on the brown body.

7. Highlight the center of each band with Yellow Ocher.
Advice.
Light and shadow are the most powerful tools for making animal features clear. The tonal contrast between dark and light areas enhances impact and adds realism to all your work.

8. Paint the wings in bright colors. I chose orange, made by mixing red and yellow. I always prefer to mix colors instead of using ready-made ones. Apply paint in two coats. 
9. Draw black dots on the wings with a small round brush. Do not try to make them completely round, this does not happen in nature.  10. Now you can cover the rest of the stone with black paint.

11. Draw the head (small circle with white paint). Two white dots for the eyes and an oval for the mouth - that's the whole muzzle.

12. Now with a liner (or just a single brush) with white, draw two hook-shaped antennae on two sides of the head. 
13. The figure below shows where to draw two elongated wings with a liner and white paint 

14. Dissolve some white paint in water to get a transparent color. The lower wings, which we are now drawing, are so transparent that the ladybug's body can be seen through them. Paint over the lower wings using a round small brush.

15. Use the liner and white color to paint the veins on the transparent wings. 
6. Your ladybug is finished. Cover it with varnish to protect the stone. Change colors to create bugs to your liking. 
Painting on stone. Choice of colors and brushes.
If you have a burning desire to paint on stones, then you will undoubtedly wonder what paints are best for painting and what brushes are best to use.
Let's start with the most important - we will consider acrylic paints. Why Acrylic? Why can't you use oil paints, watercolor or gouache? Of course, you can use it, but acrylic paints are best suited for painting on stones.
Acrylic paints are versatile and easy to handle, they dry quickly, after drying they take the form of an elastic plastic-resistant coating. These paints have good hiding power and excellent color brightness - they do not fade in the sun (like watercolor) and do not fade over time (like oil), they are not washed off with water (like gouache).
In addition, they are odorless and non-toxic, and after drying, acrylic paints turn into a strong elastic film. insoluble in water, resistant to fading, temperature and humidity changes, as well as to various kinds of mechanical stress.
That is why acrylic paints are so convenient for painting on stone.
There is a huge amount of acrylic paints of domestic and foreign manufacturers. In this article, we will look at some affordable (price and availability) brands of acrylic paints that you can use in your work.
Let's start with the most common paints, which can be easily found in regular stationery stores and art shops.
Acrylic art brand "Gamma" (Russia). Inexpensive, affordable, suitable for the first samples of drawings on stones. Of the minuses, it can be noted that when the paints dry, the colors in the picture become several shades darker.
Rice. 1. Acrylic art paints "Studio". "Gamma"
Acrylic artistic paints "Decola" glossy (Nevskaya palitra, Russia). Also perfect for beginners, the colors are bright, the colors are juicy - they are best to draw flowers, plants. The gloss in the picture will enliven the leaves and flower buds, but it (gloss) can spoil the images of animals a little, as the painted stone will glare.

Fig.2. Acrylic art paints "Decola" glossy.
Acrylic artistic paints "Sonnet" and "Ladoga" (Nevskaya Palitra, Russia) are a normal price-quality ratio for beginners.

Fig.3. Acrylic art paints "Sonnet"
In the Ladoga series, paints have increased adhesion (sticking, adhesion of paint and bases), so the painting on the stone will be durable and resistant to normal temperature changes. Some artists also note that paints become darker after drying, so this feature must be taken into account when drawing.

Fig.4. Acrylic artistic paints "Ladoga"
To create additional effects, you can combine Decola glossy paints and Sonnet and Ladoga matte paints in your work.
Pebeo " (France, China), acrylic creamy paints " Vivace » (Italy) - the next level of acrylic paints, which are often found in artists' stores. They apply well and do not darken when dry. Convenient and easy to work.

Fig.5. Acrylic art paints "Pebeo"

Fig.6. Acrylic art paints "Vivace"
The next two paint brands ( Plaid, Maimeri ) are more expensive and harder to find in stores. When choosing these brands, you need to pay attention to what this or that series was made for (painting on glass, fabric, metal, etc. - these series are not suitable for you) and for what works (internal or external). Since if you want to paint a stone for a garden, then it is best to use outdoor paints. The instructions must necessarily state that the paints are suitable for painting on stone (cement).
Acrylic art paints Plaid Folk Art ” (USA) - good paints, but they will most likely have to be ordered through online stores. Large palette of colors, do not darken after drying, many different mediums (means for special effects).

Fig.7. Acrylic art paints "Folk Art Plaid"
Maimeri" series "Polycolor "(Italy) - bright, saturated colors, easy to work with. An excellent choice if you want to create something masterpiece.

Fig.8. Acrylic art paints "Maimeri"
We discussed the issue with paints, we can move on to brushes.
Synthetic or nylon brushes are best for painting on stone. Bristle brushes are too coarse, and brushes made from natural materials (squirrel, kolinsky, etc.) are too soft and brittle.

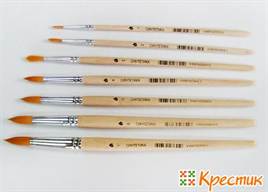
Fig.9. A set of brushes for painting on stone
Let's look at the brushes shown in the figure.
Brush No. 8 - for painting large stones (from 4-5 kg)
Brush number 7 - for painting large stones, it is convenient to draw flowers and leaves using the technique of one stroke.
Brush number 6 - for painting large stones, it is convenient to paint flowers and leaves using the technique of one stroke.
Brush No. 5 - for painting large and small stones, a versatile and comfortable brush.
Brush No. 4 - for painting small stones, a versatile and comfortable brush.
Brush number 3 - for painting small stones, for drawing details on large stones
Brush number 2 - the most popular for drawing details (fur, villi, eyes, stamens, patterns, etc.)
Brush No. 1 - for special effects (for example, in spot painting)
So, the issue with paints and brushes is resolved, now let's get down to business!
- Little tricks for beginners to paint with acrylic paints
Master class "Painting on stone".
Painting on stone.
Little tricks for beginners.
In today's master class, we will talk about some of the technical aspects of drawing on stones. Since we paint with acrylics, we decided to tell you some tricks that make it easier to work with them.
It is no secret that acrylic dries quickly, so this fact causes certain difficulties for many novice masters. It turns out that you need to draw quickly, constantly adding new portions of paint. Or use special tools to slow down the drying of acrylic paint. But this is not very convenient, not practical and not economical.:)
Acrylic paint dries quickly, turning into a dense, elastic substance. Therefore, firstly, you will not be able to work at a slow pace, dipping the brush into an open jar of paint - as the paint will dry out and you will have to throw away the entire jar or tube. At the same time, using a regular palette is also not very convenient, since the paint consumption is huge.
What to do? We suggest using a specially prepared palette that will allow you not to be nervous, not in a hurry, while maintaining inspiration, enjoying work and at the same time saving acrylic paints.
In order to make it, we need:
- Plastic container with lid
- Napkins or toilet paper
- Water
- baking paper
We take a container, any size, in the process of work you will determine the volume that is convenient for you.

Accordingly, in a large (wide) container, you get a large palette in which you can mix many different colors and shades.

We will take a small one, sufficient for painting a small stone or sea pebbles. We line the bottom of the container with napkins or toilet paper. Lightly tamp.


The next step is to take wax paper for baking, cut out a piece that fits the size of the container and place it on the bottom of the container, on top of wet wipes.


So, our custom palette is ready to use. The top layer of the palette - baking paper perfectly retains moisture - so our paints do not dry out. In addition, if the process of painting is delayed for several days (and it is usually delayed:) ), you can close the container palette with a lid and put it in the refrigerator or a cold place - the paints will calmly remain in this form for several days without losing their properties.

The palette is done, now we take the prepared stone and we can start painting! But that's a completely different story! :)
Inspiration and creative success!
Other articles on the topic "Master class Painting on stone":
- Painting on stone: choosing brushes and paints
Creative workshop DS ArtStone
Palette
To begin with, we need a stone of a suitable size, preferably rounded. The surface of the stone can be different - both smooth and rough. Choose the stone that is pleasant to hold and stroke. After all, each stone has its own energy, so you will choose the stone that suits you.
Do not use limestone - white-yellow stones. They are fragile, absorb a lot of paint, make the picture dull. It is easy to distinguish them - you just need to run such a stone on asphalt, another stone or something solid - a white mark will remain on the subject.

So, we have found a suitable material for drawing. Now the stone needs to be washed and dried well. Next, let's move on to the primer. Primer (white liquid like milk) can be professional, created specifically for stone work. You can also use the usual primer, which remained after the repair.
If you hear all the words listed above for the first time or have never come into contact with building materials, then there is an easier option. I wash the stone well, degrease it (with any degreasing agent) and prime our future cat with acrylic paints. That is, we simply paint over the stone with dark gray acrylic.

Now you can start drawing or coloring.

At this stage, everything depends on your creative idea, patience, artistic skills and abilities. It is best to paint with acrylic paints. They not only fit well on the stone, but also give freedom to the artist - if something doesn’t work out for you, you can paint over the unsuccessful area and draw again. And you can repeat the procedure as many times as you like. In addition, acrylic paints are environmentally friendly, odorless, non-toxic, after drying they do not dissolve in water (therefore, it is important to paint in special clothes that you do not mind ruining).

We will not dwell on the painting technique in detail (we will do this in the next lessons), since our master class is an overview. It should be noted that it is best to start painting the stone from the muzzle. A well-drawn cat's face is the key to the success of your work.
And as a result of our stone painting master class, we got a small (our artist used a small stone) miracle - a charming cat with blue eyes, which is pleasant to look at and hold in hands. She will always attract curious glances of acquaintances, decorate any desktop, window sill, flower pot. Children will be happy to take it to their games.
We wish you good luck in your work. If you have any questions, write to us, we will answer!
Many of those who were on vacation near the sea once brought with them fascinating smooth pebbles, carved over many years by sea waves. To be honest, it is not entirely clear what attracts us to the shape and smoothness of the surface of pebbles, and only a few people think of making crafts out of stone. What crafts can be done and how can they be useful? In this article we will look at the ways of painting on stones, a master class on their creation, perhaps, can inspire you to new works.
Paints for drawing
Artistic painting of stones can be done with gouache and acrylic paints. Moreover, acrylic paints are very good for stone, as they are bright and durable. For beginning artists, it is worth noting that acrylic paints require some maintenance. Firstly, they are more expensive, they dry quickly, and secondly, synthetic brushes should be used, since the substance in the paint corrodes natural pile, do not leave them in the open air with paint, otherwise it will be difficult to wash the brushes.
Note! The work surface and clothing should be protected with some kind of oilcloth or, in extreme cases, with newspapers and paper.
Sometimes a primer is used to make the paint go on evenly. Usually this is a solution of PVA glue with water, before starting to apply the primary colors, it is recommended to apply white paint, this will add brightness to the next layer of paint. But to make thin contours and lines, you can use special acrylic or permanent markers, as well as thick paints that are used for contouring in stained glass painting.

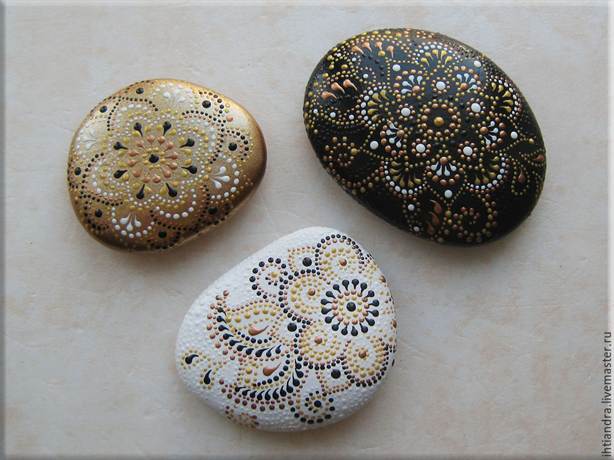
Particular attention is paid to contour paints in dot contour painting, which attracts with its easy creation process and funny final works. Although when creating it is still desirable to apply a background and a primer. Stones in bright painting can be used in interior decoration. Juicy acrylic paints will create the impression of sweets in flowerpots that do not melt, or as an addition to flower pots.


Excellent pictures are obtained from pebbles. Small stones can be glued to the construction adhesive, and it will hold firmly in a vertical position. Decorated stones are assembled like a puzzle into a beautiful panel. Photo below for examples:
In the absence of the skills of experienced artists, you can use stencils or ordinary masking tape and combinations of your favorite colors. Apply layers in the order in which they dry.


ladybugs
Use this type of craft in the classroom for children. The technique of painting stones can be used at exhibitions of children's art, or as an exciting home game to create decorative pictures for the interior of a room.

Pebbles can be used both large in size and small pebbles. Let's consider a small step-by-step MK for creating "ladybugs" from stone with your own hands.
Step 1. Let's prepare the materials.
You will need stones, best of all smooth and rounded, like real insects, PVA glue, a pen, pencil, acrylic paints, synthetic and natural brushes, a palette.
To protect clothes, use an apron, make a workplace by laying oilcloth or paper. Wash the stones with soap and dry.

Step 2. Using a solution of PVA glue and water at a ratio of 1: 1, apply a primer with a natural brush, let dry. Then we paint with diluted water and white acrylic paint, this is done so that the applied background is brighter.

Step 3. We outline the lines of the wings and head. We paint with synthetic brushes the main details of the ladybug, wings and head. Let's dry.


Step 4. Using a thin brush or markers, make circles on the back and eyes. At the end of the work, give your product a glossy sheen with furniture or decoupage varnish.


For summer cottages
Large ordinary stones can also be found on land plots, which can also be turned into bizarre animal figures using acrylic paint and several layers of good furniture varnish.
Working on such a decorative product requires professional skills if you want to achieve a detailed picture. The stones must first be thoroughly washed and, after complete drying, apply primer. And then the background color, you can apply paints intended for external work.

If it is difficult to draw animals, then you can resort to a simple schematic decoration of funny houses. Suitable stone of any size. Now we need more paints and varnish. It's better to take the good ones. An example in the photo below:


Warm spring days are approaching, which I want to spend closer to nature, somewhere in the countryside, caring for a flowering garden! However, no matter how beautiful the self-grown flower beds are, you can always add some kind of “zest” to the landscape, which will give the individuality and comfort of the backyard territory! We are talking, of course, about stones - but not an alpine slide or gravel on a path: today we will talk about artistic painting on stones, with which you can create a children's corner, decorate a pool or an artificial pond.
At the same time, it is not necessary to be an outstanding artist - by following simple rules and giving room for imagination, even beginners can try to make a cheerful ladybug, frog, turtle, funny animals and birds, or delicious glossy fruits and vegetables from small boulders.

Stone art painting technique: materials and tools
You will need:
- Acrylic paints for stone - they can be purchased at any art store, the main thing is to make the right choice (they are for various surfaces - fabric, paper, wood, plastic, etc., glossy or matte, regular and aerosol). Such paints are more expensive than all others, but they have many advantages, such as brightness and purity of colors, ease of dissolution and mixing, the ability to cover the color of the base when applying the next coat of paint. Acrylic paints for stone dry quickly, forming an indelible elastic film.
- Suitable stones are light, smooth, flat, preferably round or oval. A more intricate shape can also be used to advantage by inventing an appropriate image for the boulder. It’s good if you manage to pick up stones with a flat base that maintain a stable position not only on grass, but also on smooth surfaces (for example, tiles). Porous stones can also be useful to you - you can make Dutch cheese from them, for example.
- Synthetic brushes of different widths - natural ones are not recommended for use when working with acrylic paints, since acrylic has a detrimental effect on them. For small parts, toothpicks can also come in handy.
- Thinner for acrylic paints (wash brushes after work, remove stains on hands, etc.)
- Transparent varnish for final processing of products.
- Water - at least settled, but better filtered - this way there is no danger of getting cloudy “scale” stains on a dried product. Do not forget about the container for rinsing brushes.
- A palette for mixing paints (if you pre-cover it with foil, then after the end of the session you will not need to use a solvent). If there is no palette, we take any surface that does not absorb moisture (plastic, polyethylene).
- Damp cotton cloth or paper towels (no dust) to blot the brush with paint - this way you can avoid blots on the stones. An old t-shirt or towel will work for this.
- Polythene or newspaper to cover the workspace.
- Work clothes are the ones you don't regret saying goodbye to because acrylic paints are very difficult to wash off. A disposable cellophane raincoat is ideal.
How are the stones painted?

Technique of art painting on stone
Step One: Get Ready
Wash the stones with soap and dry (you can use a hairdryer). Dress in work clothes and lay polyethylene on the work surface.
Step two: prime
Treat the dried stones with a deep penetration primer, which is likely to remain in any home after repair, and dry again.
Step Three: Draw the Background
In order not to extract liquid and exfoliated colored “flakes” from the tube instead of paint, be sure to shake the paint well before use by tapping the bubble on your palm. If you haven’t decided on the “character” for the stone yet, it’s time to do it, because it’s time to apply the base background (for example, red for strawberries, blue for fish, green for frogs, etc. for multicolor compositions, the base will be the one that will take more space on the figure). To do this, we dilute the appropriate color with water in a ratio of 1: 1 (it is better to use the cheapest brushes for diluting paints), if necessary, mix paints to obtain the desired shade. If you still couldn’t find light stones for painting, they should first be covered with a layer of light paint and dried - so the colors applied in the future will be brighter and more natural. After applying the main background, it should be dried for 10-15 minutes, which can be spent on working with the next instance, if any.
Step Four: Acrylic Paint
Make a sketch for coloring with acrylic paint on paper, and then with a thin, soft “simple” pencil on a stone blank. Think over the details. After that, you can safely proceed to coloring in layers, each of which needs to dry for about a quarter of an hour. At the end, draw the contours with the thinnest brush (the thinner the paint, the better). When working in the technique of artistic painting, close the tubes of paint and keep unnecessary brushes in water, otherwise they will quickly become unusable for painting. Keep an eye on the palette - diluted paints also dry on it, and they will need to be diluted several times to the desired consistency. The resulting garden "sculptures" can be decorated to taste with any materials at hand - sequins, sequins, beads, which do not need glue to fix (an extra drop of paint will hold them).

Step Five: Dry the Stones and Dry Yourself
We put the products under a warm battery, hands - under the tap, but the brushes - in a solvent in order to remove the remnants of clogged paints from the bundle and from under the clip.
Step six: protective
We cover the dried masterpieces with a transparent varnish, which will give the colors depth and protect the paint from damage and fading in the sun. Now you can safely carry the revived and “played” stones into the garden, admire yourself and surprise relatives and friends, as well as take your neighbors on excursions. If you wish, you can settle your creations at home - they will perfectly decorate almost any interior.

The technique of artistic painting on stones is very popular today. Here are some ideas from professionals and just amateurs that will help you determine on what basis it is better to create compositions from colorful man-made boulders:
"Smilies":
Create a collection of characters and moods, like those used by the World Wide Web: "smiling", "sly", "cunning" pebbles, etc. etc.

"Major Minor":
Or boulders painted on both sides: a princess and a frog, an egg and a dinosaur, a caterpillar and a butterfly... Ideas of such antagonisms are easier to borrow from children.
"Character Collection"
If you already take hold of a mouse, you can “attach” a hare, a fox, a wolf, a bear to it for weeks - right up to the tower itself. Surely someone will be more inspired by a collection of blooming pink lotus buds (on proportionately increasing stones), or something else elegant and exotic.

And now a few words about the main consumable for work - rounded boulders. In general, they can be purchased at hardware stores or markets, but you can make them yourself. The technology is as follows:
- Determine the desired size of the future cobblestone and select the appropriate container (basin, pan, etc.)
- To create an oval stone, simply pour sand into a container and make an appropriate indentation in it for the irregularly shaped stone, the sand should be wetted to give the indentation the desired look.
- Line the hole in the sand with clear polyethylene. If there is a desire to "age" the future boulder - put pebbles, moss, branches, or any decorative elements on top that will effectively cover the top of the stone.
- Mix the cement (tinted if desired) and put the solution on polyethylene, then tie the film. If the boulder is large, it is better to save cement by making the stone empty inside (the outer layer of cement mortar 5-10 cm is covered with sand for the drying period). It is even better to “sculpt” large boulders right at the place of their “installation”.
- After drying, you can paint the finished boulder or simply place it in your garden in the prepared place.

Creative inspiration and unique results to you!